
Likes
Comments
Share


@SplishSploosh
Follow
TOTAL COST : 138£
-
Electricity usage - £8
Buying the Grow lights - £54
Buying the Nutrients - £45
Buying Pots (x3) - £16
Tools - £5
Soil - 10£
I should say I had the nutrients for over 2 years so I’m using the price for that initial purchase. They were used in all my other gardening endeavours such as tomato's, strawberries and chillies, I had great results with BAC and Nutrigrow but they are somewhat pricey. You might find some cheaper alternatives if that figure puts you off.
-
31/05/26- This plant blew my expectations, from seed to harvest she was amazing, developing faster than expected at all stages, with keep in mind very limited resources, still she was a productive, over achiever and definitively one of my best grows of all time!
But harvest day is upon us, her tricomes are in that sweet spot for Milkey/small amounts of amber! So Now is the best moment to harvest!
It’s always a bit emotional but I like to play some calm peaceful music like a final concert dedicated to the plant right before I put her to sleep! And start drying her.
I like to make use of all the leaves brewing them into a tea. I’ll update the dry weight later!
03/06/26 - This is great I got the dry weight back and got 10grams of dry sticky amazing weed, this is better than I initially expected, I had in mind that I would be lucky for 8 grams! But now I'm curing it and developing those terpenes flavours which should enhance the experience! This is modest quality and I couldn’t be prouder

Likes
4
Share


@Ageddd
Follow
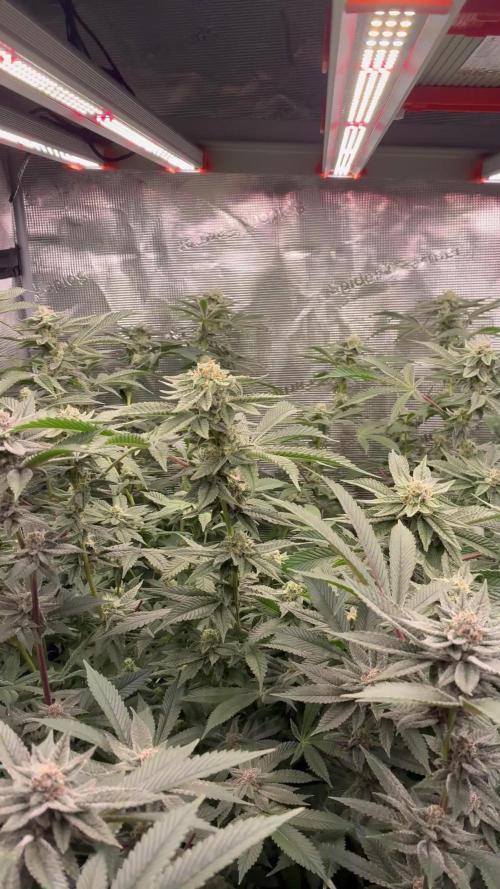
And after 2 rainy days and a sunny one after them, here comes Harvest day !! 😎
THe plant was sorrounded by a lot of bugs , as you can appreciate in the photos, it was neccesary to clean up the material... Never done this before but watched a video of Jorge Cervantes where he was cleaning the buds with H202
THe concentration was 200-250 ml with 22l, and i used 6l of water with 50 ml of H202 at 3%.... After the bath, like 90 % of the bugs are gone..
Im happy with te results, the buds/flowers are nicely lined up at the same height, and the aroma is really nice,but im curing the weed a couple of months at least... Today rolled up one and the taste is sweet on the exhale with spicy tones in the mouth too, but a proper cure is needed until full flavor develops in my opinion :)
Overall a nice experience, didnt expect that purple tones appearing in the end and didnt expect such intense smell too hahah really stinky plant.. She screams im here, dont care what you think about me hahaha
It has been drying for 5 days as the buds werent too compact and didn took too much time to dry..
Thank you for reading and i hope you liked the documentation of this strain here in GrowDiaries :D
Take care, and Good Vibes!!!
///// Bad news: The scale is broken, so next days im buying a new one an the uploading the weight :) ////////
Aprox weight : around 40-50 grams i would say

Likes
9
Share


@la_piper
Follow
sherbet cuvee cookies.
Харвест✂️
Почти неделя на PK и харвест.
Шилки плотные, липкие очень смолистые и огромное количество трихом. Харвил в респераторе ибо начинаю чихать🌬️
Likes
14
Share


@RakonGrow
Follow
Tag 82:
Hab mich nun doch entschieden , da die Trichome wirklich zu 90% Milchig sind , die Dame am Stamm abzuhacken . (Extra ein kleines Beil gekauft (scherz)) . Dann im Stück einfach Kopfüber . Abluft ist an , Ventilator unter der Spitze . Jetzt noch 4-5 Tage warten (je nach Temp und Feuchte) . Und dann schauen wir mal was es wird .Für mich wichtig , viel Feuchtigkeit im Raum , ich will das sie auch nach dem Trocknen noch kleben . Ergo hab ich den Stoftopf drinne stehen gelassen .
Tag 82-88:
Kopfübertrocknung
+ Temperatur : 21°C - 23°C)
+ Lüftfeuchtigkeit : 52%rH-60%rH
+ VPD kleiner gleich 1.2
+ 4 bis 5 Tage
Ich versuche maximal einen VPD von 1.2 zu halten für ca 4-5 Tage.
Tag 85:
Ein Video hinzugefühgt wo ihr das Trockenzelt sehen könnt. Die LED hab ich genau unter der Abluft angebracht damit kein einseitiger Luftzug entsteht, dafür mit mehr Power .
Tag 86:
Video von der Kopfüberhängenden hinzugefühgt.
Tag 88:
5 Tage lang getrocknet , Blüten vom Stiel getrennt und in Schalen in den Weinkühlschrank mit Silikatgel für die Feuchteregelung.
Tag 90:
Trichome aufgenommen.
CureBoxen geschlossen nach 2 Tagen im Weinkühler
Next Step:
Bouveda 58% , Sauerstoffabsorbierer

Likes
26
Share


@Stash074
Follow
This week was ok..this week's growth were a little stunted in my opinion...honestly I noticed some deficiencies in the leaves, which is a result of my ph being lower than ideal ranges..I noticed that my runoff ph was around 5.5.i did a light flush of the plants with low strength nutrients ph at 6.2. So the ladies seem to be responding well so far. Ill definitely keep yall updated in my next upload. Happy growing 😎 Also I am very aware of how my ph dropped down that low in the 1st place..i will definitely correct the problem
Likes
28
Share


@DudeGrowsWeed
Follow
October 16, 2021
Both girls looking yellow and burnt. Overwatered and possibly underfed. I did let the soil dry out then added a 1/2 gallon of water that was mixed with Neptune's Harvest Fish and Seaweed (this stuff smells awful). Let's see what happens. I also think my Recharge has gone bad - its not bailing me out like it usually does. I contacted Real Growers and they are sending me a replacement. Awesome customer service!!!


Likes
12
Share


@cookingwithninja
Follow
day 57 update bridal party was topped like mad weeks prior to reduce stretch and increase nodes. there is a video in the beginning of this week, might not see preview.
day 66 video, bent down bridal party, everything is happy and healthy


Likes
38
Share


@MrLahey
Follow
Been busy so I’ve been slow to update. Thinking 3 weeks until I can chop. Gonna be a much smaller harvest than I’d like (thinking/hoping for at least 2-3 ounces) but from what I’ve seen just getting to your harvest on your first grow can be considered a success. Just gotta keep them alive for 3 weeks then I can focus on the scary task of drying.
I would imagine small yield is due to beginner lighting equipment, shorter veg time (coulda gone like 3 more weeks to really pump up the roots which I’d imagine would equal bigger buds), mistakes I’ve made and uncorrected nutrient deficiency. Really hoping that they put on some more size in the final week when they ripen.
I dialed back the nutrients by half for their last feeding. I think I mistook the normal senescence for nutrient burn and I got worried. EC last night when I made my nutrient mix was 1250 I think.
Regardless the quality is there, just not yield. Reallly looking forward to when these are fully dried and cured to test them out. Lots of trichomes starting and the smell is great!

Likes
44
Share


@PotCasso
Follow
Week 8
Water only at 800ml lowering the lights on temps to 22c (70f) let see if we can get the purple senescence this 5g has been threatening and we know the Velvet Octane will finish with.
Every girl is finishing nicely, FROSTY AF, and the smells are fantastic and sweet and slap you in the face the moment you open the tent. These girls are just getting photogenic so more to come next week.


Likes
6
Share


@XanHalen
Follow
Nov 29:
They seem to be accelerating in veg growth but I see a small portion of the leaf on the smaller plant either grew in mutated or somthing cut it, I haven’t seen a single bug in the box so I don’t think it’s that but you never know, and the bigger plant has some issues near the base of its stem, I noticed it before I did the LST and now I’m wondering if I should have addressed that issue before starting the LST. Let me know what you guys think!
Dec 2:
Walked into the room and noticed a faint smell, wasn’t any smell last night when I started the LST on the slower girl. Further inspection showed some white pistols on the bigger girl, I believe she is the culprit for the smell as the other seems about a week behind. They are both now LST‘d and leaf tucked. Enjoy the pics and vid’s!
Dec 6:
I have tied down some of the longer chutes on the bigger plant (will see in week 5 update) to create more airflow and light penetration as I didn’t even realize how bushy the stem and node sections had gotten. I have also cut the chutes coming off the first true leaf. I don’t think I will make any cuts to the smaller one as it’s already a slower growing pheno. Going on a trip starting the end of week secede to late week 8, so I have a automatic feeder coming from Amazon, and I will continue using it through flower to reduce open tent time.


Likes
8
Share


@Ieiogrow94
Follow
Eccoci di nuovo qui!!!
Super eccitato per questa nuova collab con Anesia Seeds, team davvero al top, che mi ha dato l’opportunità di testare questa nuova genetica e di condividere i progressi con tutti voi!!!
Come sempre partiamo nei bicchieri per poi travasare.. Questa volta verrà svolto tutto sotto la Lumatek Zeus 465 ProC, mi aspetto molto da questo ciclo!!
Settimana pazzesca!!!!
Piante davvero incredibili!!!
Grazie a tutti per il supporto ❤️🍀🔥

Likes
38
Share


@LittleBigTrees
Follow
The tallest pheno is ready and being flushed for a couple of days now, rhe others are close but still consuming nutrients at a strong rate , I think they will take at least 1 more week.
They smell very much like gelato as a group but are all very different from one another .
Likes
36
Share


@Erpollic3verde
Follow
Molto orgoglioso di come sta procedendo,le piante stanno benissimo, la wappa continua a crescere a vista d'occhio e ora posso dire con certezza che sarà la pianta più grande che io abbia mai coltivato. Ormai stiamo entrando nelle ultime settimane di vegetazione dunque procedo nell nebulizzare sulle piante una miscela di alghe e micronutrienti


Likes
7
Share

@FourTwenty_Plants
Follow
The Smell is getting insanely loud out of that tent, the girls are big and stacking up insanely pretty, Chimera is starting to fall to the sides, because the branches started getting thinner through her 170%+ stretch😂.
Im loving the view and im proud that the Girls are healthy and love the nutrients


Likes
2
Share


@TOMI08
Follow
64.nap
Valami nagy robbanás volt az ak47 lányokon..
Nagyon meleg van és szeretik 4 naponta itatomm őket
Ma nagyon meleg volt 34fok a fólia sátorban gondolom több
Likes
32
Share


@Platinouuu
Follow
Como les comenté, antes del cambio 12/12 las deje 36 horas de oscuridad (primera vez que pruebo esta técnica) y luego de las 36 horas de oscuridad prendi 12/12. Estos son los resultados en su 1ra semana de floración. Me gusto la técnia, la seguiré usadndo. Esta técnica lo que logra en el periodo de 36 horas de oscuridad es inducirlas a producir hormonas. Que opinan ustedes amigos, Saludos por allá a todos, bendiciones y buenos humos!
