
Likes
Comments
Share

@StonedGiants
Follow
Germination in Petrischale mit 0,5% Wasserstoffperoxid.
Heizmatte Vivosun auf 25°C.
Alle Samen aufgekeimt 12/12.
Tag 1: Keimung (Germination)
• Heizmatte 25°C
Tag 2: Radicula sichtbar
• Keimlinge abgedeckt
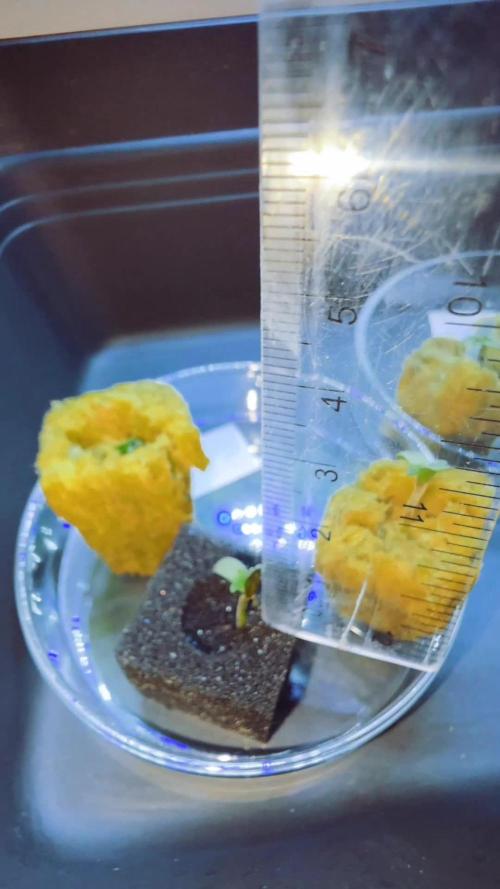
Tag 3: Aussaat in Mineralwolle
• Radicula 3-5mm lang
• 25°C bei 95% rLF
• Dome mit Wasserstoffperoxid 0,5% befeuchtet
• Sproßen sichtbar: schon grün, vereinzelnt gelb
Tag 4:
• 1ml Formulex je Würfel handgegossen
• Dome mit Wasserstoffperoxid 0,5% befeuchtet
• Lüftungsöffnung für Zirkulation
• Alle Sprossen grün - 12/12
• 23°C bei rLf 85%
Tag 5:
• Sprossenhöhe: 0,3cm bis 0,5cm - eine bei 1,0cm
• 24°C bei rLf 85%
• LED Beleuchtung vorbereitet
• keine Anzeichen von Pathogene
• 2 Keimling hängen etwas hinterher:
Blattspitzen braun, tocken
Tag 6:
• 24°C bei rLf 80%
• 1-2ml Formulex [0,5ml/l] Feed
• H²O² Prophylaxe
• bereit für 100 Watt LED Beleuchtung
Tag 7:
• 24°C bei rLF 80%
• H²O² Prophylaxe
• 40cm Abstand zur 100Watt Anzuchtlampe
• 1 Keimling auf Schaumstoff unglücklicherweise ausgetrocknet
• 1,0cm Sprossenhöhe
• erste echten Blätter bilden sich
• gesunde grüne Farbe
• stehen auch aufrecht
• kein damping off / Unfallkrankheit
[Zwischenfazit Schaumstoffwürfel]
2/3 ausgetrocknet,
Einen gestern beinahe verloren,
wurde welk etwas trocken, aber hat sich wieder aufgerichtet.
Eignet sich schon als Medium aber eher in einer Wasserschale, ansonsten trocknet dieser im Vergleich zu Quelltabs, Kokos und Mineralwolle schneller aus.
Seedling-Phase: Tag 8:
• 25°C Heizmatte ,
• 100 Watt Anzucht LED-Lampe bei 40cm Abstand
• Sprossenhöhe zwischen 1,0cm bis 2,8cm
• einige Blätter hängen und stagnieren etwas
• momentan kein Feed
• kein O² Boost
• Ventilator aufgebaut
• reduzieren die Feuchtigkeit langsam auf 70-65%
• ⚠️: oberflächlich trocken, zentral feucht halten
Tag 8 Seedlingsphase - Keimlingsphase abends:
Die Keimlinge wurden in den Cloner transferiert.
Vorsichtig extrahiert und in Klonkragen gesetzt.
Der Cloner versprüht die NL (Formulex) alle 20min für 20 sec.
25°C bei rlF 75% - Dome steht um die Feuchtigkeit zu erhalten.
Es sind sichtbare Wurzelansätze und Wurzeln zu erkennen.
Tag 9-10:
Die Keimlinge haben sich im Cloner akklimatisiert.
Wurzel bilden sich Stück für Stück aus.
25°C bei rlF 75% - Dome steht um die Feuchtigkeit zu erhalten.
Einer hängt etwas hinterher, da zu früh aus der Wolle entnommen. (Waren keine Wurzelansätze sichtbar)
Tag 10-14:
Wurzel deutlich zugelegt - sind bereit um in das RDWC transferiert zu werden.
25°C bei rlF 65 % - Dome ist nicht mehr relevant.
Morgens mit präventiv mit H²O² benebelt.25°C bei rlF 75% - Dome steht um die Feuchtigkeit zu erhalten.


Likes
Comments
Share


@GodZilla_Owner
Follow
Week 4 – Day 30 (Transition)
Where do I even begin… 😅
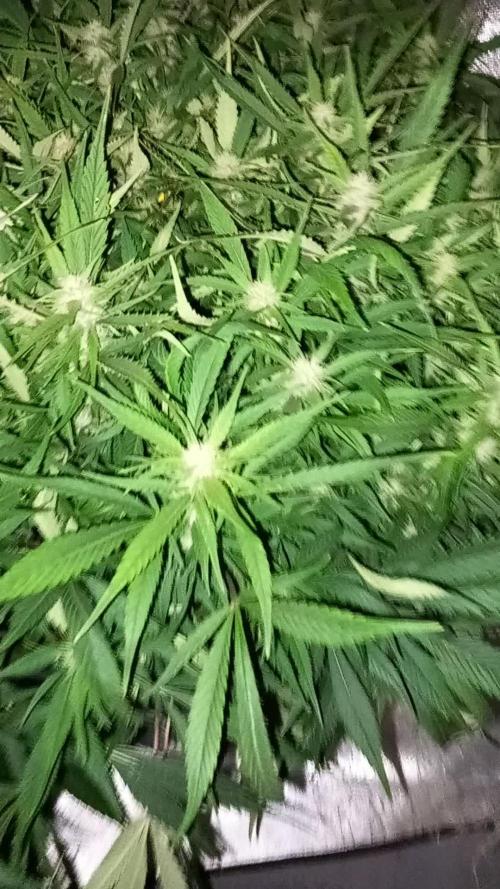
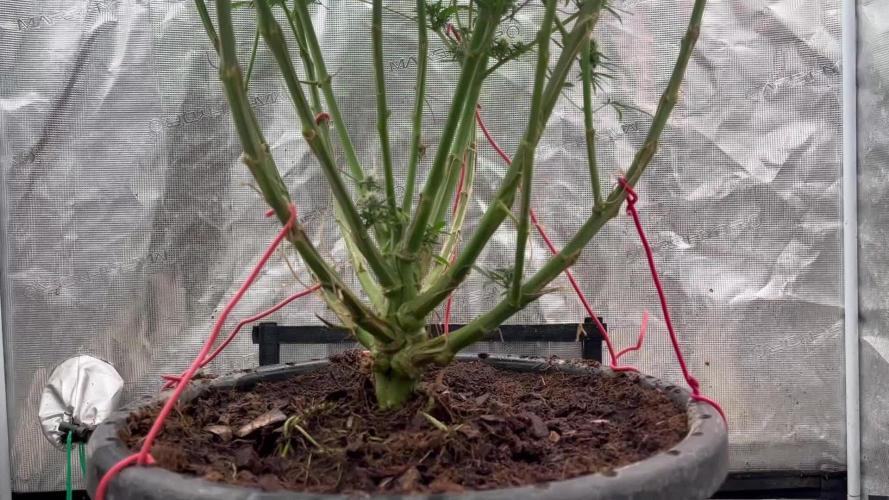
White Widow #1 officially started flowering this week (Day 0 of bloom) – but not without drama 😵
She managed to break off four of her own tops due to LST mistakes or weak stems.
But here’s the crazy part:
👉 Two of the broken shoots actually reattached themselves and continued growing – even though they were hanging by just a 1 mm strand! 💪🌱
The photos show it clearly: sometimes it's worth trying, even when it looks hopeless.
Despite the rough week, she's holding up and is now officially in the 12/12 cycle.
Stretch is coming – let’s see what she’s got in her! 🌿📏

Likes
6
Share


Likes
2
Share


@Saintvicious
Follow
Flower stretch and bud sites are setting. Lots of tops from the lst. Fingers crossed.
Likes
20
Share


@Divs_darkroom
Follow
This strain was an easy girl to grow. Very vigorous and towered over her double grape sister. She didn't develop the most dense nugs but I will attribute that to my lame light setup during this grow. She grew under 2 mars 300s and 1 hlg65 4000k in between. I've rolled 1 joint that got me pretty baked. I would judge this particular pheno as sativa leaning. I also vaped a bowl through the mighty and she still has a very green taste because She hasn't been curing very long. She developed a beautiful color when she ripened at the end of flower and yielded 54.8 dry grams of beautiful buds. I had probably another 40 or 50 grams of trim from this lady also. Next time I grow this strain, I will be dropping her in a much bigger pot. Harvested when trichomes were mostly foggy with maybe 5% amber. The biggest auto I have grown yet.

Likes
48
Share


@Theia
Follow
I am not sure what the deal is with the Chibans. They look mutant to me maybe due to pollination. There is so much crystal forming up on them and they still look beautiful.
Plant 1 is huge with big colas that are fragrant and very very sticky to the touch.
Plant 2 looks the most normal as far as bud structure to me. She has not got the same flattened of tops but instead are more cone like . Also very very crystal heavy
Clones 1 and 2 look like monsters to me. Their buds are bulbous and fat with a very flat round top and quite a bit larger then golf balls! I have never seen bud look like this but then I have never had pollination issues and watched the plants quite as much as I am at the moment.
We will keep going with them and see what we get. I hope for some smokable bud and also some Sherbert banana seeds maybe🤪👍👍.
Thanks for looking.
Stay safe.
Grow well.🌱🌱

Likes
24
Share


@DogDoctorOfficial
Follow
🌱 Divine Seeds Week Three Veg Report 🌱
Hey, fellow growers! 🌿✨
Welcome back to our weekly update on the Divine Seeds journey. We’re now into Week Three of the vegetative stage, and our plants are loving their new environment. The Moon Rock, Opium, and Big Demon are thriving after the transplant, and we’re excited to share the latest developments.
🌟 Week Three Highlights 🌟
This week, we plugged in the Autopots and turned them on, letting gravity do its magic. From now on, we’ll rely on the Regulator and CaMg-Boost in the reservoir. Our soil is rich in organic matter and nutrients, so we’re testing if just the organic inputs in the soil, plus CaMg and Regulator, can sustain the entire run. Let’s dive into the details:
1. Moon Rock 🚀
• Growth: Vigorous vertical and lateral growth, with lush, broad leaves.
• Health: The transplant has boosted its vigor, and the plant looks healthier than ever.
• Notes: Moon Rock is showing exceptional adaptability and strength.
2. Opium 🌸
• Growth: Steady and balanced growth with symmetrical leaf development.
• Health: Opium is thriving, with no signs of stress or deficiencies.
• Notes: This plant continues to flourish with grace and beauty.
3. Big Demon 💪
• Growth: Robust and vigorous, with thick stems and expansive leaf growth.
• Health: The transplant has enhanced its already impressive growth.
• Notes: Big Demon remains a powerhouse in our garden.
🌟 Nutrient Strategy 🌟
Our feeding regimen this week focuses on:
• Regulator (0.15ml/L): Helps reduce stress and improves overall plant health by regulating plant processes and enhancing nutrient uptake.
• CaMg-Boost (0.25ml/L): Provides essential calcium and magnesium, preventing deficiencies and supporting strong cell wall development and photosynthesis.
Our rich organic soil is packed with biolife and nutrients, so this experiment will test if these organic inputs, combined with CaMg and Regulator, can sustain the plants through their entire growth cycle.
🌟 LED Lighting and Control System 🌟
To support our plants’ growth, we’re using the Lumatek Zeus 465 Compact Pro LED. Here’s why it’s amazing:
• Efficiency: Provides high light output with low energy consumption, ensuring optimal growth while being energy-efficient.
• Full Spectrum: Delivers a balanced spectrum of light, mimicking natural sunlight to support all stages of plant growth.
• Coverage: The compact design ensures even light distribution across the entire canopy, promoting uniform growth.
We’re also using the TrolMaster Hydro X controller with its impressive 3-in-1 sensor for temperature, humidity, and light detection. This controller allows us to:
• Monitor and Control: Keep precise control over the grow environment, ensuring optimal conditions for our plants.
• Automation: Automate various aspects of the grow room, reducing manual work and improving efficiency.
• Data Insights: Gain valuable insights into environmental conditions, helping us make informed decisions.
🌟 Key Observations 🌟
• Plant Response: The plants have responded exceptionally well to the transplant and nutrient strategy.
• Growth Rate: Significant increase in growth rate, thanks to the balanced environment and nutrient-rich soil.
• Health and Vigor: The plants are healthy, with vibrant foliage and strong structures.
🌱 Next Steps 🌱
As we move into Week Four, our focus will be on:
• Monitoring the Autopots: Ensuring the system runs smoothly and the plants receive consistent moisture.
• Observing Plant Responses: Keeping a close eye on how the plants respond to the nutrient strategy.
• Maintaining Optimal Conditions: Using the Lumatek LED and TrolMaster controller to maintain perfect growing conditions.
Stay tuned for more updates as our Divine Seeds continue to flourish. We’re excited to see the results of this nutrient strategy and share every milestone with you on this incredible journey!
Happy growing, and may your gardens be ever green! 🌿💚
#DivineSeeds #WeekThreeVegReport #AptusHolland #MoonRock #Opium #BigDemon #GrowDiaries #PlantMagic #GreenThumb #Inspiration #LumatekZeus #TrolMasterHydroX
Germination method 🌱 @thecannakan
Genetics
@divine.seeds
Nutrition
@aptusholland 🌿
@aptus_world 🌎
@aptus_es 🌍
@aptusbrasil 🌱
@aptus_thailand 🌿
@aptus_portugal 🌳
@aptususa_officiala 🍀
@aptusplanttechnz 🌺
@aptusplanttechaus 🍃
Ambient controls🎮
@trolmaster.eu @trolmaster.eu.support @trolmaster.support @trolmaster.agro
Soil @promix_growers_eur @promix_cannabis
LED - @lumatekeu
Watering- @autopot_usa @autopot_global
Love and attention- @dogdoctorofficial
#aptus #aptusplanttech #aptusgang #aptusfamily #aptustrueplantscience #inbalancewithnature #trolmaster #trolmastereurope #trolmastersecrets #Autopots
#GreenJoy
As always thank you all for stopping by, for the love and for it all , this journey of mine wold just not be the same without you guys, the love and support is very much appreciated and i fell honored and so joyful with you all in my life 🙏
With true love comes happiness 💚🙏 Always believe in your self and always do things expecting nothing and with an open heart , be a giver and the universe will give back to you in ways you could not even imagine so 💚
More info and complete updates from all my adventures can be found ⬆️link in the profile description ⬆️
Friendly reminder all you see here is pure research and for educational purposes only
💚Growers Love To you All 💚

Likes
66
Share


@McBubatz
Follow
Soweit alles 👍
Wetter is die Tage auch ganz gut so das sie jetz auch ordentlich Sonne draußen tankt😁
Denke 1-2 wochen braucht sie min. noch.


Likes
28
Share


@crystal_garden_0
Follow
Strong genetics for the colors , started immediately, everything going great, cant wait to see how they turn out
Likes
8
Share


@AERO_Grower
Follow
2° Semana- Aeroponía - Ligera mejoría de las plantas, el daño de la primera semana aún sigue afectando, sin embargo ya comienzan a tomar forma. Se mantienen las condiciones de cultivo. Los dos videos son de la misma semana pero en distintas etapas.
---------------------------------------------------------------------------------------------------------------------------------------------------------------------------------------------------------------------
2° Week- Aeroponics - Slight improvement of the plants, the damage of the first week is still affecting, however they are beginning to take shape. The two videos are from the same week but in different stages.


Likes
1
Share


@HighlandWolf
Follow
Around 11-12 weeks seed to harvest,, only had a few plants the largest yielded 72 grams the smallest around an ounce,,,
just a few plants for personal medicinal use grown 100% naturally in the great british outdoors 😎

Likes
16
Share


@Ladyblazed
Follow
Bud forming so fast!!!!!! Comparing to previous plants I growth in witch I used biobizz light soil I changed kind of soil in this one I’m using canna professional and the different is quite noticeable I’m really satisfied. I was worried that the small box I’m growing in would eventually make the plant suffer but it’s totally not, the plant is responding well!!
Started with the maximum dose of bud ignitor by advanced nutrient. I’m really exited for this lady can’t wait to se the beautiful complete resinous buds.. keeping growing with LOVE 💚

Processing
Likes
25
Share


@Greengirl420
Follow
Hey hey hey Growmies 😘🤗🤩 Thanks for stopping in! I hope your week has rocked! 💪🏼So far so good over here! Today is day 49 for my set of G14s from 420Fastbuds and they are kickin ass! 🤩
The first plant was topped early on at 3 nodes and we also did some LST, we now have 4 beautiful main colas that are getting so thick!! This girl is smelling so so good and is really doing great! 💪🏼
The second plant pictured is the same age and was not topped. This girl we did LST early on and it is also doing very well and has a good smell!
Both girls are receiving a few different types of bloom nutes and also cal mag. We did some more defoliation on day 47 so the bud sites are sure to get plenty of light!
We’ve been using the spider lights and so far are very happy with them. 3 gallon pots that are super breathable.
Like I said, so far so good 😊 We are leaving to FL soon for 10 days 😬 so hoping everything goes smoothly while we are gone. Any tips for that (leaving plants while on vacation) are welcome!
Thanks for following along or stopping by! I’m here to learn and here to help if possible 😊
Check me out on Instagram @greengirl420mipotfarm or my Husbands at mi.pot.farm to see more of our grows 🤗🙃
And don’t forget.... puff, puff, passssss 💨 💨
Likes
76
Share


@Canna96
Follow
Absolutely LOVE this strain. She has only been curing for a little over a week but I had to try her. She is one of the 3 most potent strains I have ever consumed, tastes like grapes on the inhale, and then on the exhale it tastes like a classic chemdawg, piney and gassey. You will feel the effects by the time you finish exhaling. I lover her so much I am going to run her back after I take a little break to travel. The only thing I regret with this grow is that I used much too small of a final container. No fault of the genetics, it was all me. I will run her back in a 12.5 gallon container and see what happens. My goal is to run 2 photoperieods every year, and get a Kilogram off each plant. Might be somewhat ambitious but I enjoy challenging myself and improving. I cannot wait to squeeze this lady, but I want to give her a few more weeks in the jars first. I will post some videos down the line. If anyone wants a quick pound or two of some potent ass indica leaning flower, this is your girl. I honestly don't know how I could even bring myself to grow another autoflower after smoking this lady.....She blows every auto I ever grew out of the water.

Likes
8
Share

@Prof_Weed
Follow
Today i removed the big bottom leaves and also at the whole plant inside to get a better airflow.
Bud producing starts..
Smells already in my tent..
Edit: 1 day after defol she starts to pray very heavy, how cool!!
Likes
11
Share

@Rangaku
Follow
Future is loving the tent to herself, room enough to spread out and phatt up . She’s pungent as , sticky, and colas are like 3 ft long . This strain promises high THC and by looks of it I’m gonna get a bumper yield in around 2 weeks . Can’t wait for my time space continuum to be fucked up 😂😂😂😂😂
Processing
Likes
5
Share


@Ozgrow
Follow
Plants have stretched more than i thought. Been trying to fill out the screen as best as i can, some have worked better than others. Looks like there are plenty of bud sights. Began pk heavy this week so looking forwsrd to seeing them fatten up. I also gave a light defoliation under the canopy removing skinny stretchy stems receiving little light. I also removed some massive fan leaves that were blocking light from budsights. Not too many just enough to have light penetrate.


Likes
4
Share


@Herbz_Unkraut
Follow
everything's looking good 😀
check www.sr-organics.com for some topnotch 5 in 1 fertilizer!
root, growth, bloom, micro-organisms, enzymes & vitamins all in one!
CODE: "Unkraut10" for 10% Discount! 😊

Likes
22
Share


@Fatnastyz
Follow
Cut her on day 74
She grew amazingly! She even handled my over feeding like a pro! Her buds and some of the beat to sit and stare at! Her colors are vibrant which sparkle more off her resinous gleam!
She has a very pleasant sweet smell.
Thank you so very much Clarissa and Weedseedsexpress for these awesome beans!
I am very grateful for the opportunity! 😁💚
They have quite the selection for any needs!
Go get ya some beans, always got a deal!
www.weedseedsexpress.com
Happy growing and ty for the support! 💚😻🤘
Likes
24
Share


@Guerilla_Jack
Follow
Girls strech very nice.plants are healthy.watering 5l per day all three plants. Happy new year people💚💚

