
Likes
Comments
Share


@wolfvb
Follow
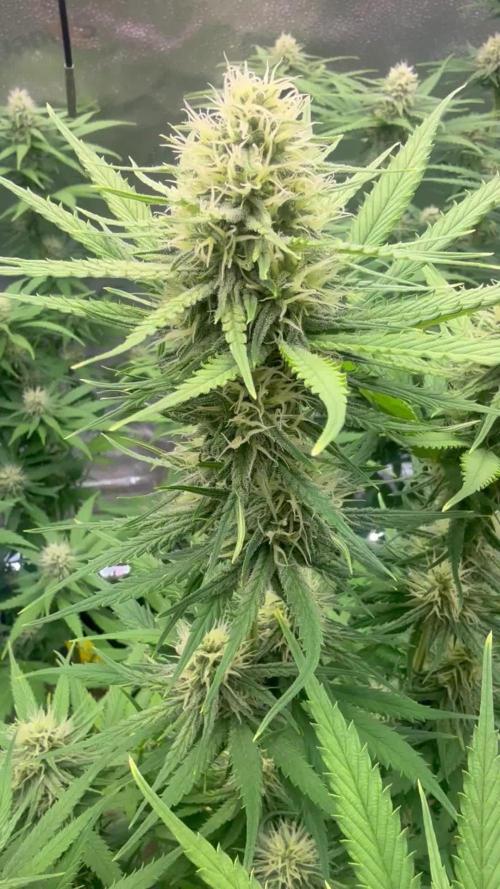
🌿 RS11 "C" - The Balcony Colossus Transitions! 🏙️
Welcome to Week 12! RS11 "C" continues her reign as the absolute titan of the balcony. She is towering over her space and is putting on a gorgeous display as she gears up for her next phase of life.
📈 The Details / Progress Report:
Towering Canopy: Taking a look at the full-plant shots her size next to that red railing is staggering! She has established an incredibly tall, sturdy main frame with strong lateral branches pushing their way up to compete for the sunlight. 🌳
The Transition Begins: If you zoom in on the apex and upper growth you can see the nodes tightening up and the earliest signs of pre-flower development. She is officially entering her flowering stretch and channeling all that vegetative energy into building bud sites! 🌸
Immaculate Health: The foliage close-ups show how a plant in peak condition look like ?. The fan leaves are massive, vibrant, and perfectly praying toward the sun. Thanks to your proactive biological pest control (the sachet is still visible doing its job!), she is completely free of outdoor pest damage. 🛡️🐞
💧 Next Steps:
As she pushes through this pre-flowering stretch, her water and nutrient demands are going to hit their peak. Keep her well-fed to support the incoming bud development. Because she is so tall and about to start packing on flower weight, the most critical step moving forward is ensuring her branches are supported against any heavy balcony winds.
She is an absolute outdoor beast! Let's keep it growing! 🌱💨

Likes
3
Share

@JuiceboxTerps
Follow
Summer around the corner and the temps are rising. Tough to keep my small room temps down so we’re rocking a solid 78 and 55%.
Great week of stacking and bud development. All 3 plants are starting to take shape. Each feed was all on separate days and no top dressing this week.
Using the build a soil schedule I will be switching to 11/13 but keeping a solid DLI.
Ppfd- 850
Vpd- 1.3

Likes
13
Share


@BigDripFelgo
Follow
Sherbet is growing very well, fast and healthy. Want to take cuttings from this one but also want to top it, don’t know what route to take first?! Would also like to keep a clone to breed with GSC to make some Gelato 45, then eventually cross that with Zkittlez to make some Runtz and so on and so forth! Hopefully everything go as planned.

Likes
9
Share


@TeamQuality420
Follow
So you've grown a normal seed? so you've grown and autoflower? well why don't you try the fast streams definitely one of the most interesting and exciting grow experiences I have been a part of up-to-date. One of the most notable traits was the branches being extremely susceptible to bending making it a truly ideal strain for a SCROG.
I think one of my main mistakes was leaving the plants in a 3 gallon pot I would suggest that nothing less than a 5 gallon pot should be used and from what I have seen going from jiffy transplanting into a Solo cup then solo cup straight into a 5 gallon pot has worked much better for the clone run I'm doing now. These plants need support!!! That is a must! Especially if you are going to use defoliation at any point you're gonna see a mass of spurt of growth.
Now another thing I noticed is that the end right towards your finish window where your trichome are going from clear to Cloudy They tend to mature a little bit faster than a normal photo sensitive Strain.
On the feedings I would do at the end 75 to 80% of the recommended maximum nutrient mixture you are using meaning use a little bit less the nutrients for the green crack. Expect A flowering stretch of at least 75%.
Other than that I'm extremely impressed with the genetics again that humbled seed organization has created for us cannabis lovers to Excite and motivate us to have something different.


Likes
13
Share


@Canadian
Follow
plant has been very easy to grow the smell is very strong seems to have a week to go. The plant seems to have a very big buds all over their branches and it is maturing at a very high rate of speed the smell is to die for but you got to keep an eye on the flowering stretch because it's quite large for the those who have small spaces now I'm growing in a tent 3 by 3 foot by 8 foot so they don't have much space to stretch and become monster in my tent everybody's fighting for light and space so if this is grow outdoors with a Canadian long hours of light in the summer and a little bit of vegetable grows indoors maybe two months it will become a truly huge plant in the outdoors the grower only needs to protect the plant so it doesn't get stressed out and doesn't had more weeks to outdoor grow ,for sure for the 1st of October you should have a decent amount high quality flower.
I will continue to update have a happy grow.

Likes
8
Share


@ryanloftus222
Follow
Seen webbing from mites and sprayed with alcohol and water mix. See how that turns out. Also too much watering. Even spraying it was over kill. One plant seems to be stunted a little from over watering. Let it dry a day or two and she’s coming back.

Likes
29
Share


@Ukfarmer420
Follow
Hi guys
So here is my 10 plant auto run from fastbuds 420 genetics. I will update weekly on this one. So I'm going to be using 3 gal fabric pots filled with biobizz lightmix soil.
I will be putting into solo cups after the 18 hour soak then transferring them to there for ever pots. Im looking forward to this run and trying to get 20oz + dry and cured out of this 4x4 tent grow.
Part 2 of germination in operation in solo cups with root juice. Hopefully 10 out of 10 pop.

Likes
19
Share


@GrowMo
Follow
This week has been absolutely beautiful to watch!! So much growth and the purple is outta this world I love it so much and I just can’t get over it! Every day it looks better and better and the frost is so heavy.
Fed b1 b2
Ph 6.1
Ec 2.6
No cal mag
Likes
38
Share


@Danger90946
Follow
Here we are in week six of flower and not a lot has happen this week other than the usual watering and letting her do her thing. Only trouble this week was updating GoPro had to try a few times. Other than that we got some rain in my home town and collected about 60 gallons that I'm going to use to finish the rest of the grow. Also, got my new AC Infinity CLOUDLINE T4, Quiet Inline Duct Fan System with Temperature and Humidity Controller, 4-Inch. I was really hoping this two plants would finish before the year ended, however, it looks like they got others plans. See you guys next week.

Likes
6
Share


@1Prinz
Follow
18.07 watering with 400ml - 400ml - 400 ml
Blueberry got only water
Trainwreck got Bloom, Top-max and Fish-Mix
All the others got only Top-Max and Bloom.
Search everyday for some spidermites or something else. On some days I find a few on blueberry and Biscotti. I remove the manually.
21.07 watering with 400 - 400 - 400 water.
Again: blueberry only water
All the others Top-Max and Bloom
Trainerwechsel started to flower.
The leaves of Blueberry and Biscotti started to get yellow. Also removed some leaves with were down in the shadow of the top strains of frosted guava.

Likes
17
Share

@pHilosophy420
Follow
Day 105 - She received last watering with nuts and next time I will flush the plant and at the end of next week I will harvest the plant. She is huge and very frosty 😍

Likes
5
Share


@DanM1727
Follow
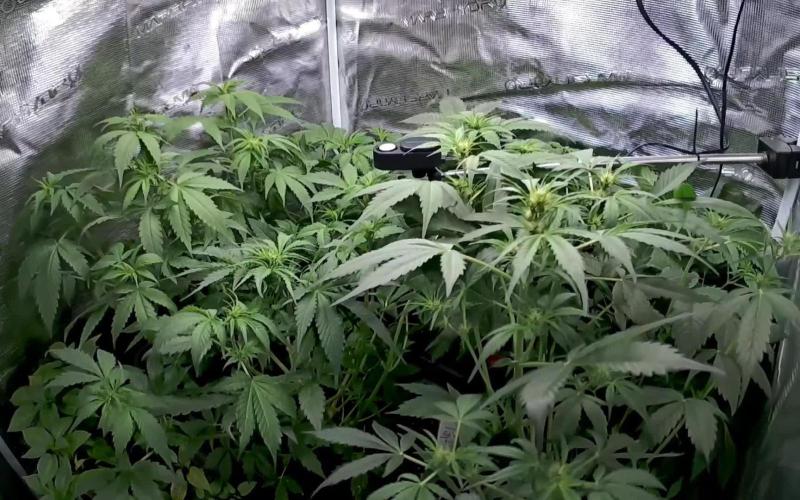
Apologies for shakiness of the video. First time using my new digital magnifier. Plant is coming along nicely.

Likes
241
Share


@Tropicannibis_Todd
Follow
💩Holy Crap We Are Back At It And Loving It💩
Growmies we are at DAY 56 and she's just killing💀it👌
👉We are in full on flowering , gotta say the pink to redish hairs have gone away which is a bummer 😕 but the frost 🍦 is strong 💪
So Shit , I gave them just a tad to much nutes on the first few feeding 👈 But I have since fixed it
So I'm still doing some low stress training 🙃 and some defolation 😳
Lights being readjusted and chart updated .........👍rain water to be used entire growth👈
👉I used NutriNPK for nutrients for my grows and welcome anyone to give them a try .👈
👉 www.nutrinpk.com 👈
NutriNPK Cal MAG 14-0-14
NutriNPK Grow 28-14-14
NutriNPK Bloom 8-20-30
NutriNPK Bloom Booster 0-52-34
I GOT MULTIPLE DIARIES ON THE GO 😱 please check them out 😎
👉THANKS FOR TAKING THE TIME TO GO OVER MY DIARIES 👈
Likes
6
Share


@eldruida_lamota
Follow
Que pasa familia, empezamos la primera semana de floración de estas Original de GrowBarato.
Y es que no veáis de un momento a otro se quedaron sin espacio, vaya estirón esta última semana.
Están bastante sanas , tienen muy buen color, se practicó una limpia de bajos y ramas que no eran necesarias porque no llegaran a la luz.
Hasta ahora todo bien y ya superamos esta primera semana.
Agrobeta:
https://www.agrobeta.com/agrobetatiendaonline/36-abonos-canamo
Mars hydro:
Code discount: EL420
https://www.mars-hydro.com/
Las maximas de temperatura no superan los 26 grados y las mínimas no bajan 20, así que no me puedo quejar.
Los niveles de humedad también son los correctos van entre 50%/65% de humedad relativa.
Por supuesto el Ph lo estamos dejando alrededor de 6.
Hasta aquí es todo, buenos humos 💨💨💨.

Likes
12
Share

@Webacca
Follow
Sherbet Haut einen raus mit satten 20cm in der letzten Woche. Die anderen sind mit um die 10cm/w etwas verhaltener.
Einzelne Pflanzen sind in dem riesigen Zelt kaum mehr auszumachen, aber das ist ja eher erfreulich. Auch wenns vllt ggf evtl uU etwas Licht kostet.
Zeitraffer der letzten Woche is am Start
Unterderwoche-Update:
Durstig sind sie und kräftig am wachsen. Hab erneut ne handvoll Laub abrasiert, aber richtig sieht man nix.
Wird Zeit, dass sie raus können und sie separierter stehen.
Likes
10
Share


@DeepRootsGrowTrees
Follow
APRICOT GORILLA AUTO /
GANJA FARMER
HARVEST WEEK
This lady produces golf sized trichome covered buds that had a sweet aroma to her. She's a nice smooth smoke not heavy at all light notes with this lady.
Thank you for stopping by and taking a look it's much appreciated!!
THANK YOU GANJA FARMER!!
APRICOT GORILLA AUTO /
GANJA FARMER
Likes
35
Share


@ThatoneAKguy
Follow
The two big dawgs started to really pack it on this week. Number one is holding strong a week ahead of two. Has a bit of a learning curve with the new hydro setup and HLG leds. I learned that the intensity causes the flowers to use more cal-mag than standard hps/halide according to some reading. It also could be they are just using more than the recommended dosage and a had a bit of a phosphorus deficiency. Either way I upped my Cali magic and the young leaves look great as do the flowers. #1 is starting to get some pinks and purples and #2 is still cranking out white pistils.
Likes
5
Share


@420-Grow
Follow
Nur bissen entlaubt sonst nichts gemacht wachsen von alleine wie man sieht

Likes
285
Share

@Tropicannibis_Todd
Follow
👉Alrighty Then👈
( 👉Bonus Video Showcases Everything I Have Going on in TropiCannibis HQ 👈)
So we are at DAY 54 of Flowering with the Sugar Larry 👈 And she's doing fantastic 👍
😀 decided to showcase pheno #2 , definitely has different traits then #1 very interesting 😀 thoe both are killing it 👈
So just waiting on alittle more amber to show before we do the chop 👌
👉I had to Top her during the middle of 4th week 👍 Happy Growing
👉Soil Provided by ProMix.ca
👉Nutrients Provided by Agrogardens
👉Lighting Provided by MarsHydro.ca
Thanks my friends for the great support over the years 🙏 Happy Growing

Likes
25
Share

@eldruida_lamota
Follow
Ya estoy de vuelta y esta vez se trae la quinta semana de crecimiento de estas Casey’s rollex O.G. de Dutchfem. Están fenómeno los 3 ejemplares van al mismo ritmo y entre nudos tenemos muy poca distancia, se nota su genética indica, la temperatura va de 21/23 grados ya sea de día o de noche.
.
La humedad anda entre 50% y el ph está en 5,8/6,0.
.
AgroBeta:
1 ml x L Growth black line , vía radicular.
0,2 ml x L Tucán , vía radicular.
0,2 ml x L Flash Root , vía radicular.
0,05 ml x L Gold Joker, vía radicular.
.
Hasta aquí es todo familia, espero que os vaya gustando el proceso tanto de crecimiento como la futura floración 💨💨💨 buenos humos.
