

Likes
142
Share


@MadeInGermany
Follow
Hi everyone 🤗
This week it looked more and more astonishing after opening the box a wonderful sweet smell wafts through the room 👍.
A few days ago the Blue Cheese Phenotype 1 was harvested and placed in the dark room :-).
This week both Kosher Tangie Kush phenotypes will be harvested 👍.
Next week the Blue Cheese phenotypes 1 and 2 will be harvested ;-) everyone else needs a while 😀.
I wish you all a nice week, stay healthy 🙏🏻 and let it grow 🌱👍


Processing
Likes
12
Share


@Fabii
Follow
Mazari doing Great, very impressive loving the stacks of Buds and incredible Trichome production, a light touch will leave my fingers really sticky and smelly. It’s getting fatter and stickier as the days past and the smell gets stronger by the day. Pictures don’t do justice to be honest

Likes
9
Share


@eldruida_lamota
Follow
Vamos familia, es la cuarta semana de floración, y estás Kritical aparte de carencias que vamos a solventar ya, van progresando bastante bien, las flores ya están agarrando bien los tricomas y ya empiezan a brillar de por si.
Es una variedad bastante rápida a ver si soluciono las carencias esta semana y ya comenzamos recta final.
Agrobeta:
https://www.agrobeta.com/agrobetatiendaonline/36-abonos-canamo
Mars hydro:
Code discount: EL420
https://www.mars-hydro.com/
Las maximas de temperatura no superan los 26 grados y las mínimas no bajan 20, así que no me puedo quejar.
Los niveles de humedad también son los correctos van entre 50%/65% de humedad relativa.
Por supuesto el Ph lo estamos dejando alrededor de 6.
Hasta aquí es todo, buenos humos 💨💨💨.

Likes
4
Share


@TheGreenGroomer
Follow
Day 58 of flower, and I've officially started the flush! Overall, I'm really happy with how things are looking, but I’m a bit gutted about all the larf below that isn’t getting good light. A lot of the lower growth is going to end up as cookies, but it’s a lesson learned! Next time, I’ll be more aggressive with removing small, weak branches and focusing on the main colas. I’m also planning to flip around day 40 of veg while they’re still small since this Gorilla Glue stretches like crazy once it hits flower, Excited to see how these buds ripen over the next week and the colors they bring!
Likes
7
Share


@Adkguerrilla44
Follow
Oh man I messed up by not cutting candy kush #3 before the rain last week and lost a little less than half to botrytis 😓😓😞 but can only be mad at myself for not chopping her down sooner and I will still end up with a few ozs from CKE #3. Candy kush #2 just exploded with trichomes and orange pistils over the last 8 days so I'm very glad I left #1 & #2 out,going to chop #2 today or maybe tomorrow if it stays warm and sunny!!! Candy kush #1 is the biggest of the 3(makes sense since I put her in a full 15 gallon grow bag). When I chopped #3 last week cke #1 was no where near done but now almost all her pistils have turned brown and she has milky trichomes all over!! Im the most excited for CKE #2 ,she smells like the old school west coast og kush with a hint of chem to her it's amazing!! Candy kush #1 got more of the sweet special traits in the nose smells very sweet and earthy but im sure both will be amazing smoke no doubt in my mind!! ✌️ ☮️

Likes
13
Share
@DutchBarnacle
Follow
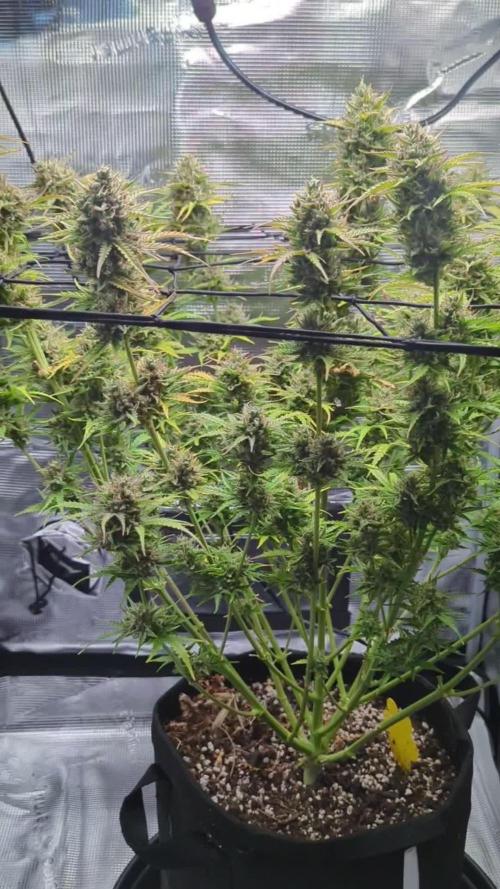
Week 9!
Day 65: 2L (pH6.8) + mild organic fertiliser from kitchen scraps.
Remember the potato water I spoke of earlier? I blended it up with some ruined sweet peppers from the garden and some applecider vinegar & eggshell to give her one last, very diluted nutrient solution. This feed was aimed more at the soil than the plant.
Bud bulking has come to a halt, she's fading. Nonetheless, I discovered some purple leaf edges on one of the buds in particular, I wonder if this might be related to nutrition or temperature.
Day 67: 2L (pH6.6) + 5ml/l home-made fertiliser.
I found some more information regarding the purple leaf edges here: https://growdiaries.com/grow-questions/54072-edges-tip-leaves-are-turning-purple
Also: oops.. I noticed I accidentally had turned off the timer on the LED, as well as left it on 20% power the entire night. I was expecting to have to disturb her lights off period to look at her, but there she was just chilling in low light conditions.
Also, she seems to have no problems running on the very diluted home-made fertiliser so I'm repeating the previous feed - this time being a bit more precise on the dosage: 5ml/l. As I stated, this is more of a fertiliser for the soil microbes than herself.
Day 68: Damp, no water
Trichomes are still mostly clear, nothing unexpected. Patience is not my strongest virtue.
Likes
16
Share


@Dr_Rook
Follow
Ya casi un mes a 12/12 y entrando en su etapa más bonita.
Están resinando muy bien por todos lados y ya cada vez huelen más y mejor. Empiezan a coger color, demasiado pronto ya que a veces pasan más frío de la cuenta.
Esta semana les he alejado el foco unos centímetros. Estaban 3/4 centímetros por debajo de lo mínimo recomendado y no me fío de quemar mis primeras plantas de interior. (Ya habrá tiempo para experimentos)
La semana que entra ya deberían de entrar en la fase de engorde. Toca seguir atentos a ellas
Likes
51
Share


@Cannabeast40
Follow
Grape Gushers
Taste: sour Grapefruit and Gas with sweet grape notes
Effect: Happy, energizing, long lasting, helpful for stress and anxiety
Robust genetics provide great protection against adverse conditions and pests
High resin content, low bud to leaf ratio, and dense harvests of extremely potent flowers with an unbeatable smell
Genetics: Grapefruit x Grape syrup (Gelato 41 x Grape Kush)
THC: 20%
Indica: 80%
Sativa: 20%
Indoor Yield: up to 600 g/m2
Flowering Time: 8-9 weeks
Outdoor Yield: up to 900 g/plant

Likes
6
Share


@thenotillwizard
Follow
We're almost there :)
The RHC#2 has developed a fantastic nose of artificial sour grape on a tropical backgroung (Mango, pineapple, lemongrass).
My favorite of the run so far


Likes
9
Share


@Call_Me_Vaan
Follow
Day 36 😋
- Defoliationed 20% (Start from below)
💪ROUGH FEED SCHEDULE💪
VEG
Week 1 (day 1-6) : Just 6.5Ph balance H2O
Week 2 (day 9) : ( 1ml Micro , 1ml Grow , 1ml Bloom , 2ml B-52 , 2ml Voodoo Juice) / 1 lite H2O
Week 2 (day 14) : ( 2ml Micro , 1ml Grow , 1ml Bloom , 2ml B-52 , 2ml Voodoo Juice) / 1 lite H2O
Week 3 (day 19) : ( 4ml Micro , 4ml Grow , 4ml Bloom , 2ml B-52 ) / 1 lite H2O
Week 4 (day 23) : ( 4ml Micro , 4ml Grow , 4ml Bloom , 2ml B-52 ) / 1 lite H2O
FLO
Week 5 (day 32) : ( 4ml Micro , 4ml Grow , 4ml Bloom , 2ml Voodoo , 2ml Bud Candy , 2ml Sensizym)/ 1 lite H2O
Week 5 (day 38) : ( 4ml Micro , 4ml Grow , 4ml Bloom , 2ml Voodoo , 2ml Bud Candy , 2ml Big bud , 2ml Sensizym)/ 1 lite H2O
(👉one time per 5-7days👈)
😏EQUIPMENT USED😎
- QB288 v2 Powered by Samsung LM301B LED (240watt) 💪
- Mars Hydro grow tent (1mx1mx1.8m)
- 6" Duch fan HF-150P
- The Aroma diffuser
I'm a beginer grower 👽
Please LIKE 👍 & FOLLOW ME 🙌
Likes
40
Share


@KingSalomonsWeed
Follow
15.12. Tag 84 Blüte 58.
Das gesunde Grün scheint einem blendend ins Gesicht. Der Stamm ist sehr stabil.
Gut, denn sonst würde sie unter ihrem eigenen Gewicht der gewaltigen Knospen zusammbrechen.
Erstaunlich, sie wächst.
22.12. Kotelett
24.12. Ich lasse sie im Topf trocknen.
03.01. 1,6 g eins komma sechs Gramm. MUHAHA EINS KOMMA SECHS GRAMM.
Der Titel ist mir sicher.

Likes
15
Share


@Dunk_Junk
Follow
Day 56 - She grew 10cm this week. Plenty of flower sites forming. She is a really bushy plant!
Day 56 - Tent configuration changed: 4x more CREE CXB3590's have been added and 4x blurple LED things removed. Lights now consist of 8x CXB3590's & 1x 1000W HID with flower bulb.

Likes
12
Share


@Belivitez
Follow
Crazy hard nuggets 🤤 lot trichomes, small amount of time necessary for trimming 💪 @barneysfarm this is great genetics massive thanks ❤️ i cant wait to try this strain again!

Likes
2
Share


@Junior1900
Follow
Happy GrowingHarvested at 15 weeks and the royal runtz will be a staple in my tent from here on exactly what I like to smoke the taste the buzz is perfect high and I'm a Head 💯 since birth so. The plant was a bit hollow didn't produce much all my errors I'm pretty positive but damn It is good . I also ran a sherbet queen . It is the opposite of what I really like I don't care for that cookie lemon mild high on the other hand it produced double and is still good smoke just for my preferences lacking ice got it hanging in a dark closet ac blasting and small fan circulating air . Then I'll jar it and maybe if let it cure a week or two if I can . Maybe also sherb top was 100 gs fresh and Runtz top was 60 gs fresh cut also I think I really did damage more than good in the flush process
Likes
23
Share


@adam_pawloski87
Follow
This week went very well! One will be getting cut an hung to dry while the rest finish up with one more week of flush ! These ladies are smelling so lovely I hope you all enjoy! Stay tuned for next week! Cheers 😤💨💨💨💨💨

Likes
2
Share


@I_Identify_As_A_Dan
Follow
Day 28
I was away for 5 days and wow the growth... I'm sold on the auto-pots 😂
Shes a nice in-between of bushy/stretchy structure.
No signs of preflowers yet.

Likes
5
Share


@Deli_Weed
Follow
Iniciando la semana con el primer entrenamiento 💪🏻 🌱 (LST) respondió muy bien 👏🏻
Likes
15
Share

@Kominest
Follow
Watered on day 2 with around 4L tap water and 5ml canna magnesium .
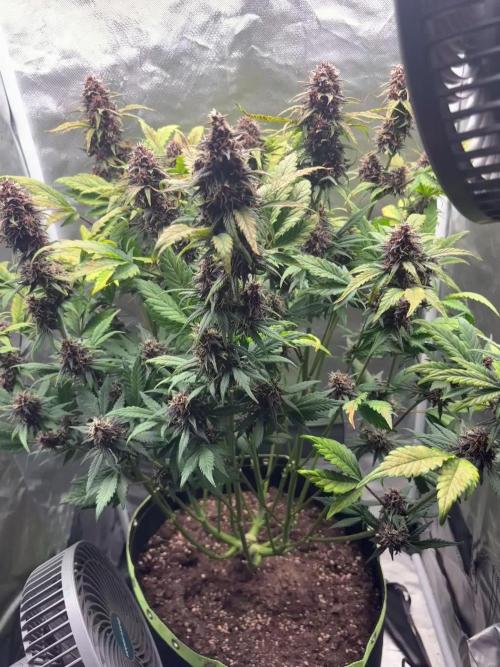
Buds are fattening up still . Slight fruity smell .pistils are turning orange more and more . Will check on trichomes again in the next days