
Likes
Comments
Share


@GrownwithLED
Follow
During week 3 all plants are growing well inside the Growfor.Life-Closet and have a healthy green color. The latest addition: Double Dutch plant #3 (from Serious Seeds) is behind the rest, but also doing well. On Day 18 the biggest three plants, Double Dutch plant #1 and #2 and OG-Kush have gotten so big that a first round of defoliation was necessary. I do this in order to avoid big leaves touching each other and causing dampness to condensate between the leaves, which in turn can attract fungus and mold. Therefore i take off all the big fan leaves starting from the bottom of the plant and only leave the top two fan leaves on the plant. Now the air can flow freely through the canopy again and no leaves are touching and no dampness can condensate. The plants are still getting no extra nutrients, since the PLAGRON Grow-Mix I use should still have plenty in it. I only use RHIZOTONIC from CANNA one time in order to enhance the root-production. Now at this stage you already can clearly see differences between Double Dutch (from Serious Seeds) and OG-Kush (from Humboldt Seeds). The leaf shape is different (smaller and more pronounced fingers on the leaves of OG-Kush) and also the growth pattern (more like Indica in Double Dutch). On Day 19 I decide to do some LST (=low stress training) in order to train the 3 biggest plants into a bushier form. This is necessary, because the Growfor.Life-Closet is limited in height and I want the plants to fill out the whole area well with budding sites. I use stiff insulated copper-wire (standard electrical wire, pieces of appr. 30 cm length) and bend small arches, which I then carefully place over the top-part of a side-branch and push the open ends of the wire downwards into the soil so it holds the branch in place, while its bent outwards away from the main stem. This way I 'fan-out' the lowest 4 side-branches, so they are growing upwards at places where the light can reach them better. (see in detail in video) All plants respond well to the LST and turn their leaves and tips of the side-branches towards the light again until the next day. At day 19 the plants are now almost 20 cm tall, therefore I also decide to switch to 12/12 hours of light/darkness now in order to induce flowering. I change the program of the Growfor.Life-Closet from the standard-grow-mode (=18 hours of light per day) to the custom-flowering-program (12/12 hours of light, where I can choose the time when the lamps turn on). Now the plants will grow slower until they start to flower. I LOVE THE Growfor.Life-Closet, its sooooooooooooo BEAUTIFUL and soooooooooooooooo SILENT, a landmark technical development in my opinion! This is growing made stealthy and effortless, GROWING OF THE 21st CENTURY!


Likes
45
Share


@MadeInGermany
Follow
Info:
Unfortunately, I had to find out that my account is used for fake pages in social media.
I am only active here on growdiaries.
I am not on facebook instagram twitter etc All accounts except this one are fake.
Flowering day 31
since time change
to 12/12 h.
Hi everyone .
The lady is developing beautifully :-).
The buds start to get thicker and it smells better and better :-).
I added another 1 g GHSC Bio Bloom per l coco.
That should be enough for the remaining weeks.
Otherwise everything was checked and cleaned as usual.
Have fun with the update and stay healthy 🙏🏻
You can buy this Strain and Nutrients at :
https://greenhouseseeds.nl/
☝️🏼☝️🏼☝️🏼☝️🏼☝️🏼☝️🏼☝️🏼☝️🏼☝️🏼☝️🏼☝️🏼☝️🏼
Green House Seeds Company Cup Clone 🏆
Type:
Wonder Pie
☝️🏼
Genetics:
Wedding Cake x OG Kush
👍😍
Vega lamp: 2 x Todogrow Led
Quantum Board 100 W
💡
Flower Lamp : 2 x Todogrow Led
Cxb 3590 COB 3500 K 205 W
💡💡☝️🏼
Earth: Canna Coco
☝️🏼
Fertilizer: Bio Grow Feeding ( GHSC ) , Enhancer ( GHSC ) , Bio Bloom ( GHSC)
☝️🏼🌱
Water: Osmosis water mixed with normal water (24 hours stale that the chlorine evaporates) to 0.2 EC. Add Cal / Mag to 0.4 Ec Ph with Organic Ph - to 5.8

Likes
44
Share


@Aedaone
Follow
The temperatures, humidity, height, and watering volume(if measured) in grow conditions are all averaged for the week. The pH is soil pH. Any watering done by me is well water which is 7.6 pH and 50° F. Coop Poop, Molasses, Feather Meal, and Soluble Kelp are ml/gallon of soil top dressed. Everything else listed in nutrients is ml/gallon of water fed to plants without checking the solution Ph.
Day 1 we had a high temperature of 76°F. Skies were overcast and cloudy. I watered about 4 gallons.
Day 2 we had a high temperature of 80°F. Skies were sunny, but everything was still humid. I watered about 4 gallons.
Day 3 we had a high temperature of 84°F. Skies were sunny, but humidity was running high. I watered 4-5 gallons.
Day 4 we had a high temperature of 73°. Skies were clear and sunny. The humidity only reached a high in the mid 50% and a low of 30%. There truly is a God who knows this garden needs some dry air for harvest.
Day 5 we had a high temperature of 71°. Skies were super sunny and humidity is averaging around 40%. I watered about 5 gallons. We are having excellent weather to finish.
Day 7 we had a high temperature of 82°. There was abundant sunshine. Super clear skies and humidity dipped into low 30%'s. I watered about 5 gallons. Not so much because of them feeding heavy but the arid conditions and sunshine. I've treated these with very thorough washing of the pm.
This week was a success. We've gotten so busy, it's all we can do to keep the garden going, while harvesting, drying, and processing. I've had to wash all the fastbuds repeatedly this week to get the pm off of them. We had a brutal mid and late flower. Extremely high humidity, ridiculous amounts of rain and cool nights, thunderstorms blowing in and just overall brutal weather for cannabis. It's a blessing to have late flower perfect weather. We should harvest next week.

Likes
22
Share


@WolverineGreens
Follow
Plan to harvest on Sunday thats day 60 and I spotted a little pm on a few of the lowers so its time to cut. Added flora clean Sunday will go straight water today. Can't wait.
So far on my strain hunt I'm gonna retire the mango and headband (cause I've had these genetics for a year) the enemy's dream because it's small and I didnt take clones in time and I'm on the fence about the Skywalker so ill wait til I give it one more shot indoors and once outside. And I'm on the fence about the white widow since I've had it before. Gotta make some hard choices especially if I get that order in to seedsman before the sale ends.
Next grow will be:
Alaskan Purple
Gelato og
Do-si-Do
Bruce Banger
Runts
Skywalker og
White Widow
Amnesia Haze
Followed by the same strains outdoor. I'm thinkn about ordering seedsman 3 new 420 strains and sum moonbow or moonboots any thoughts?


Likes
4
Share


@Mo_Powers
Follow
i have now moved it to its last pot. it was a bit stressful for it and i hope it recovers well. the root formation looked really good. it is now in an autopot system and is being fed with HESI fertiliser.
Likes
28
Share


@Luv2Grow
Follow
Day 78 - Starting week 12 and her final week and man o man she’s gonna be amazing. She’s almost to the percentage of amber trichs that I’m looking for so she’ll be getting the chop this weekend and planning on doing it Sunday, just waiting for her to dry out.
Day 79 - She ambered up quite a bit the last 24 hours and she’s almost dried up so will most likely do the chop on Friday. Nice, fat and dense buds and can wait to give this girl a try. What an easy grow this has been.
Day 80 - Decided I’m going to give her until Sunday now for the chop. Going out of town for two days and don’t want to rush chopping her tomorrow night. So ended up giving her 2 more gallons of cold plain water and the way she was drinking, she should be ready Sunday evening.
Day 82 - She’s actually fattened up quite a bit more the past couple days and on track to chop tomorrow. Heading out of town for the night and she’s pretty much dried up and should be good for an evening chop.


Likes
5
Share

@Jardineiro_Br
Follow
Precisei viajar e tirei todas da estufa pois estava muito quente e como eu estaria fora de casa nao poderia monitorar , assim estão do lado de fora da casa. Assim que chegar devo colher.
Likes
567
Share


@Legendaryseedthumb
Follow
Day 16: what is happening to my girl? Anyone knows?🤔
Day 17: Flushed them through with my solution mix to stabilize the ph in coco
Installed my net today. I don’t really need it yet but it looks nice 😆🥦
Started with lst today
Day 19: started to defoliate today, not much just 2/3 leaves each plant!
Day 20: hey guys! Shit is about to go down!!!! Finally some work with the girls… I hate the early fragile days.
As you guys can see I topped my girls, but hahaha I just noticed that I accidentally FIMed one plant😂
I love training my plants as much as possible. I will let them recover some days before I defoliat again. I defoliate all the way to week 1 in flower.
Likes
19
Share


@Basementganja
Follow
Light was at 16" from days 1-7, which was way too close! The light was moved up to 32" and normal growth begun! The light is an SF4000 that's dimmed to 333watts while being cooled.
day 21-Defoliation begins! removed 1 fan leaf, and one node(on oposite side of 1st node) already!
Day 22, two more LST wires added, to expose the lowest node to equal light with the rest!
Likes
2
Share


@MrDoubleHaze
Follow
Strain Links Oben : Super Lemon Haze
Strain Oben Rechts : Break Pad Breath
Strain Mitte : Auto SFV OG
Strain Unten Links : Lemon Orange
Strain Unter Rechts : Velvet Moon


Likes
49
Share


@LockDownGrow
Follow
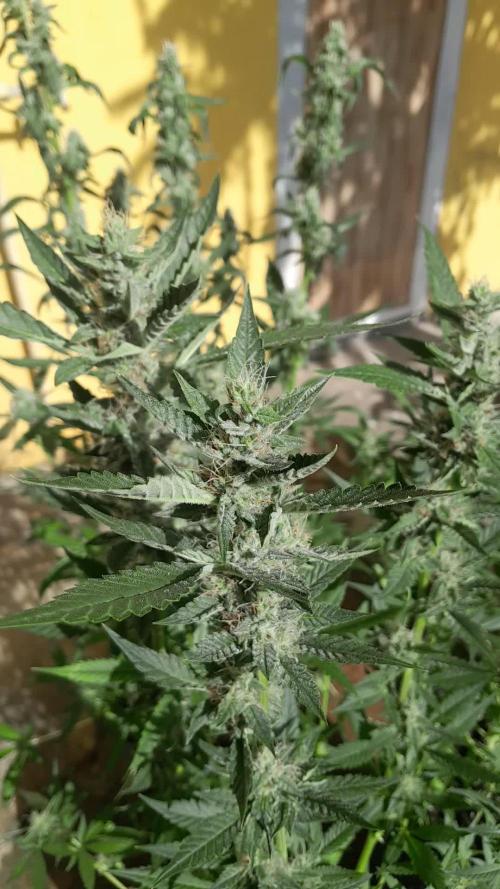
So this plant is doing very well and fattening up nicely , she has had her last dose of pk now ,
Fast buds do not give anything away with there tester seeds , but I am wondering from the flower formation of this could be the gelato auto they are going too bring out this year ?
Processing
Likes
6
Share


@ganjaman24
Follow
Just got a new 600w mh/hps light for now it’s in my current setup with my 250 n it’s dimmed to 50%, only reason I mention is b/c the plants seem to be loving it!! They’re 12 days old from seed, still just ph’d water for them! So far so good :P

Likes
54
Share


@TheWeedaltor
Follow
I harvested the bigger strawberry banana who grown under the CMH all time, I will updated next week once dried.
I put the second one (after a vegetative fase with sun from windows and sea breathe, following than the others plants on the border of the garden) in the room where I finished the photoperiod strains and gave her 2/3 week of 400W HPS all for her 💪🏻
Now I will let her finish the flush under the CMH since I set free one place 🤙
The Runtz Muffin got poor light because Skywalker grown as a monster, the scrog net for sure didn’t helped me to raise up the pot nearer to lamp 😬
Next time I will use scrog net only if I grow same strain but I think I will not use it, I prefer have plants free to move in the garden 🤷♂️🏻
Happy smoking to all growers 💚

Likes
25
Share


@JeyGanesha
Follow
Ultima settimana, max 10 giorni per il flush,e poi raccolgo....devo dire che questa watermelon della korngarden seeds non è venuta carica di tricomi (come la wedding cake) ma strutturalmente è venuta bella carica,i fiori sono grandi e duri come delle vere pannocchie 🤣😜✌️,poi vedremo ,vi dirò com'è da cremare
Likes
34
Share


@gottagrowsometime
Follow
She grew really well and strong, I topped both plants, and maybe I shouldn't be. Cause height, I'm just not getting in my autos and me topping them is leading me to believe that they are flowering earlier than they would if I just left them.
But I'm still happy with how these grew, instead of 1 main cola I got 10 smaller ones, so I'm happy, they grew strong and quick, gave no trouble but a bit of nutrient burn. Very easy to grow and very resistant some of the most I've grown so far, they bounced back very quickly with the very few issues I did have, she was really easy to turn around and if you found this to be your strain, then you'll get some decent harvests back from a few plants, hoping to see 130-160g from both plants.
WOW. 1.5 day on the cure and already I'm getting the bang of ripe bananas. The berries smell has kinda dropped a little. Amazing at how fast this smell took over. Ripe banana + fruity and a deep fuel has taken over my cure press. And the bud is in jars, it still stinks.
Likes
7
Share


@Organic_G
Follow
Ein wunderbarer aber auch anstrengender Grow geht zu Ende. Erstes Mainlining, erste Photoperiodische im Zelt…
Qualität, Resistenz, Geschmack 🤩super
Habe bisher nur einen geraucht, THC hat mich gut weggehauen, hätte ich selbst nicht gedacht


Likes
68
Share


@Teamdirtbag2
Follow
Making holes.... Farmageddon is here. 15 plants....
5 - Kush Mints
4 - Sundae Driver
1 - Tangerine Slurpee
2 - Ice Cream Cake
2 - 818 Headband
1 - Platinum Alien Orange Cookies
Six plants are going into the ground.. 😈 I hope??


