
Likes
Comments
Share


Likes
19
Share


@Wenz004
Follow
So aufgehts mit Fettarschfrau.
Gewählt Samen von Flo. Lasse nur eins von 3 erstmal keimen...also muss 100% Keimrate sitzen🤭...keine Selektion etc...und vor Allem ohne dieses Hopfenzeugs🤭
Kommen aber später sicher nicht in Living soil...obwohl ich Flo sympathisch finde, weiß ich mittlerweile, dass es einfach nur ein riesen Markt ist, mit dem man gut Geld verdienen kann. Mann muss lediglich den Gärtnern gut ins Gewissen reden und mit vielen Fachausdrucken wie "Bodennahrungsnetzwerk" etc. gut umgehen...aber es funktioniert. Wurde übrigens alles bei den Amerikanern abgekuckt...wie fast alles andere auch. Dort natürlich alles viel größer wie es z.B. Jeremy Silva macht (build a soil)...hab übrigens zwei seiner Rezepte ausprobiert...garnicht mal so schlecht aber trotzdem natürlich einfach nur Marketing damit die Kasse gut klingelt und die Gärtner sauberes Gewissen haben...einfach mal selber ausprobieren oder sich ein paar echte Wissenschaftler und Koryphäen anhören...wie den guten alten B.B...z.B. hier
https://youtu.be/qtXa_dAWKXc?si=nXuThrh_BhyvUSHH
Ab 6:14 eben dieses Thema...ansonsten happy growing😃
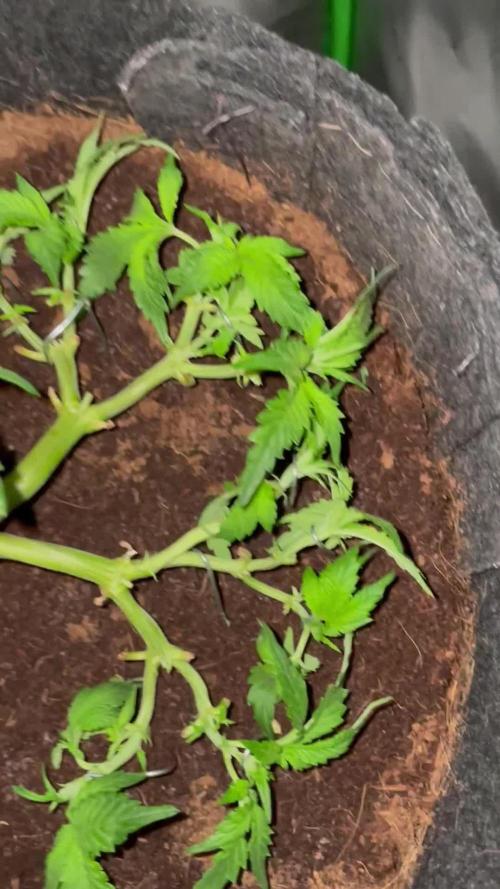
Kokos getränkt ec 0.7 (davon 60% dest. Wasser 40% Leitungswasser Ausgangs-ec 0.1) und mit Aptus:
All-in-one 1 ml/l
CalMag Boost 4 Tropfen /l
Startbooster 4 Tropfen /l
Regulator 3 Tropfen /l
Gegossen wird mit einer noch leichteren Lösung...geblubbertes Leitungswasser EC 0.4 + 4 Tropfen/l Startbooster
Also gleich der Keimling/Sämling wird beschossen🙆♂️...mal sehen...ist ein Experiment😉
Am Tag 3 die Lampe gewechselt...bin mal gespannt was die neue "CreScience FLUXshield Babo 450C (160W)" so kann☀️
Update!...der Lampenwechsel am Tag3 war schlechte Idee...veg mode von der babo450c ist schließlich auch völlig anderes Spektrum als bei der SF1000
Neustart läuft gut...2ter Samen von Flo ist auch super gekeimt...Bilder folgen bald
Licht ca. 200 mikromol auf den Deckel...drunter weniger
Versuch #2 läuft besser...coco zu scharf getränkt...sieht an der linken Blattspitze letztes Bild...insgesamt löuft die Sämlingsphase zu langsam ab...aber das lag wohl eher an mir


Likes
72
Share


@DreamIT
Follow
🐩👤Sirius Black👤🐩 by 🌍🌱WeedSeedsExpress🌱🌍
👤 29.3 ...
👤 30.3 ...
👤 31.3 ...
👤 1.4 Begin to see a swelling of the flowers, it was time: D begins to feel a slightly sweet scent but we wait a little longer to feel the veterinarian characteristics of this beauty. Viparspectra always works to the maximum, I am enthusiastic about this lamp, I can't wait to mount the XS1000 too. in a week I will soak another seed, I hope to catch the colored one: p
👤 2.4
👤 3.4
👤 4.4
__________________________________________
👀Are you looking for a good lamp to start?👀
Viparspectra in my opinion has something more than the others, take a look at their site.
➡️ http://bit.ly/pro-seriesproductspro-series-p1500
⏩Use " GDVIP " for an extra discount💯
____________________________________________________________________________________
📜👀 A look at the details of what I'm growing 👀📜
🐩👤Sirius Black👤🐩 by 🌍🌱WeedSeedsExpress🌱🌍
📋 Details 📋
⚧ Gender
▪️ Feminised
➰ Genes
▪️ 70% Indica / 30% Sativa
🎄 Genetics
▪️ Sirius Black
🚜Harvest
▪️ 450 g / m²
🌷Flowering
▪️ 63 - 70 days
✨THC
▪️ 25.0%
✅CBD
▪️ 0.5%
🏡Room Type
▪️ Indoor
🌄Room Type
▪️ Outdoor
🕋Room Type
▪️ Greenhouse
🎂Release Year
▪️ 2020
____________________________________________________________________________________
👀📷 Follow the best photos on instagram 📷👀
https://www.instagram.com/dreamit420/
🔻Leave a comment with your opinions if you pass by here🔻
🤟🤗💚Thanks and Enjoy growth 💚🤗🤟

Likes
Comments
Share

@Kardo
Follow
Die Purple Haze ist buschig und sehr gesund die Triebe lassen sich super biegen
Likes
69
Share


@Natrona
Follow
*****DIVINE SEEDS *****
*****FRACTAL*****
SPONSORED GROW
Week 9 6/2-6/8 Now at the start of week 9, my outside gals, except L. Cake are now in flower.
Several pics show the very narrow new leaves and small white hairs evidence of flower formation. 6/7 This is the first time I’ve had to add nutrients to her feeding. Some lower leaves were yellow. Since I’ve been using amended soil, this indicates Fractal is a heavy feeder. Nutrients in soils are used up and she is starting to use her own food sources
6/7
5 gallons well water
TPS1 60ml used 1 gallon per plant =12ml
Cal-Mag 25ml used 1 gallon per plant =5ml
Recharge 5ml used 1 gallon per plant =1ml
Signal 1.25ml
PPM 1414, PH 6.93, Temp 82.5
Note I do not have to PH adjust my well water. However, our city water comes out of the tap at 8.2 ph so I must PH down using the city line hose and my inside grows.
============
Germination April 6.
Vegetation
Week 1 water only
Week 2 water only
Week 3 added recharge and TPS1 increased ppm to 570.
Week 4 continues with recharge and TPS1. I added Fox Cal mag increasing ppm to 685 - 805.
Week 5
TPS1 9ml/gal
Recharge 5 ml/gal
Fox Cal-mag 5 ml/gal
Week 6 5/12-19 Moved outside in 5 gal air pots receiving rain and well water.
Week 7 5/19-25
Opium received only rain water for the last 2 weeks. Since I was in Colorado last week, I feel very behind on my diaries. Despite my absence, my outside gals did just fine. Opium loves the outside sun, breeze, and frequent rain.
They love the natural rain and sunshine evidenced by vigorous growth.
Thank you @DivineSeeds
Thanks for the visits, likes and comment, I appreciate all the plant love💚.
Have fun & love what you grow 💚
Sending you good vibes of love, light, and healing 💫
💫Natrona 💫
Sending you good vibes of love, light, and healing 💫
💫Natrona 💫
***FRACTAL***a
Rating:
Fractal is an especially psychedelic strain that Divine Seeds developed for esoteric and mystical experiences, meditation and creativity. A potent and vivid landrace variety from Southern India was crossed with a sticky leaning Indica (mostly Afghani), then Skunk #1 joined this company. Their progeny underwent multiple selection experiments, until its massive built, resin concentration and hypnotizing powers reached an ultimate level. The result is now known as Fractal – resinous, spicy and productive. Best choice for commercial growing: a compromise between bigger yields and fast ripening! A great source of hashish that has something incense-like to its musky smell.
Indoors expect 170 сm height, out of doors plants grow up to 200 сm. Fractal fits for all types of growing environment: grow boxes, hydroponic or aeroponic setups, outdoor plantations, balconies, terraces and green houses. For more weight it is recommended to train Fractal plants to broaden their structure and limit their vertical growth. For that purpose use ScroG or SoG, LST, FIM or topping, supercropping or mainlining – there are no limitations for the strain itself, but certainly low-stress methods are recommended to smaller samples. Fractal has an inherent immunity to molds and insect pests, but since its colas are thick, protect your plants from stale air. Also during rainy weeks your plantation may need to be covered. Ready for outdoor harvesting in October. Big and dense buds the color of olive, hunter green heavily coated with crystals.
Whole Fractal buds smell hashy and earthy, while cedar and fruity hints are noticeable on breaking. Measure your portion carefully: the potency is above average! With Fractal you experience an overall stoning that either keeps you put or slows your motion down, also vertigo is possible. However, in moderate dosage the impact is described as a pleasant sensation of well-being and placidity. Perfect for spending a night by a bonfire without talking, therefore is more often enjoyed as a solo smoke. Efficiently relieves muscle spasms and seizures, inflammations, combats insomnia and increases your appetite. Up to 3 hours of altered state of mind can be expected. Best consumed at night time.
Pots: 5gallon Air pots
Soil Fox Farm Happy Frog Amended with worm castings, dolomite lime and mychorihiza
Seeds provided by Divine Seeds
Divine Seeds breeding company
The link to Fractal Feminized Seeds
Fractal - Divine Seeds breeding company
The link to Fractal Auto Seeds
Auto Fractal - Divine Seeds breeding company


Likes
6
Share


@jaydee702
Follow
girls are doing great they smell like stinky feet wew thats rank.Have not found anymore hermi parts these bubba cheesecake nuggets are getting better every day
They are awsome plants

Likes
6
Share


@TheMayor4434
Follow
Ok this week was a little exciting one of the plants developed an issue with one of its leaves. It's the only plant out of all of them it's hard to see from the picture but 2 out of the 5 fingers on the leaf had a burn and were shrivelled and also very very shiny. I looked it up and it suggested it was boron deficiency. I simply removed the affected areas and carried on as it was only localized too a couple of leaves and just on that one plant. The smaller plants are catching up now

Likes
24
Share


@Jays_Not_Here_Man
Follow
The Apple Betty girls have performed very well this week! The LST began, and there was some great growth in side branching. I also started this week off with introducing them to some nutrients ❤️
Start of week 4, the girls had responded well to transplanting, so I decided to start with some LST. My main method is to use soft wire wraps (dollar store purchase!)
I poke one hole in the side of the pot near the top, and then go directly opposite that hole and poke through to make another. The first hole is for a wire wrap to secure the base of the seedling from pulling right out or over too far. The other hole is for the direction you want to bend your plant to.
I start by slowly working the stem between my fingers at the point where I want it to bend. Twisting and pinching slowly so not to snap. *wait a day or two after your last water, or it will be easier to snap* once it’s ready to flop, I use the wire tie to hold down the top of the plant as close as I can to the nearest shoots.
I’ll usually leave the plant like this for a couple of days, adjusting the ties, and then take them off to let them recover .
Watered with a small dose of the full line of Advanced Nutrients I will be using for this grow. The girls got about 500 ml at the beginning of the week, but 2 days in I could tell they wanted more. By the end of the week they are taking nearly 1/2 gallon (which will give me 10% runoff)
At the end of the week I increased the intensity of the BP2500 to 190 watts at the wall and the girls did show a few wrinkles as they adjusted, but have quickly recovered.
I haven’t topped these girls, and I’m not sure if I am going to… thoughts? Happy Gardening 🇨🇦❤️🌱😎💨

Likes
18
Share


@Bigbombbudz
Follow
Another week closer....
Well its coming to an end pretty soon...the girls leaves are starting to fade and the buds are getting nice and tight...Frosty and smelling great.
Nothing to report, not much happens the last few weeks its just you got to have patience, and let them ripen up...
Until next week, smoke a fatty, help out your fellow grower.

Likes
13
Share


@tiasmaaa
Follow
topping for the second time, still one more topping and we'll stop stress them and just let them grow :)

Likes
38
Share

@cultivars
Follow
OCTOBER 18th to OCTOBER 24TH
Sunrise: 08:31 | Sunset: 18:50 | Total Daylight: 10:19
Weather over the past week saw several consecutive days of full cloud cover and rainy periods. Greenhouse has held temperatures during the day, and only dropped below 10C once (Day 168). Good periods of sun on Day 167 and 168, with the forecast looking sunny for the next few days. I suspect that will help along the ripening process as the plants process nutrients from the fan leaves during the fade. There hasn't really been any issues with humidity levels, as it has hovered in and around 40% to 45% RH
Both Lemon Orange specimens are near ripe, with many trichome heads cloudy, some clear, and few amber. Suspect it is a matter of days before they are ready to be harvested.
DAY 162
2L of plain rainwater (cold) applied to all but Lemon Orange #2 (1L for this specimen).
DAY 163
n/a
DAY 164
15C in greenhouse in the morning; Cloudy and cool day overall, but greenhouse holding temperatures above 19C and plants are clearly going through senescence.
DAY 165
Steady rain overnight, with armer temperatures; Greenhouse held overnight at 17.5C and 50% RH. Cool, cloudy and rainy day (high of 9C, 97% RH, but greenhouse and the associated equipment performing as designed and holding temperatures at 19.5C with humidity ranging from 40% to 45%.
DAY 166
Cool and rainy overnight (6C intermittent light rain). Greenhouse held to 16.5C and 41% RH. Noticed some droop so provided 1L of plain rainwater (cold) via drip in the afternoon to each specimen and everyone perked up thereafter. Temperatures reached 19C for much of the day, with 43% humidity. Temperatures outdoors were a high of 7C, with 80% humidity (or more) during the day. Remained overcast for much of the day, but there was a couple of periods of increased brightness. Plants are doing well, all fading;
Lemon Orange #1 is nearing full ripeness, and has displayed blue-ish purple tints in upper sugar leaves. and smells of sweet citrus. A few lower leaves are yellowing, but it hasn't progressed to fan leaves near the top of the plant. Pistils are all wilted and receded into calyxes (and have been for several days). Upon inspection, clear trichome heads outnumber cloudy ones, and there are very few if any amber ones.
Lemon Orange #2 is furtherest along in senscence and is soon to drop lower leaves. Upper fan leaves are slowly fading from green to yellow. Flowers are large and comparable to Lemon Orange #1 and #2 of the Summer of 2024, have very good trichome production and smell strongly of lemon with an earthy background. Pistils have largely wilted, however those at the apex of flowers are still white. Calyxes have plumped, but they're not quite ripe yet. Upon inspection, clear trichome heads outnumber cloudy ones on calyxes, while at edge of sugar leaves there are quite a few amber heads.
DAY 167
Overnight low of 2C, greenhouse held at 12.5C and 41% RH. After a cloudy cool morning, the sun broke through and warmed up the greenhouse shortly after the noon hour. Exhaust fan even came on intermittently to reduce temps below 24C. Humidity was ideal all day, in and around 40%.
After noting some droop, applied 1L of plain rainwater (cold) via drip to both Lemon Orange specimens. This may be the last watering of the season. I think it will be possible to decommission the irrigation system for the winter over the coming weekend. I can pull 20L of water for use either for this crop and/or the mother tent.
Lemon Orange #1 will be ready any day, but clear trichome heads still outnumber cloudy ones. Purpling of upper parts of flowers in sugar leaves and calyxes is progressing, with some yellowing of fan leaves starting to move up the plant. Flowers appear ripe with pretty much all pistils wilted and receded into their calyxes, but trichomes do not.
DAY 168
Greenhouse 9.5C (-2C outside) in the morning with 40% RH. Sunny morning, with greenhouse warming to over 10C by 9:30AM; Exhaust fan kicked in to hold temperatures at 24C just before the noon hour. Both Lemon Orange specimens are showing cloudy trichomes outnumbering clear ones, and outside of the margins of sugar leaves, there are few amber trichomes present. Both plants are a mere few days away from harvest.

Likes
17
Share


@CZ420CZ
Follow
more later
3rd Apr, today is day of two Amnesias - its time. they are on peak trichoms are milky 10% amber. Zkittles is on grotek final flush strawberry I trying if it change her smell and she is good now, but I fed her week ago with rocket fuel some fertilizers for peppers (11-6-8) coz im was out with bloom fertilizer, Amnesia 3 get this feed too but little bit improvemed with bio grow and rest of biobloom, yesterday I bought Powder Feeding PK booster/mineral and thats should be good. More later after some smoke :D
Likes
75
Share


@GODSGIFT_2005_JM
Follow
Grow tent⛺️ check out MARSHYDRO
💡 GROW LAMPS 💡 check out:
VIPARSPECTRA PS2000 (200W) & XS2000 (240w)
MARSHYDRO ts1000 (150w) & fc3000 (300w)
NUTRIENTS: GREENHOUSE FEEDING BIO LINE —-ORGANIC STYLE GROWING

Likes
40
Share


@CampaCavallo
Follow
2ª VEGETATIVA :
Alla piccola BISCOTTI {ZAMNESIA} abbiamo cambiato il vaso, da vasetto per la germinazione a 6.5 litri.
Durante il travaso abbiamo abbondantemente spruzzato una miscela con olio di NEEM al 4% su tutta la pianta, sul substrato e pure nel box.
Partiamo anche con la fertilizzazione con gli amici di ADVANCED NUTRIENTS e la loro linea di prodotti base ph perfect!

Likes
9
Share


@Colo420
Follow
Venimos muy bien con todas las plantas a pesar de esta ola de calor que no se quiere ir.
Por un lado las fancy están en su etapa de lavado para ser cortadas próximamente.
Las colombian Jack vienen flotando muy vigorosamente, y la kritikak k se está bancando el calor del exterior como puede


Likes
45
Share


@masterofsmeagol
Follow
7/11 It's pouring. We got like 2 in of rain. I compared the flowering with that of the mendo breath I grew in a previous journal and they are real close. Tjat was DONE DONE in September. Judging by the small preflowers they are going to be ready approximately around the same time. I think I'm going to have a middle September harvest with some and some will go to October. Realistically, I should've changed this to flower. I like to call it "the stretch" though. Plants are stretching like a mother fucker. Seems like the less I fuck with them the better they do! No nutes yet. I'm going on vacation for a week and I think I won't feed before I leave either. Plants don't look like they are lacking in anything. Just because I have tons of nutes doesn't mean I need to use them. Still need to put up the secondary supports for flower. Went over after a break in the rain. Went through each plant one by one. Most had leaves that were either turning yellow or yellow at the bottom interior. I only removed leaves that were dead or dieing. I should probably have degoliated more but I'm doing the KISS method this year. Things seem to be doing good that way. Some minor pests. I found a slug but put out slug bait for those and earwigs. Noticed a few white flies and multi color flies (probably fungus knats but they are up at the top, not down by the soil. I'm going to think about it and do some research. Damage is so MINIMAL and pests are MINIMAL that im holding off spraying. I mat start nutes tomorrow though. I'm uncertain on a lot of things. I need to meditate on it. Just because those interior leaves died the plants are still a LUSH dark green so I think they're alright. It's going really good but I'm going to be on vacation for a week. I can still monitor daily with my camera's and my family that is watching them will FaceTime me every morning and show me what's going on. They know what they're doing and if something arises I have BASICALLY a growers union in my town. All family. We look after each other. That's the only reason I considered even going. However, the event horizons, sherb pie, toasted toffy and AT LEAST 1 GMO "LOOK" like they will be flowering early. Like I said they look similar to a mendo breath pheno on another diary that finished in September. We shall see. I'm excited that's for sure!
7/12 So far no rain! Super hot and muggy. Killed a jpn beetle and a moth larvae this morning and another beetle this afternoon. I'm seeing SOME pest damage which makes me want to spray before some of these plants take off flowering. There isn't much damage and tje birds sit on the top just WAITING for a chance to swoop in and grab something. I've seen tons of wasps tjis year. I killed a snail yesterday and put out slug bait around my pallets. I'm leaving early tomorrow. I'm CONSIDERING doing an application of Cap'n Jack's before I leave. I'm not sure. I made little DIY videos for dad and I hope he follows them. If not I'll have another grower come help. With all the rain I noticed some white flies when I shook a couple plants. I don't have time to really deal with it right now. There were only a few and I think spinosad would kill those too. Either way it will be fine. I can monitor via camera. I can even hit an alarm that goes to four different people. Still. I don't like leaving my girls. Especially in this heat.
7/13 Left early for a short vacation. Just got a picture saying it's sunny there and my plants are doing good. I'm lucky to havecthe crew that I do. I'm sure if I asked they'd put up yellow sticky traps. That's something I may consider.
7/14 Dad said it Rained last night and driving down here it was just PURE SHEET RAIN. He sent me pics I uploaded and everything looks GREAT! gonna get sun after all that rain and wind. They are gonna explode!
7/15 Still on Vacation. Dad showed me the plants and said they looked a little dry so I had him use the 4 GALLONS OF WATER I HAD PREMIXED FOR HIM TO WATER THE GARDEN. This way each plant gets a half gallon. It's supposed to be in the 90's with no rain tonight. Rains euppised to come tomorrow but I've seen how fast a bag can dry out in ONE day with super hot weather and high winds. The wind blows through the bag drying the medium out. Dad's right. Things do look amazing. I'm having fun but it will be nice to get back and see if I was right and those few plants are trying to flower. Looks just like those two mendo phenomes that flowered early.
7/16 still on vacation. Got a nice rain for the plants. Not much though.
7/17 Had DAD WATER FOUR GALLONS ON THE GARDEN. ANOTHER HEAT ADVISORY IN EFFECT. I really miss my girls. I'm ready to get going and start doing the things that need to be done. Few more days and I'll be home with my pretty ladies. Last time I came back to nice little flowers. They looked about in the same stage when I left. I love early finishers. They're stretching thsts for sure.

Likes
6
Share


@BigGGrows
Follow
This week was a big week for the candy cush. I noticed upon watering her to run off, that in the same day the pot would go super dry and light weight. I also noticed stress in the leaves and roots poking out the bottom of the pot. It was time for a transplant. So far so good! Upon transplanting i performed more LST to help her fill in the pot. She went from a 1 gallon to a 5 gallon. She was also defoliated thia week.

Likes
32
Share


@Hawkbo
Follow
It grew quick it's an early bloomer. The green buzz were great I kept the ppm lower than I typically do staying around 950 for the crop and 880 for this one. If you like the purple autos this is a good one to start with.
Likes
11
Share


@JaysBuds
Follow
Day 60 from flip for these girls and they're SO sticky and gooey it's kindof ridiculous. The camera just isn't doing it justice, and they're in bed now so no flash photos. The sweetness has really started to develop, and less vomit smell is most welcome - gassy strawberry apparently takes a while to get right, even with a fast strain.
