





Likes
11
Share


Likes
6
Share

@NoProbation4Weed
Follow
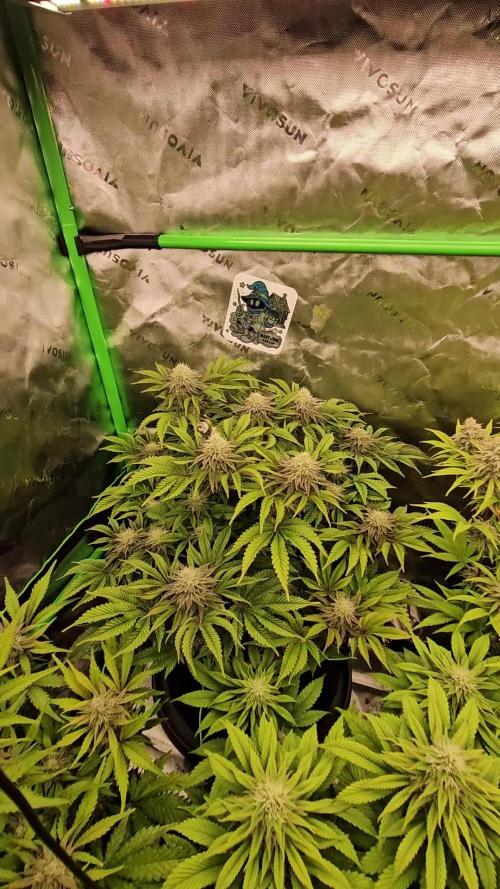
It is day 42 since switching the light cycle to 12/12.
Huge Plants! different phenos and growth paterns. one looks super frosty and the other more like oldshool weed from back in the days. both leaning towards lemon side.
The light is hitting the plants at around 800 PPFD

Likes
11
Share


@Pomona_Sprout
Follow
Georgeus strain smell taste energetic and beautiful buds with bloody red with tricomes snow 😎🙌🏻


Likes
12
Share


@StonedandSteady
Follow
AutoBlueberry 7th w/ 2nd W/ Flower breed by #DivineSeeds #DivineSeedsSquad #DivineSeedsBreedingCompany
Starting to Flower and her Smells are already getting Stronger of Gasy Blueberries!
Origin:Afghani/Thai
Type:50% Indica/ 40% Sativa/ 10% Ruderalis
Flowering:56 days
THC:22%
Harvest:400-550 g/m2
Height:110-150 cm
They were Growing under the #Growatt600w and in my #TopoLite 24×24×48 Grow Tent but I've Upgraded and Updated it to my #OsreeQB100W I'm also using #TNBNaturals #TheEnhancer Co2 Despersal Canister and using thier Ph⬆️⬇️ for my Decolinated Tap Water!
Green and Growing Up Great! She's Growing into her 2nd week of Flower! She's Growing in my special blend of ProMix potting mix, a 1/2 bag of Earthworm castings and 2 light handfuls of Diatomaceous Earth mixed Up well for before transplanted! Diatomaceous Earth: Diatomaceous earth is made from the fossilized remains of tiny, aquatic organisms called diatoms. Their skeletons are made of a natural substance called silica. WHAT IS DIATOMACEOUS EARTH?
In a nutshell, DE comes from the fossilised remains of small marine organisms called diatoms. Over a 30 million year period, these hard-shelled algae collected on the bottom of bodies of water, eventually forming into a type of sedimentary rock. Fast forwarding, it wasn’t until around 1836 that a German peasant Peter Kasten discovered the ivory-coloured, powdery substance while drilling a well in northern Germany. Ever since, the usefulness of DE for multiple purposes, including industrial and horticultural applications, has been well-reported. Just sprinkle some diatomaceous earth on top of your soil and watch mother nature's secret weapon work its magic.CONDITIONS THE SOIL
When it comes to growing cannabis, everyone strives to provide the best soil to grow the best plants—but there’s always a way to make it even better. Making the soil a better medium is called soil conditioning, which is exactly what diatomaceous earth does. It works by improving the retention of moisture in your potting soil, holding a large amount of fluid and drying at a rate that’s much slower. This natural soil additive also helps to retain nutrients and allows for better oxygenation of the substrate. NATURALLY CONTROLS PESTS
DE is an all-natural, safe-to-use substance that doesn’t harm the cannabis plant with toxic chemicals. The nature of diatomaceous earth makes it useful against most types of insect infestation you might be experiencing; and unlike chemical insecticides, insects can’t develop a resistance to the effects of DE. So once they’re gone, they’re gone for good. DE is an abrasive. and when used as an insecticide, it gradually scrapes away an insect’s exoskeleton, absorbs the fluids, and dehydrates insects and other critters to eventual death. IMPROVES PLANT STABILITY
When using DE in your soil, it can be especially beneficial as it frees up nutrients so that they are made available to the plants as needed. This works via the silica content of DE being absorbed into the plant tissue, which helps improve the plant’s ability to respond and receive more nutrients as DE activates. This in turn results in greater yields and better stability under small pH fluctuations!
https://divineseeds.net/
https://instagram.com/divine.seeds?igshid=osxe2v7en33v https://divineseeds.net/
Thanks Again to All my Friends, Family's, Teams, Sponsors, Followers and Subscribers!!! Your Genetics are Merry Magnificent, Mega Marvelous and Mighty Medical! Love um!!! I really Can't stress enough how Thankful and Grateful I am of All of you and what you've Shared with Us! Means the World!!! It's definitely a Pleasure being able to Grow with these Phenomenal Grow Lights! Please Enjoy! BudBrothers4-Life! Cheers Famz!!! Much Props and Much Topz!💯🔥 #Osree #GrowStarStore #Growatt #TNBNaturals #TNBTeam #GrowYourOwn #Bliss
https://instagram.com/as420.ca?igshid=1f116alw054wp
The Grow Bags: https://www.as420


Likes
3
Share


@MicroHidroGrow
Follow
Día 36.
Estamos en 6ta semana. Los esquejes se atrasaron debido a que han sido días muy fríos y no he logrado enraizarlos. Decidí poner el extractor de aire junto con la bomba de aire, así solamente se prende 15 minutos cada hora. Así estoy logrando temperaturas mayores a 24°C en el indoor y así voy a lograr el enraizado. La planta ya tiene un tamaño que ocupa casi todo el indoor. Pero lo importante es que la voy guiando y ya estoy proyectando como va a ir cada rama. El tamaño va a exceder lo que esperaba, pero aún así creo que si logro lo que tengo en mente, voy a sacar muy buenos resultados. Igual no me voy a arriesgar demasiado, así que si contando 10 días desde ahora, no logro que los esquejes enraicen, voy a pasar la madre a floración sola. Cómo pueden ver, las ramas están bastante gruesas, y el la ramificaciones van ganando su lugar cada una. Las raíces son demasiado grandes, aunque sé que voy a poder poner la planta en el sistema de arriba igual, aunque me voy a tener que ayudar de algo para meterlas. Es importante no utilizar las manos, ya que se pueden transmitir muchos hongos.
Voy a seguir actualizando e ir viendo que pasa. Pero ya estamos en los últimos días de crecimiento, haya o no esquejes. Incluso puede que ya pase la planta al indoor de arriba para darle mayor libertad de crecimiento. Esto me va a servir para tlmar en cuenta en la próxima camada que se vendrá. La idea de esto es hacer las cosas rápido, y no en gran tamaño. Pero siendo que ya estoy en el baile, no me queda otra que bailar.
Día 40
Los esquejes no estaban enraizando, así que decidí cambiarlos de lugar y los puse arriba de la luz, donde les da calor y luz tenue. Espero que ahora si agarren.
Y hoy fue el gran día, pasé la planta madre al módulo de arriba. Pero lo voy a dejar una semana más creciendo. De esa forma veo si los esquejes llegan a agarrar a tiempo. Y además tuve un problema en el trasplante. Primero que la planta se hizo más grande que lo esperado, y la raíz también. Cuando la pasé, hubo contacto de la raiz con prácticamente todo lo que había cerca. Sumado a que se enredó en el oxigenador, así que quedó una pidra difusora en la raíz.
Dado el alto riesgo de haberla contaminado con algún hongo, le puse una solución de agua con agua oxigenada, recirculando continuamente, para lavar las raices y de paso bajar el stress de teansplante. Mañana veremos cómo arranca el día.
En el aprendizaje me llevo que en la madre, es mejor hacer un corte en el primer nudo, o dejar las ramas del segundo y quitar las del primero. Y así que queden sólo dos ramas, para luego dejar a los esquejes en el medio. Eso planeo hacer con la próxima variedad.
Entre tanto ahora sólo me preocupa que la raíz no se haya contaminado en el traspaso. Ya en 8 días estaré pasando a floración si no hay esquejes. Si llegan a agarrar, habrá que dar unos días de crecimiento hasta que alcancen a la madre en altura. Pero ya está todo en definición. Ahora sólo queda esperar y seguir guiando a la planta. Ya tengo ganas de poner la próxima, pero falta bastante para eso. Tengo 10 semanas de flora, así que recién en 5 semanas voy a poner la nueva madre.
Likes
3
Share

@Lahuertacannabica
Follow
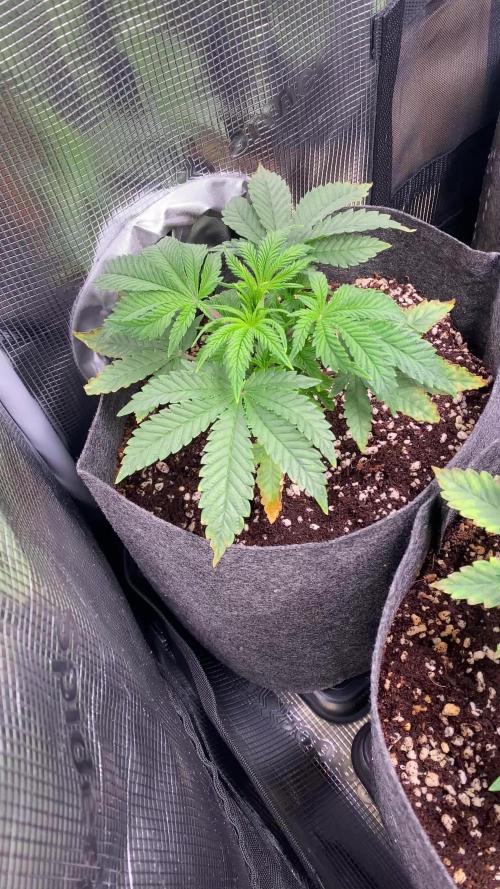
🌱 Seguimiento – Última semana de crecimiento (cultivo desde semilla)
Estamos en un cultivo con 10 plantas desde semilla:
4 plantas de Humboldt Seeds
6 plantas Permanent Marker – Philosopher Seeds
Durante esta última semana de crecimiento hemos aumentado la dosis de fertilizantes siguiendo la tabla de B’cuzz Coco de Atami.
Seguimos regando con un pH estable entre 5.9 y 6.0.
💧 Aditivos añadidos al riego
Hemos incorporado también:
Atazyme, para ayudar a la descomposición de raíces muertas y mejorar la absorción.
Coco Booster Uni, para estimular el sistema radicular y el vigor general.
Todo de nuestra marca de confianza: Atami.
💡 Ajustes en el cultivo
Ajustamos la distancia del LED para optimizar la intensidad lumínica.
Comenzamos a realizar un ligero croping en las plantas más altas para igualar el dosel antes de floración.
🌿 Estado de las plantas
Las 4 plantas de Humboldt están respondiendo muy bien por ahora.
Las Permanent Marker se muestran algo más delicadas. Puede deberse a:
Posible bloqueo de calcio/magnesio
Diferente sensibilidad al pH
O simplemente fenotipos más exigentes
Aunque sigamos una tabla, está claro que no todas las plantas comen igual.
Incluso la cantidad de luz que recibe cada una puede hacer que unas se estresen y otras no.
Reflexión
Esto es lo bonito de cultivar desde semilla:
cada genética y cada fenotipo siguen su propio patrón de crecimiento. Aquí empieza realmente la observación y la selección.
📸 Próxima actualización: últimos días de crecimiento y preparación para el cambio a floración.

Likes
22
Share


@J_diaz420
Follow
Todo normal, en esta semana comenzamos la dosificación de engorde para las flores.
También se colocó malla scrog, con la finalidad de usarla como tutor para ayudar a la planta a soportar el peso.

Likes
31
Share


@Kim_Jong_High
Follow
12/11/20 - Was slightly worried I had flipped too early, but the screen is filling out nicely!

Processing
Likes
22
Share


@Lion_of_Buddha
Follow
6/17/20: 15 days from seed. 11 plants look absolutely fantastic. 2 are a bit undersized, although they're probably the second wave of sprouters and are expected to be a bit behind schedule. 1 has twisted leaves and doesn't seem to be growing as well as the others. I moved one of the 6" clip-on fans into the tent yesterday to increase airflow. Discovered this morning that shutting the window of the grow room and sealing the tent completely with the humi set to midway results in a quite humid grow tent/room the next morning; RH was at 82% when I checked in!
6/19/20: Day 17. Watering day. I'm going to add 0.25 tsp of Dyna-Gro Grow to the mix. Maybe too early, but a little bell in my mind is saying "It's time!" Every plant is popping new growth, even the weird twisty ones. I think that means the conditions are dialed in and they're happy. I probably shouldn't upset the apple cart, and maybe this will end up being the place when I look back on this diary that will make me say "And that's where it all started to go wrong," but ... I just want to give them a tiny little kick. We'll see how they like it!
6/21/20: Day 19. Watered/fed again. Plants are crushing it since I started adding the DG!
6/23/20: Day 21. Conditions are getting a bit cramped in the Solo cups for a couple of the kids. I think a couple might get potted up today. Exciting!

Likes
7
Share


@Eaegifts
Follow
Topped her late in the week but mostly hand lst and then after adding the hydroton back to lst with a tie. Had to switch over to Botanicare from the Jacks 321 because I ran out but I may switch back for flower. Last week Veg yay!
Likes
37
Share


@DogDoctorOfficial
Follow
🌱 Germination Journey with Terpyz Mutant Mentha de Croco 🌱
Hey Grow Fam! Today kicks off an exciting adventure with Terpyz Mutant Mentha de Croco genetics. I’ve got 10 regular seeds ready to sprout, and I’m looking forward to discovering some beautiful female phenotypes—and maybe even a standout male for potential future breeding. It’s been a while since I’ve worked with regular seeds, so I’m thrilled to dive in!
Germination Process Overview:
Here’s a step-by-step rundown of the germination setup and process, with a special focus on the equipment and nutrients that are helping these seeds thrive right from the start.
Step 1: TheCannaKan Germination Pod 🌱
For germination, I rely on TheCannaKan—a device I’ve come to love and trust. It’s designed to create the perfect microclimate for seed germination, and within just 24 hours, the seeds started showing signs of life. By the 32-hour mark, they were all ready to be transferred to the next stage! I can’t recommend this gadget enough for anyone serious about getting strong, early growth from their seeds.
• Why TheCannaKan?
• Humidity Control: Ensures seeds stay hydrated without oversaturation.
• Stable Temperature: Maintains an even temperature around the seeds, so there’s no shock or stalling.
• Enhanced Oxygenation: Keeps fresh air circulating, helping prevent mold and ensuring seeds don’t suffocate.
Step 2: Transfer to Root Riots & Aptus Holland Supplements 💧
Once the seeds were sprouted, I transferred them into Root Riots, known for their excellent water retention and structure that encourages strong root growth. Root Riots also have a pH-balanced, spongy texture that makes it easy for roots to penetrate, promoting sturdy, healthy root systems.
At this stage, I started using Aptus Holland’s Regulator and Startbooster at 1ml/L each. Here’s why I chose these products for early growth:
• Aptus Regulator (1ml/L): Helps strengthen the plants against environmental stresses by supporting cell wall structure. It’s a fantastic choice for giving young seedlings an early boost in resilience.
• Aptus Startbooster (1ml/L): This product provides essential microbes and nutrients that stimulate root growth and early plant vigor. Especially for regular seeds, the early root development makes a noticeable difference in later growth stages.
Step 3: Lighting with Future of Grow (FOG) LED at 200 PPFD 💡
For lighting, I’m using a Future of Grow (FOG) 600W LED. For the germination stage, I’ve dimmed it to around 200 PPFD (photosynthetic photon flux density), which provides just enough light for healthy, strong seedling growth without overwhelming them.
• Why Low Intensity?
• 200 PPFD ensures that young plants aren’t exposed to too much light, which could cause stress or stunting. This level of intensity is perfect for encouraging healthy development without risking “stretching.”
• The FOG LED provides a balanced spectrum tailored to plant growth, setting up these young sprouts for success as they grow.
Step 4: Environmental Control with TrolMaster Tent X Controller 📲
For monitoring and control, I’m using the TrolMaster Tent X Controller, which lets me dial in every aspect of the environment to make sure these little ones have the perfect conditions for germination and early growth.
• TrolMaster Benefits:
• Precision Control: Adjust temperature, humidity, and lighting all in one place.
• Notifications: Sends updates in real-time to my device, so I can make adjustments as needed without being physically present.
• Consistency: Maintains stable conditions around the clock, reducing stress on seedlings and ensuring they’re thriving.
Grow Tips & Reflections:
Germination is one of the most crucial stages in a plant’s lifecycle. Starting with strong genetics like Terpyz Mutant Mentha de Croco, combined with a solid germination setup and the right nutrients, creates the foundation for a successful grow.
💡 Quick Tips for Fellow Growers:
• Hydration Balance: Don’t oversaturate! Moisture levels should be high enough for the seeds to sprout but not so wet that they drown.
• Light Management: A low PPFD for young seedlings prevents stretch and keeps nodes tight, preparing them for a healthy vegetative phase.
• Environment Consistency: Use a reliable controller like the TrolMaster Tent X to manage your settings, and consider monitoring tools for real-time adjustments.
Shout Outs to the Community:
Big thanks to Terpyz Genetics for these incredible seeds, Aptus Holland for their top-notch nutrients, Future of Grow for the stellar LED lights, and TrolMaster for the amazing controller. Also, shout out to all of you in the growing community—you make this journey exciting and filled with endless learning. Let’s keep growing and sharing together!
That’s it for the germination update! Next up, I’ll be monitoring growth closely to identify strong females (and maybe a standout male for breeding). Stay tuned for updates on our Mutant Mentha de Croco adventure—this is just the beginning!
Genetics - Mentha De Croco
https://terpyz.eu/products/menta-de-croco-fern-type?_pos=1&_sid=e9237cbcb&_ss=r
DogDoctorOfficial Discount Codes @ terpyz.eu - DOCTOR 15% off
Nutrition - @aptusholland
https://aptus-holland.com/
Led Power @ F.O.G. Future Of Grow
https://www.thefuturofgrow.com/en/online-store/BLACK-SERIES-600-p489093171
Controls @ TrolMaster
https://www.trolmaster.eu/tent-x
As always thank you all for stopping by, for the love and for it all , this journey of mine wold just not be the same without you guys, the love and support is very much appreciloved and i fell honored with you all in my life
With true love comes happiness Always believe in your self and always do things expecting nothing and with an open heart , be a giver and the universe will give back to you in ways you could not even imagine so
Growers Love To you All 💚


Likes
10
Share


@Barzenegger
Follow
I chopped the Glookies on day 70F, on day 74F I decided to chop the remaining GMO and Acapulco Gold. I didn't feed or water the last week as the soil was still pretty moist and I wanted to harvest soon-ish anyways, they faded quickly in the last few days.


Likes
8
Share


@skaterblasted
Follow
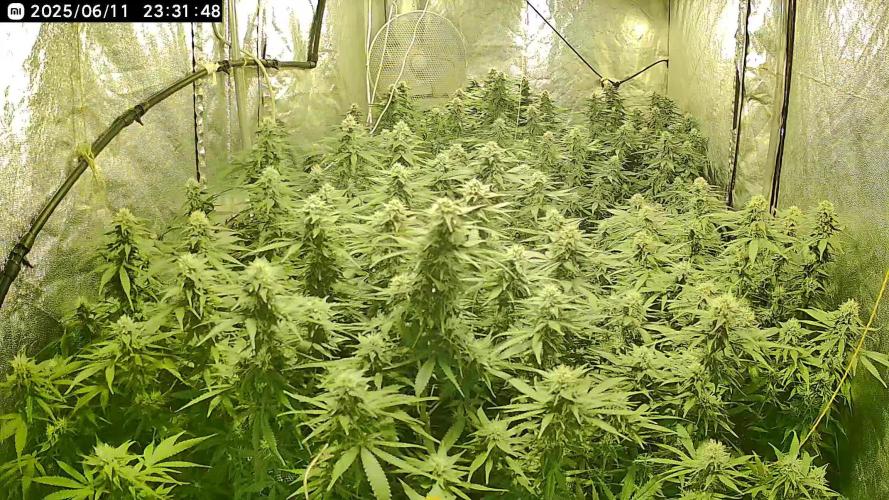
Days 99 - 105 (from sprout)
8/30/24 - 9/5/24
Raised light above canopy of The Good Shit - PAR on main tops is 800-700+ while remaining lowers are seeing closer to 450-500
Loompa's Headband x TK fading to a close this week - trichome check starting to show amber on the bracts
Sweet 16 S1 now starting senescence and a little fading on some fan leaves
The Good Shit showed signs of some overwatering, so a newly made FPE was added to feed schedule to assist the microbiology
Light schedule lowered to 10 hrs this week
IPM: Applied enzymes (tweetmint) at a rate of 0.5 fl oz to 1/2 gallon and sprayed on cover crops + mulch throughout the week. Significant decrease in pest population, now needs a high quality compost top dressing for long term correction



Likes
9
Share


@Smokey_J26
Follow
A nice bit of growth this week, one girl is shorter than the other 2, and slightly behind in terms of growth. Hoping to see a good spurt now with the first application of Evo 2.0 spray on day 25, abit more nutrients added and lights turned up to 400w. Onwards and upwards 🌱💯