


Likes
Comments
Share


@Atomik_water
Follow
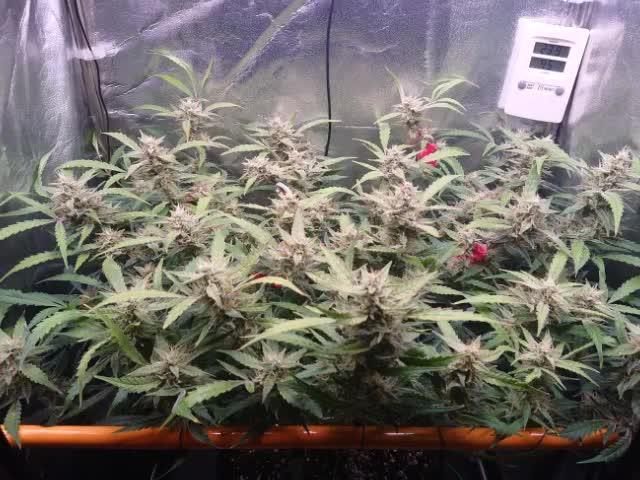
Week 9 – Late Ripening, Root Zone Reset & Canopy Management
Entering Week 9 puts us squarely on the home stretch.
Transpiration has noticeably tapered off as the plants wrap up floral development, which made the stubborn 6.7–6.8 runoff pH even more critical to resolve before the final flush.
With nutrient demand declining and runoff volumes climbing, I made key structural adjustments to dial in the finish line:
Eliminating the Silicate Buffer:
The root cause behind the elevated runoff pH was Silic Rock (potassium silicate). At this late stage, its strong alkaline buffering was continuously fighting the acidification and blunting the action of Athena Cleanse. I dumped the remaining reservoir and mixed a fresh 35 L batch (EC 1.0 mS/cm, initial pH adjusted to 5.4)—**completely cutting out Silic Rock** while maintaining a 0.2 ml/L dose of Cleanse for root and line hygiene. Dropping the silicate frees the root zone to sit naturally in the optimal coco absorption band.
Metabolic Shifts Under High DLI & CO₂:
The plants have been pushed hard under high light intensity and CO₂ supplementation throughout bulk bloom. Heavy phosphate uptake in prior weeks, coupled with an anion/cation exchange that pushes hydroxyl ions OH into the rhizosphere, left behind concentrated salt pockets in the coco core as transpiration outpaced nutrient consumption.
Canopy Thermal & Radiation Relief:
Looking closely at the main colas directly beneath the fixture's center, several top pistils showed early browning and heat stress. This was photo-oxidation from high PPFD rather than uniform trichome maturity. To relieve canopy stress and protect ripening calyxes, I raised the LED fixture by 10–15 cm, dropped ambient temperature by 2°C, and increased relative humidity by 2% to bring the VPD into a gentle, non-stressful range for the final fade.
Phenotypic Variances (Seed vs. Clone):
Operating four distinct seed-grown phenotypes under an automated dripper setup requires keen observation. Plant #3 developed a noticeably denser root block with slower drainage, requiring targeted manual top-offs to match the wash-through of the other three.
With the fresh, unbuffered reservoir locked in and light stress minimized, the canopy is cruising cleanly through Week 9 to finish cloudy and amber without salt buildup.

Likes
5
Share


@Wenz004
Follow
experiment explanation see week1
This week both different living soil experiments Tropicana No2 and No3 did not grow anymore...only the flowers got a bit bigger...especially No3
Likes
21
Share


@ClosetKing33
Follow
Held off on feeding for 2 waterings, as I over fed slightly and notices a slight yellowing in the leaf margins signifying a nutrient lockout/toxicity.
I flushed Media with Ph'd water and problem was successfully resolved ..
Then yesterday 11/5/2021 I watered in some "Instant Compost tea" lol... a.k.a (Real Growers) 'RECHARGE' 💦🌱🚀.
Before watering, I Top Dressed my media with 1 Tbsp./Per 3 Gallon container with 'AZOMITE'

Likes
84
Share


@TragicTerps
Follow
Easy harvest single plant super dense and honestly it couldn't have gone smoother. I am debating removing the popcorn bud or revegging it... either way the main tops were the biggest buds I've harvested yet covering my entire palm.
I will be growing this in the future I won't log the grow however. This pheno I believe is one of a kind and I likely won't be as pleased with a second run.
The sungro#4 I grew in was excellent too and honestly I am seeing the relation between quality and the medium being used. I will be using this medium for a while.
Until the final dry weight is In, Happy Growing and Happy Toking!
-TRAGIC OUT-
Update water curing was the best end result and will be the way I cure all my flower.

Likes
20
Share


@420DeepGrow
Follow
Gracias al equipo de Royal Queen Seeds, Marshydro, XpertNutrients y Trolmaster sin ellos esto no sería posible.
💐🍁Punch Pie:
Un híbrido monstruoso con un 90% de dominancia índica, ocupa uno de los primeros puestos de la lista de favoritas de Kid Dynamite.
La Punch Pie desciende de la Cherry Punch Pie de Tyson 2.0 y contiene la genética de dos índicas galardonadas: la Purple Punch y la Purple Kush.
Punch Pie tu paladar se impregnará con ricas notas de pastel de frutos rojos, repostería caramelizada y tierra. Luego, pocos minutos después de la primera calada, sentirás todo el poder de este portento. La Punch Pie proporciona un combo 1-2 que se manifiesta justo en medio de los ojos y derrite todo el cuerpo, dejándote en un estado somnoliento, hambriento y apacible.
Produce plantas compactas que alcanzan una altura de 80-110cm en interior y hasta 120-150cm en exterior. Tras 9 semanas de floración, esta señorita robusta crece con fuerza para soportar el peso de sus densas flores, y da cosechas de hasta 600g/m² en interior y 750g por planta en exterior bajo el sol.
💡TS-3000 + TS-1000: se usaran dos de las lámparas de la serie TS de Marshydro, para cubrir todas las necesidades de las plantas durante el ciclo de cultivo, uso las dos lámparas en floracion para llegar a toda la carpa de 1.50 x 1.50 x 1.80.
https://marshydro.eu/products/mars-hydro-ts-3000-led-grow-light/
🏠 : Marshydro 1.50 x 1.50 x 1.80, carpa 100% estanca con ventanas laterales para llegar a todos los lugares durante el grow
https://marshydro.eu/products/diy-150x150x200cm-grow-tent-kit
🌬️💨 Marshydro 6inch + filtro carbon para evitar olores indeseables.
https://marshydro.eu/products/ifresh-smart-6inch-filter-kits/
💻 Trolmaster Tent-X TCS-1 como controlador de luz, optimiza tu cultivo con la última tecnología del mercado, desde donde puedes controlar todos los parametros.
https://www.trolmaster.com/Products/Details/TCS-
📆 Semana 2:
Fantástica semana, estan creciendo de una forma espectacular gracias a la ayuda de @marshydro, @xpertnutrients y @trolmaster.
Se puede apreciar un tercer nudo aunque la aplicación de cola de caballo y el estar en una maceta pequeña ha influido en el tamaño de ella, se recupera muy rápido 😁.
Potencia de la lámpara: 50%

Processing
Likes
49
Share


@CBD_Sweden
Follow
2018-04-10 Day 1
I gave the girls water and nutrients yesterday so nothing to drink today.
Turned them 90 degrees today, to give my girls as much lightexposure as possible.
The flowers get bigger and bigger for each day,
Overall the ladies look really good, the colors are very nice, they look healthy.
I am a little surprised over the difference in size between nr1 and nr2, nr 2 is 21 cm taller than nr 1, and the flowerproduction is awesome. Not that nr1 doesn't look great - she certainly does - but still.... Nr1 is huge, she decides how much all other girls needs to be risen to get their canopys at the same height as hers. 👊.
Zombie Kush nr 1 is 68 cm
Zombie Kush nr 2 is 89 cm
Check out my latest videos 👌
-----------------------------------------------------------------------------------------------------------------------------------------
Strain information
From the selection of one of Ripper seeds first genetic search works, an old Lavender Kush clone was pollinated by brilliant Amnesia.
From there a clone that we named “Sideral” was selected and decided to pollinate it again later with Bubba Kush.
Its vegetative cycle should be generous if we want to develop the full potential of its Indica demeanor. With a low EC both in the vegetative and the flowering cycles we will get spectacular results.
Its purplish colour scheme and the great quantity of trichomes that cover its large flowers would make this strain a key one for Kush flavor lovers.
Vegetative: From 2 to 4 weeks
Genotipe: 20% Sativa / 80% Índica
Indoor flowering: 55/60 days.
Production: Medium / High
Effect: Powerful / Durable
------------------------------------------------------------------------------------------------
https://www.youtube.com/watch?v=G8sSHdfbu1g
https://www.youtube.com/watch?v=-Twzz8lBfEQ
https://www.youtube.com/watch?v=PnE5ixD9iTE
https://www.youtube.com/watch?v=bDyJXP4vEG8&t=906s
--------------------------------------------------------------------------------------------

Likes
203
Share


@yan420
Follow
🌈💐🍬🌈💐🍬🌈💐🍬🌈💐🍬🌈
Hi and welcome to another grow again from Kannabia we are talking about my second attempt at the strain Runtz Auto it's going to be a single plant diary and I'll be LSTing HSTing topping and pruning like last time.
Only difference is that I’ll be trying a different nutrient schedule this time to try and avoid pH fluctuations as much as possible as the last pheno seemed a bit sensitive on pH issues, so I’ll be keeping it more simple but maybe at a higher dose let’s see what she wants.
Thank you Kannabia for the chance to try out your awesome seeds 🙏🏻❤️
🌈💐🍬🌈💐🍬🌈💐🍬🌈💐🍬🌈
💭❗💭❗💭❗💭❗💭❗💭❗💭
❗Events"&thoughts worth noting❗
💭❗💭❗💭❗💭❗💭❗💭❗💭
23.10.24(GW)(morning)The little lady popped her head above ground.
23.10.24(VW1)(afternoon)Soaked her with (*1) again, I really hope I won’t burn her, what I’m doing is not advisable but I’m a greedy man I guess, it’s all or nothing 😉
27.10.24(VW1) Add 10ml TriPartMicro to (*1) and use at next feed.
30.10.24(VW2) in the clip I’m just strengthening the main stem for her future training and not just being mean😉
02.11.24(VW2) Add another 10ml of TriPartMicro and get it to 20ml and let’s see how she reacts, use on next feed✅.
05.11.24(VW2) Topp her and prune nodes not needed and start training preparations, add clay pellets up to the first node from the bottom that I’ll keep (if possible of course)📸✅. *part of training preparation👇🏻
05.11.24(VW2) Add another 10ml of TriPartMicro and get it to 30ml and let’s see how she reacts, use on next feed✅.
💭❗💭❗💭❗💭❗💭❗💭❗💭
🐝🌼🐝🌼🐝🌼🐝🌼🐝🌼🐝🌼
🌼Day to day tasks & actions🌼
🐝🌼🐝🌼🐝🌼🐝🌼🐝🌼🐝🌼
29.10.24(VW1) No water no feed.
30.10.24(VW2) fed with (*1) 3l
31.10.24(VW2) No water no feed.
01.11.24(VW2) No water no feed.
02.11.24(VW2) No water no feed.
03.11.24(VW2) feed 5l of (*1)✅.
04.11.24(VW2) fed with (*1) 1l
05.11.24(VW2) fed with (*1) 3l
🌼🐝🌼🐝🌼🐝🌼🐝🌼🐝🌼🐝🌼
🍶💦🍶💦🍶💦🍶💦🍶
💦Nutrients in 30l(*1) 💦
🍶💦🍶💦🍶💦🍶💦🍶💦🍶💦🍶
💦TriPartMicro: 0ml *10ml *20ml
🍶TriPartBloom: 0ml
💦 Fermented🌿juice:0ml
🍶GreenBuzzBloom: 30ml
💦Cal-Mag: 60ml
🍶buxXtrade citric acid Ph-
💦🍶💦🍶💦🍶💦🍶💦🍶💦🍶💦
⚙️✂️⚙️✂️⚙️✂️⚙️✂️⚙️
✂️Tools & equipment ✂️
⚙️✂️⚙️✂️⚙️✂️⚙️✂️⚙️✂️⚙️✂️⚙️
✂️➡️2xMarsHydroSP3000
⚙️➡️MarsHydro150mmVentilatorACF
✂️➡️Trotec (big) dehumidifier
⚙️➡️Small no name dehumidifier
✂️➡️Kebab stainless skewers 3 (LST)
⚙️➡️wire+roast beefskewers(LST)
✂️➡️trimming scissors.(HST)
⚙️➡️Waterproof vacuum cleaner for
✂️spills.
⚙️✂️⚙️✂️⚙️✂️⚙️✂️⚙️✂️⚙️✂️⚙️
🍭🍦🍬🌈🍭🍦🍬🌈🍭🍦🍬🌈🍭
🍦RUNTZ AUTO KANNABIA
🍬🌈🍭🍦🍬🌈🍭🍦🍬🌈🍭🍦🍬
🌈Seed:Auto Zkittlez&Gelato😋.
🍭Effect: Balanced
🍦THC: 20 %.
🍬Features: For beginners
🌈Flavor: Earthy, Floral, Sweet
🍭Complete cycle: 70 days.
🍦Average height: 100.
🍬Yield: 450-500 gr/m2.
🌈🍭🍦🍬🌈🍭🍦🍬🌈🍭🍦🍬🌈

Likes
8
Share


@Kirsten
Follow
The plant responded well to topping. There is a pencil shape to her, both tops very close together, so I used the clips to LST them in a move constructive direction.
Considering she is 3 days older than my Northern Lights, it's quite astonishing for me to see the differences between them.
I also went ahead and topped the two tops again. This time by rolling the centre heart out. Thereby eliminating the stress. I want to give her the best chance against my Northern Lights, as she has 7 tops now.
Watering with Ecothrive Biosys: .5g/2 litres.
I water 2 litres of dechlorinated water PH'd to 6.4, whenever the pot dries out. Usually about 3-4 days.
Looking good, if a little strange.
Thanks for hanging out 🍃 ✌️ 💚 🙂
Likes
14
Share


@BushDoctor740
Follow
Last of the 5 Papaya Cookies still going strong.Ive given her just plain water when the pot is dry.She is still showing some signs of new growth and has more time to develop.cut the last Papaya down trichomes were cloudy. I’m going to dry her a little differently than the rest.Im going to hang in small branches on hangers as I’m trying to avoid any molding on the big center cola.Drying at 67 degree and 62 percent humidity and she smells amazing.
Likes
6
Share


@weedhouse420
Follow
La floracion empezó a mitad de semana 4 y ahora en semana 5 se nota mas , 5 semanas contando desde germinacion exactamente .

Likes
27
Share


@MrJones
Follow
OSS Cheese XXL
🔹⊱╮🔹╰⊰🔹 GROW Started 03.10.24 INFORMATION 🔹╰⊰´🔹⊱╮🔹
🌞Environment - Maintaining 80F and 65%Humidity
🌾Training - These ladies are Pruned and Defoliated and ready for flower.
⚱️2-Gallon 📊6.2 PH
💧 Feeding - Using Horti Grow 8-11-21, Bloom 5-15-26, Late Bloom 0-24-26, Cal 12-0-0
🌞Medic Grow Smart 8 760 Watts
🕷️ IPM - CannControl from Mammoth and Mosquito Bits as needed
🔹⊱╮🔹╰⊰🔹 GROW Started 03.10.24 INFORMATION 🔹╰⊰´🔹⊱╮🔹
🌞Environment - Maintaining 80F and 65%Humidity
🌾Training - The girls are recovering from last week's Pruning and Defoliation,
⚱️2-Gallon 📊6.2 PH
💧 Feeding - Using Horti Bloom and Horti Cal 12-0-0
🌞Medic Grow Smart 8 760 Watts
🕷️ IPM - CannControl from Mammoth and Mosquito Bits as needed
🔹⊱╮🔹╰⊰🔹 PLANT UPDATES 🔹╰⊰´🔹⊱╮🔹
📝 Notes - On 🗓️05.11.24, This week, we are on Auto-Pilot and just Fertigating as needed; the ladies are stacking up nicely, and the leaves have grown back not sure if it is the genetics or the new nutrients; I would like to see less and will evaluate if more defoliation will be needed.
📝Fertigation injects fertilizers into an irrigation system to supply dissolved nutrients to crops.
🗓️05.11.24 Just feeding daily, sometimes twice; today, fed with Hort-Bloom @ 2.7 GRMS Per Gal and Horti-Cal @ 2.5 GRMS Per Gal.
🗓️05.12.24 Just feeding daily, sometimes twice; today, fed with Hort-Bloom @ 2.7 GRMS Per Gal and Horti-Cal @ 2.5 GRMS Per Gal.
🗓️05.13.24 Just feeding daily, sometimes twice; today, fed with Hort-Bloom @ 2.7 GRMS Per Gal and Horti-Cal @ 2.5 GRMS Per Gal.
🗓️05.14.24 Just feeding daily, sometimes twice; today, fed with Hort-Bloom @ 2.7 GRMS Per Gal and Horti-Cal @ 2.5 GRMS Per Gal.
🗓️05.15.24 Just feeding daily, sometimes twice; today, fed with Hort-Bloom @ 2.7 GRMS Per Gal and Horti-Cal @ 2.5 GRMS Per Gal.
🗓️05.16.24 Just feeding daily, sometimes twice; today, fed with Hort-Bloom @ 2.7 GRMS Per Gal and Horti-Cal @ 2.5 GRMS Per Gal.
🗓️05.17.24 Just feeding daily, sometimes twice; today, fed with Hort-Bloom @ 2.7 GRMS Per Gal and Horti-Cal @ 2.5 GRMS Per Gal.
╰⊰🔹╰⊰´🔹⊱╮🔹╰⊰🔹╰⊰🔹STRAIN INFORMATION🔹⊱╮🔹╰⊰🔹╰⊰🔹╰⊰🔹⊱╮
Cheese XXL cannabis seeds are a unique blend of Afghan Kush x Super Skunk, producing the most pungent dank weed. Cheese XXL is the third commercially available edition released by Original Sensible using and developing these Afghan and Skunk genetics. The first release of these genetics was their Skunk Afghani. The second improved version was Stinkin' Bishop, which had an enhanced and more potent THC content and was more intense in terms of smell. The third and improved release on a similar theme is this Cheese XXL, which has a similar THC content but an enhanced heavier yield. The smoke is incredible, with an outstanding flavor of pungent skunk and spicy, extra strong mature cheese created by the dominant terpene myrcene with its earthy solid scent accompanied by caryophyllene and pinene, which combine to create a peppery acrid cheesy odor. THC levels are exceptionally high in this Cheese strain, and the effect is well-balanced, developing mental and body relaxation with a remarkable alleviation of stress and depression.
The intense solid aroma starts early in the flowering period; if you're growing Cheese XXL indoors, you'll need plenty of ventilation to disperse these babies' stinky "road kill" aroma! Cheese XXL is a cheese strain suited to indoor setups and thrives outdoors well. These feminized marijuana seeds are incredibly resistant to mold and disease and produce a substantial harvest that professional and amateur growers can quickly achieve. These Cheese weed seeds are outstanding. Break open the buds ready for use, and you'll see why the stench will make your eyes water!
Cheese XXL from Original Sensible Seeds is a great choice to break into the commercial market of growing cannabis, so if you're looking to buy something special with extreme yield, potency, and flavor, Cheese XXL cannabis seeds are simply the best choice.

Processing
Likes
28
Share


@No_Clout
Follow
27/02/19 - This one is great, I popped the seed 24hrs after the gelato and this one seems to be developing its leaves a lot faster than the rest, so far really happy with DNA and with mills nutrients, it’s a lot easier to mix and I no longer have to use ph down because once all mixed it’s at a 5.8/5.9. 👌🏻
02/03/19 - Just transplanted all into their final pot, just in time I think as it looked like the roots were starting to circle at the bottoms of the pot, sprinkled half a tea spoon of Mykos on each hole prior to the transplant & fed them 2.5 litres each. I was going to saturate the whole pot but I’ll do that next feeding.

Likes
19
Share

@C17H19NO3
Follow
🇩🇪
28.09 (71) - 2l Wasser
29.09 (72)
30.09 (73) - 2l Wasser
01.10 (74)
02.10 (75)
03.10 (76)
04.10 (77) habe sie heute geerntet ✂️
Ende der Woche wird sie geerntet ✂️

Likes
5
Share


@Eljardindemargarita_grower
Follow
Buenas
Aquí en la 5 semana de flora
Las peques , van tirando y poco a poco vamos viendo cómo finalizan
No le cogí bien el punto a esta gama de nutrientes , van llegando algo justas a esta etapa
Ya tan solo iremos viendo , que amarillean bastante , pero bueno , no pasa nada , tendremos ,si todo acaba bien , buena cosecha ...
Mil gracias un saludo
Hoy os dejo un vídeo , que por cierto ,está también en mi perfil de YouTube...no dudéis en hecharles el vistazo
Mil gracias

Likes
10
Share


@StoneJackson
Follow
I’ve lost two of the four arms I was trying to save 😢 one snapped clean and the other is standing dead. No worries cause there is plenty left to take care of!
I’ve built a 4.8m x 4.8m x 3.0m enclosure and now that I’ve splayed everything out there’s barely any room to move again haha absolutely loving it 🌴
I’ve stripped a good 1.5m of bottom plant material clean of side branches and foliage partially for energy distribution and airflow but also partially to bring the obvious foliage above the neighbouring properties tree line now if anyone peeks over they should see a bunch of sticks instead of a forest of sticky :p
They are definitely in flower I think I’m at the end of pre-flower stretch. They’ve reached the top of the enclosure so I’ve pulled most of the tall arms over and I think they’ve stopped reaching meaning the next few weeks should produce some fun material to post up
Thanks everyone for following along
Likes
27
Share


@RDWCGrowing
Follow
1/20/2023- So much to do pre grow and over the next 16 days, absolute first order of business is that I have to take down my current Grow---TIMBER-- Then I have a list of things I have to get done in order to be ready to start this grow 1 Feb.
With that said
T - 2 days until start 48 hour Flush
T - 2 days until Start 48 hours of Light
T - 4 days until TIMBER!!!
Items that need to be done before 1 Feb 2023
1. I need to clean the tent out
2. I need to clean the equipment- Proper Sanitization between grows in Hydro is a must!!!
3. I need to get the hole in the ceiling above my tent repaired- For my last grow I had a deep sink installed in my grow room, to make Hydroponics a little bit easier and have a water source in the same room. The seals on the pipes they were installing broke and leaked through the ceiling causing some damage all the way across my grow room, I was already weeks into my grow and couldn't risk them working above my tent and it would have been very awkward positon for them to be working in as well, so have to get this done quickly between chop and germination.
4. I have to install my new light- I was using a Vivosun 4000 and for this grow I am switching up to a Spider-farmer SF 7000.
1/20/23- For this upcoming grow I am working with M/F photo seeds so I ordered 4 Sex determination kits. I recieved my my 4 Sex determination testing kits from Rimrock Analytics today. I will be using these to test my plants at week 2 of Veg so that when/if I take clones I know I am taking them off females. As well as I don't want to accidently pollinate my tent during this grow I am looking for big beautiful buds not seeded buds. :-)
1/24/2023- Harvest of current grow- Started at 2:00pm and finshed wet trim and firt batch into the freeze dryer.
1/25/2023- Next batch into the freeze dryer and cleaning all my equipment for this Grow.
T-1 Day until the workers are supposed to be here to fix the hole in the Grow Room.
T-3 days until I instll my new Gorilla Grow Tent and my New Light Spider Farmer SE-7000 for this grow.
T-7 Days until Start of Germination
1/26/2023- Harvest is done ran through the Freeze dryer and dry tim completed.
1/27/2023- Grow Room repairs completed. Hole is gone Letting the paint dry before I install the new tent.
T-2 days until Install the New Gorilla Grow tent and the new Light
T-3 days until I put the hydro equipment in the new tent
T-5 days until Germination
1/29/2023- Day 0- Final Pre Germination activities
Germination Start T-3 days
The paint on the ceiling was dry and it was time to finish prepping for Germination. I got the following items knocked off my list.
New 4X4 Gorilla Grow Tent is up and ready
New Spider Farmer SE-7000 Light is installed- Thanks Moony Grows for the suggestion and for the Code that got me some money off and free shipping (Moonygrows)!! I turned the lights all the way up to max and set the timer to 18/6 0600-0000. I will keep an eye on the temperature and humidity without my plants and see how hot it gets with the new light.
I put my Hydro system back together and put in 40 gallons of water into it, time to monitor for leaks the next few days.
I Setup my cloning machine for Germination Days 3-11
1/30/2023
let me break down the situation, ROOM in the TENT.. Enough said.. No really I tried putting my exhaust system up in the new tent with my new light, The light is so big corner to corner that it really didn't give me enough room for the lights be be raised, with the exahust hanging the buckets my plants are Starting in are 2 and 1/2 feet off the ground, great for plenty of room for roots but not so great for upwards space for the plant to grow. In a 6' 11 tent with the exauhst in side and hanging that only gave me a little over 4 feet of grow room to play with. My last grow if you saw my diary, anyone could tell I was struggling to keep the buds off the lights. No good, Since space was such an issue I was running my carbon filter inside on the ground but It really needed to be up sucking the heat out not shooting the cool out. With that setup I was sucking air through the filter and pushing it out the tent at a bottom exhaust hole cold out. Wasn't doing me any good for my heat. I was hitting temps of up to 85 degrees. I bought a portable AC unit and have been running it in the grow room to try and keep temps below 85 and I have had to lower the power on my lights during grow also not ideal.. With that said a friend of mine MoonyGrows (Check out his diary) took the time to look at my issue send me a picture of my grow tent setup with detailed instructions on how to suck the air out from the top but putting my filter and fan on top of my tent so no room issue and I am sucking the air out from the top where the heat is instead of pushing the air out from the bottom where the cool is... THANK YOU MoonyGrows For taking the time to help me get this straightened out.. Now I have room and I have the exhausts working right and now my temps with everything at 100% are topping out at 80 this dropped the temp by 5 + degrees at 100% max.
T-2 days until Start of Germination
Prepped my seed tray with humidity dome
Prepped my Rapid Rooter plugs. I Used RO water, and I added a few drops of Hydrogen peroxide to Oxygenate the water. I then PH balanced between 5.7-6.0 the same that they will be getting in the Cloning Machine and when they get to thier final grow pod. I perfere the 5.8x range and I hit 5.84 for these rapid rooters. If you want to see a complete video on the process HowWeedGrow has an amzing video that shows step by step how to do it and explains it better than I ever could including how to plant the seeds. Which I will cover when I get to that step on Wed. https://www.howweedgrow.com/how-germinate-weed-seeds-cannabis-rapid-rooters/
1/31/2023
T-1 day until Germination Start
All set and ready have my Rapid Rooter plugs ready to go have my seeds out.. Have my seed tray warming up tonight. Tomorrow morning right into the Rapid Rooter then strait into the tray. I will spray the dome to start the humidity in there.
2/1/2023
Germination Day!!
Let the games begin!
0600am Put the seeds into the Root Riots. And then put the seeded Root Riots into their first home the Seed tray. I have them under the light 24/7. Sprayed the dome
7:30pm Sprayed the Dome to keep humidity going on the dome.
2/2/2023
Day 1 of Germination
Sprayed the Dome in the morning
Sprayed the Dome in the evening
2/3/2023
Day 2 of Germination
Roots are starting to come out the bottom of the root riot plugs and the heads are slowly popping out of Number 4 just below the surface.
Afternoon- Number 4 has popped up
Evening- Number 3 has popped up as well. Happy Dance!!
2/4/2023
Day 3 - Germination
Surprise Surprise Surprise- all 4 have now poked their heads up.. Happy day!! 100% Germination succeeded.
Now major milestone to track is how many are female and how many are male.
I will take look at the roots this afternoon/evening and see if they have enough root to go into the cloning machine for the next 7 days before they go into their Hydro Pods.
Day 3 - Germination - Evening..
Roots looked good and they were tall enough to make it into the cloning machine.
Now that they are all in the cloning machine I have switched the lighting to veg state 18 on 6 off.
2/5/2023
Day 4 - Germination - Morning
All the Ladies (fingers crossed) looking great stretching nicely and look nice and green, Photo synthesis underway....
UPDATE!! After a very interesting POD cast on FSTS by Dr. Bruce Bugsbee from Utah University, I have shifted my lighting to 24 hours on through seedling and then I am going to shift to 20 hours on the rest of Veg.
2/6/2023
Day 5 - Germination
While Checking on my conditions inside the new tent last night, I found that the Humidity was down to 39 Percent. I added an AquaOasis Cool Mist Humidifier, the reason I selected this humidifier is that I needed one that could be turned on and off utilizing my Inkbird Humidity Controller IHC200 that I have my Pro Breeze Dehumidifier currently running with.
Root structures are starting to get there about 1/4 of an inch.
2/7/2023
Day 6 - Germination
Everything seems on track more roots poking out of each today. They are each getting a little taller as well.
Checked in the evening and number 3 was drooping the Root riot plug on the bottome was dry and the roots were not in the water yet. I raised the water just enough that the longest root that was sticking out is now hitting the water.
2/8/2023
Day 7 - Germination
Everything looked good while checking in on them this morning number 3 is now full up and no droop again.
2/9/2023
Day 8 - Germination
T-2 days until Plant into Forever Pods and we start week 1 of Veg .. :-)
Surprising thing to me is that number 1 and 2 were later in popping then 3 and 4 but the roots are growing longer in 1 and 2.
2/10/2023
Day 9 - Germination
Number 1 and Number 2 are definitely ready for transplant today.. Based on how they were yesterday and where they are today I am hoping by tomorrow 3 and 4 are ready. Today they look to me where 1 and 2 did yesterday.. I really hope 3 and 4 catch up by tomorrow since..
T-1 day until transplant to new/ final home for grow.
Need the roots long enough to have some clay down in the basket to keep the root riot out of the water and only roots in the water..
2/11/2023
Day 10 - Germination
Today they got placed in thier forever Home, 7 days from Sprout and 7 days until Week 1 Start.
PPM- 180 this is water out of the Tap
Temp Water: 70.7
Temp Tent: 77
Humidity: 40% I have a humidifier going 24/7 to try and bring this up.. I also have Humidity Domes on each plant.
2/12/2023
Day 11 - Germination
Sprayed the domes, all are looking good.. Nothing much to do at this phase but Keep monitoring the PH level in the system and making sure they have a comfortable home.
T-6 days until Week 1 start
2/13/2023
Day 12 - Germination
Sprayed the domes, They were looking a little yellow today so I moved the light down to assist. Nothing much to do at this phase but Keep monitoring the PH level in the system and making sure they have a comfortable home.
T-5 days until Week 1 start
2/14/2023
Day 13 - Germination
Sprayed the domes, They were looking a little Florissant yellow today, with what looks like slight burn on the tips, I talked with a fellow grower and we agreed that It was probably that I was drowning them, Yes you can drown you plants even in Hydro, but only early on.. :-) It usually happens with the water being too high, which soaks not only the roots but the medium (root Riot plug in this case). I lowered the water from touching the bottom of the pot to about 1" away. This will probably take 3-4 days to resolve. I will continue my daily monitoring.
T-4 days until Week 1 start
2/15/2023
Day 14 - Germination
Sprayed the domes, continue my daily monitoring they look a little darker green instead of lime green now that I lowered the water levels in the system, so I think that I might have resolved the issue but it will take a few days for recovery to happen.
T-3 days until Week 1 start
2/16/2023
Day 15 - Germination
I looked in on them this morning, 3 and 4 look like they are doing well and recovering nicely. Number 1 not so much it has brown spots on the leaves, this very well can still be a side effect of the overwatering but I decide to go ahead and add Nutes earlier than I was planning just incase. I was going to wait until Saturday but I think intervention is necessary now especially after drowning them early on.
I added 1/2 what I am planning on adding for week 1 start. I also think I am going to adjust my chart to add 1/2 2 days after plant from now on. I don't think it would hurt it to have some Nutes to pull from.
.25ml/Gal Calmag = 12.5ml
1ml/gal GH FloraMicro= 50ml
1ml/gal GH FloraGro = 50ml
1ml/gal GH FloraBloom = 50ml
T-2 days until Week 1 start = I will drain the system and start it over on Saturday with Week 1 Nutes.
2/17/2023
Day 16- Germination
I didn't even want to post today after looking in on them this morning, 3 of the 4 are now showing signs of dronwing.. Brown spots on the leaves, the water levels were still too high.. I drained about another inch out of the tanks.. Will see how quick they recover.. I start week 1 tomorrow and will have to ensure my water levels are at least 1" away from the basket on this round.


Likes
6
Share


@CanarianGrow92
Follow
Perfect strain to grow, easy, fast and sweet as sugar totally covered in trichomes.
The plants showed a very equaled and stable genetics and are very generous with a little care, this strain is almost like walking directly into a dutch candy shop with all kind of winegum smells, simply perfect.

Processing
Likes
35
Share


@hornato420
Follow
Week 9 their wasn’t any real changes. Everything is on par with week 8. Girl #1 looks like she’s starting to gain some more weight. I’m satisfied with her progression so far. Girl #2 still hasn’t shown any flowering. I will keep It short this week. Nothing really to report. I’m excited for the next coming weeks. Thank you for viewing my diary.
Processing
Likes
17
Share


@Hoodoo
Follow
2020-06-21 DAY 1 of flower! New week, new nutrient schedule, I kept the PPMs high and changed the ratio. I've tried to keep the 2nd plant on the same nutrient schedule but I had to dilute it within 24 hours because PPM was rising. It seems to have stabilized now. Starting EC = 2.0/1.8 and ppm= 930/880 and pH = 6.0. Added a new dehumidifier but it's totally raising the tent temperature almost 4 degrees F!!! I am in the process of setting up my recirculating system so I can take soon put the reservoir/dehumidifer outside in the same closet, just gotta take out the mini fridge.
2020-06-23 The girls are drinking like crazy! They are drinking much faster than normal so I am topping up with 1.1 mL/L calimagic instead as they still have a ton of food! pH still sinks from 6.0 to 5.5 over the course of 4 days or so but that seems normal for my setup. Threw up a video so you can get more perspective! I now have 3 different dehumidifiers running. There's a small 500 mL one inside the tent which raises temp about 2 degrees F at all times. I have a compressor dehumidifier outside the closet pulling in litres of water a day. I also have a big AC unit with a dehumidifier function that is draining into a 5 gallon pail. I am pulling GALLONS of water out of the air in this room and i've had to close the door to maintain it. Sorry, roommate! No AC unit for you.
I had to do some SUPER CROPPING and bend some of the main stems down on plant 01. It was growing way too quickly in the last 2 weeks. I'm hoping the change in nutrients will promote flowering instead of such rapid height!!
2020-06-27 I keep having to super crop, the plant is so damn resilient, it fixes itself in 1-2 days!! What the hell!! I have reduced the feed going forward for next week. 1000 ppm was too high, I ended up having to top up with fresh water + calimagic almost every single day because it was drinking far too quickly.
I will lower to 800 ppm for next week but maintain the same ratio. Root system is looking ROBUST on both plants!
