
Processing
Likes
Comments
Share


@Kushizlez
Follow
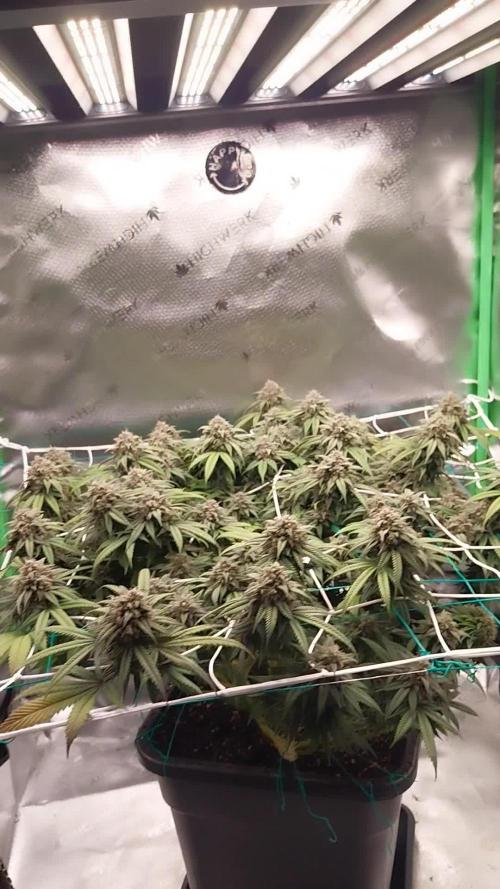
Day 40-47 (May 31st- June 7th)
(Day 41) For the first time in this grow these plants are looking halfway decent. Smell is ramping up too. I finally feel optimistic about this grow.
(Day 42) The two jacks and the chunky blueberry are showing early signs of N/Mg deficiencies. I know it’s late in flower but since I’m experimenting with this tent, I’m going to give them one final feeding of nature’s pride 2-5-5.5 (tbsp) along with a teaspoon of oyster shell flour and some rock dust. Everything else I’m going to give a teaspoon of rock dust and oyster shell. There is no way these amendments will fully break down in time to be used by the plant but they could at least use the pH buffering and trace amounts of minerals after their recent leach.
Everything but the BAOGC is covered in pistils that don’t really match their bud size. I hope they fill into their pistils because an over abundance of hairs drops the bag appeal like crazy.
Over the last few cycles, indoor and outdoor, I’ve definitely learned that different strains and phenotypes mature at different times. Sometimes really radically too.
(Day 43) None of the plants are fading at all but they’re still looking good. Black garlic I know should be fading but remains dark green and toxed. I popped a developing seed out of the main bud too. I wonder if that blueberry herm branch pollinated it at all. It seems like plants don’t really like that Destiny dark matter soil by itself. I find it works better mixed with coco or promix 1:1.
(Day 44) I’m starting to think I might be mixing up the TWOG and BAOGC. BAOGC took forever to fatten up last round and the 2 phenos I suspected already look done. I was thrown off by the similar terps. The beauty phenos are definitely TWOG
(Day 45) God these Jack Herer’s smell good. Nothing but fruity funk. Almost like a vanilla or blueberry yogurt. I would say this stuff has the most overpowering smell in the tent now. I’ve noticed they’re starting to foxtail like crazy. Blueberry#1 too.
I’m watering a final low strength feeding of seaweed extract on everything.
(Day 47) Everything really fattened up this week. Even at the beginning of the week I was saying I didn’t think they would fill out. Jack Herer and BAOGC specifically made some big gains and nearly doubled their density and still have quite a way to go on them too! The smell has ramped up and finally, everything is looking happy and healthy.


Processing
Likes
6
Share


@ganjaman24
Follow
Just got a new 600w mh/hps light for now it’s in my current setup with my 250 n it’s dimmed to 50%, only reason I mention is b/c the plants seem to be loving it!! They’re 12 days old from seed, still just ph’d water for them! So far so good :P


Likes
102
Share


@Aleks555
Follow
Dear team TrolMaster Europe,
We would like to express our sincere gratitude for providing us with the Tent-X controller. We are delighted with its functionality and performance! We are confident that this controller has significantly aided us in our journey with our beloved plant Jealousy from Zamnesia.💪🤝
We were pleasantly surprised by the efficiency and ease of use of the Tent-X. It seamlessly integrated into our plant care system and helped us achieve incredible results.
Once again, thank you very much for your support and high-quality equipment. We are immensely satisfied with your product and hope for long-term cooperation in the future.
Today marks the end of our journey with Jealousy from Zamnesia💚, and we want to express our heartfelt gratitude to Zamnesia for their support throughout this entire journey. We also want to extend our thanks to Plagron for providing us with their high-quality fertilizers. Their products are not only effective but also incredibly easy to use. We highly recommend them to everyone!

Likes
2
Share


@NocturnalGardner44
Follow
Flipping now, light training trying to maximize horizontal space

Likes
18
Share


@GYOweed
Follow
Result was on par to breeder descriptions. High yield for a lanky sativa. Bap will help stretch and density a lot on this strain at flip.
I have to grow my last seed outdoors and breed it with another nasty sativa like sourD muahahahaha


Likes
18
Share


@eldruida_lamota
Follow
Buenos dias familia. De nuevo por aquí, dejo hoy la actualización de las northern light xL , buen crecimiento, tendremos que empezar a darles más comida para la 3 semana, ya que algún ejemplar marco carencia de N.
Por lo demás todo bien la temperatura no suben nunca a 30 grados ni baja de los 20 y la humedad no aumenta de los 55%.

Likes
49
Share


@masterofsmeagol
Follow
5/3 WATERED EVERYTHING WITH A SHOT GLASS. STUNTED PURPLE PUNCH THAT TOTALLY SRIED OUT GOT HALF A SHOT GLASS. Doesn't seem possible but the plants look bigger and better than
they did yesterday. Cups are really drying out fast. Takes a while for it to drink up that little shot glass of water. Sits right on top for a while. I know they'll tell me when they're ready to transplant but I'm planning about a week week and a half until transplant to the 3's. I'm moving my cage and getting supports setup ahead of time. Soil is properly stored. Need to sanitize grow bags and tools. I'm super excited for this year. At least this year I don't have to start out fixing others problems from clones.
5/4 Plants still continuing to grow at a rapid pace. Stunted purple punch is doing better. Plants seem like they are using more water. Soil seemed dry. Ill stop qnd ask my buddy but everything LOOKS awesome.
UPDATE: I stopped and showed my buddy some pictures and videos and after getting some advice I'm considering increasing water intake on the 10th planet and the blueberry cheese. He said I could go up to 1 1/2 shot glasses or even two and he didn't think I'd see problems. Just watch for run off. I figured I'd weigh the dry cup of soil and see what the other plants weigh before I make my decision. This dude has definitely helped in the past and hasn't been wrong. I think either way it would be fine. I got a QUICK peak at them around 3pm and they were all "praying to the sun" and their was company so I didn't weigh the plants considering in that glance they looked even better than before!
5/5 SOMEWHERE HERE I MESSED UP THE DATE AND I CANT SEEM TO FIND WHETE SO IM JUST CORRECTING IT HETE AND MOVING FORWARD. I weighed a dry cup of soil which weighed about 180-190 grams today. One of the 10th planet seedlings weighed in at like 190 so they definitely are getting a dry cycle and need more water. Same with the Blueberry cheese. They were light and are growing like crazy. Thing is they look so perfect I don't wanna change anything. I spoke to my commercial buddy and he said I could increase to two shot glasses without issue he thought. I decided on a shot glass and a half for the 10th planet and Blueberry Cheese Cake. I talked to another grower (my buddies mom whos very familiar with the strain) about Barney's purple punch and I guess they look good and take a while to really "take off". When I weighed some of the purple punch the weight of a small plant was in the 220's. I decided to try 'half a shot glass' instead of a full one for the purple punch.
UPDATE: I watered between 5am and 6am and went to check around 11. It's 11:11 right now! I wish for a successful harvest and healthy plants! This morning the plants seemed a little droopy. It could've been in my head but looking at them after watering and they look substantially better. Leaves up! Praying to the sun! It's not going to be long until the 10th planet and Blueberry Cheese will need to be transplanted. I just want to make sure I've got a solid rootball before I even think of transplanting.
5/6 WOW. Adjusting the water made the plants take off faster! I felt the cups and they want more room! Unfortunately I left my soil in the garage. I'm wondering how long it will take to warm up otherwise these girls would be on their new temporary 3 gallon homes. Purple punch REALLY took off. Might be good to give the soil a day or two to warm up. Tomorrow's my wife's birthday though....hope she likes transplanting cannabis....that was a joke.
UPDATE: I sanitized a tote and mixed 3 part soil fox farm ocean forest, happy frog and 707 in a bin. I then chose the blueberry cheese cake to test for transplant. I was afraid plants were dry but I stupidly went ahead anyhow. I tried the cut the solo cup method and it wouldn't cut down all the way. Anyway u thought i lost that first one but I didn't. Not yet anyway. 45 mins later and they looked great. Still I had put everything away and decided to give the others a few more days. Plus my wife's birthday is tomorrow. I did get some outdoor prep done.
5/7 NO TRANSPLANT SHOCK. All 5 blueberry cheese are in their new homes and loving it. It's my wife's birthday so I'm gonna have to wait until tomorrow to transplant the 10th planet and maybe a couple more for the purple punch. We'll see. Watered the plants in solos. Purple punch got half a shot glass. 10th planet got a full one. Soil should be nice and moist for the transplant. Oh and that ripping the solo cup tip sucks. It NEVER goes all tge way to the bottom and it's like thicker or something down there. Important to have slim scissors or something to snip that tiny bottom piece at the end where it tapers.
5/8 Blueberry Cheese Cake is doing great and doesn't seem like it has any stress. Didn't water. Successfully transplanted 10th planet. Nice white roots. Looks like it's going to be a good year. More wotlrk to do.
5/9 10th planet is looking GREAT! Transplants have gone great this year. Purple punch will be transplanted tonight or tomorrow. I watered the purple punch with less than a shot glass. I'd like to get them transplanted today. I have an idea this is going to be a good season.
UPDATE: Went to the house around 6 and brought in a couple more bags of soil so that I can finish my transplants tomorrow. Team #nowater lol seems to be doing great lol. I'll give then water tomorrow. As long as they aren't doing so good. With everything that's going on seeing these succeed feels great. Healthiest plants I've grown so far.


Likes
60
Share


@Dirty_Hippy
Follow
Week 8:
She just keeps growing!!!
I trained this into two main tops and it really decided that it would use all of that space.
The smells coming off htis lady have me drooling.
It is 2nd most sweet and fruity boquet I have ever smelled.(Cherry Sumo was #1)
Really excited for this lady to come down.

Likes
74
Share


@AsNoriu
Follow
Day 48. Very busy week for me, this weekend I'll make a plan and we will see were each girl is ...
Till then only pure water all week.
Girls are starting to pump up and maybe I'll have 2 ounces from half of the plants, that's a lot better than my first view after holidays was ...
There is one problem too, as seen in photos, one Lemonade OG in stucked in veg mode, her sister is second biggest plant in all tent after FB Strawberry Pie. Hope she will catch up others soon ....
Happy Growing !!!


Likes
11
Share


@TerpyTears
Follow
Nice to see you 💚
The Fat Monkey is developing well. The flowers are developing and I'm really excited to see how it goes on hope it has a lot of the watermelon zkittles 😅
There was Enhancer 1g/l water. So that the solid fertilizer is released even better with extra bacteria and Trichoderma in the substrate.
I love GHSC Bio line
Thank you very much for your time 😊✌️💚


Likes
18
Share

@TheBloomer1
Follow
Leider ist mein Handy kaputt gegangen.
Berichte folgen in Kürze..
Ich bitte um Verzeihung..💚💚💚


Likes
19
Share


@ArtisticGrown
Follow
Hello I hope every one is dooing good! We are here going into week six of flower. I'll be honest this plant here has been teaching me a lot I've gaven her the name once of "patience" because thats one of many things i'm learning and working on in life s well. I do believe there is a balance with life and life in your tent or garden we will say.
I made some mistakes trying to weave this plant in the trillis, as there is no neeeeed!! ahhh silly me. Its okay we are learning here,at this time im mainly focused on having a good environment in aspects of temperature, humidity,vpd. Im looking for a vpd of 0.80 to 1.5 some days we hit a sweet spot others not so much but I do what we can to control humidity in the tent. I have a small dehumidifier currently. its helping bring down the humidity, seem to notice the hunmidity rising after I water so I leave the tent open for a while, also have a duc fan blowing air in at the bottom of the tent, so great circulation going on...
oh my we are doing good tho!!! loving this grow this plant ther GENTICS omg i cant wait to see this thru!
I am giving hr some new nutrients to add to the line, starting in week six. I am giving her 2ml per liter of water of tastey terpenes from advanced nutriennts. starting to see thrichomes development. excited to see these flowers get thicker and sweeter much love happy growing!!! lets go Guava
Likes
9
Share


@Piorkeed
Follow
Week 8 (13/03 - 19/03)
During this week I will continue to feed the plants mainly with Bio-bloom and Top-max, I will add a bit of Bio-grow every two watering days. The past week the Fat banana #2 starts to show some yellow leaves starting from bottom. Parameters remains the same of previous week.
13/03 D50: -
14/03 D51: added 3ml of Bio-bloom and 2ml of Top-max to 3 liters of tap water.
15/03 D52: -
16/03 D53: added 2ml of Bio-grow, 5ml of Bio-bloom, 4ml of Top-max and 1ml of CalMag to 3 liters of tap water @ pH 6.3
17/03 D54: -
18/03 D55: watered with 1liter of tap water each @pH 6.4
19/03 D56: added 1ml of Bio-grow, 4ml of Bio-bloom and 3ml of Top-max to 3 liters of tap water @ pH 6.2


Likes
21
Share


@Cardiffgrown
Follow
Only the gorilla glue from fast buds made it smells danks think I need more direct light next year i did have a tantrum when I saw most of them died so haven't bothered going up for this since then


Likes
39
Share


@Hazecat_420
Follow
Aparecieron unas pequeñas manchitas en las hojas más viejas, se realizó el trasplante a maceta de 5 lts y se regaron foliarmente con Knactive por estas hojas amarillas que comenzaron a salir y para que tomaran de buena manera el trasplante. Seguimos ... Pronto se viene la floración