
Likes
Comments
Share


@Kushizlez
Follow
Day 28-35 (May 28th - June 4th)
(Day 29) My rooted blackberry #3 clone looks like it’s finally starting to reveg. It’s starting to stretch it’s internodes but no new growth yet. Nearly all 9 are pushing roots now. What a waste of time taking clones in flower! Won’t ever do that again.
Grapefruit #1 has a twin! I thought it was just an odd formation on the taproot but two seedlings are pushing out. I wonder if it will be genetically identical. It’s definitely slower growing than the other one so who knows. I will try to train them apart when the time comes.
(Day 30) I think the EC/PPMs are too high on nearly every plant including my veggies. The promix is actually really hot for a “blank” medium coming in at 1800. Adding compost and amendments to that is probably raising it to 2500+ at least. It should self balance the more I water it but I know for a fact I can get better growth by leaching the soil around each plant. Next time I use promix for anything, I’m going to prewash it like coco coir and add a dash of oyster shell flour for pH and calcium.
(Day 32) Purple tuna is now big enough to start lst on now. I’m going to wait a little while for the slurricanes.
(Day 33) One of the grapefruits has a twin that actually popped... I’m going to leave it and see how she turns out
(Day 35) I’m going to prune off the lower leaves on each plant. I was going to lst Purple tuna but it’s so vigorous I may as well just top/mainline it.
Autoflowers are looking established and should be taking off this week. I wonder if this will give them enough time to veg into decent sized plants before they flower. I won’t be topping or even doing lst. My goal is 22 big spear colas from each plant.
I’m going to get all my rooted clones into 1.7 gallon pots over the next week or so.


Likes
2
Share


@TTerpz
Follow
Start of week 6!!
One more week until flip
All pits have been brought back up to ph range in the 6s

Likes
12
Share


@GREENPHOENIX6262
Follow
Week 1 Flower 09/04
Everything is running smoothly
Introduced NPK Phosphorus - Potassium
Scrog net dropped - Flowering evenly.
Veg nutes stopped.
*Mimosa (1&2) end of week recap -09/09
Both plants are in early flower and proceeding accordingly.
Nute feeds remain the same.
Plants have grown in height approximately 5inches.
Moderate defoliation on the bottom half of both the plants
Will LST to trellis next coming week.


Likes
46
Share


@Chubbs
Follow
420 Fastbuds Week 3
Gorilla Punch Auto
What up grow fam. This week has been exciting seeing one of them really start to stretch and the other is staying super short stacked really tight. Both appear to be healthy I might add a little cal-mag to the next feeding if starts to worsen. Other then that will keep up the same routine.
Happy Growing
Likes
27
Share


@AsNoriu
Follow
Day 79 since seed touched soil. Found some bud rot on other strains yesterday, so made early chop for #2 and #3. Both needed time, #2 needed like 3 more weeks, would be huge ;)))
Day 112 since seed touched soil. last one is done. Ganja Farmer 2024 project is over.
Happy Growing !!!

Likes
9
Share


@Lapolda
Follow
Hello to all growers.
This week has been quiet.
Otherwise, I am very satisfied, a beautiful big and thick mallet 😍
Just water, I think it will be ready in a week.
Keep it growing friends 👊🌱🌴


Processing
Likes
15
Share


@GanjaFarmerGrow
Follow
Big Seedbank had delivered some great genetics..
She is going the best out of all the plants...
really long branches but a lot of pulp flowers already...
She still has easy a month to go and already she looks amazing...
Feeding as planned..
fingers crossed 🙏


Likes
12
Share


@Lazuli
Follow
I fill a reservoir with 25 liters rainwater
Then i add 10ml ph up
Then i add 25ml calmag
Then i add 30grams drypart bloom
This way the ph is perfect and the plants have all they need.
This scedule also works for soil, just add 15ml ph up instead of 10.
*if my kids ever need help with growing and im gone:
The scedule above is what i use from start to finish on all my plants, autoflowers and photoperiods
(ofcourse half strength first 2 weeks)
Likes
9
Share


@Willy_Balls
Follow
Beautiful , hope there is not much seeds. I used some crop steering this round for the first time. I will refine it in the next round.
I've tried a advanced nutrients sensi bloom professional in powder. Part A do not dissolve fully. I've had sediment shooting on tank for week and not dissolve. Also when I tried to make some stock solution. There was a lot of white powder on the bottom of the bottle after many days. Even though I've shaked the bottle every day. I think it's unacceptable in this day and age to sell something like this.
Likes
10
Share

@GardenerAP
Follow
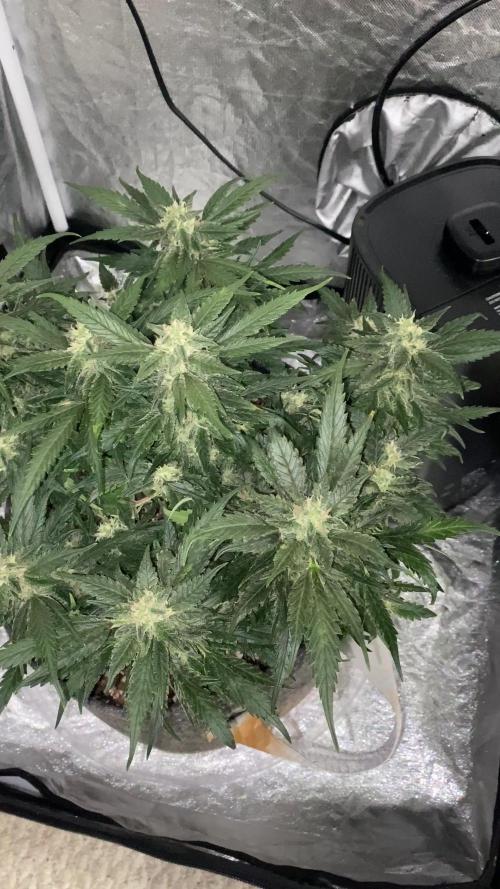
She is still bulking. White pistils are starting to turn brown. She is starting to smell sweet with citrus notes.
Likes
57
Share


@Ultraviolet
Follow
The cannabis strain Grape Guava can be a purple strain, depending on its specific phenotype and genetic makeup. While not all phenotypes of Grape Guava are purple, some variations, such as the Zatix Grape Guava, are noted for their striking purple appearance due to the genetic expression of anthocyanin pigments.
Grand Cru Genetics is a cannabis seed bank that emerged in 2018 from a group of breeders in Madrid to provide a satisfactory experience to all cannabis users.
"If we do things, we do them well. Due to our experience in the sector and our taste for excellence, we know high quality and we seek it in everything we propose and do."
"We have a “cultivate without giving up” philosophy that we apply to everything we do. We do not give up, we are friends of change, and we adapt as necessary in a still restricted sector."
"We speak relaxed because we know how to relax. We are not intense or preachy; we accept everyone as they are, and we understand that farming is not for everyone. But for those who do, we are here to accompany you. We like to do it and tell it. We are experts in the field because we are the first to do it. We speak from experience and connect with others because we share the passion for cultivation."
"Cannabis has the ability to show us a world of possibilities. When you cultivate and live its growth process, you enjoy a path full of emotions and not just the final destination. At Grand Cru we find beauty in small things. We are attentive, observant, detail-oriented and aware of everyday things, and we savor them without rushing."
In a garden of green, Grape Guava gleams,
With its fruity aroma, enchanting dreams.
Clusters of grapes, guava's sweetness ignite,
A strain so divine, in purple and white.
Euphoria whispers, a lush fruity haze,
Grape Guava's embrace, a tranquil daze.
Off and away.@1400ppm. The increased CO2 allows plants to thrive at higher temperatures, which in turn necessitates higher humidity to maintain the ideal VPD for healthy growth and transpiration. 80F -5F = 75F LST with 70% RH = 0.72 kPa. Higher temperatures and humidity promote rapid growth, nutrient uptake, and photosynthesis while maintaining a lower stress level. Temperature influences the rate of enzymatic reactions involved in aerobic respiration. Enzymes, such as those involved in glycolysis, the Krebs cycle, and the electron transport chain, work most efficiently at an optimal temperature range. In low temperatures, enzymatic activity will slow down, thus reducing the rate of aerobic respiration. In high temperatures, enzymes can become denatured, thus impairing their function and stopping the process of aerobic respiration. Glucose is the primary fuel for aerobic respiration. The rate of aerobic respiration increases with the availability of glucose, as it is the starting point for glycolysis. If glucose levels are low, cells may rely on alternative energy sources such as fatty acids or amino acids , but these processes may yield less ATP or be less efficient. To determine this effect, carbon dioxide volume was measured (as carbon dioxide is an output of aerobic respiration)
18/6 with the 6 being IR. The near infrared (IR-a) borders around 700nm up to 1400nm @ photon par flux density of 1.8 instead of darkness, keeping temps overnight a neat 77F-80F.
I think of my tent as a lung. What goes in must come out. When the rate of air going out exceeds the amount of air coming in, it creates a negative pressure. Tent concaves (bends in). If set up correctly, the RH will begin to drop slowly to the desired level I set, and the extraction turns off when it reaches the desired RH. The plant, as it performs cellular respiration, will always release more water into the air; therefore, the RH% of the tent overnight will increase, as long as oxidative phosphorylation is occurring. As soon as the RH% creeps back up to 55%, the extraction turns back on, over and over. This creates a strong pressure differential, which will work wonders with mass flow. Replicating high and low-pressure fronts in nature. Critical for oxygen diffusion at the critical time of peak cellular respiratory function..
Moisture will not transfer from a saturated atmosphere to another if that air is already at or above its saturation point, meaning the air can't hold any more water vapor. Once I understood that water is produced as a by product during cellular respiration, specifically at the very end of the electron transport chain (ETC) where electrons are finally transferred to molecular oxygen, the higher the RH of the air, the more resistance there is for more moisture to be added to that environment, and effects the ease with which it does so. But none of that water comes from the pot; it's pulled from the air. If you run high daytime RH, your medium/pot is 100% reliant on transpirational root pull to move water. ZERO evaporation happens across the atmosphere if the tent air has high RH%, the medium cannot release its water through evaporation. Once a canopy develops, light no longer slowly wicks and evaporates from the topsoil. The Soil-Plant-Atmosphere Continuum (SPAC) describes the continuous pathway and process of water movement, driven by a gradient in water potential, from the soil, through the plant's roots, stem, and leaves, and finally evaporating into the atmosphere through transpiration. There is evaporation, there is transpiration, and then there is evapotranspiration; Evapotranspiration (ET) is the combined total of two processes: evaporation (water lost directly from soil and surface water into the atmosphere) and transpiration (water released from plants to the atmosphere through their leaves). Evapotranspiration represents the total amount of water that moves from the medium into the air. There is no such thing as a medium with too much water, only a medium that retains too much for too long.
The water must always flow efficiently from one atmosphere(Medium) to another(Air) in a timely manner. Moisture is a critical factor for bacterial growth and decay. Dictating how long it's allowed to sit in any one location for any given period is a key preferred control. To ensure a net reduction in a bacterial population, the rate of removal (ET) must exceed the rate of bacterial growth (decay rate), which is often modeled as a growth rate for the specific bacterium under the given conditions. By optimizing daytime VPD, we also optimize conditions for bacterial growth to explode exponentially above 77°F.. If water is allowed to sit in a medium without an escape within a timeframe, nothing good will happen. IF High RH is maintained overnight as well as during the day, placing 100% of water movement at the behest of daytime transpiration, roots can only pull where they can reach, and if soil is compressed above a certain point, moisture will become trapped in a medium with no way of moving day or night. This will begin the countdown for decay to take hold. When water stagnates in a medium, it loses oxygen, creating anaerobic conditions that foster the growth of harmful microorganisms like bacteria and fungi, which can produce toxins and disease vectors.
Thigmomorphogenesis, the process by which plants respond to mechanical stimuli like touch by altering their growth and development, results in significant morphological changes to improve survival against mechanical perturbations. This complex response involves sensing touch and initiating physiological and genetic responses, leading to changes in form and structure over days or weeks. The process is triggered by physical forces such as wind, rain, or touch. Plants adapt to these stimuli by changing their shape and structure, which may include slower growth, thickened stems, or altered leaf development. Plants possess sophisticated mechanisms to detect even subtle mechanical stimuli and initiate responses. A variety of molecules, including calcium ions, jasmonates, ethylene, and nitric oxide, are involved in signaling these mechanical inputs. Touch can induce the expression of genes that encode proteins for calcium sensing, cell wall modification, and defense mechanisms. A plant exposed to constant wind may become shorter and sturdier. A plant that is touched frequently might grow more slowly to conserve energy and develop thicker cell walls. These changes increase a plant's resilience and ability to survive in harsh environments.
Let's get Thiggy with it.
Likes
10
Share


@Audi_grows98
Follow
Cherry cola,the one we thought was gonna be a runt turned out to have the fattest,tightest,most dense buds. The bud structure on her is absolutely amazing,the aroma she leaves on your fingers is out of this world and honestly she will be one that hits the tent again. She may of been smaller but that’s only because we thought she wasn’t gonna make it giving she had issues in the first couple weeks. But she bounced back and thrived the entire grow! Highly recommend this strain to any home grower that wants a nice plant with even better bud structure 🔥 she’s definitely a keeper!
Likes
8
Share


@treuominieunapianta
Follow
We started the week by transplanting the Orange Groovy F1 into the 3.6L pots filled with our SWA super-soil: we waited a bit more compared to the first 8 transplants just to make sure the roots were strong enough. At the same time we realized that the Orange Groovy F2 was the first plant ready for topping. This week we continued using our Lumatek dimming it at 60%. We are watering them with 1L divided by all 9 of them of osmosis water. On days 16 and 17 we topped every plant (except for Golden Pussies which still need a couple days and the Orange groovy F1 which we will not top because of her smaller size). We noticed that most of our plants presented lightly yellowed tips. We think that this is due to the deficiency of some immobile elements such as Ca, Fe, S. To solve this problem, we will put some decanted water (because it doesn't contain Chlorine which kills our bacterial substrate life) to give them the correct nutrients. We failed topping Orange Groovy F2 because the central apical started to grow even after cutting it but we kept it just to see what is going to happen. Golden Pussy F2 has been topped too and it went perfectly as you can see in the pictures. The plants continue to grow out of all proportion!
Likes
12
Share


@AllieO
Follow
1/12: lots more leaf tucking today. She's taking waterings like a champ. I'm always so worried about overwatering but she seems to be growing well
1/14: did a little more lst, so she's looking a little bit like an ugly duckling. Hoping the effort plays out. Attempted to adjust some clips and accidentally broke a stem. I splinted that up with some tape... Also my attempt at a fim is growing out... She's looking a little rough right now, but honestly, aren't we all?
1/15: watered and some leaf tucking this morning. Excited for the top to not look like a hot mess!
1/17: the ugly duckling phase is strong with this one. Gave her a good watering today and attempted some leaf tucking, only sacrificing one fan leaf.
Likes
45
Share


@mad_scientist
Follow
In general i am very satisfied considering the biggest problem i had which was the heat during all the growing period. I also had a power cut which stressed the plant very much to the point it stopped growing for a few days ( the most critical days 😡 😤 ) and developed 3 finger leaves. Despite the heat the buds are very frosty, they have a very strong smell like brown sugar and cookies and the density is decent. The buds dried for 9 days at 22 °C and 60% RH and now are placed at PP tapers with boveda envelops to cure. Smoke report at 2-3 weeks.
Likes
19
Share


Likes
14
Share


@StoneyMelony
Follow
Week 10 Temperatures are still not as high as in week 8, still 25 degrees celsius (77fh), I gave a few days only PH water, but now i'm back on the feed again with PK 13/14. You can see some leafs turning a lighter colour green but i think this is normal ending of life cycle. Maybe someone can say more or else about it.

Likes
42
Share


@MadeInGermany
Follow
Hey everyone :-)
This week both have done really well.
Flowering day 22
Both were poured with 1.2 l each and checked for their health.
Flowering day 23
Today the tent was cleaned and the humidifier refilled.
Flowering day 24
Both were checked, and the technology was checked for functionality.
Flowering day 25
Today both were checked and fresh osmosis water was left in the tank.
Flowering day 26
Again, both were poured with 1 liter.
Flowering day 27
Today was a pure control day.
Flowering day 28
Today the whole tent was cleaned. Wasn't that exciting the week, I wish you all the best, stay healthy 🙏🏻 and let it grow 🍀
You can buy this Strain at :
https://sweetseeds.es/de/cream-caramel/
Type:
Cream Caramel
☝️🏼
Genetics:
Blue Black
x
Maple Leaf Indica
x
White Rhino
👍
Vega lamp:
2 x Todogrow Led
Quantum Board 100 W
💡
Bloom Lamp :
2 x Todogrow Led
Cxb 3590 COB 3500 K 205W
💡💡☝️🏼
Soil :
Canna Coco Professional +
☝️🏼
Fertilizer:
Green House Powder Feeding
☝️🏼🌱
Water:
Osmosis water mixed with normal water (24 hours stale that the chlorine evaporates) to 0.2 EC. Add Cal / Mag to 0.4 Ec Ph with Organic Ph - to 5.5 - 5.8 .