The Grow Awards 2026 🏆
Likes
Comments
Share
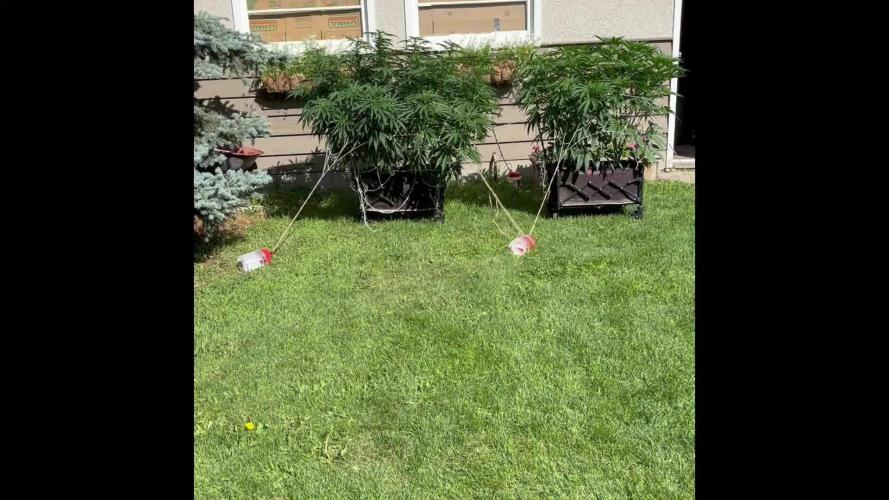
I am thinking about getting either a light rail system or more lights for next grow, every day and half I am moving the lights At least 2 feet.
Likes
9
Share
Processing
Likes
5
Share
@Ensign420
Follow
Week 02 Introduction This week has been a bit of a struggle. Had my first experience dealing with slime and brown algae. But I think adding enzymes and increasing the beneficial bacteria helped to fix the issue. Also experienced nutrient burn for the first time. My nutrient solution strength got as high as 671 PPMs. So backed it down to about 430 PPMs during the end-of-week reservoir change. Also cut Hydroguard (expired?), CaliMagic, and Superthrive from this grow. Now she's still stunted, but is starting to recover. Hopefully... [START OF WEEK 02] Day 01 - Monday - 08/10/20 - Total Days: 008 ----------------------------------- - [0830]: Still looks a bit yellow. But getting larger! --- Solution strength was at 248 PPMs. --- Just topped off with a bit of distilled water --- PH went up to 6.1 so PH'd down to 5.8 --- Ran the top feed for a bit to wet the hydroton. - [2130]: She's looking even more yellow now. --- Even the new leaves are really yellow. --- Decided to add more base nutes. --- Added 4ml of Sensi A --- Added 4ml of Sensi B --- Now at about --- Solution Strength went up to 304 PPM. --- PH was at 6, --- Also raised the water level a bit more. --- I really hope it's a nutrient deficiency and not an over-watering issue. --- Please live! Day 02 - Tuesday - 08/11/20 - Total Days: 009 ----------------------------------- - [0830]: Looking less droopy. But still yellow. --- Decided to do a reservoir change. --- 4.5gal of distilled water --- 8ml of Sensi Grow A --- 8ml of Sensi Grow B --- 8ml of Voodoo Juice --- 4ml of B-52 --- 4ml of CaliMagic --- 4ml of Hydroguard --- 4 drops of Superthrive --- PH'd down to 5.8 --- Solution strength: 302 PPM --- Since I didn't want to risk over-watering the rockwool, I did not to do a top feed, may do one tonight after the sleep cycle (lights are still set to go off at 10am and back on at 4pm). --- As I was doing a reservoir change, I noticed that the tubes and bucket were a bit slimy. Didn't really stink or anything. Is this normal? Maybe due to the Hydroguard and Voodoo Juice? --- I hope she gets better soon! - [2215]: Getting larger! But still yellow. --- Also can see a root growing through the net pot! Tiny little thing but it's there! Will have to start dropping water once more appear. --- After looking over a few DWC diaries using AN nutes, seems like my solution strength is still too low. Most around this stage average around 500 PPMs with about 4ml per gallon. --- Top fed for a minute to wet the top of the hydroton. --- Solution strength went down to 263 PPM. --- Added 8ml more of Sensi A --- Added 8ml more of Sensi B --- Now base nutes are at 16ml for 4.5 gal of water. --- PPMs went up to 411. --- Still lower than 500 PPMs, but that's okay. --- PH was at 6. Not sure if I should adjust PH using AN nutes. So going to not ajdust unless PH goes above 6.1. Day 03 - Wednesday - 08/12/20 - Total Days: 010 ----------------------------------- - [0830]: Looks like more root growth! --- She still looks yellow. But leaves are perky. --- PH was at 6.2 so lowered down to 5.8. --- Solution strength was at 394 PPMs --- Since roots are still growing, I decide to lower the water level a bit. Now water level is a bit below the net pot. - [2200]: Root is getting longer! --- Slime is returning. Not sure why. --- Solution strength: 357 PPMs --- PH: 6.1 --- Decided to add an enzyme along with more beneficial bacteria to hopefully cure the slime. --- Added 16ml of Sensizym --- Added 5ml of Hydroguard --- Added 8ml of Voodoo Juice --- New solution strength: 430 PPMs --- New PH: 6.1 --- Top fed for a minute. --- This slimy residue is really freaking me out! I hope the added enzymes will help eliminate the slime. --- Going to do a full reservoir sterilization/nutrient change over the weekend. Please survive until then girl! Day 04 - Thursday - 08/13/20 - Total Days: 011 ----------------------------------- - [0930]: I think the enzymes worked! There is little to no slime now! --- Although I think the root was also dissolved in the process. It's now just a little stub sticking just below the net pot. The enzyme is also suppose to dissolved dead roots too but guess that root was too weak? Not sure what happened there. But I think the slime is cured! --- Solution strength went down to 395 PPMs. Decided to add more base nutrients. --- Added 8ml of Sensi A --- Added 8ml of Sensi B --- Added 4ml of B-52 --- Solution strength went up to 598 PPMs. --- PH was at 6.1 --- As long as the PH is between 5.5 and 6.3, I'm not going to use PH Up or Down. But still will monitor PH levels. - [1715]: Checked up on her after her nap and shes looking alive but stunted. But no slime! --- Decided to add some sugars to help maintain the enzymes and beneficial bacteria. --- Solution strength was at 587 PPMs. --- PH was at 6.2 --- Added 8ml of Bud Candy --- Solution strength went up to 671 PPMs. --- PH also went up to 6.3 --- Lowered water level a bit to hopefully promote more root growth. --- Top fed for a minute. --- She is getting bigger, but still looks yellow. Day 05 - Friday - 08/14/20 - Total Days: 012 ----------------------------------- - [0915]: Leaves look a little burnt on the tips. Still no slime. --- Going to back off on the PPMs to hopefully fix the nutrient toxicity. --- Solution strength was at 632 PPMs --- PH was at 6.3 --- Added/Removed water until PPMs were at 536. --- PH was still at 6.3 --- Raised water up a bit, then top fed for a minute. - [2200]: Looking better. Still yellow though. --- Solution strength: 514 PPMs --- PH: 6.5 --- Added PH down. --- New solution strength: 518 PPMs --- New PH: 5.2 --- PH was kind of high. So decided to PH down. Had to use quite a bit to bring it down. But eventually got it to drop down to 5.3. A little low, but so far, the PH has always gone up so wanted to start it really low. --- Ran the top feed for a minute to re-saturate the top of the hydroton. Day 06 - Saturday - 08/15/20 - Total Days: 013 ----------------------------------- - [0830]: She looks stunted. leaves are still yellow. --- Solution strength: 514 PPMs --- PH: 5.6 --- Top fed for a minute. --- Not sure what to do at this point. Going to do another reservoir change soon. Hoping she lives until then. - [2145]: Looking pretty much the same. --- A bit of slime has returned. Since I've been diluting the nutrient solution, the enzyme ratio has dropped. So I guess this is expected. --- Also noticed that slime build up was on the air-stones. Never really checked the stones so not sure how long that has been there. Looks brown too, which can't be good. --- Going to do an H202 sterilization of the system (minus the net pot) tomorrow so did not add anything. --- Lowered the water level to below the net pot. --- Then top fed for a minute. Day 07 - Sunday - 08/16/20 - Total Days: 014 ----------------------------------- - [0900]: STERILIZATION DAY! --- Decided to skip today's night cycle for a deep clean. --- I'm hoping that skipping a night cycle won't be too stressful. --- Temporarily moved her to a new bucket. --- Used about a half of gallon of straight distilled water to flush out the net pot. --- Drained the system and wiped up all the brown sludge. Also removed the air stones and cleaned up all the goo. --- Filled the system with 2 gallons of distilled water and at least 30ml of food grade hydrogen peroxide (35% strength). --- Yea its a lot, but since I'm not going to sterilize the system overnight, I went with a really high doseage. Basically I kept adding until I started to see little bubbles start to form. --- Then I ran the water pump. - [0915]: Boiled the air stones in tap water for about 10 min. Then reconnected them to the airlines. --- I let the air stones and hose soak in the sterilization solution for about 5 minutes so the peroxide can absorb into the stones. Then ran the air stone to help mix and agitate the solution. --- Occasionally, I'd repeat the process of turning the air pump off for a few minutes to let the stones soak. - [1000]: Covered the top two row of holes of the net pot with some aluminum tape. Hopefully this solves the light leaking in through the hydroton. - [1200]: Used an old toothbrush and scrubbed the pump clean. Then drained the system. --- Refilled with more distilled water and peroxide. Again added a lot. --- Ran system again to sterilize even more. - [1530]: Drained the system and refilled with distilled water to rinse. --- Ran the system for a few minutes, then drained and rinsed again. --- Did this a few more times over about an hour. - [1630]: Added 4 gallons of fresh distilled water. --- Added 15ml Sensi Grow A --- Added 15ml Sensi Grow B --- Added 12ml of B-52 --- Added 16ml of Voodoo Juice --- Added 16ml Sensizym --- Solution strength was at 430 PPMs --- PH was at 5.6 --- I was going to add Hydroguard, but I think the bottle is expired. Since 2017 or 2018!? I think Hydroguard is good for up to 2 years from the date on the bottle or 6 months after opening. So not going to use from now on. I wonder if this could have contributed to the slime build up. --- Also removed the CaliMagic and Superthrive too. Going to only use AN products to eliminate the chance of incompatible nutrients. --- Placed her back in the bucket and top fed for a minute. --- Here's hoping for the best. Going to let it ride until morning! Please feel better! [END OF WEEK 02]
Likes
8
Share
Week 14 - August 13 Back from holidays. One week without carrying plants. All is Ok ✅ the Blumat irrigation system worked perfectly, Aphids are totally eradicated: the Garlic mixture is a miracle. 🐛I found 5 caterpillars on 2 plants: it makes lot of damage on a Bubble Gum I didn’t mention in the diary, but the other are safely. caterpillars are the Enemy N°1 at this point: must check everyday. I found 5 caterpillars on 2 plants: it makes lot of damage on a Bubble Gum I didn’t mention in the diary, but the other are safely. caterpillars are the Enemy N°1 at this point: must check everyday. Presence of leafminer flies but nothing important. -Royal Moby, seriously injured by sunburn and aphids aggression: recovering good, amazing stretch (sativa dominant) 140cm high , new branches are healthy. Flowering stage not engaged. -GMOxZombie Kush, was pretty shocked by aphids and sunburn too but problems are resolved: the plant is not too bad, starting a pre flowering period. 115cm -Flash Back #2 start flowering. Perfectly healthy, no pests, diseases or deficiency. Gook stretch last weeks, lot of ramifications and booming sites.130cm -Brake Pad Breath is the most advanced with a flowering stage engaged since 2 weeks. Super heathy, efficient bushy structure with lot of branches: my Favorite! 🌞Daylight 14h15 - 7h05 / 21h11 Around 26 to 32°C this week, hot night, sunny day, little bit of humidity. 💦Watering 1,5L / 3 days 💪Nutrients: Master Grower Floraison by Hydropassion
Processing
Likes
2
Share
@Ay_ef_see
Follow
Veg box is starting to flourish. Both lemon and sativa clone are very bushy and healthy. All others are healthy as well, and will be topping these soon. Once they start shooting again they’ll be transplanted once more and thrown into flower to start my first “sog” grow. Two ladies in flower are well. One still showing burnt and curled tips and I think flower growth is slowing down. The other is happy and well. There were two babies out in flower last week, one turned male. The other is happy and healthy. Until next week...
Likes
53
Share
! this is my current status, gonna upload my last veg weeks within the next week - got a bit busy around Spannabis - thank you for your understanding! 💚 Welcome to Bud Boutique Grow Diary - really appreciate all your love and support :) Dont forget to check out my other current grows! 🗓️ This Week: - Day 24: attaching once a week APTUS Foliar with Regulator & Nutrispray with the amazing CannaFogger by Petra Grow - Day 28: bud development is super beautiful on each pheno #1 and #2 Thank you for still staying with me 💚 ___________________________________________ --- 🌱 Strain (Sponsor) --- 🏷️ P.C.R. by Art Genetix https://www.artgenetix.world/product-page/p-c-r --- 🥗 Nutrients and Feeding (sponsored by APTUS: APTUS Ambassador) --- 🍸 APTUS: full nutrient schedule extreme -- Regulator, N-Boost, P-Boost, CaMg-Boost, K-Boost, Allin1 Liquid, Startbooster, Topbooster, Enzym+ every feeding -- Fulvic-Blast, NutriSpray as Foliar each once a week 🔗 https://aptus-holland.com/ --- ♻️ Grow Control (Sponsor) --- TROLMASTER: TENT-X + LM14 Light Adapter to dim/sunrise/sunset lights + Temp & rH Sensor all remote on App 🔗 https://www.trolmaster.eu/ --- 🚿 PetraGrow (Sponsor) --- CannaFogger Foliar Spray 🔗 https://www.petratools.com/product/petragrow-cannafogger-atomizer-new-mini-fogger --- 🏭 Grow Setup --- 💡LUMATEK Zeus Pro 600 * 🏠🌿 Indoor: Homebox 120x120x200cm (4x4) * 📐🌀 PrimaKlima exhausting Fan 1180m3/h (running on 60-80%) * 🌀 Can Light Filter 800m3/h & 1x Fanbox 1x Dyson fan for Air circulation 🔗 https://lumatek-lighting.com/zeus-600w-pro-29/ 🔗 https://primaklima.com/de/shop/ventilatoren-de/ec-ventilatoren/pk160ec-tc/ 🔗 https://canfilters.com/products/filters/ All Likes and comments are highly appreciated!!! 👨‍🌾 don't forget to check out my Instagram for daily educational content: budboutiquee - Bud Boutique
Likes
92
Share
Week 4 Veg Report - TrolMaster Chronicles 🌱 What a week it’s been in the garden! We finally transplanted the Papaya Zoap into its final Autopot, and let me tell you, this plant is something special. Though her roots weren’t quite where I wanted them to be yet, the move was needed to help her catch up with the rest of the crew. She’s already looking fantastic in her new home, and I have no doubt she’s about to explode with growth in the coming days. Sometimes, you just have to trust the process, and I’m feeling like this is one of those moments. It’s almost as if the room itself is taking on a life of its own. 🌿 In fact, I’m starting to believe that what we’re building here is something greater than ourselves—there’s this energy in the room, a feeling of everything coming together perfectly. I can’t wait to see how this journey unfolds! Dialing in the VPD with TrolMaster’s Tech Now, let’s talk VPD (Vapor Pressure Deficit) and how I’ve been keeping everything in check with the Tend-X and the incredible (DSH-2U) Humidity Station. VPD is crucial to plant health—it’s all about finding that perfect balance between humidity and temperature to optimize transpiration and nutrient uptake. The (DSH-2U) Humidity Station, connected directly to my humidifier, has been an absolute game-changer in this regard. With its real-time data and automation, it allows me to monitor and adjust the RH with pinpoint accuracy. Simple yet brilliant, the (DSH-2U) Humidity Station is keeping my room at the sweet spot I need. Whether I’m tweaking the settings from my phone while I’m out and about or just fine-tuning things while relaxing at home, this machine does it all. It’s like having an extra pair of hands in the grow room—and when you’re managing something as complex as VPD, that’s invaluable! And yes, the TM+ Pro App—let’s not forget how awesome it is. I’m adjusting my grow room from the couch, the car, or even the bathroom 😜. I’ve said it before, but this app is making growing easier than ever. Feeding the Girls: The Perfect Blend 🌱 We’ve upped the game by adding CaMg-Boost at 0.25 ml/L to the feeding schedule. Along with the 1 ml/L of the all-in-one liquid, this brings the TDS up to 320 ppm, with a pH of 5.99 and solution temperature of 24.8°C. In the soil, readings are around 415 ppm, with temperatures hovering around 25°C The plants are absolutely thriving, and I can already see the difference this new feed is making. I can’t help but have a bit of fun with this process—it feels like I’m spoiling them with the best of the best. And they’re rewarding me with beautiful growth and vibrant green color. You know how it is, with the right care and attention, these plants are truly becoming a masterpiece in the making. 🌱 Shoutouts 💚 Big shoutout to TrolMaster and ThinkGrow LED for the phenomenal gear that’s making this grow smoother than ever. Also, massive thanks to Aptus Holland for their top-notch nutrition, and of course, to the community here on GrowDiaries—you guys keep the energy alive! 🌱 Last but definitely not least, shoutout to all the seed banks supporting this journey. You’ve been a huge part of this process, and I couldn’t do it without you! Remember, for exclusive behind-the-scenes content and updates in real time, head over to my Instagram and YouTube channels @DogDoctorOfficial. We’ve got tons of epic content lined up, and you won’t want to miss it! P.S. Let’s talk about the new Model One LED Bars—these beauties are not only powerful but super efficient. I’ve been able to dim them down, save on electricity costs, and still maintain an incredible PAR and spectrum. It’s all about fine-tuning the balance of power and performance, and these lights make it easy to get the best results while being eco-friendly. Whether you’re running them full throttle or dialing it back, you’re still getting optimal growth conditions for your plants. That’s the kind of innovation that takes your grow to the next level. 💡 Growers Love to all 🌿💚
Likes
7
Share
The plants are growing beautifully and the first signs of flowering can be seen. Flowering day 10💚
Likes
6
Share
@Kannamar
Follow
So, they streched a lot, I had to bend severely. And so quick, like 5 cms in a day! They touch the light, I had no more room... I did a late FIM on 2 of them.... emergency I finally found a way to get the lamp 5 cms higher. Lukily it has stabilized but still, top of the buds are at 5 cms from light!!!! That's why I decided to drop the power at 50% and I lower the day light to 16 hours.
Likes
2
Share
Saturday 25 February; The big one keep growing nice and healthy, the tiny has started growing but its like a week delayed, if both born at the sane time maybe the tiny one is gonna produce less, the shock of repotting has punished her a lot… in still worried about her… Anyway im still super excited with this project Custom 0.8 m2 tent, x2 Solux 50W LED, Canna profesional soil 5% perlite Thank you Super Sativa Seed Club To create Auto Purple OG Punch we crossed our feminised Purple Punch with an autoflower OG Kush. The original Purple Punch is a cross between Larry OG and Grandaddy Purple, illustrious and stable indica dominant THC-rich heavyweights! The total grow cycle from autoflower seed to harvest is a short 9 weeks. You will be rewarded with a large yield of sticky resinous buds, up to 600g/m2 indoors. If you’re looking to grow a high quality indica auto made with cannabis cup winning genetics you will love Auto Purple OG Punch. THC content is always up-to/around 20%. Auto Purple OG Punch effects are intense, euphoric and relaxed. She also contains around 1% CDB which contributes to the very smooth, chilled smoke. Expect a mouthwatering blend of sweet tasting candy, dark fruit and hints of spice. A real connoisseur cocktail with powerful effects! She normally reaches around 1m tall. But in optimised conditions with LED grow lights you can see occasional monster plants up to 2m tall with XXL yields. Auto Purple OG Punch is easy, potent and heavy yielding indoors. She also delivers well outdoors - such as the balcony or garden. Auto Purple OG Punch is a perfect, powerful strain for a quiet relaxed day. The calming indica body effect is very satisfying and de-stressing.
Likes
43
Share
~ FastBuds PAPAYA SHERBET Photoperiod~ Well here we go on another journey together through 'Canna-land' and this one's kinda special... forget that, it's VERY special because this is FastBuds newest surprise for the community, a FEMINIZED PHOTOPERIOD STRAIN!🤯 I was fortunate enough to score these seeds, of which only 1000 were available and can't wait to see what this strain can do! This Papaya Sherbet, according to FastBuds, is a hybrid with a 9-10 weeks flowering period. For a more detailed and accurate description of this strain the following from FastBuds says it best: "Combining the massive stature of Papaya (Oni Selection) with the strength and resilience of one of our best keeper cuts (Sunset Sherbet), this strain develops into a big, expansive bush adorned with numerous bud sites that later transform into a generous harvest of medium-sized buds. Papaya Sherbet flowers deliver a signature flavor of premium cannabis with subtle citrus undertones that emerge upon inhaling. During growth, her aroma makes for a sweet yet pleasantly bitter fragrance, giving you an idea of what the smoke will taste like. Notably stress-resistant, Papaya Sherbet is a great choice for growers working in challenging environments. She is very forgiving and rebounds quickly from any adversity, allowing growers the freedom to experiment with confidence that she will take everything like a champion she is. This strain embodies resilience, flavor, and abundant yields in every grow cycle." Sounds like an epic strain and I personally cannot wait for this lady to strut her stuff!😍 ________________________________________________________________________________________________________________________________________________________________________________________________________________________________________________________________________________________________________________________ The Setup: This is going to be an outdoor grow, but I have started the Papaya Sherbet photoperiod indoors as our weather is still a bit too chilly to put a newly sprouted seedling outside (nighttime temp's dipping regularly into the 40's℉). The plan is simple... let her grow inside under a 19/5 light schedule until the nighttime temperatures are in the mid 50's℉, which shouldn't be long. After which, she'll be moved outside and transplanted into the soil which I have already setup and inoculated with beneficial microbes, and slow release dry amendments from Gaia Green. Once she's established herself outside she'll be given periodic top dressings of Gaia Green 4-4-4 and 2-8-4 along with worm castings and Compost Tea's. Her grow area is approx. 5'x5' and I have posts and a trellis net set up already for when she gets bigger to aid in training her. Let the fun begin!🤪💚 ________________________________________________________________________________________________________________________________________________________________________________________________________________________________________________________________________________________________________________________ Weekly Updates: 5/7- Here we go with the new addition to the FastBuds family, Papaya Sherbert fem photo. I placed one seed in a glass of lukewarm tap water (non-chlorinated well water). Within 24hrs there was a root beginning to show coming out of the seed. I then placed the seed between two moistened paper towels that I then put in a vented plastic container. I put the container in a dresser drawer where it would be warm and dark. 5/9- When I checked on the seed yesterday, there was a substantial root about 1/2" long coming from the seed. I then planted the seed, root first with just the seed head exposed, in a 2" starter pot filled with peat that I pre-moistened with 6.5ph well water. I placed the starter pot in the bottom of a Solo Cup that I had cut in half. I then placed a clear Solo Cup over it to act as a humidome and placed it under the lights in the grow room. Today the little Papaya Sherbert showed her pretty little self and so begins this journey together with her! 5/12- Two days ago the Papaya Sherbet sprouted her first true leaves and today she's really showing some vigor and some impressive growth! Today I went ahead and transplanted her for the first time into a 2qt pot filled with pre-amended coco/perlite. Before placing the Papaya Sherbet into her new home I coated the hole with Xtreme Gardening MYCOS, then placed the Papaya Sherbet and watered her in. 5/15- One week from breaking ground and the FastBuds Papaya Sherbet feminized photoperiod is looking fantastic and doing great with a second set of leaves now out! She's liking her bigger pot and is really beginning to take off now. I should be able to do her final transplant, which will move her outside, next week as our weather is rapidly improving... I can't wait! Thank you for checking out my diary, your positive comments and support make it all worthwhile! 💚Growers Love!💚😎🙏
Likes
89
Share
@Gunnen
Follow
It's now over the end of week 13. These pictures are about 2 days past a week. So I will upload next step in about 5 days. Things are smelling great and nugs are getting dense. Colors are coming in purples on the fade, looks nice. Trichomes are milky on most but still some clear, not much amber. Will be waiting likely another week or 2 even to see what happens. So far these have been champs, honestly been a pleasure to work with. Though I think the plants might not agree! Even with the mishaps we got some good bud going and some great crystal coverage. Excited to see the drying and product. Cheers everyone, happy growing.
Likes
2
Share
Its now week 3 of flower and the budsides are growing and showing their beauty and smell and at the end of the week is lollipopping on the Menu. There aren't any signes of lacks in nutrients. I found one yellowish leave but I'm pretty sure that was my fault for leaving the Soil a little bit to dry for some days.
Likes
13
Share
Hello Diary, We start with a new round. I am continuing with F1 strains since I am delighted with Medusa F1. This time I will have three different strains on the "Farm" Apollo, Milky Way and Titan. I will keep separate diary for each strain, and this one is intended for the Titan F1. First, here is some information about the strain itself. TITAN F1 As one of the first true F1 autoflowering hybrids, this pioneering cultivar offers something productive, resilient, and brand new. Although not born from celestial bodies, Titan F1 still has an impressive ancestry! Talented breeders created this F1 by crossing inbred lines that share a heritage with Blue Dream, Sugar Magnolia, and Amnesia. This autoflowering variety unleashes a powerful terpene profile consisting mostly of myrcene, farnesene, ocimene, pinene, bisabolol, and limonene. Combined, these aromatic compounds offer notes of fruit, candy, and lemongrass. With the highest THC concentration within our F1 hybrid range, Titan F1 exerts a powerful and fast-acting effect that melts the muscles and clears the mind. Perfect for enjoying after a long day at work. Flowering time - 30-45 days SET-UP ON MY LITTLE FARM: Box - Secret Jardin DS120W 120x60x178 Lights - MIGRO 200+ Ventilation - TT Silent-M 100 Filter - Primaklima filter PK 100/125 Fan - Oscillating Koala Fan X 2 Humidifier - Beurer LB 45 Soil - BioBizz Light - Mix Pot - 11L Air pots Seed - Royal Queen Seeds Nutrition - RQS Organic nutrition I can now officially start the journal. 20/04/2023 Planting plants. As usual, I prepare everything I need for planting in advance. I still use Air-pots because they are really great. For the soil, I used BioBizz - Light Mix, which I filled 2/3 of the container and then added the Organic booster in pellets, Mycorrhiza and Rhizobacter. I mixed everything together well with the soil and filled the container to the top. I soaked the earth well with 2 liters of water, made a small hole, put the seed and lightly covered it with earth. The conditions on the Farm are satisfactory, the temperature is around 25 degrees while the humidity is around 50%. I think that after sprouting I will put a humidifier to increase the humidity. 23/04/2023 I sprinkled some water on the surface of the earth to let them know where they should go. 24/04/2023 Titan F1 has sprouted like her other two roommates. 26/04/2023 First watering. I regulated the p.H. of water at 6.0 and watered the plant with maybe 0.5 liters of water. That's all for this week, see you soon.
Likes
5
Share
This week the plants seem to be adjusting well to the Mega Crop nutrients. Also the plants are doing well with the 19 hrs on & 5 hrs off light schedule. Today is January 31st which means it is time for another feeding. They received a 1/2 gal of feed each.
Likes
2
Share
Hola a todos!!. Esta semana he regado con oro negro de namaste 2ml x l de agua. No controle ni ph ni ec. Pero a la planta se la ve bien, en las imágenes podemos observar que la malla fue bastante cubierta.
Likes
3
Share
Likes
4
Share
@nelly31
Follow
Don’t think it will get any bigger, buds look & smell lovely 😊
Likes
14
Share
@Fildjoni
Follow
28.11 Snaping big branches i try to snap bads also for be sure if its realy dryed... after puting in yars humidity says 48-55 % befor puting two way control bag (58%) so i think its a good call, its time to cure and wait for smell unlock, open 1-2-3 times a day Still got work to do, 1 was left becuse lack of time, i was slow triming and buds on last one was bit thicker, still not snaping like i saw on this two,got still little more time to be ready 29.11 Work was done, haaappy with resault of the laat one.. its not to dry, could be smoked alone, burning nice..so not too much, didnt have time to leav it without two way bags but they will do ther job till morning with stabilazing it on 58%, they need dark but need to check par times a and open them🙏👏💆‍♂️🍀🥦💚 25.12 After almost a mounth situation is very nice for my eyes to see magic happening, still got time to proces more, in last mounth, first two week i was opening twice a day, for a few minutes to exchange with fresh air, they are jared in dark, always 53-60% humidity and 17-19° Celsius.. work is solid, taste neutral, bit of bitter, its need to proces some time to become smoother mass to smoke, for now i am happy how its look, needs to gtet some smell and aroma from proces of curing, sooo..more waiting, now its not so big problem. And for you guys, wish you all good for Holidays that just started today Merry Christmas🥦🍀🎄 02.01.25! New year is here so after 33-35 days of curing its geting better and now is that point that you could smoke it but you are not 100% happy with resault of doing that only mounth and something, think that with time would be much better, like after 60days. I did some mistake in start of curing proces..why, becuse after i put them in jars and after 1-2 hours they show on meter 46-49% humidity and i react at first and right away put that 2way humidity bags, i think i should rather relase some time say or two to see will humidity rise up like it should, and this bags was strong for how much i had in jar with bag, so basicly i didnt let moist from inside turn up to outside of bud, and thats why i had till 20-x day problems with still feeling moist and harshnes in smell and taste.(while testing to see every few days how its going to understanding better of point curing) So i put away 2way bags, give them few times fresh air, trying to recreate begging of proces and remove with fresh air that shild that bud become from bag thats stops moist getting out of bud from inside, and i think that i did good job in that save and time will and must show more from this strain! So i fixed that and now going in ups side direction! And when am i by that word strain, need to say that northen light showed well for first grow,she could take some damage and good recover, easy and as you see in grow i didnt do lst or toping, i try bit of lst but i have holes on pots so i lost that option in my head from begginig, i am glad that i leave them alone and let them be them, to see how will they show up, at the end they did. Its hit nice and fluffy (not high thc %) (thats the maybe best part of text in whole proces from first day till now)(zaza is working nice and i got become more fulently writer)(maybe iam tripping 😁🍀🥦) Wish you guys all best in new year, enjoy more and lot of health 🎆🥂