
Processing
Likes
Comments
Share


@Four20Guerrilla
Follow
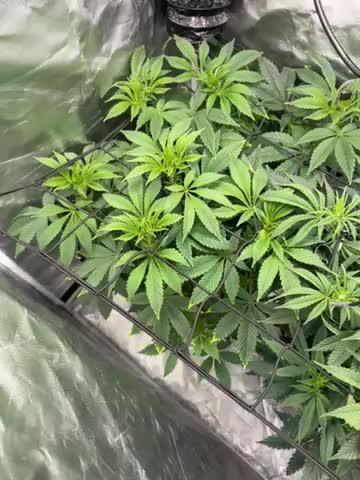
This week was amazing to see the growth really start. Felt like a little kid again when observing the first pointy leaves that come through! To think these 9 are going to provide us with the most beautiful, versatile plant on our planet, is just awesome. Eradicating the need to fuel crime by putting money in dealers pockets, and taking full control of the wonders I’ll be inhaling and consuming.
They didn’t need much attention day to day, just moving windowsills morning/afternoon, and watering when the soil/pots looked dry. Thankfully haven’t had much trouble with them, although one of the FastBuds original AK’s isn’t looking so great. She’s not as developed as the others as you can see. She’s not received any different treatment or water or anything different at all to the others. Maybe I need to investigate more.
I’ve decided to try stay as organic as possible with this grow. With that said, I’ve been brewing up a nettle tea to make a good nitrogen feed for the girls. Nitrogen is said to be needed most during veg stage, so preparing as much as I can.


Likes
18
Share


@DabNinja710
Follow
6/1/2020
I aased water with nutes lowered the light about. The leafs were clawing and droopy. I cant seem to catch .break. learned allot. So even though thay will cost more money to but bud fro someone else. That's the whole point of growing. I'm just a little sad and reluctant to keep groing. I think o definitely stunted. More than killing it. Im goona be so upset if I get a shitty amount. I wanna give up. I really do. But I won't this be a game change for me with the amount of bud and money in my pocket.
6/2/2020
They went back right away. Im learning there very versatile.
6/3/2020
Lst today fixed some of what I did.
6/4/2020
She's looking good i gave her some water with kelp in it. Got the 6" fan today gotta find 6" ducting.
6/5/2020
She's gotten so big I can't believe it. Not as big as I'd like but hey its my first grow. I got some mollases today ill start adding that too. I think i can do it with every watering but I think ill stick to feeding time. I raised my lights today. I was getting suggestions to do so. Ill add pictures tomorrow. Its been busy since its gotten nicer.
I just did a little lst. And I cracked a stem. Right at the end were its connected to the main stem.. i added a little tape and some stakes. Man I keep messing up. I homw its ok.
6/6/2020
I did some LST to her I hope im doing it right pretty much stake em down so they get more light? I think im doing it right. Anyone wanna tell me if I am or not.
6/7/2020
Nothing today. She took well to this round of lst. End of week 5.
Likes
19
Share


@LittleBigTrees
Follow
Still pulling top fan leaves to allow the side branches to catch up to the main stem.
Plants are enjoying the new root space and increased feed.


Likes
4
Share


@eldruida_lamota
Follow
Vamos familia, actualizamos la octava semana de floración de estas Thunder Banana de Seedstockers, salieron las 3 de 3, 100% ratio éxito.
Aplicamos varios productos de Agrobeta, que son increíbles para aportar una buena alimentación a las plantas.
Temperatura y humedad dentro de los rangos correctos dentro de la etapa de floración.
La tierra utilizada es al mix top crop, por cambiar.
De 3 ejemplares seleccioné los 2 mejores para completar el indoor, cambié el fotoperiodo a 12/12 y también apliqué una poda de bajos, se ven bien sanas las plantas, tienen un buen color progresan a muy buen ritmo por el momento, las flores han tricomado que da miedo.
Agrobeta:
https://www.agrobeta.com/agrobetatiendaonline/36-abonos-canamo
Hasta aquí todo, Buenos humos 💨💨💨.


Likes
346
Share


@Canna96
Follow
This week went pretty well for my sour diesel auto. She Finally stopped growing vertically at about 48 inches to the top of the highest cola. We did have a serious heatwave and high humidity I been dealing with as well, but so far so good. The only thing I changed this week with nutrients is I raised my ec value to 1.6, at the advice of another grower, and the sour diesel took it like the piglet that she is. I am still on an 18/6 light cycle,which I plan to stay with the entire grow, and still feeding Maxibloom, calmag, and koolbloom. I am seeing some bright orange colored spots on the top leaves, but I am hoping it is just a little light bleaching. I have no experience with this as I have NEVER grown anything indoors before other than vegetable seedlings.
I just wanted to say thank you to this community for all the advice, tips and encouragement along the way, very much appreciated all, and Blaze On!

Likes
82
Share


@BigBadLion
Follow
Heeeere we go! Sorry for the late update!
This is when I start the flush! I believe the plants are pretty much ready at this point and doing this will just improve the final product!
Doing this took me a good chunk of time, mostly because I didn't know exactly how much of water I was going to need (it was a loooot 😫) and how hard/tiring it was to pH it as well. In the end my calculations were off, as I needed far more water than what I had (lol) so I didn't manage to do a full flush... but I still managed to lower the amount of salts and residues to a "decent" level (around 850 to 1500 ppm). I also used flawless finish so I suppose than even when I didn't use enough water that solution alone was enough to help!
Besides that the rest of the week was quite calm and relaxing.
Thanks everyone for reading! 😍
Likes
64
Share


@Prof_Weed
Follow
Heute startet die 9. Woche,nicht wie hier vermerkt die 12. Woche.
In paar Wochen starte ich dann mit Final Part von Terra Aquatica und Flash Clean um zu flushen.
Anscheinend braucht die 11 Wochen Blütezeit laut FastBuds Website.
Die Buds werden langsam fetter und die Pflanze ist super gesund.
Ec Wert des Wassers steigt von anfänglich 1.5 immer auf 2.5 sobald der Wasserstand runtergeht. Muss nach 2,3 Tagen immer ein wenig Wasser dazugeben.
Die Temperaturen sind für Indoor immer noch zu hoch,die Luftfeuchtigkeit ebenfalls.
Werde das nächste Mal Indoor erst im Oktober starten, wollte aber mal sehen wie das im Sommer funktioniert.


Processing
Likes
15
Share


@CannabisAprendiz
Follow
Hola con esta semana ya quedamos al dia con el seguimiento ya que estaba atrasado en el tiempo. Se nota una producción de resina notable en esta genética que nos ha gustado mucho por su olor y estructura de las plantas .
hemos creado un video por cada una de las 14 plantas del seguimiento, hay varias muy llamativas que están "pre-seleccionadas" para mantener a futuro, el olor que se llega a sentir es muy florar y dulce, si tienen alguna pregunta no duden en preguntar saludos.
Hello with this week we are already up to date with the follow-up since I was late in time. There is a remarkable resin production in this genetics that we liked a lot for its smell and structure of plants.
We have created a video for each of the 14 floors of the follow-up, there are several very striking that are "pre-selected" to keep in the future, the smell you get to feel is very flowery and sweet, if you have any questions do not hesitate to Ask greetings.
Likes
151
Share


@CANNASIM
Follow
Training > topping, defoliation, and LST, using a cage for the first time, liked a lot to model a even canopy.
Girls wore grown in 15l fabric pots, I choose a higher pot so is not wide, my idea was to grow three, felt that 25l pots still ideal, the girls net bigger and have more room for the roots.
She was constant feed
> Watering 1 = Base Nutes + Recharge .
> Watering 2 = Boosters.
> Preventive Cal Mag every 15days +- .
Based on my feeling, and the leafs color I released some nutes or added so this is just an Idea on my schedule, no expressive or relevant burning.
— — —
My LED started to fail in mid cycle, so the light intensity started to vary, and i feel the matrix is not working and full potencial anymore.
At first was hard to control the RH but in a few weeks i have got a hang of it, and all went ok besides my LED.
Liked a lot this cycle, was flawless, simple and rewarding, only downfall was the weight, but everything was new, the tent, the pots size, the nutrient line, so on, so i’m satisfied.
Weight is compensated over quality, none the less she was not heavy flushed, without the cure she was already tasting amazing, butter smooth, and white ash.
When you open the jar a very pungent sweet, berry like smell comes out mixed with a pleasant cheese cake sour end.
Potency is above average, 3 hits are what I can take, a bit more and the fun is over and the experience becomes too strong for me.
The effect is just perfect for a night smoke, to me is instant, I feel mainly on the body, just want to lay and relax. Just perfect for our needs home.
Smoke is clean and easy to smoke, you feel the joy of the usual insense smell around, very strong, stealth smoking is not a option, taste is sweet and fruity, easy to overdo.
——
UPDATE 1
Vaping is a joy, the effects are more controlled as you have the temps to do that. The terpenes profile is very pronunced with the Volcano and the Davinci IQ, Pine berryes is what i taste.
At this point buds are curing woth boveda 62 for 1 1/2 weeks, then I will change the humidity pack to a dryer one.

Likes
15
Share


@GermanGrow182
Follow
Woche 7 und die Automatiks gehen in die Blüte. Tropicana Cookies purple Auto, fat Banana Auto und Apple fritter Auto. Die feminisierten wurden nach der 5. Node getoppt und verzweigen jetzt, LST bei den Autos wirkt. Hab die pötte mit Hornspänen (Stickstoff) vorgedüngt, deshalb noch kein Flüssigdünger. Erst, wenn die Blüte oder Mangel kommt. Es läuft ganz gut 👍 bis nächste Woche ✌️
Likes
17
Share

@eldruida_lamota
Follow
Venga familia que ya viene la cosecha de estas finta F1 de ZamnesiaSeeds, que ganas que tenia ya de darles machetazo, me estaban dando muchos quebraderos de cabeza.
Las flores no son para nada llamativas, una variedad más cruzada con rudelaris, que para mi gusto es perder el tiempo y el dinero invertido en cultivar cosas así… no merece la pena en interior, el ratio de gramo watio se me quedó en 0.5 , de los no peores resultados que tuve en los últimos 5 años.
a sido una genética con la que no disfruté nada cultivarla, es complicada, es bastante sensible.
Las plantas en sí se quedaron enanas y para nada fue lo que esperaba, me recordaron a las autos que plantaba en el 2012…
Agrobeta:
https://www.agrobeta.com/agrobetatiendaonline/36-abonos-canamo
Mars hydro:
Code discount: EL420
https://www.mars-hydro.com/
Hasta aquí es todo , espero que lo disfrutéis, buenos humos 💨💨.


Likes
44
Share


@PotCasso
Follow
Week 8
Water only at 800ml lowering the lights on temps to 22c (70f) let see if we can get the purple senescence this 5g has been threatening and we know the Velvet Octane will finish with.
Every girl is finishing nicely, FROSTY AF, and the smells are fantastic and sweet and slap you in the face the moment you open the tent. These girls are just getting photogenic so more to come next week.


Likes
Comments
Share

@AkatsukiVirtue
Follow
Started Flowering GPA Cookies and Money Maker.
Left the Chocolate Skunk clone to get bigger before flipping to flower since I know the plant doesn’t stretch much during flower.


Likes
20
Share


Likes
15
Share


@masterofsmeagol
Follow
8/17 Watered everything but the 50. Found two leaves with sep markings on the pink kish in the 50. Definitely not using old soil again. I'm pretty sure THIS plant contracted it from the soil and not the way the others did with the lawn mower and birdseed hijinx. It's supposed to rain for the first time basically all summer. It's am 80% chance so I HELD OFF ON PLANT DOCTOR AND DID NOT APPLY as I'm supposed to have a clear day after. I'll apply the plant doctor in the morning. I'm hoping this rain will knock down a bunch of those thrips. They seem to be on a small branch on a plant or two. One or two leaves show damage and I'll pick them off. I figure I'll get them after I apply plant doctor. I'll use either citric acid or just my regular bt-k pillar treatment with Castille or liquid soap. That will kill them as well. I'm on really worried about it. I also might just buy a bunch of lady bugs and unleash them once things get further along.
EDIT: TOOK A QUICK VIDEO AND A COUPLE PICS. HOPEFULLY WE GET THIS RAIN. IF NOT IM GOING TO TREAT THE THRIPS THAT ARE ON TWO PLANTS NOW. I THINK IM GOING TO GO WITH BT-K FOR NY PILLARS AND HOPE THAT THE DISH SOAP IN THE MIX KILLS THE THRIPS. I HAVE LOTS OF DIFFERENT OPTIONS SO ILL FIGURE SOMETHING OUT. BUDS SEEM TO BE EXPLODING IN GROWTH. OH AND THANKS TO THE OUTDOOR GROWER THAT MESSAGED OFFERING TO HELP. I APPRECIATE THAT. THANKS.
8/18 We got the rain we were expecting. It was sheet rain for a few hourscand rained during the night. Everything was drenched and it was cold (50°F). I shook off the special kush that's way further in flower. I decided to use the leafblowrr despite the risk of spreading anything. I did it so that it wasn't ever blowing TOWARDS another plant but still. I was hoping it might blast off some thrips that might have survived that torrential rain. We've never had a dry summer like this. I'll moniter things. My water day is tomorrow so I assume that's when the girls will get their plant doctor dose. It's a great time of year for cannabis growers. We get to watch all the hard work we've put in literally pay off. It's very peaceful in the garden.
EDIT: Went over at about one to check things out and do some minor defoliation. I checked on the thrip situation and I dont know if I blasted them off with the leafblower or if the rain washed them away bit I doubt it. Ivecmade the decision to treat these little bastards. It's on one plant but it's started to spread to another branch on another plant. I probably just overlooked it but still. Seeing that it rained like he'll and I'm seeing like zero signs of septoria I'm going to treat everything. At least I think I am. I haven't decided what to use. I think I could just use bt and soap and I'd probably be alright. I'd feel better doing that as it's something I'm familiar with. Outdoor growing. It's always something.
8/19 In the 40's last night. Hopefully that will help with the thrips. I was hurried and since today tops at 72° I only watered the 10th planet big mk ultra and the chem dog with preventative plant doctor. I'm not seeing hardly any septoria and if I do itsca random leaf. I mixed up 3tsp of citric acid and some Dawn in a 2 quart hand sprayer and treated the 10th planet that I thought had heat stress and the Pink kush in the ten gal that has the damage. I also treated a branch on my good tenth planet. It was the only branch with markings so I think I've got it early enough. I'm just wondering the best way to tackle this. The pink kush I'm sure, could handle spinosad. That strain is much later flowering. I'll see how the citriccacid works and go from there. If the other girls need water they'll get it when I get home alongcwith plant doctor. I've got some work to do. I'll keep this updated. Opinions are always welcome.
UPDATE: THE PLANT IN THE TEN I SPRAYED LOOKS BETTER THAN WHEN I SPRAYED IT! I ALSO DIDNT WATER AS ITS UNDER 70° AND EVERYTHING I WATERED LOOKS WORSE THAN WHAT I DIDNT. WATERING NEEDS CHANGE QUICK WITH A 40° TEMP SWING. THESE THRIPS ARE GONNA HAVE A FEW MORE NOGHTS IN THE 40'S. THE CITRIC ACID SEENED TO KILL ON CONTACT. MY PROFESSIONAL BUDDY ADVISED TO ORDER GREEN LACEWINGS AS OPPOSED TO USING SPRAYS. HE SUGGESTED SPOT TREATMENT BUT AFTER MY RESEARCH ON THRIPS THAT WONT HE AS EFFECTIVE. I HAVENT DECIDED WHAT TO DO. I MAY ORDER THE LACEWINGS AND I MAY CONTINUE AND ROTATE TREATMENT. I DONT WANT TO OVERREACT (WHICHVI TEND TO DO) BUT I ALSO DONT WANT ALL MY LEAVES TO DIE. ILL KEEP THIS UPDATED. IM PLANNING TO GO OVER TONIGHT AND CHECK THINGS OUT. I MAY SPRAY A FEW MORE PLANTS AND WATER WHILE IM THERE. ITS TIME FOR THERE PLANT DOCTOR PREVENTATIVE.
8/20 I watered the two kush in the back WITH THE PREVENTATIVE DOSE OF PLANT DOCTOR as they were dry I assume due to the wind they get. The one in the 50 I found one sep leaf. Looking carefully arpund the garden I can tell that I have a thrip infestation. First time I've fought this and it seems most people don't really know what to do besides predators at the beginning of the season. I'm too far along for spinosad. At least thats what I've been told. My pro buddy said to try to spot treat it. It's not bad bit I'm afraid it might be worse than I think. The plants I treated with citric acid look MUCH better. I think I'll dial the dosage of citric acid down and start with that tonight and switch up treatments. I can get rid of them it's just going to take a ton of work. I think I've had them before and I attributed to something else. I so think that the very early pink kush plants could handle spinosad. I hope so. The plants I watered the other day look overwatered. The plants I didn't water look GREAT. The special kush in late flower looks happier than I've ever seen her. The difference being we went from 104° one day to 72 the next with 46° night Temps. This week is highs of 70's lows of high 40°'s. I've got a lot of work cut out for me. Didn't do a video as I didn't have time but I'll do one.
EDIT: Nothing needed to be watered at noontime and I'm trying to not overwater so I left them. The two I watered this morning are fine. I'm glad I caught this thrip bullshit when I did bit it sounds like it's going to be a HUUUGE pain in the ass to beat. One thing right after another. I've found those suction marks and the silvery shit they leave behind on pretty much every plant now. I'm thinking me using the leafblower (away from the other plants I THOUGHT) must have blown a bunch of them around. I'm not seeing a lot of bugs. Mainly feces. I did find a couple adults. Honestly, I've probably had these before and not known it or attributed it to something else. Literature I'd all about spinosad which of course I have on hand. AI told me I could use spinosad in early flower so MAYBE I could treat the pink kush plants with it but ill have to figure something else out for the other girls. I'm planning to treat tonight depending on where the research takes me. Not sure exactly what I'll be using but I'll keep this updated.
8/21 IT got cold last night. It was low 40's when I went to the garden. I watered the special kush in late flower and the mk ultra I kept natural. Did some defoliation. Found little feather on a large branch. Birds have been helping with pillars. I left out the plant doctor on those watering as septoria has pretty much been eradicated. Plants are drinking significantly less water. It went from 104° day time to 72°. Same with the nighttime Temps. Luckily with Temps like this the thrips don't seem to have spread. I found a couple lacewi g eggs while looking for pillars. Hopfully they will help. Maybe spot treatment and decoliation will he enough. I'll update as I go.

Likes
10
Share


@CanadianFillmore
Follow
Fed and defoliated to start week 7. The plant looks great, big frosty sticky buds! Not much else to say here, this girl is on point and loving life.
