


Likes
18
Share


@eldruida_lamota
Follow
Que pasa familia, vamos con la primera semana de vida de estas Tropicana Cookies Fast Flowering, de FastBuds.
Agradezco a Agrobeta todos los kits obtenidos de ellos 🙏.
Vamos al lío , las 3 semillas que germinaron con éxito se colocaron en macetas de 0.6 litros y asomaron las 3
El ph se controla en 6.2 , la temperatura la tenemos entre 21/24 grados y la humedad ronda el 60%.
Mars hydro:
Code discount: EL420
https://www.mars-hydro.com/
Agrobeta:
https://www.agrobeta.com/agrobetatiendaonline/36-abonos-canamo
Hasta aquí todo, Buenos humos 💨💨💨

Processing
Likes
14
Share


@BatGuano
Follow
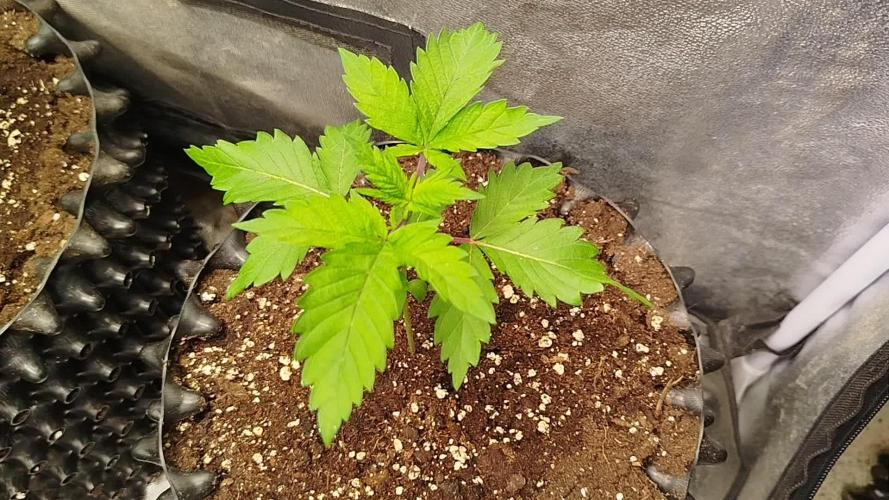
D19 - After planting her in soil, she just started to grow very fine.
Beast: Cats are instinctively attracted to this plant. Mine is always asking for it by standing in front of the door. I usually feed him during regular defoliation. :)


Likes
11
Share


Likes
27
Share


@DogDoctorOfficial
Follow
Day 50 Flower And this beauty’s keep on growing day after day. I still think i will have at least 2 more weeks for them to be ready, this means by the looks that they will be massive buds 🤩🤩🤩💚💚💚🙌🙌🙌
Day 52 Flower And had to pul out my camera for some more photos of them, the build up i made on the soil with AptusHolland nutrients is showing the results and this girls are just beautiful 🤩 shoutout to AptusHolland for the quality on the all nutrients line they have , and shoutout to Lumatek for the LED quality, still my best light, and i still think that the sun should take notes 😆😆😆 and of course shoutout to seedsmanseeds for the quality the put in all of them genetics 🙌🙌🙌🙏🙏💚💚💚🙏
Day 56 FLower snd they keep growing and growing despite the fact that they have been on plain water for over 3 weeks ,I’m amazed af 🙌🙌🙌 respect to both genetics as nutrients ✊✊✊
Thanks guys for checking and reading my diaries, I truly appreciate the love and it all 💚💚💚🙏🙏🙏 growers love and happy new 2022Too 🎊🎆💨💨💨💚💚💚
PPFD - 1000 Umol/m2
DLI - 40.0 mol/m2d
VPD - 1.72 kPa
Girls:
Gelato OG @Seedsman
Light Lumatek Zeus 465W compact pro at 100%
All i grow is medecine for myself, nothing to sell, dont even ask !!!!
Stay safe and do it with love for the love ❤️ 🙏
💚Growers Love to you all 💚

Likes
5
Share


@Deli_Weed
Follow
En general me encanto cultivar esta genética, siempre fue la primer genética que quise cultivar desde que empecé en esto y no me decepciono en lo absoluto, de una sola semilla obtuve 106 gramos de flores de gran calidad 😃 increíble para ser mi primer cosecha con semillas de bancos, ya quiero ver que resulta en la próxima cosecha ya con más experiencia y mejor equipo 🤩

Likes
8
Share


@Prilyfe13
Follow
04/26/2026
Readings before water swap.
pH: 5.6
EC: 1450 cm
TDS: 1050 ppm
Temp: 71.3°
So I'm going to start flushing today. She has a whole lotta nutrients left in those leaves and buds. So what I'm doing now is fill and drain. In my case pump and pump. I mix my nutes in a 5 gallon bucket. Then use another bucket to drain the DWC reservoir. Do it twice and then the last time with flawless finish.
Again! Something happened to my yesterday entry.
04/28/2026
Readings:
pH: 6.58
EC: 499 cm
TDS: 351 ppm
Temp: 66.7°
Will be pHed today. It's too high.
Anyway, she looks really odd with all of her branches just falling down. All around and the main top and some select branches are left standing up.
She has issues everywhere from clawing to tacoing spots and burned tips or whatever else is wrong. So she's getting her week of flushing. I haven't noticed anything yet. But maybe it's because theight is too close to the top.
Speaking of, does just the top getting too much light stress the whole plant out? Or is it just the top?
I honestly hope my plant isn't waterlogged. I wonder what causes that. Because when I hung the plant up, the branch I was going to use legit sqweeshed on me. Like it was soaking wet. And when I take leaves off, the break pours out water. Never seen that before. Just a new thing.
The environment looks really good
Now it's working.
04/30/2026
Readings:
pH: 6.7
EC: 521 cm
TDS: 371 ppm
Temp: 66.2°
05/01/2026
Well, I say she's done. I have her in the dark for the next couple of days, then I'll harvest. That'll give me enough time for the bucket to empty out and by the time it's ready, the bucket should be nearly dry. Actually, I wonder if that'll happen. I topped her off yesterday, so she should be fine for the next 3 days.
I'm gonna check the water one last time before she's in the dark for 3 days. I dunno. I think she's ready now. I'll also get a trichome video to make sure.
No top off just this one last trichome video and harvest will be in 3 days. Or sooner.
I took a trichome video this morning. It's not very good. But you can see the abundance of cloudy and in some spots, amber. Other than that, I might pop off a few leaves today before her official dark period starts. It was supposed to be last night, but I forgot to set it. So it's off this morning, but I have some things I still need to do. Like snip off as many fan leaves as possible. No sugar leaves. And if there's a ton of trichomes on the offending leaf, I shall leave it. It's really dry out now, so I'll need to keep a lot of the leaves in tact so it doesn't dry out too quickly.
Readings:
pH: 6.16
EC: 605 cm
TDS: 431
Temp: 69.6
I'm curious as to why both the EC and TDS have higher readings than yesterday. There's absolutely no nutrients, or shouldn't be in that bucket as I've added 2 flushes of Flawless Finish. And 1 top off of plain water. She needs about a half gallon now, but I'll let her take her own water down. I'm not sure how quickly it will be gone. She drinks about a half gallon a day. I think there's around 3.5 gallons left. Should be plenty of water left at harvest and not too much. I still haven't seen a single bit of color. I had to have done something wrong.
Back to the EC and TDS. Both spiked about 100 points. That might be my pH pen. I doubt it though. Something environmental or most likely not a colorful one. Which I don't get. It started flushing 3 days ago. Shouldn't I be seeing something colorful by now? All I'm seeing is a very earthy plant. Well, more plant like smell. As for the water situation. I think I might have to pull the water out and pH it back to 5.8 but I'm inclined not to do such a useless task. Of course if it goes over too much, I'll have to step in and add more Flawless Finish. Because I don't think she is eating at all. Or there's a nutrient lockout. Again, that should t matter anymore.
Another thing. I found more clawing leaves that were super dark. But how?! There's no nitrogen in this plant. No idea how it's showing signs of toxicity? I don't get it. Like at all. I don't understand why the EC and TDS are climbing when they should be like going down.
Likes
11
Share


@hanzSour
Follow
68 days of flower
sticky frosty solid buds
branches supported
becomes big
dark green buds covered with frost

Likes
4
Share

@Bear_Grows_Green
Follow
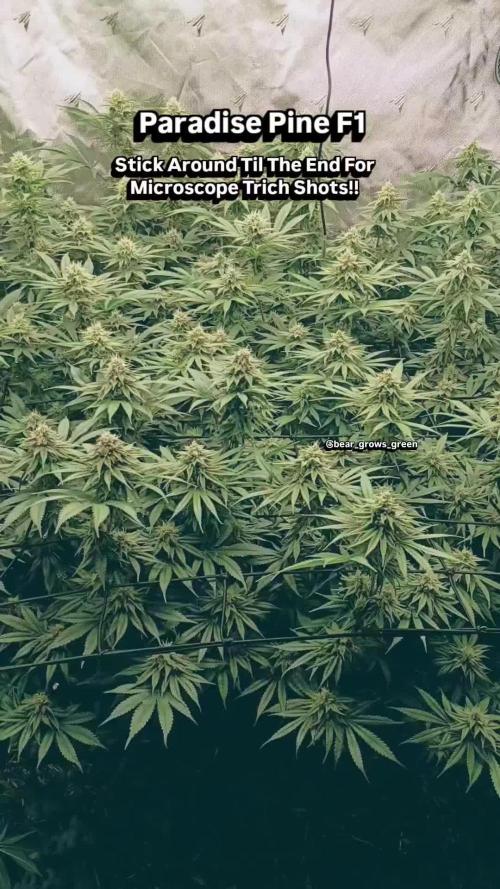
02/05 day 29 flower and holy shit things are popping. The smells are strong of tropical fruit punch on the run when I open the tent it smells of over ripe or slightly fermented fruit yummy. Stacking and filling out awesome! They got water and fed today.
02/09 got watered with bio phos, and bio catalyst 7 gallons total water. Terp check on them all. #1 straight tropical fruit punch very loud strongest and most unique terps in the tent. #2 slightly gassy pretty generic smell I feel I've smelled a million times before. #3 slight gas and fruit punch but subtle nothing impressive. #4 2nd strongest terps on the tent a even mix of gas and tropical fruit punch. I'm gonna have a hard time letting go of #1 or #4 honestly so they are both getting ran again next round for fresh frozen and will be kept around at least til I try the end rosin.
Likes
11
Share

@GreenEldritchGardens
Follow
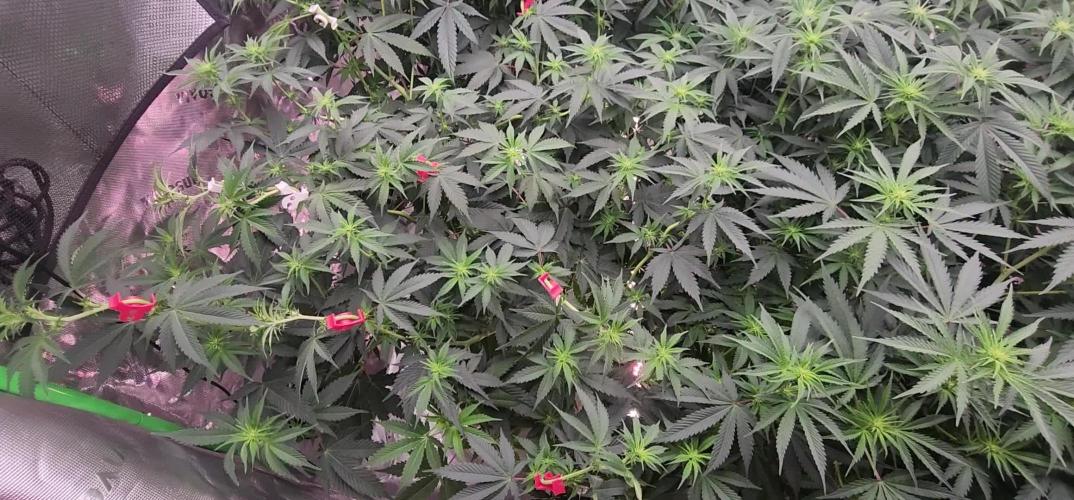
The roots had begun to demand more.
No longer content within their smaller vessels, the chosen plants of Eldritch Gardens were transferred into greater chambers, black containers vast enough to house the expanding hunger beneath the soil.
Plant #1 — The Fat One — emerged as the largest presence within the garden. Broad, vigorous, and deeply rooted in its new domain, it stood like some ancient green monolith beneath the false sun.
Plant #2 — The Battered One — continued its unnatural ascent through the ranks of growth. Node after node unfolded with terrifying efficiency, each new layer arriving before the others.
The crimson coloration remained. The pale markings upon certain leaves lingered like cryptic symbols written in chlorophyll and flesh. Perhaps the LEDs demanded a price.
Plant #5 — The Red One — Though still alive and developing, Yellow hues now crept softly through parts of the foliage, subtle as old parchment aging beneath candlelight. The red stems deepened further, veins illuminated beneath the cold LED glow like blood beneath translucent skin.


Likes
18
Share


@JeyGanesha
Follow
Prima settimana di fioritura . tutto ok .ma con qualche altra iniziano a spuntare sorprese inaspettate....beh questa è la natura 🤷😂💪👍🙏
Likes
117
Share


@BigDaddyK
Follow
Ok this is my Full guide with pictures on how to setup a Deep Water Culture grow, items you will need for this grow -
Firstly a TENT or ROOM i use a tent
REMEMBER stuff you buy NUTRIENTS off eBay and Amazon could be decanted (watered down) , or cheap chinese fakes (Ph Meters, PPM meters) you should really buy these things from you local hydroponics store,as they are guaranteed , i ve dropped a few into the bucket and they are fked,its been a sunday night with a bank holiday monday and i m fked,
1) Ph Down - makes the ph of water LOWER - this is VERY STRONG SHIT , wear gloves and googles if you are messing with it, i drop a bit into my main reservoir Ph 6.9 ( maybe 10ml per 200L)
2) Ph up - makes the Ph go higher - also STRONG SHIT -only needed in Emergencies
3) Ph meter
4) PPM Meter or EC meter
5) 20L Bucket + moulded lid netpot
6) Air Pump ,air hose 3m ,air stone x2,
7) Pebbles to fill to top of netpot,
8) ROOT IT cubes , i use these and ONLY these, by that brand,i know why,and so im telling you,
9) Seeds - I prefer Fast_Buds ,autos ready in 10 weeks of 18/6 - top quality
10) Nutrients, I use Canna as they are the easiest, they have a way of filling the one side , if you take the top off you can squeeze into the measuring side - I would also recommend Advanced Nutrients,but they are more expensive - so you will need 1L Canna Aqua Vega A+B ( it comes as two parts that you cannot mix together , when you put this into the water you MUST stir it well before putting each one in seperately otherwise you will get salts formed and crystals floating around,10 ml per 10L week 1-2 ,15ml per 10L week 3, 20ml per 10L in week 4)
1L Canna Aqua Flores A+B (as above) 25ml per 10L week 5, 30ml per 10L week 6 ,30 ml per 10L week 7 , 25ml per 10L week 8,15ml per 10L week 9, 0 per 10L week 10
250 ml Canna Rhizotonic (roots love this use this from start 20 ml per 10L and cut down after 4 weeks to 5ml per 10L up until week 9
250 ml Canna Cannazym ( breaks down dead roots, enzyme of some sort) 15ml per 10L from week 3 through to week 9
250 ml CannaBoost - (quite expensive but worth it, DWC will show you why) 15ml per 10L week 3 to 4 , 25ml per 10L week 5-9
250 ml Canna PK 13/14 (bud booster) this is optional because you only add it once,personally i add 15 ml per 10L in week 7 so its stays in for 10 days
I leave my water for at least 24 hrs before using it, in a big old olive container i bought , i think its 225 L i might be wrong, but it was cheap , solid and had a top :)
I check my water levels ,my PH and PPM daily
11) Jubilee clips x3 - to secure the fan ,filter and outlet.( 5 clips if using air cooled hood )
12) Fans - i have 2 little fans and 1 big one = think about it, outside there is always good air flow -
13) Extractor fan -mine is 6 inch
14) Carbon Filter - mine is 6 inch im not overly impressed with any brand.
15) Ducting- 5m of 6 inch easy enough,well for me...
16) Ballast - LUMATEK -i found this one amazing and switchable.
17) Lightbulb -600w HPS ALL THE WAY but i would use 1000w HPS if i could keep the heat down, they both fit in same fitting
18) Air hood - i have a MAGNUM superXXXL it has screw in holders for glass , they are quite tight
19) Timer for lights , must be good quality , I do 17 hrs on 7 off as it's more natural
20) Syringes for measuring accurately
21) Bucket to mix solutions
THE GOLDEN RULE - you can always put in but never take out - never put in too much or undiluted into the reservoir unless you really know what you are doing, less is better than too much .
Ppm v EC - you may well buy an EC meter instead of ppm meter there is an easy way to convert between the two ~ 1.0 ec = 500 ppm
EC multiply by 1000 then divide by 2 to get ppm
This diary will start shortly but as so many people ask me how to setup HERE YOU GO :)

Likes
3
Share


@Earthsower
Follow
She is doing well with a lick of 300ml of nutrients the fuel dog is holding up so far with no leaf burn and healthy green leaves she stands at about 35cm
Processing
Likes
18
Share


@BufoAlvarez
Follow
Added hi yield mag sulfate due to nitrogen deficiency. Immediately got better
Moved light up as high as possible
Starting to have to think about a slight smell issue. I don’t have the luxury of a window to blow exhaust out of a window so I assume that’s my issue even though I have a carbon filter and whatnot.

Likes
9
Share


@High_Grade_Dadli
Follow
Plants loved their new home from last week.....the crown of one plant got broken off while I was deal with something else....so instead of trying to fix it or throw it out I decided to put it into a pot.....to my surprise 5 mins after doing that I realize it started to straighten up from the training of the tree it broke from....thinking it would be like that for a while until it pushes root.....woke up to find it fully straight and buds got fatter......hope it is a success would be first clone...#happy growing
Likes
3
Share

@NEPA-Cultivations
Follow
Another week left of the stretch should be where I want them...good grow so far
Likes
12
Share


@Socal6pak
Follow
STARTING TO SHOW SOME N DEFICIENCY ON THE LOWER FAN LEAVES. WILL NEED TO AMEND A LITTLE THIS WEEK TO CATCH UP. BUDS R NOT BIG. NEITHER IS PLANTS. I THINK STILL EASIER TO GROWN INDOORS. MORE CONTROL AND AUTO SEEMS TO GO BETTER INDOORS FOR ME.
I DONT KNOW IF OTHERS FEEL THE SAME WAY. BUT DEFINITLY MORE ECONOMICAL TO GROW OUTDOORS DURING SUMMER SEASON. FREE SUN.
Likes
19
Share

@eldruida_lamota
Follow
Vamos familia segunda semana de floración de estás apollo black cherry de SeedStockers.
Que ganas tengo de ver el progreso de esta variedad, las plantas están sanas, se ven con buen color.
La cantidad de agua cada 48h entre riegos.
Esta semana añadimos nutrientes de la gama Agrobeta.
Ya puedo confirmar que elimine la plaga de tripa con aceite de nene jabón potásico e insecticida para ácaros.
Las plantas están bastante bien ya llevan una semana en 12 horas de luz 12 oscuridad.
Estas próximas semanas veremos como avanzan.
Mars hydro:
Code discount: EL420
https://www.mars-hydro.com/
Agrobeta:
https://www.agrobeta.com/agrobetatiendaonline/36-abonos-canamo
Hasta aquí todo, Buenos humos 💨💨
