


Likes
18
Share


@valiotoro
Follow
Hello everyone 😎
Week 6 of flower for the Amnesia Zkittlez🍭
Only 1 plant left then finito✔️
Very nice smell super sweet🤤
The buds are super sticky🔥


Likes
15
Share


@SweetheartOG
Follow
The girls started to pre-flower on the 6th of June. They all have a slight smell when you rub the leaves. Kosher cake, Strawberry banana and the Forbidden runtz have a sweet smell to them. The Forbidden runtz reminds me of the smell of skywalker OG which is totally LUSH..!! The blackberry has more of an deep earthy smell with a slight bit of fruitiness. Super excited for the next few weeks with these ladies. Happy toking my peeps 😁
Likes
2
Share


@MG2009
Follow
06/16/2019
Star Cookies has her own tent back,and good thing because she is spreading out and reaching for the sky! I can only hope she is done with the stretch and ready to fill out, otherwise I'll have to raise the tents top somehow.


Likes
3
Share


@The_Doctor_Green
Follow
Hola a todos mis amigos.
Este diario llego a su fin, pero pronto comenzare otro, de esta misma cepa, pero para exterior, quiero probar. Que tal se comportan afuera🙌🙌🤩🤩💪💪

Likes
40
Share


@MadeInGermany
Follow
Info:
Unfortunately, I had to find out that my account is used for fake pages in social media.
I am only active here on growdiaries.
I am not on facebook instagram twitter etc All accounts except this one are fake.
Flowering day 43
since time change
to 12/12 h.
Hey everyone :-).
The buds keep getting bigger and tastier :-)
This week it was poured 3 times with 1.2 l each.
The tent was cleaned and everything checked and refilled.
Stay healthy 🙏🏻
You can buy this Strain at :
https://sweetseeds.es/de/cream-caramel/
Type:
Cream Caramel
☝️🏼
Genetics:
Blue Black
x
Maple Leaf Indica
x
White Rhino
👍
Vega lamp:
2 x Todogrow Led
Quantum Board 100 W
💡
Bloom Lamp :
2 x Todogrow Led
Cxb 3590 COB 3500 K 205W
💡💡☝️🏼
Soil :
Bio Bizz Coco
☝️🏼
Fertilizer:
Green House Powder Feeding
☝️🏼🌱
Water:
Osmosis water mixed with normal water (24 hours stale that the chlorine evaporates) to 0.2 EC. Add Cal / Mag to 0.4 Ec Ph with Organic Ph - to 5.8 .


Likes
14
Share


@PeaceByTheGram
Follow
Added strength by adding some LST clips from around my area. She’s on day 90 from sprout. Honestly the longest auto I’ve grown to date. No complaints. Just wish there was better support from the breeders. Anyway. Hope y’all enjoy the photos and video. She’s loving the new TSL2000 btw. Can’t wait til harvest day.


Likes
1
Share


Likes
25
Share


@pifflestikkz
Follow
Day 45
17/08/24 Saturday
Another watering today using de-chlorinated tap water pH 6 only.
Lemon skittles and XXL ammo are tall, bud nice and smelly plants!
The Kabul is more of a dense compact build, I'm excited to see what they grow into 😍
Picture and video update ✌️ 💚
Day 48
20/08/24 Tuesday
Feed today using de-chlorinated tap water pH 6. With Plagron PK13-14 and power buds.
Noticing the stretch stop, and now packing out there bud sites 💪💚
Vid + pic update ✌️💚

Likes
85
Share


@Pungolian
Follow
So a bit of a setback this week to report. We took a direct hit from Tropical Storm Ophilia on Friday/Sat and Monday i had a dead limb. Dont think it was the storm though as it wasnt broken at all so im thinking some type of boring worm or something. Chopped that limb off and havnt looked back. Finally saw some sunlight for the first time in over a week yesterday! Cooler temps i have cut back on water from 4 gal/ day to current 2 gal/day. Still feeding top scratch every 3 days or every three waterings. Keeping up with mold and bug issues, very little of either, Lost Coast Plant therapy and BT are my friends. Hope everyone else is having good harvests this fall, till next week!

Processing
Likes
25
Share


@parachute
Follow
The buds are fattening and getting covered with trichomes very well, most of them are healthy and flowering at the same stage, orange pistols are already popping out, thinking about harvesting in a week or some.


Likes
5
Share


@yerbatero
Follow
Como escribí anteriormente, no pensé en realizar un seguimiento, por lo tanto, no tengo fotos de todas las semanas. Desde esta semana sí llevaré un seguimiento. Estas fotos y videos son del día que inicia la semana 6. Desde el inicio de la floración, la planta ha multiplicado por tres aproximadamente su tamaño. El olor es riquísimo, como a frutas exóticas muy dulces. Fui demasiado ambicioso y le di demasiada vegetación considerando el pequeño espacio de la carpa. Como dispongo de muy poco espacio, quise aprovecharlo al máximo; todo el espacio está repleto de puntas, lo que no deja pasar mucha luz a los cogollos de abajo. Hay demasiada materia vegetal, por lo que, para evitar la aparición de hongos, tengo muy vigilada la humedad. La extracción de aire y la ventilación están encendidas casi todo el tiempo para evitar la botritis. Nos vemos la siguiente semana.

Likes
30
Share


@Grower_Of_Persia
Follow
at last we are in harvest week. im happy at all it was a good experience.
my dry and cure style is this:
4 days of hanging upside down to get water activity lower to around 0.6 in 50% humidity and 26 C temp (i know its a little high but we are in a hot summer right now and i cant get it lower even with air conditioner) and then after 4 days of drying i remove leaves and stalks, trim buds and move them to jar for the rest of their life :D . and in the first 4 days of curing i open the jar door and let hem get some fresh air in the jar for about 5 minutes and close the jar door again, after 4 days of curing like that buds are smokable but they will get better as they getting cured about 1 month.
buds are dense and frosty but very little in size!
i had some mistakes and problems with this grow so i admit i wasted them .
lesson from this grow :
grow autos far from fems and always give them 20 hours or more light per day to get good weight in little time.
Likes
46
Share
@valiotoro
Follow
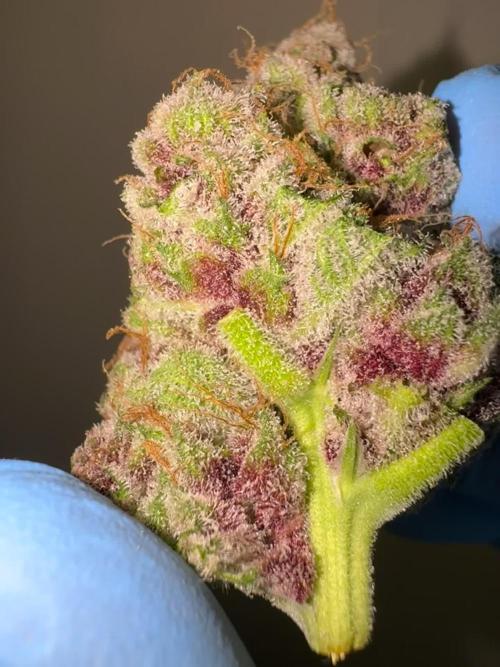
The smell on this one is next-level for real!
I got 2–3 different phenos, but they all carry that same loud scent I’d describe it as sweet and fruity
I honestly can’t wait to smoke it, and judging by the insane layer of trichomes she’s rocking, I already know she’s gonna hit hard.😝😝
Likes
6
Share


@Shadow_grower89
Follow
i harvested the top part of my grapefruit plant as i checked the trychones and they were 20% amber the lower half had mostly cloudy but no amber ro im going to give it a last feed then flush in about 5 days for 7 days should bd ok then
..
Ive raised thr grapefruit off the ground to stop fluids mixing between them as one gonna have a few more feeds where the other is on flush
My other plant the bushy banana blaze is foing ok had a good 2-3 weeks i rekkon till i even think about harvest
