


Likes
19
Share


@Ganjagrandaddy
Follow
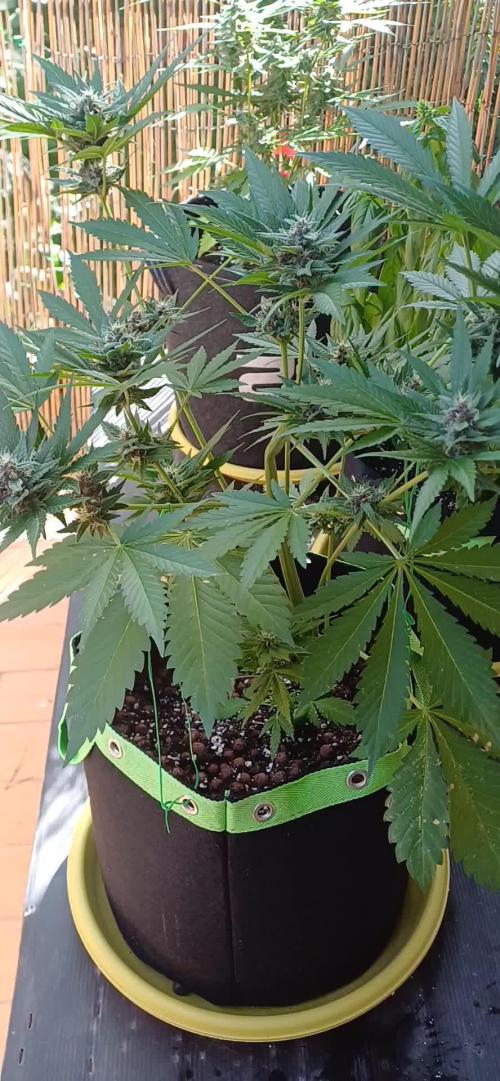
Day 9 above soil: Well they survived their 1st week above the soil and are looking fairly happy among the other girls in this Fast Buds fun grow. I have a clear front runner with #3 of the girls being the most developed and certainly the largest of the entire crop.. All factors bed
sides medium are the same within the room and the environment is the best control I have had for any of my previous grows so there shouldn't be any "better position" or best of the nutes situation here either. Genetics obviously plays a big role but her speed is above what I expected and even faster than her sisters. They have had their 1st coco feed today and have been given a few waters throughout the week with the biosys tea. I have no real concerns on these triplets and see them growing nicely at the moment. The slight pale issue is not bad on these three so let's see what they can do when they get that organic gold into their stems.


Likes
6
Share


@Nvchods3
Follow
Buenas gente !! 🤝🙋♂️🏾
Despues de un par de meses , volvemos con todo al autocultivo.
esta vez probare las variedades Automaticas de Fastbuds
Processing
Likes
6
Share


@Creatorknbsland
Follow
Essa semana engorda continua ! Esta dando uma amarelada nas folhas inferiores mais estou com fe que seja normal! Vamos aguardar esse semana agora para ver o que rola!

Likes
92
Share


@DogDoctorOfficial
Follow
🌸 Week 3 Flower – Growing Strong, Tall, and Vibrant! 🌱
Hey Grow Fam! It’s already Week 3 in flower, and I’m thrilled to bring you this update because these plants are doing phenomenally well! Some are stretching up so tall that I might have to get creative in the coming weeks! Fruit production is well underway, and it’s absolutely amazing to watch the canopy fill out as these girls reach their potential.
Aptus Holland Pack Unboxing & New Additions
This week kicked off with a big arrival: the Aptus Holland nutrient pack! 🙌 I couldn’t wait to share the unboxing with you all; there’s a video up where I go through all the goodies, so check it out if you haven’t yet! Between the photos and videos, you’ll be able to see just how well these nutrients are already feeding these green beauties. Having a blast sharing more content lately—I’m in the zone with editing and creating, so get ready for even more shares!
🌡️ Environmental Control and Fine-Tuning the Reservoir pH
Temps this week have been holding around 27.2°C with RH at 65.2% and CO2 at 800 ppm, creating a VPD of 1.26 for ideal flower development. The lighting intensity is at 833 PPFD, and the solution in the reservoir is fine-tuned to a pH of 6.22, EC of 475, with a temp of 21.8°C.
Let’s talk pH in the reservoir: it’s a dynamic process, and I’m constantly adjusting it to keep everything at the right level. The pH tends to rise throughout the week, and each day, I work it back down, fine-tuning it to keep those plants happy and balanced. Managing pH is truly a hands-on job, and it’s worth every moment. I love staying on top of it for optimal nutrient uptake—it’s all about consistent effort and keeping that perfect range dialed in.
Leaf Maintenance & Selective Defoliation
These leaves are HUGE and gorgeous, creating a lush canopy that’s nearly too perfect! I’ve been taking a few leaves here and there, focusing on leaves that may be blocking light from reaching lower parts of the plant. Selective defoliation at this stage is key because it opens up airflow and allows light to penetrate deep, boosting energy distribution across the whole plant.
Big, healthy leaves mean we’re getting excellent photosynthesis, but a gentle, strategic defoliation can guide that energy toward those developing buds. Leaf removal is all about balance, giving the plant space to breathe and thrive while still maximizing growth in flower!
🌐 TrolMaster + App – Real-Time Precision
Huge shoutout to the TrolMaster system and the app—keeping everything in sync and at peak performance is honestly effortless with this ecosystem. The app provides a full overview of each environmental parameter, allowing me to make real-time adjustments as needed and track trends over time. The precision here is unbeatable, giving me complete control over temps, humidity, CO2, and VPD, ensuring my girls are in a controlled paradise 24/7.
What I love most is how the app records everything automatically, so I always know exactly where things stand without having to keep separate records. If you haven’t tried TrolMaster yet, it’s a total game-changer for any grow setup!
💥 Shoutouts & Gratitude
Massive shoutout to TrolMaster and Aptus Holland for powering this grow with tech and nutrition that’s second to none. And, of course, gratitude to Pro-Mix for the superb growing medium and to the seed banks behind the genetics. We’re running strong thanks to each of you.
And to the whole community—thank you, everyone, from new friends to seasoned followers, lovers to haters. Your energy, whatever form it comes in, is all part of this journey, and I’m so grateful for it all. Special shoutout this week to my brother Daggadna—head over to IG and give him a follow! And if you’re loving the journey, remember to like, comment, and subscribe—it really helps the channel grow and reach others who may also dig this content!
Discount Codes so you can save big on your next check out 💚💚💚
Kannabia - DOGDOCTOR 30% off
SeedsmanSeeds - DOGDOCTOR 10% off
CannaKan- DOGDOCTOR 15% off
terpyz.eu - DOCTOR 15% off
The Neutralizer - PORKIT5-DOG 15% off
As always thank you all for stopping by, for the love and for it all , this journey of mine wold just not be the same without you guys, the love and support is very much appreciated and i fell honored and so joyful with you all in my life 🙏
With true love comes happiness 💚🙏 Always believe in your self and always do things expecting nothing and with an open heart , be a giver and the universe will give back to you in ways you could not even imagine so 💚
Friendly reminder all you see here is pure research and for educational purposes only
Growers Love to you all 💚💚💚


Likes
48
Share

@Nvchods3
Follow
se le realizo transplante de 5 a 11 lt definitiva, le dare 1 -2 semanas mas antes de hacer el cambio de fotoperiodo.
Likes
18
Share


@Green_Blood
Follow
Beautiful fade on all the girls.
Flushing for a few extra days really made a difference, and i did notice a slight final increase in bud size.
Sometimes when you convince yourself it is done cause you are anxious to get it down and dried to smoke a sample
you can miss out on a few extra days of bulking and final development. :)


Likes
17
Share


@Professor_Chaos
Follow
Beginning of week...
The flushing has begun! I flushed with 1L of just pH'd filtered water.. Then flushed with 1L of distilled water.. Not pH'd.. Havent used FloraKleen yet, wanting to get the TDS down as much as possible, then using the FloraKleen to remove the leftover nutrients and whatnot..
Next day...
Flushed with FloraKleen in distilled water pH'd to 6.3.. Runoff is now reading 50 PPM 6.3 pH.. She is doing great.. Can't wait to see what this strain is all about!
Mid week..
Man, this plant smells so amazing! I can't wait to taste this girl! I've just been giving her refrigerated distilled water daily.. I'm gonna start using JUST rainwater pH'd to 6.2 - 6.3 once this gallon of distilled is used up lol.. So far, I've gotten the runoff TDS down to 30 PPM.. Perfection! Can only get better (...or stay the same.. That's fine too lol) from now till harvest.. I may do the 48 hours of darkness.. But that's next week.. Love this strain so much!
End of week..
I don't think this strain is a colorful one.. Which is fine.. Quality is still there for sure! The smell is awesome! Milky/cloudy trichomes.. She should be ready for harvest in another 7 - 8 days! I can't wait to taste this girl! Just plain, low TDS, pH'd water till then. On to the (last) next week!...

Processing
Likes
8
Share


@MMatos
Follow
Week 1
Today I started 2 Strawberry Pie Auto from Fastbuds. 🍓🍓
I'll start by giving 18 hours of light and controlling the ph 6.5 without nutrients
Let's see if they want to grow or not.
Likes
7
Share


@Mr_nugs_lover_David
Follow
She'll go to sleep earlier tomorrow as she's gonna be flipped into flower finally on her day 30 since planted February 15th, cannot wait to see how big she gets on the final stretch! Stay tuned everybody!
My lady have been flipped into flower on February 15th finally! Let's see how big she gets in the first 2 week of flower! Now the fun begins!! 💚💛❤️👨🌾

Likes
121
Share

@squalino
Follow
Le Bilan d'une Session Mémorable & Remerciements
Une culture d'une grande facilité :
Babouch s'est révélée être une plante très facile à cultiver. Malgré quelques erreurs totalement involontaires en cours de route – notamment un pH monté trop haut à cause du bulleur ou les fortes chaleurs causées par les lampes trop proches (liées à sa grande taille) combinées aux températures extérieures – elle a tout supporté avec une résistance incroyable. Le système Autopot a fonctionné à merveille, maintenant la plante saine et en excellente santé tout au long de sa vie. Elle a su offrir de magnifiques têtes bien denses malgré les excès de température.
Le défi de la manucure finale (Défoliation) :
La défoliation finale avant séchage a été particulièrement compliquée. À cause de sa forte densité et de sa forme en foxtailing (queues de renard), retirer les petites et grandes feuilles incrustées au cœur des têtes s'est transformé en un travail de précision. beaucoup de temps passé a retiré 6 heures de travail à la main .Beaucoup de "monofolioles" (feuilles à une seule pale) s'étaient formées à l'intérieur même des buds, une réaction typique de la plante face au stress thermique pour essayer de transpirer et de se refroidir.
Conclusion :
Je ne pouvais vraiment pas rêver mieux pour cette session. Par sa structure, sa résilience et ses arômes, Babouch reste l'une de mes variétés préférées à ce jour.
📣 Remerciements Finaux
Un immense merci à Fast Buds pour cette génétique incroyable qui m'a permis de travailler cette magnifique F2.
Un grand merci à Biotabs pour leurs engrais formidables et si simples à utiliser au quotidien, ainsi qu'à @MIA_BIOTABS et @Mrs_Larimar pour leur présence et leurs précieux conseils tout au long de l'aventure.
Je tiens à remercier chaleureusement @Dryrocket pour l'opportunité et la chance d'expérimenter leur appareil de séchage Dryrocket. Babouch n'a malheureusement pas pu attendre plus longtemps dans le noir et a dû être coupée hier, mais j'espère recevoir l'appareil aujourd'hui ou demain pour y installer ses têtes de Frostbanger !
Enfin, merci à tout le monde, à toute la communauté qui a suivi, commenté et fait vivre ce journal du début à la fin ! J'espère qu'il vous à plus .
Malheureusement se sera la dernière jusqu'au 1 septembre. les vacances approchent à grans pas et je n'aurais plus le temps de refaire une nouvelle culture.
Mais je vous réserve pleins de surprises pour la rentrée. BONNE VACANCES À TOUS .
Likes
56
Share


@TOTEM
Follow
Here we go! New setting for this CBD Crack. Just under the big 384W led panel. I hope she doesn’t stretch much, or she will be light burnt for sure. It makes me smile because it’s an autoflowering strain that wants photoperiod-style nutrients. This week I started giving her bloom nutrients. I forgot the Bud Candy, but I’ll add it on the next watering (I think in just a few days). Much hype for this CBD Crack. Canadian ruderalis definitely makes the difference. Great job FastBuds!
Likes
47
Share


@terpproducer
Follow
👇 This week:
---
Watered again as usual with the standard Plagron scheme + Calmag (last feeding with Alga Grow) (PLEASE CHECK YOUR WATER BEFORE USING CALMAG)
Phosphorus foliar spray - red stems pretty much gone now
PPFD at canopy height approximately 350-400, VPD ~1
Performed a major defoliation again
Ordered more Autopots 😂
---
Happy growing and thanks for checking out my report! I really appreciate you! 😁💪🙏

Likes
39
Share


@J_diaz420
Follow
Nuevamente se realizó una pequeña defoliación a hojas que tapen alguna flor 👍👨🌾🍀


Likes
33
Share


@TeknoRanger
Follow
🌱 Sour Apple⠀⠀⠀
🌸 flowering 9 weeks⠀⠀⠀⠀⠀⠀
💚 70% Indica, 30% Sativa⠀⠀⠀⠀⠀
💣up to 27% THC⠀⠀⠀⠀
👅Apple, lemon⠀⠀⠀
⚖️ 550g/m²⠀
Sour Apple was created by an intersection of the original Sour Diesel and a Pure Kush. It is an indica dominant hybrid with a combination of both indica and sativa effects. It has an delicious intense taste of sour apples and lemon and a gigantic potency.
The rockhard buds are covered in a thick layer of milky white trichomes and are packed with sweet resin. Users describe the high of the sour Apple as a strong mental shift, a uplifting head high that leaves you motivated and focused with a sense of overwhelming euphoria and social tendencies. This is followed by a slow fade into an intensely overwhelming couch-lock. Sour Apple sends her 27% of THC stright to your mind to kick you in other psychedelic spheres. We proudly present this unique goddess to all the growers in the world.
GROWING SOUR APPLE
When growing indoors it is a good idea using screen of green or sea of green methods. You can expect big yields of 500g or more per squae meter indoors, 700g per plant outdoors. The flowering time is 9-11 weeks. Indoors, Sour Apple is a vigorous grower with many side stems which can be trimmed to keep the plant in bounds. Indoors, the plants grow between 1,00-1,50 m depending on the introduction of the flowering phase, outdoors Sour Apple can reach four metres of hight.
MEDICAL USE
Because of its strong effects Sour Apple is an ideal strain for treating patients who suffer from conditions such as chronic stress or anxiety, chronic pain due to injury or illness, and sleep disorders (insomnia and sleep apnea). In low doses it is daytime suitable for medical applications, at higher doses, it is the ideal weed for medication at the evening.
