


Likes
10
Share


Likes
12
Share

@Hempface86
Follow
Big shout out to Herbies Seeds for making this grow possible, this is a very exciting grow for a couple reasons, one being that I love purple haze, and secondly, this is my first run with growdots so I'm really hoping they work great because I don't have the time with work. Anymore to do my old concoction, because it would take me literally 3 hrs some days just to gave all the plans their own individual feed, because I would make each batch for each individual plant depending on their needs... I hope everybody's doing well. I am doing better than I was doing, and so God is good ... i hope everyone's having a great day. And I really look forward to this girl growing out because there's a good chance as well that this is gonna be my last auto flower for a little bit.. I have a couple that I wanna grow ( purple b****** eater by roc bud and banana daddy bx auto my ethos ... both thanks to my buddy @Grow4releaf...
Hope everyone is doing well.God bless and happy growing ✌️
Likes
22
Share


@donovanliam
Follow
Love the amount of growth. Pruned a bit just to let light in but i cut as little as possible. If anyone has any suggestions of what to do or if you think im doing something wrong please tell me. This is only my 3rd plant ever so i have alot too learn and dont mind criticism

Likes
50
Share

@DerFredlFesl
Follow
Die zwei explodieren förmlich! Schaut aber alles so weit ganz gut aus, nur meine Lampe hängt jetzt wirklich am Limit hehe.
Die zwei bekommen am Sonntag vor meinen drei Wochen Urlaub noch einmal eine emtlaubung. Und dann sind sie auf sich alleine gestellt.
So heute noch einmal richtig entlaubt, dass tut immer so richtig weh....
Habe heute auch schon das letzte Mal gedüngt mit dem Bio PK und calmag.
Bin sehr gespannt wie die zwei nach drei Wochen Marokko so aussehen :D.

Likes
Comments
Share


Likes
1
Share

@Bones_1986
Follow
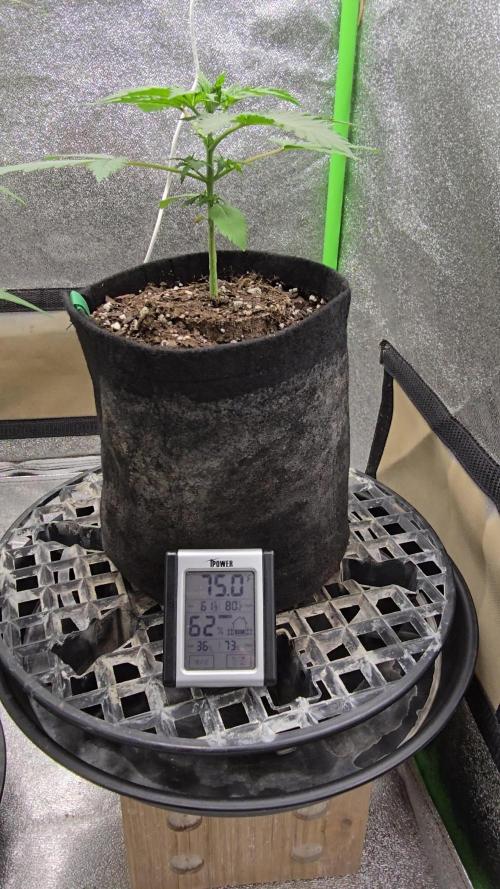
Day 50.
Very annoyed at myself as 2/3 plants needed a strong feed, but the other one didn’t but forgot and fed the strong feed to all 3. As a result the 1 what was already thriving has now foxtailed on the main cola. Such a shame, but lesson learned.
That plant will have just a water feed for the next week, and PH run off was also high at 6.8 also contributing to the foxtail I’m guessing so next few feeds will be PH at 6.0.
Another 15 - 20 days to go I’m guessing, I will now be swapping big bud out for overdrive, really make these swell to the finish line.
Likes
3
Share


@CaliJ
Follow
beginning of the 6th week, I add pk 13/14. everything is going well😎. 12/07: too hot, installation of an air conditioner

Likes
40
Share


@MadeInGermany
Follow
Info:
Unfortunately, I had to find out that my account is used for fake pages in social media.
I am only active here on growdiaries.
I am not on facebook instagram twitter etc All accounts except this one are fake.
Hello, everyone .
The lady is developing beautifully.
She also responds very well to training.
You feel extremely comfortable with GreenBuzzLiquids 👍😊.
This week the water was poured twice with 0.8 l each time (see table above for nutrient administration).
Topping has been applied once this week and I'll do it a few more times before it goes into bloom.
I sprayed them 2 times with GreenBuzzLiquids Spray this week.
Otherwise, as always, everyone was checked for their health, the tent was cleaned and observed for half an hour 😂.
I wish you all a lot of fun with the update.
Stay healthy 🙏🏻
You can buy this Nutrients at :
https://greenbuzzliquids.com/en/shop/
With the discount code: Made_in_Germany you get a discount of 15% on all products from an order value of 100 euros.
You can buy this Strain at :
www.Zamnesia.com
Type:
Runtz
☝️🏼
Genetics:
Zkittlez x Gelato
👍
Vega lamp: 2 x Todogrow Led
Quantum Board 100 W
💡
Bloom Lamp : 2 x Todogrow Led
Cxb 3590 COB 3500 K 205 W
Soil :
Canna Coco Professional +
☝️🏼
Nutrients :
Green Buzz Liquids :
Organic Grow Liquid
Organic Bloom Liquid
Organic more PK
More Roots
Fast Buds
Humic Acid Plus
Growzyme Big Fruits
Clean Fruits
Cal / Mag
Organic Ph - Pulver
☝️🏼🌱
Water: Osmosis water mixed with normal water (24 hours stale that the chlorine evaporates) to 0.2 EC. Add Cal / Mag to 0.4 Ec Ph with Organic Ph - to 5.8


Likes
9
Share


@Johan2
Follow
Pulled day 59 of flower could waited a week more.Reasonably happy with the outcome.
Very incense kind of smell but chocolate taste.
Made some bag shake hash , about
2gms - lots of cloudy trycs in the hash. It’s worth checking the quality of the shack hash with a microscope. have made 400gms of canna-butter for edibles.
Not a bad yield . I was expecting a bigger yield.
Looks good in the jar .


Likes
25
Share


@Kikiwindsurf
Follow
HAPPY 420 GUYS !! GG day 46 y 47 and LH day 38
23/4/2020 : Lemon haze y la GG con LST estan muy resinosas, la que tiene corte apical no tanto, se nota el estrés y un poco el exceso de nutrientes porque come menos que su hermana. Solo he regado con agua de lluvia y PH regulado a 6. Ultima semana iluminacion muy inestable (unos dias 10 horas otros 12h otros 20h.... Creo que podre mantenerlo estable en 20 horas hasta el fin, pero controlar la temperatura debajo del HPS las horas que no hay sol se me ha hecho muy complicado... Sigue atento y recuerda que tengo una duda sobre la nutrición de mis niñas en mi pagina !
Likes
24
Share


@Easygrower
Follow
Hello growers day 71 in the garden with the purple lemonade she is ripening up now getting close to peaking I think just waiting for my new loupe to get here then I can check some trichomes up close still just giving here water all is well until next week happy growing stay safe✌️


Likes
10
Share


@Grey_Wolf
Follow
This Mexican Airlines Plant is developing nicely after the initial stretch , I gave her 1/3rd of a cup of Mr B's Green Trees Bloom Mix plus a qtr tspoon of Great White.
It is fairly easy to apply you simply sprinkle the Bloom mix and Great white across the soil around the base of the plant and water it in well.
Thankyou for checking out my diary once again Happy New Year From grey Wolf
Likes
9
Share


@DisTentAint4Campin
Follow
0o0o0of bacio belts she is growing boy and stretching in the closet I got plenty of room she was a make shift closet gna go a different route next time its just to hot in the room I keep the door closed alot due to a fucking terrorist of a cat luckily my bedroom is fucking huge plants making it hot 🔥 up in my bedroom
Likes
12
Share


@Socal6pak
Follow
start to smell now. got some sweet fragrance. but buds kind of small. hopefully they will bulk up in size. no far no pests. no caterpillars no grasshoppers no aphids.
Likes
14
Share


@TOMI08
Follow
Csak a Trainwrecket videóztam
Sátorban 30celsius és imádják
A Trainwreck elkezdett csilogossá válni de az illata nem erősödik ami miatt aggódok...
Tegnap adtam neki canna pk-t elősször
A héten már superthirve vitamint akarok nekik plussz energia miatt

Likes
30
Share


@DogDoctorOfficial
Follow
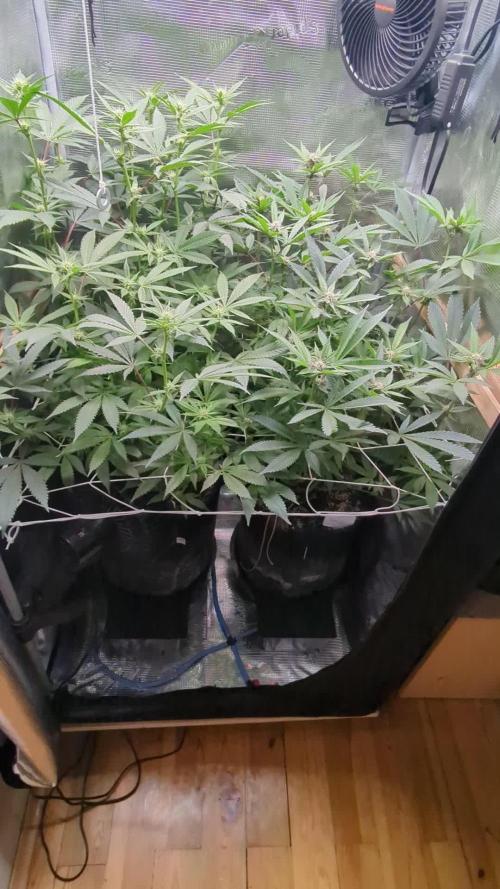
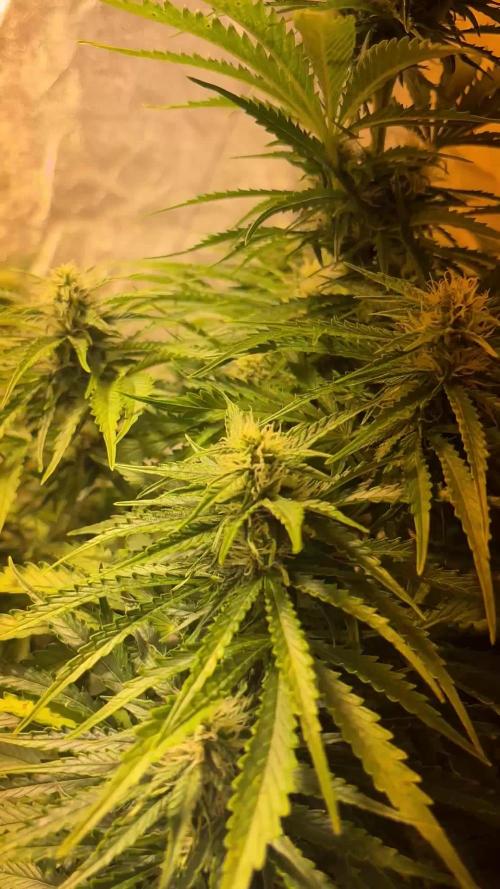
🌿 The White OG – Harvest Report 🌿
Week 18 – From Seed to Shine
And here we are, my dear friends… the moment we’ve all been waiting for. Our magnificent White OG from Seedsman has reached the finish line of her incredible journey — and what a journey it has been.
This girl came through like a warrior queen. Towering, majestic, massive in size, with hues of gold and fading leaves that paint a perfect picture of the season’s farewell. Her trunk, once soft and green, now stands strong and thick like the base of a tree — a true sign of her strength and maturity.
Each branch was heavy with resin-coated dreams. The aroma, the colors, the crystals — everything speaks of a harvest made with love, time, patience, and care.
She is now hanging upside down, peacefully drying in her final stage, at a stable 18°C with 58–60% humidity. For the next couple of weeks, she rests — transforming, curing, becoming the essence of medicine and magic.
No root talk, no weights today — today is about her beauty, her grandeur, and the end of one cycle that leads to the beginning of another.
A huge thank you to all who’ve followed along — the GrowDiaries family, the sponsors, the community, the haters, the lovers, and every single curious soul stopping by.
And of course, a warm invitation to join me on Instagram and YouTube, where even more is shared, and where the Dognabis Cup is just beginning…
Much love and light,
🌿💛 Let her dry, let her shine.
DD
As always thank you all for stopping by, for the love and for it all , this journey of mine wold just not be the same without you guys, the love and support is very much appreciated and i fell honored and so joyful with you all in my life 🙏
With true love comes happiness 💚🙏 Always believe in your self and always do things expecting nothing and with an open heart , be a giver and the universe will give back to you in ways you could not even imagine so 💚
Friendly reminder all you see here is pure research and for educational purposes only
💚Growers Love To you All and remember to keep that smile big and alive 💚


