
Likes
Comments
Share


@TheHazeMeister420
Follow
The video says enough. Week 3 of flowering. I put them in a dark place for 12 hours so the flowering begon earlier. I live in the Netherlands so the autumn is not nice for weed plants.


Likes
36
Share


@Gorrilla420
Follow
Another week gone for these 2 girls, they are looking very good and strong, getting some lovely autumn colours coming on the one at back so think she will be down soon. Will start to check trichomes on her next few days, as for the other one she’s just starting to fill out now, keeping the feed going for another week or so. Amazed by the amount of thc that’s on the girl looking forward to getting her down and trying her.
Happy growing🌱

Likes
5
Share

@MrGrOH1008
Follow
Just water to bring em home!
Day 59: should be their last watering, then let em dry out before harvest
Likes
15
Share


@MTSCannabisTH
Follow
Day 5 12-11-23 LED 24 Hours + Co2 500-600 Ppm
Day 6 13-11-23 LED 20 Hours


Likes
9
Share


@russrahl
Follow
First week of flowering went good, plants are not really starting to stretch to much yet, screen is pretty much full already so I will probably just fill the last few squares on each side then I’ll add the second screen and let them grow up into it. I did a heavy defoliation at the end of week 1 as the screen was way to crowded. I’m going to wait till the end of week 2 and clear everything under the first screen then. Plants were also showing a little bit of nutrient burn on some of the leaf tips so I added about 3 gal of fresh water to my reservoir to dilute the mixture a bit. Overall it’s a very robust and leafy plant so far, lots of shouts coming up into the screen, should be a pack tent anyway. I’ll add more pictures throughout the week as well. Cheers 💨


Likes
15
Share


@NSCanna
Follow
Compost tea turned out well, let it go for 26 hours total and geared it towards fungal. Also took some soil samples several days later around the stalks and found a lot of nematodes and protozoa which is what you want to see. Lots of different types of nematodes so what your looking for are the bacterial feeders (there are charts online that show you how to identify them). Mycorrhizae can be identified by it's dark colour, uniformity and segmented nature. Testate amoebas live in a translucent shell like a snail and are easy to spot but hard to spot moving due to my shitty microscope, but look for the tentacles. Also found some eggs with movement inside, no idea what they are but they have vacuoles and flagella.
She is really getting sticky and smelly now; berries with herb notes. You can see the resin stretching over the trichomes in the last pic.
No signs of senescence yet so I'm not going to feed them, they should have plenty of food anyway as this is a second run of the same soil.

Likes
3
Share

@Fyno_TH
Follow
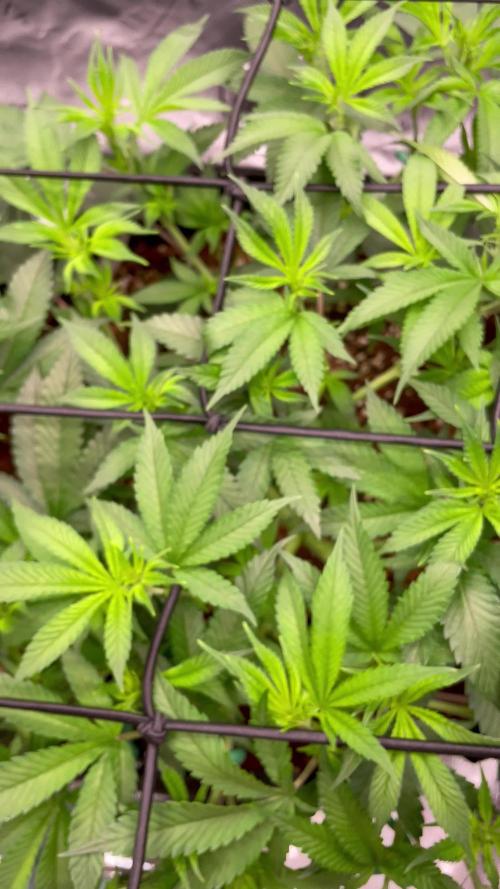
Week 4 update 🌱✨ — the tent is filling out fast! The main plant is spreading beautifully under the trellis after topping + LST. Side branches are shooting up and filling the grid nicely 👀🔥.
Second plant is still smaller but showing strong recovery — fresh green growth and stronger branching since the 5-gal transplant 💪.
Feeding Corex + Eldex + Terra + CalMag + Mira (~1,400 ppm @ pH 6.0) always to 10–20% runoff. Both are drinking heavy now and responding well.
Temps holding around 27 °C with RH 60–70% 🌬️ — leaves are praying all day. Trellis training continues this week as I prep them for a strong stretch before flip. Flowering is getting closer 🚀🌿.”

Likes
21
Share


@w33dhawk
Follow
Hi liebe Freunde des grow sports ✌️, ich hoffe die Woche mir euren Ladys war genau so problemlos wie meine 😁.
So zum wesentlichen am 30.04.22 war wie immer nur zu schauen dann am sonntag den 01.05.22 war giessen angesagt, reines wasser (ph 6,5) und diesmal 0,4 g/L wasser microbes von biobizz werde diese woche keine Nahrung zuführen da ich finde das die ladys ein ziemlich sattes grün vorweisen. Montag den 02.05.22 war Nach justieren der Äste damit die t-Form einiger maßen erhalten bleibt. Am 03.05.22 musste wieder alles neu justieren da die befestigung nicht richtig saß. 04.05.22 für die Lady im 3,6 L Topf gab es heute das 2. Topping und weiteres justieren für sie damit die t Form bleibt. Am 05.05.22 war dann das 2. Topping für die anderen 4 die im Zelt bleiben dran und wieder neues fixieren der t-Form. Und am 06.05.22 musste ich wieder giessen reines wasser (Ph 6,5) das war es mal wieder für diese woche, euch allen ein Mega wochen ende........
Likes
2
Share


@cafer
Follow
My plants are growing healthily and have already entered the flowering period.

Likes
5
Share


@Brasson
Follow
Haven't done any feeding so far, I've been usong miracle grow so I think that's the only reason it's doing okay. I'm buying Remo kit nutrients this week and im excited to see what a difference it will make. But any advice on how much I should do for her first feeding or even what I should start with exactly would but greatly appreciated.
Likes
7
Share


@Meksi2790
Follow
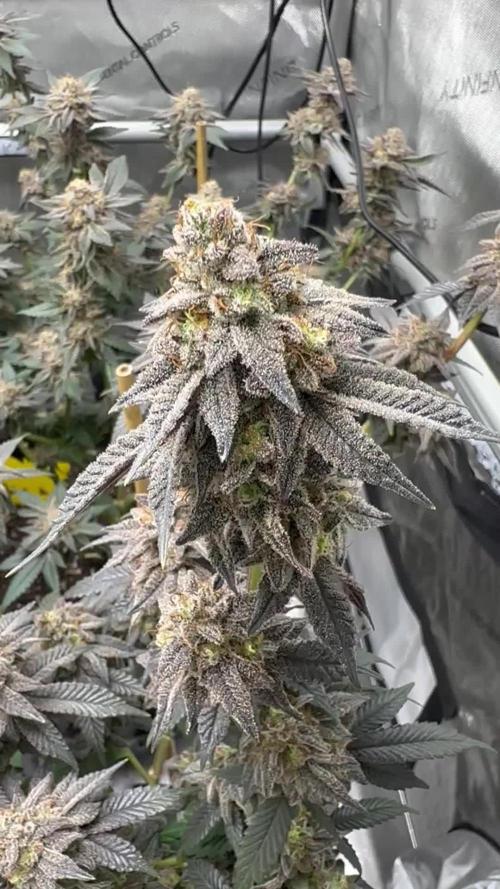
nice and clean down below so the energy can focus on the top maintaining the same temperatures will start lowering next week to start bringing out the purple


Likes
6
Share


@BioGrowBayer
Follow
In der zweiten Blütewoche läuft alles ohne Probleme. Die Pflanzen zeigen weiterhin gesundes Wachstum und reagieren sehr gut auf die Bedingungen. Wir haben langsam begonnen, die Nährstoffzufuhr auf Blüte-Dünger umzustellen, um die Entwicklung optimal zu unterstützen. Gleichzeitig wurde die Lichtleistung schrittweise von 50 % auf 75 % erhöht, um den Pflanzen mehr Energie für die Blüte zu geben.
Zudem wurde eine leichte Entlaubung durchgeführt, um die Luftzirkulation zu verbessern und den Fokus der Pflanze auf die Blütenbildung zu lenken. Alles in allem verläuft die zweite Woche der Blütephase sehr vielversprechend.


Likes
31
Share


@birdmountain
Follow
It was probably the hottest week of the year with a maximum of 34° C, a lot of water had to be administered, especially the Frisian Dew in the pot. On the other hand, I continue to enjoy the good appearance of the plants, with no pests, caterpillars, aphids or similar to be found so far. Even the slugs are no longer interested in the leaves, there are now so many flowers in the garden that simply taste better. As the flowering that I have read about already begins with the pre-flowering, I can say that all the plants in this report are flowering. Only the Durban Poison is by far the fastest and is already producing buds and seeds. As I had used regular seed for the Durban Poison, I fertilised it with pollen from a remaining male Durban Poison. The seed pods are already visible and look promising. The Durban Poison flowers are purple in depth, at least in my phenotype, and it doesn't need as much water as Frisian Dew and Shaman. The Shaman and Frisian Dew in the garden are showing their best side and continue to grow diligently, they need much less water than the others, probably due to roots that reach deep down. Do Durban Poison, Frisian Dew and Shaman actually have tap roots?
However, I would really like all the plants to start producing flower buds now, as it is already mid-August.
Durban Poison 168 cm
Frisian Dew in Pot 236 cm
Frisian Dew in garden 201 cm
Shaman in pot 160 cm
Shaman in garden 197 cm

Likes
11
Share


@Mr_Motalovah
Follow
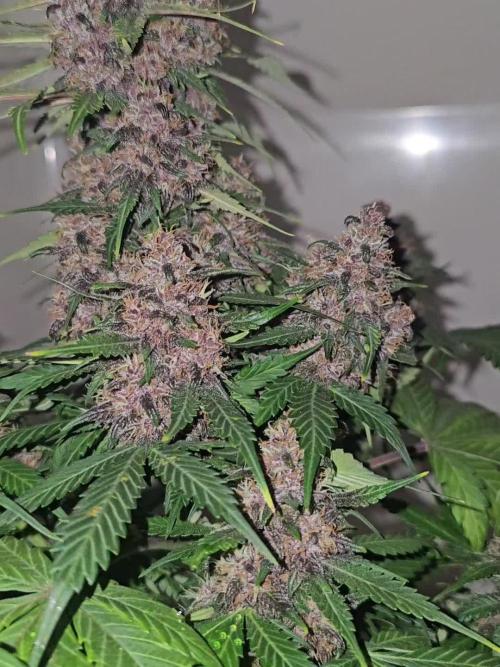
Ladies are looking and smelling amazing, truly zenzational!
You can notice the different phenos that came out.
One is pure zkittlez while the other three in bud structure are sweet zenzation (zkittlez x grape ape) in those three two of them smell like grape juice.
Hope that turns out like some fine red wine taste when cured.
Dropped the amount of water a bit and also nutrients.
From next week onward only water.


Likes
17
Share


@Mr_nugs_lover_David
Follow
My beautiful prince's is looking even better now that she's not having to deal with those freaking fungus gnats that were eating all the roots of my plant, I've got rid of them just by watering with a nematode called steinernema feltiae if you're having or have had the same infestation just apply predator nematodes like steinernema feltiae guys!
Likes
9
Share


@Surge
Follow
The above nutes were mixed with 33.8 fl oz of non ph tested tap water an fed every other day of week 10. Getting some low temps at lights out notice the purp