
Likes
Comments
Share


@Barcelona_Farmers710
Follow
Tardamos un poco en finalizar la anterior y además con alguna que otra plaga, estás se están recuperando de las plagas bastante favorablemente... esperaremos con el transplante coja más cuerpo farmers!🙏🍁

Likes
Comments
Share


@OhighOCannaGram
Follow
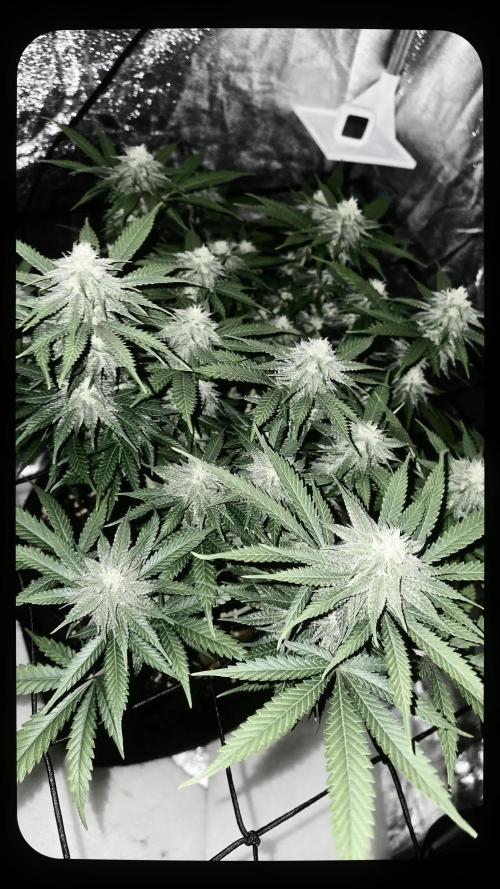
The aromas are starting to show themselves. I can’t even begin to describe them. Give me a couple more days and I’ll come up with my best educated answer. Thanks for checking out my grow series. Only about 4 more weeks before the harvest. Beyond excited.

Likes
45
Share


@masterofsmeagol
Follow
8/14 Everything looked beautiful this morning. Seems like I've got the watering schedule down better. I do have one gmo that looks hungry so I need to increase nutes. At least on that plant. Toasted toffy has little spits that could be water marks, pests or septoria. I don't think it's septoria. In the pastvi lost far more leaves when I had septoria. I've been crazy busy. I'm surprised things are going this well. I need to put up the final supports so I can add to them once I've got big heavy buds. I was really stoked to see everything doing so well. The plant in the 50gallon is the furthest in flower. I'm so grateful to have the ability to grow high quality cannabis for myself amd my wife. There's nothing quite like it. That hash I made turned out great. I think I'll press it today. Supports will be done this week. Saw a few aphids on the plant I cut down. Earwigs aren't here this summer or there would be NO aphids. Plus when I cleaned out the insides this morning I found some dead leaves WAY in the middle by the stalk. They would've eaten that shit if they were here. Birds and other predators seem to be keeping pillars at bay. I'm not seeing the damage and when I do sfind one it's absolutely tiny like a newborn. I'll think about whether I need to spray BT.
8/15 That fucking cancel button always fucks everything out. I was done no I need to start over. Didn't water last night. Found pm on my gmo in the 30. Interior of the plant. Should've defoliated better and earlier. Oh well. I'll treat with k bicarb or plant doctor. I'll have to think about it. Other plants are looking good. Well they all are. I just hate pm. I can't isolate it due to local laws so it is what it is. Nothing I haven't dealt with before. Watered today. The middle gmo in the 30 got 1.5 gallons. The other plants each got a gallon. Including the one in the 10gal and 50 gal. Its supposed to rain but only like .1. I also chose to feed today. All plants got a gallon. I DID NOT WATER THE EVENT HORIZON IN THE MIDDLE AND THE SHERB PIE AS THEY WERE PRAYING AND HEAVY. I need to get these supports up. I'll update as I go.
Oh and one thing I remembered is that, I didn't properly sanitize the trellis nets I installed on the plant that has pm (non visible today but still). I harvested the plant that used that bet last year was harvested in two stages. The bottom I let go way later and ended up with a little pm on the stuff I left for hash material and it got some pm. I wonder if that's whete this came from.
8/16 Death in the family this morning. I couldn't decide if I should use organocide plant doctor or not. It's a systemic It's been discontinued and reformulated. It's a systemic fungicide. Instead I mixed two tsp potassium bicarbonate with a little dawn in a half gallon mister. I used gloves and defoliated everything that had pm on it. I checked the plants next to it and luckily it hasn't spread yet....but it will. I feel safer using the k bicarb. I'll do more research and try to find the best way to tackle this. I don't want to get rid of the plant and due to local ordinance I can't isolate it. If I can keep it to this one plantvthat would be fine. I'd just use it for extracts. So glad I didn't use all that netting and put up tjosr supports. I'll need to disinfect them if I decide to use them. We'll see. Plants are coming right along flowering.
WENT BACK OVER AND DEFOLIATED A BUNCH OF fan leaves and interior stuff to promote airflow. Still saw pm on that plant u had treated earlier with k bicarb. I can't isolate due to laws and I'm not willing to discard this massive monster cropped plant. So I'm going to treat it. I started by removing everything infected and improving airflow on that plant and all the others. I didn't make it to one event horizon. I plan to treat the infected plant with Organocide Plant Doctor since its what I have on hand and I've had good luck. It's a systemic. After I treat the one plant and see that it didn't hurt the plant I'll use a preventative dosage on the other plants. I've battled wpm several times. This is something I'm very familiar with. What sucks is it's totally my fault it happened due to grower error. This has set back me puttingvup my supports as well. Plants look good woth a haircut. Also the toasted toffy had some leaves removed with spots that looked like septoria. I think nutes havecreally kicked things in gear. Now there are little buds on plants.
8/17 BAGS still seemed heavy so I didn't water. It's been MUCH cooler. It's 63 at 9am. It would normally be 80 by now so maybe they aren't using as much water. I watered the the toasted toffy I missed last round but the Sherb Pie still had weight to it. I also watered the GMO on the far side and the one in the 30 as the seemed a little lighter. I looked in and I couldn't find a SPOT of powder mildew on the plant! I know it will come back but on this 100% rh day there isn't a spot I can find! I'm going to go check on them later today. Do some more defoliation and treat the plants with Plant Doctor to try to mitigate the spread of the P.M. Very suprised the k bicarb worked like that.
WENT BACK OVER AROUND 11. I WATERED THE TWO THAT DIDNT GET WATERED LAST TIME. THE EVENT HORIZON AND THE SHERB PIE. IT WAS COLD AND OVERCAST. TEMPS HAVE BEEN MUCH COOLER. SOON AS I WATERED THE SUN CAME OHT AND THE TEMP WENT UP. I WENT THROUGH THE PLANTS I MISSED AND SEFOLIATED LEAVES AND INTERIOR BRANCHES TO INCREASE AIRFLOW. SURPRISED TO STILL SEE NO PM WITH 100% HUMIDITY. I WENT THROUGH EVERY PLANT. ILL NEED TO GO TJROUGH AGAIN BUT TJIS IS MUCH BETTER. THE TOASTED TOFFY THAT MAY HAVE SEPTORIA I WILL TREAT TONOGHT WITH PLANT DOCTOR. I REMOVED ANYTHING LOOKING INFECTED. I LSTed THE BIGGEST BRANCHES WITH CLIPS TO THE BAG AMD TWINE. SO AIRFLOW IS MUCH BETTER. I THEN REMOVED A BU CH OF THE MIDDLE. I COULD TAKE MORE BUT ON OUTDOOR HARVESTS THAT LITTLE STUFF GOES IN EXTRACTS. I PUT A FEW HOURS IN TODAY. IM GOING BACK AND ILL TEST THE PLANT DOCTOR ON THE TOASTED TOFFY. BUT IF THE K BICARB WORKS THIS GOOD ILL JUST KEEP USING THAT.
8/18 It started sprinkling when I left this morning. I did more defoliation on a few different plants. Including the healthiest GMO. It seems like things should be further in flower but it is what it is. I'm not doing clones again. Only reason I did is because I lost my 72 seedlings and depleted my seed supply. I hate treating pm. Lost Coast Plant Therapy I'd really whete its at when it comes to treating pm. I might just order that. My commercial buddy told me that he wouldn't use the plant doctor and not to "spray shot all over my plants". He's probably right. I see something small and try to overcurrent. I dont see any more septoria looking leaves on the toasted toffy since I lsted it and removed damaged leaves. I was going to use the fungicide plant doctor on that and then use it ad a preventative. He's probably right. I've put a lot of work in defoliation and such. It WILL spread but it hasn't yet. I removed what I saw. I was going to hit it again with k bicarb but it said it should be weekly treatments.i hope I'm doing things right. I shouldn't be this worried about pm but I've got am anxiety disorder. I'll fully sterilize (AGAIN) my posts and trellis netting before I instal it. I'll probably go check on them later. It's hard to avoid pm with 100% humidity and 30° temp swings. I've got a few lights so maybe this winter I'll do indoor. I'll try to keep this updated. LOOKING BACK AT PRIOR DIARIES I GUESS IM RIGHT WHERE I SHOULD BE FLOWERING WISE. I JUST HAD A COUPLE REALLY EARLY PHENOS A COUPLE TIMES.
8/19 Defoliated some more stuff amd tried to improve airflow. Humidity is high and it was sprinkling earlier. I think we'll have showers. Not seeing much pm. MAYBE a little in the middle of that middle gmo but it could just be residue. I'll treat it again with potassium bicarbonate soon. If that doesn't work I'll switch up treatments. I've got citric acid amd some other stuff too. I almost ordered lost coast last night but decided I'd wait to try it out. The toasted toffy has SOME spots that look like septoria. It's the second furthest in flower and very indica leaning. It seems to be flowering vigorously so I don't want to fuck with it too much. I could use plant doctor on it and see what happens but I'm going to monitor for a few days after defoliating.
WENT BACK OVER AROUND 4 AND SHOOK OFFCTHE PLANTS. HADNT RAINED MUCH. BAGS ARE STILL HEAVY. THE TEN WAS LIGHT AND THE EVENT HORIZON BESIDE IT SEEMED A LITTLE LGHT AS WELL. I THINK IT MIGHT BE ME COMPARING THEM TO OTHER PLANTS THAT ARE SATURATED. SEEING HOW THEY BOTH LOOKED THE BEST IVE EVER SEEN THEM I HELD OFF WATERING. ITS ALSO SPRINKL9NG AMD GOING TO RAIN TONIGHT. ILL REASSESS IN THE MORNING. PLANNED ON USING PLANT DOCTOR ON TOASTED TOFFY BUT DECIDED AGAINST IT PARTIALLY DUE TO THE RAIN. PARTIALLY BECAUSE I PUSSED OUT. I WANTED TO FEED. IVE NOTICED SOME FADE AND PLANTS PUSHING AND TRYING TO GET OVER THE FENXE INTO FLOWER. THE TOASTED TOFFY AND THE UNKNOWN IN THE 50 ATE THE FURTHEST ALONG AND DEVELOPING ROCK HARD BUDS. GMO HAS A MASSIVE STRETCH. THINGS CHANGE DAILY. I WANTED TO GET A GOOD DOSE OF NUTES IN SO AFTER THIS LITTLE BIT OF RAIN WHEN WE GET THAT NICE SUNSHINE MY PLANTS WILL TAKE OFF!! THEY'VE BEEN PROGRESSING FAST DESPITE THE SHITTY WEATHER.
8/20 It's still sprinkling. It SAYS WE got zero rain yesterday but that's just not true. Today is supposed to be light showers with like .02 in 9f rain. I mixed up some water to check the plants. I figured a few would he light. The event horizon on the back SEEMED a little light. So did the one invthe ten. I realized it was just comparing it to the bags that were saturated. Still I ended up giving the event horizon in the back a half gallon and split the other half with the one in the 10 that dries out super fast. It's crazy. The weather just abruptly changed one day and I go from watering twice a day to hardly at all! Everything but the sherb pie and the seedling in the 10gal are vigorously flowering. Upping the nutes was a smart move. The seemed to like it. I'm gonna check later and as soon as I can I'll hit that toasted toffy with plant doctor. That's tied for furthest along in flower. I've done a bunch of research and I think this is the right move. I'll keep this updated. After this small patch of shitty weather we are goingvto get some sun amd these girls will EXPLODE!
WENT BACK OVER A FEW TIMES. LAST AT SIX. I DID SOME DEFOLIATION AND PRUNING OF PLANT INTERIORS. ITS ABOUT TIME TO TREAT THE TOASTED TOFFY AGAIN WITH PLANT DOCTOR. I CAN SEE SOME SEPTORIA SPOTS. I TREATED THE EVENT HORIZON THIS MORNING. IT GOT A FEW HOURS BEFORE A LITTPE RAIN WND THEN SUNNY AND 80. I USED BETWEEN A QUARTER AND HALF GALLON ON THE INE PLANT. I MAY NOT HAVE USED ENOUGH OF THE MIXED UP SOLUTION ONVTHE TOASTED TOFFY. IT HAD BEEN WORKING AWESOME AND NOW THAT ITS TIME TO REAPPLY I NOTICE A FEW LEAVES THAT LOOK INFECTED. OVER THE NEXT WEEK ILL BE MONITORING THE RESPONS FROM THE PLANT DOCTOR. I'M CONSIDERING APPLYING PLANT DOCTOR TO THE REST OF THE GARDEN. I THIBJ THE K BICARB HAS BEEN DOING GOOD KEEPING THE PM DOWN ON THE MIDDLE GMO. I HATE THAT I HAVE TO FIGHT DISEASES. IM NOT DOING CLONES AGAIN. AND IM GOING TO BE MUCH CLEANER. THE SHERB PIE LOOKS A LITTLE OVERWATERED AND HAS SOME YELLOW LEAVES BUT MANY HAVE TURNED PURPLE AND OTHER FALL COLORS. THE PLANTS ARE AGGRESSIVELY FLOWERING AND TEMPS ARE CHANGING. STILL IN EARLY FLOWER. IVE GOT A GOOD FEELING. IVE DEALT WITH MUCH WORSE AND CAME OUT GOOD.

Likes
Comments
Share


Likes
19
Share


@HeavyHead
Follow
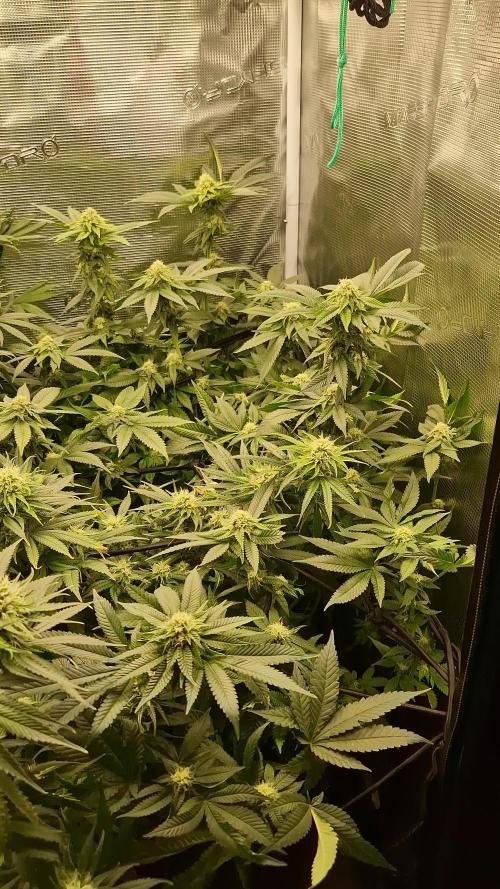
First week of flower :)
Did some final touches on some LST and a very light de leaf of some shading leaves. Pulling down the room temp slightly and will add some pre flowering nutrients towards the end of this week or early next week.

Likes
29
Share


@TrickzGrowz
Follow
Servus Moin!
Die Punch Pie geht jetzt in die letzte Woche!. Es gibt nur noch Wasser ohne Dünger. Die Buds sehen phänomenal aus. Sieht so aus als wären alle Fäden braun geworden. Es sind richtig feste Buds geworden und man sieht schön, wie jede einzelne Calyxe schön ausgebildet ist.

Likes
11
Share


@Ieiogrow94
Follow
Eccoci di nuovo qui!!!
Super eccitato per questa nuova collab con Seedsman, team davvero al top, che mi ha dato l’opportunità di testare questa nuova genetica e di condividere i progressi con tutti voi!!!
Genetica che non ha bisogno di presentazione fantastica di sapore e di odore..
SUPER CONSIGLIATA
Grazie a tutti per il supporto ❤️🍀🔥

Likes
2
Share


@Islandgrowbro
Follow
Plants moved to final growing area. Lights added. Ground cover to be added. Spraying done to help fight fungus, insects and some nutrient application.

Likes
16
Share

@LST420
Follow
Week 16
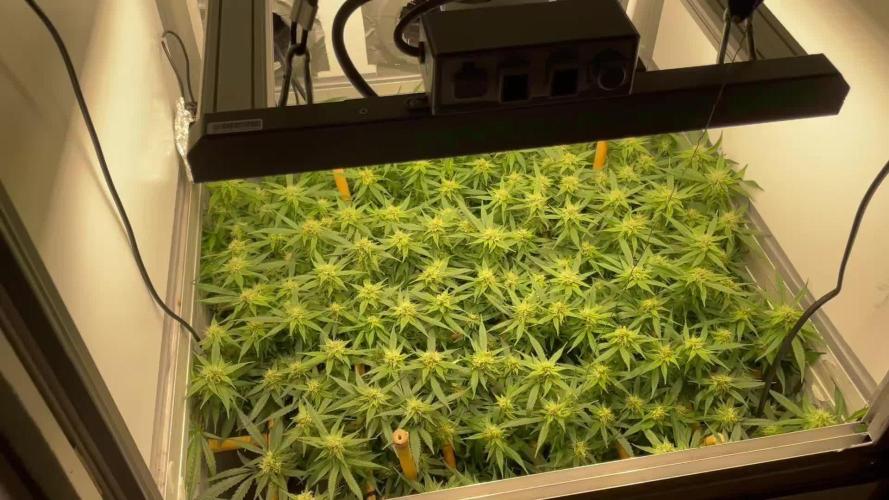
The buds really start to form and smell now. And because of the high density of buds I regularly defoliate so they all get the maximum amount of light.

Likes
9
Share

@timbarin
Follow
31/aug
Week 4 of flowering is done. She stoped growing and now focus is on bud growth and density. I defloatied her to allow light to come in and also took off the lower tiny flowers. Food is normal minus 2l of water since I've seen minor burns on some leafs.


Likes
15
Share


@Naujas
Follow
i am very happy :) this was my first cultivation and he succeeded :) i know a lot of mistakes I made wrong or not :) I'll fix it next time :) the yield is not high because my pot is only 4 liters (

Likes
22
Share


@CanarianGrow92
Follow
Another week for the sour Tangie Dawgs😁 so far so good, only 2 and half weeks left, we gave some candy and for the rest only water! Hopefully things continue to go good!
Great strain at the moment, nice citrus 🍋🍊 smells and nice and sticky buds!


Likes
44
Share


@ILoVeThiSpLaNt
Follow
Giorno 74 (14 fioritura)
Le piante stanno abbastanza bene.
Per il prossimo giro autunno/inverno dovrò stare attento con le temperature perché tra vegetativa e ora inzio fioritura hanno sofferto un po' di basse temperature (nulla di preoccupante ma preferisco avere 23/24° piuttosto che 17/18°).
Come detto la settimina scorsa ho dovuto flushare una Pink Gasoline perché tutte le foglie avevano macchie chiare distribuite in modo non uniforme.Ora, dopo dieci litri di acqua con gli ultimi due con una leggera dose di fertilizzanti finalmente i nuovi getti sembrano stare meglio.
Tutte le altre piante stanno bene, sta solo a me non dare troppo cibo e monitorare il colore delle foglie per correggere eventuali eccessi/carenze.
Non posso fare danni con questi incroci 😃 🙏
A settimana prossima sperando di vedere un po' di resina 😋


Likes
Comments
Share


Likes
6
Share


@zombikush81
Follow
Very easy to grow, I did not have any problems in any of the stages of both growth and blooming, good yield facility, great to start the advice.
