
Likes
Comments
Share


@MrAutogrow
Follow
She is growing great and right where I want her. I mainlined her on day 14. I topped her above the third node and left a small stump. The stump will swell which helps keep the main from splitting later in life. I cut everything below and will the down the new growth.

Likes
Comments
Share


@Trichoma
Follow
This week I low stress trained plant a bit and removed a few leaves that blocks light for lower nodes so it grows more equally!
In the end I am moving to my main flowering tent.

Likes
3
Share


@Ctrellis90
Follow
I loved growing this girl. So much so that I had to double her life and re veg her lol. Well yeah that's story pretty much, it was a long ass grow but I only documented the last 9 weeks out of 8 months! Literally. But now she's gone and that's the last of the zkittz. She grew like a champ and I can't wait to see how this grape pheno taste.

Likes
Comments
Share

@SpliffDoc
Follow
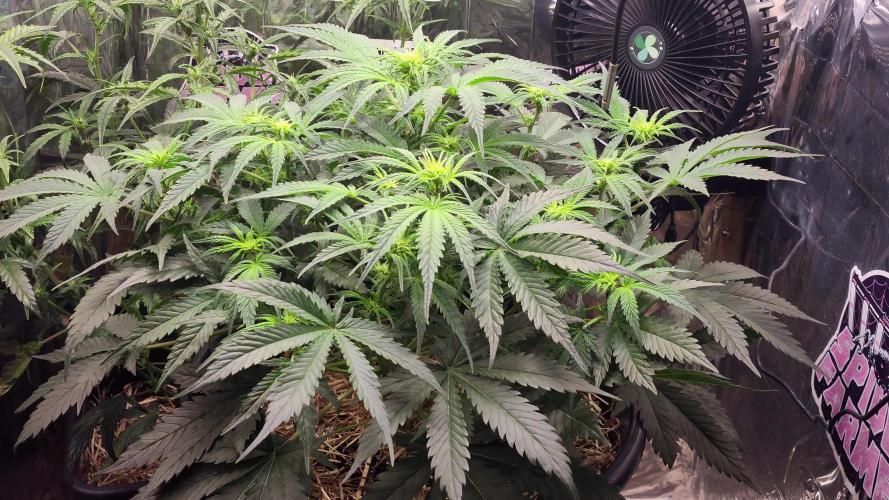
Saying rhat this girl had a rough start she really is impressing me.
Bare in mind this has NEVER been topped or trained and just look at the shape of her a real woman.
She is getting bulkier by the day and those little buttons are starting to stack.
Let's goooooo
Update Day 40, she is getting maaaaaasive.🤣🤣She has had to be moved to take centre stage, the guava can shine in the background now. What a plant this is, ill be buying alot more of these seeds. Bar removing a couple of leaves blocking sites she hasn't been trained, topped or anything. What a plant fast buds have on their hands here 👏 👏

Likes
216
Share


@CRiSPrGrow
Follow
Well this was quite an experience, from the nice box the dutch passions come in to the germination , vigours sprouts came about, and took well to transplant. Potted each of these into their own soil and peat mix, layered seven of each i think with perlite. they got CELLMAX soil, best soil I've ever used for sure, it's horticultural soil so it's been steamed meaning no pollutants and no pests. The room itself this time i had reworked a bit, still loads of bends on the tubes though, but had a proper intake this time with a fine mesh filter so nothing got into the room. Had the pots elevated only by the time flower came around same for the CO2 so I only had a few good weeks with it. Didn't kill the plants though, so I'll review using it in my Six shooter diary, check it out . Anyway these plants veged out , and in the first weeks had the light too high for how strong/weak it was (it's crazy how close you need to have it actually!) and the little seedlings stretched some, so I LST'ed all of them. They all took to LST really well actually. The biotabs plant was the first one to sort of musle through her bindings, and i ended up feeling sorry for it and removing them thinking the bend was mostly done anyway. It didn't help that this was a corner plant and I just didnt really have access to it as nicely as the others. Anyway the LST wasnt done though and the plant fully redressed showing only a little bend towards its base at harvest time. The Mr. B's showed the best results on LST. It got bent 90° then grew out but managed to stick it's main cola out just in time i guess, so it had several mains maybe 3 maybe 4 and several side shoots. The Vertafort one took to LST the worst of the three (through no fault on vertafort's nutrient's part!) It basically got bent 90° but got held down too much by the bindings , and being a corner plant simply it got less light the whole grow, being overtaken by the other plants in the tent. Through veg though these grew to nice busheles, each in their own style, pushing out fat indica leaves , mostly being kept at appropriate VPDs. Note that the temps i've recorded are for maximum temperatures hey ! Anyway it I ended up with an uneven canopy by the start of flower stretch due to the different LST styles and the different growth rates, the vertafort one being basically stunted. During flower stretch these stretch ! lol doubled in size at a steady rate I can tell because the biotabs one was basically no longer LST'ed right? Anyway way blueberry styles not so much auto gsc styles that much I can tell you. The longer side colas a great too, they're much longer than the GSC's side colas and they have two or more flower nodes more each. By week 4 of flower the Mr. B's started to look pro, with a nice canopy and several distinguishable mains sticking out from the bush. The vertafort one was a corner plant so I just paid less attention to it - too bad for me ! Anyway the flowers themselves started to emerge with a calyx to larf ratio of 1:0 for the biotabs ones, and I started getting stoked. I could already tell from the squeeze that these would be nice and dense nuggy nug nugs just like I like them. The Mr.B's one was different though, the flowers grew all up and down the colas like they were all filled up. The sugar leafs themselves were like non-existant on Mr.B's but long and thin on the Mr.B's. Then the stacking began, last quite a while to finish up and rippen, i'd say from week 8 through 13. The trichomes reached out, filled up some, curled, in and were full white. I noticed some amber trichomes and it was time for the chop !
Throughout the grow I tried something new. From joining GD on my first grow I got loads of goodies from @Mrs_Larimar with the Mr.B's nutrients - thank you so much ! - and the biotabs contest , plus the Vertafort that came with seeds from the folks at Zambeza, Zamnesia, and RQS , all of these were dry nutrients, and I got those micro nutrients from my friends too. Great experience using dry nutrients, much more affordable on the whole, easier to measure too. That didnt stop me from messing up a few measures though ! So For most of the grow I planned to add my own micro. I had four micro powders made. One green one for early veg with all the "rare metals" in it at 2% , a bio cal mag, white powder for veg and early flower and a cal mag and mag sulfur I meant to use during flower. So I ended up giving a quarted dose of the organic cal mag most of the time then in flower still had them on a quarter dose of cal mag sulfur before i realised and switched up too late. My whole micro line up i think would cost 10 dollars retain and I had plenty of it left over i think it should last like 4 grows. Not that I'll use it again unless i can get a steady supply - a the travails of the underground micro nutrient market. Worked great though, pH neutral, i used it as spray too, next time I'll mix in humic acid directly in the same feed, because why not and because I would have massively helped. Sometimes in flower i used only calmagsulfur and maybe I didnt mix it in very well but i would dump everything on anyway , a couple time I would check after water and the clumps had formed like 3 inch crystal formations on the top of my soil... Anyone ever seen that before? maybe it's a good sign idk, i usually tried plain water to dissolve them asap. The biotabs worked great on the Colorado cookies though, that much I can say, no excesses of any sort detected, leaves weren't too dark green at all. Mr.B's turned out a BEAST , but that could be from the LST aswell... the vertafort one ended up being a very healthy plant that never lacked anything either. Around halfway through flower I started traing the colas upwards where they were drooping on the biotabs plants and the Mr.b's plant, glad i did because i think plants like to make colas going straight up right? Chopped these at the top of week 14 which is 95 days from the moment i dunked them into the water kept a calendar which I'll show you. Hung to dry for 10 days, then jarred with the 62% boveda, burped
inspected daily for a week, then weekly for two weeks. I weighted what I kept lol , no small buds this time, finally my grower dream realized ! So happy i got two (maybe three phenos) because I loved the flowers on the biotabs but I also loved the yielding of the LST'ed pheno. Plenty of wasted cola space though if I'm honest, should have defoliated more, maybe done that just at the edge of veg or something, maybe next time I'll try to flux like @silky_smooth so I can keep them in veg longer and make me a couple beasts.
Had to travel to for two halfway through, so what I did was to put perlite in the trays, get the pots off their grills and onto the perlite then i bottom fed plain water, the idea being that the perlite would keep the water from evaporating from the trays too quickly, just as i was loading up the trays , the nex day I saw three thrips but they were flying all wierd and all strange so i thought maybe the airflow was f-ing them up ... and i had to leave anyway. Got back and the pots were bone dry but the plants hadn't died, and the temps were way up. I think the remaining perlite absorbs heat... Anyway started top feeding them again but by this time they were showing signs of stress especially the biotabs one, the mr.b's kinda recovered, and the vertafort was healthy enough it just looked like a bit of magnesium issue. May this could be a good technique for other folks to try. Like i said the perlite might absorb heat, so remove it when you dont need it anymore (i had issues with heat).
Over all these gens are yielders, had some of my best work in here, and some less good work. I like having been able to use the GD platform as a companion app, was great fun really. it's great to be able to put all your pictures up and see them side by side, i tried to keep it organised so you and I can see some interesting things like the "three stages of LST" and other interesting nuggets of info. Speaking of nuggets I'll try to get some more and some better pics of the nugs in. Hope you'll visit this again 🚀
EDIT: made some bubble hash for the first time, grower's priviledge ! only used the stems stalks and leafs for it, and it came out really delicious, smells like perfume, burns like incense and tastes like vanila and spices/hash lol basically used some bubble bags , rand the water through once, got negligeable 120s 75s and 45s but got some 25 quite a lot. ran it again, same results with just about the same amout of 25s, i thought i could go a third one, but got negligeable everything lol. Two passes for whatever that is in bubble hash lol, it's still got to dry for another week - bubble hash is kinda of the grower's priviledge, definitely recommend doing it ! 🚀

Likes
13
Share


@DaisyNabis
Follow
hice trasplante a maceta definitiva dentro de unos días esperando que se establezcan de su stress hare cambio fotoperiodico, el humificador lo saque 5 días antes de trasplante

Likes
29
Share


@cherokee
Follow
Привет всем 👋😋 !
Клоны переехали в бокс (шкаф) побольше , но к сожалению места все равно мало. 25-30 ноября буду ставить 12/12 и пересажу растения в горшки 5.8 литров.
Моя кошка продолжает помогать с дефолиацией в моем саду 😄😝 она просто безумно любит кушать мои кусты каннабиса это ее любимое лакомство )))
________________________________________________________________________________________________________________________________________
Ребята предлагаю всем желающим подписаться на мои социальные сети где я делаю еще больше контента о каннабисе.
Подписывайтесь пожалуйста буду рад всем 😜 !!!
👽 Instagram - https://www.instagram.com/jedi_genetics/?hl=ru
👻 YouTube - https://www.youtube.com/channel/UCRFN2LzgQ4gxDj-6CIIr82g
________________________________________________________________________________________________________________________________________

Likes
16
Share


@Boomdrawfyah
Follow
Empezamos la 7a semana con 49 dias de vida , el proyecto A ha cogido una fuerza espectacular en general, se estan haciendo unos monstruos, lo puedes comparar con las ultimas fotos y las nuevas, lucen sanisimas. Seguimos con el riego de elicitación y nutrición de terranabis , estan muy bien alimentadas. Las geneticas se ven bastante fuertes y sanas en general también , vamos a ver donde conseguimos llegar este año ya que dependemos mucho del tiempo de vegetación.
Likes
32
Share


@Brujha77
Follow
Beginn Woche 7 Blüte.
Die beiden entwickeln sich richtig schön 👍
Bis auf Gießen und hin und wieder ein paar Blätter weniger ist warten angesagt.
Sie Bekommen die Woche nochmal BioEnhancer, evtl. nochmal etwas PK Booster und danach nur noch Wasser.
Tag96
Beide bekamen Nochmal je 1,5l Wasser mit 1g/l BioEnhancer.
Denke mal so 2-3 Wochen brauchen die Damen noch.
Likes
Comments
Share


Going to start flushing in about a week or so
Likes
32
Share


@MadeInGermany
Follow
COMMENTED BY
MadeInGermany MadeInGermany 5 minutes ago
Unfortunately, I had to find out that my account is used for fake pages in social media.
I am only active here on growdiaries.
I am not on facebook instagram twitter etc All accounts except this one are fake.
Flowering day 49
since time change
to 12/12 h.
Hey everyone :-).
We are slowly getting closer to the last few weeks :-)
There are still 2-3 weeks and The buds develop very well towards the end :-).
It is slowly starting to use up its nutrients.
This week it was poured 3 times with 1 l each time.
Everything was cleaned and checked.
Have fun with the update.
Stay healthy 👍
You can buy this Strain at :
www.Zamnesia.com
Type:
Runtz
☝️🏼
Genetics:
Zkittlez x Gelato
👍
Vega lamp: 2 x Todogrow Led
Quantum Board 100 W
💡
Bloom Lamp : 2 x Todogrow Led
Cxb 3590 COB 3500 K 205 W
💡💡☝️🏼
Soil : Bio Bizz Coco
☝️🏼
Nutrients : Green House Seeds Company Powder Feeding Bio
☝️🏼🌱
Water: Osmosis water mixed with normal water (24 hours stale that the chlorine evaporates) to 0.2 EC. Add Cal / Mag to 0.4 Ec Ph with Organic Ph - to 5.8

Likes
19
Share


@deFharo
Follow
Bienvenidos cultivadores de marihuana clandestinos, y también, a los que tienen la fortuna de no serlo!🖐️👨🌾👍
Cepa: PUЯPLΞ ØG PUИϾH (Purple Punch x Star Killer). Índica/Sativa: 80/20%. Floración: 7-8 semanas. THC: 18-22%
Esta cepa ha estado hermanada en riegos, maceta, sustrato, luces, productor y tiempo de vida con 3M ✠ S₭UИ Ձ.Օ ► ƒϑ.
He cosechado esta planta después de nueve semanas desde el paso a floración y seis semanas de crecimiento vegetativo.
El último riego lo he hecho sólo con agua pura de manantial de montaña, el único de estas características que hago durante un cultivo, el resto de riegos siempre llevan alguno de mis Bio nutrientes, mi estrategía se basa en crear un sustrato ligero sólo con minerales variados, pocos nutrientes, buen drenaje y aireación, aplico Bio Fertilizantes solubles en cada riego porque busco cultivos de alto rendimiento.
La planta, por accidente, tuvo un periodo de oscuridad total durante 4 días, esto provocó un envejecimiento prematuro, después, la tuve 10 días con periodos de luz normales y la planta consiguió recuperarse bastante. Estoy contento con la producción, teniendo en cuenta el tamaño de la planta y la maceta. Una cepa a tener en cuenta.
La planta creció debajo de la lámpara Spider Farmer SF 1000 colocada muy cerca del dosel y al 100% de potencia (92w), las colas han crecido con gran densidad y vigor... los días de sol, aproveché y expuse la planta durante 2-3h a los rayos del sol de verano y el fantástico espectro de luz solar! 🌞💡
Hasta la próxima...
SALUDOS A TODOS!!🖐️👨🌾💧💦🌞💡
=================================
Likes
5
Share

@El-Ecko
Follow
Week 4: Vegetative Growth
Brrrrrr🤧
It’s been a really cold week for this time of year so far—just under 15 degrees during the day and between 6 and 8 degrees at night.
It’s supposed to stay this way for a few more days.
But the Gelato is doing great anyway.💪 The temperatures don’t seem to bother her, even though her growth has slowed down a bit... at least that’s how it seems to me.
Still, I’m very happy... and she’s also starting to give off a little scent.😍
Likes
18
Share


@TheCannaProphet
Follow
~ FASTBUDS TESTER #2204 ~
Well friends, here we go on another 'canna-venture' together!
The grow room has had a complete remodel and some upgrades done to it including brand spanking new 4x8 and 4x4 tents and a Trolmaster Hydro X controller along with a new Control Panel.
This tester strain is one of six tester strains that FastBuds has graciously provided me with and I'm looking forward to seeing what this girl has to offer when she's grown to her full potential!
One drawback of 'testers' is I have little to no information on it other than its number and that it's an autoflower... 🤪 But, it's ALWAYS a blast growing them for me because not knowing a lot allows me to just concentrate on the essentials: Light, Environment, Water, Nutrients and possibly a bit of LST... not complicated, just basics like keeping a constant temperature and RH in the tent at a level that gives a good VPD, watering when almost dry and maintaining proper light levels according to their stage of growth.
____________________________________________________________________________________________________________________________________________________________________________________________________________________________________________________________________________________________________________________________________________________________________________________________________________________________________________________
~THE SETUP~
~Initially seeds were lightly scuffed, then soaked for 3 hours in 78℉ distilled water after which they were transferred to moist paper towels laid out in a Jiffy Pellet plastic starter tray with lid. Underneath the tray was placed a Vivosun Heat Mat with Controller that was set to 78℉ where they stayed until their tap roots emerged.
~Planted into Jiffy Peat Pellets that were hydrated with distilled water warmed to 78℉ with a 7.0 ph.
~Once roots emerge from the Jiffy Pellet they're transferred to their fabric pots.
~Grown 100% organic in a 4g Gronest fabric pot and a 3g fabric pot by Wraxly filled with Mother Earth 70/30 Coco/Perlite medium and initially amended with Dr. Earth 4-4-4 / Earthworm Castings / Dr. Earth Flower Girl 3-9-4 and Coast of Maine Stonington Blend Organic Plant Food 5-2-4.
~19/5 light cycle for the entire run with supplemental UVA added during flower. Lights are controlled by a Trolmaster Hydro X controller set for a 15min Sunrise/Sunset simulation.
~Top dressing every 3-4 weeks with slow release dry amendments and Earthworm castings.
~Straight water ph'd @ 6.2-6.8 when needed and bi-weekly Compost Tea's.
____________________________________________________________________________________________________________________________________________________________________________________________________________________________________________________________________________________________________________________________________________________________________________________________
Weekly Updates:
1/19- Here we go into Week Three of flower and these testers are finally in flower mode!🧐👍
Both testers are in flower and are ready to eat! Today I gave both girls a top dressing with Down To Earth 4-8-4 Flower Mix at a ratio of 2tbsp/g and Coast of Maine's Stonington Blend 5-2-4 Organic Plant Food at a ratio of 1tbsp/g which I simplified by using 1/3 cup of the 4-8-4 and 1/4 cup of the 5-2-4 in the 4g pot and 3/8 cup of 4-8-4 and 1/8 cup of the 5-2-4 in the 3g pot. After working the amendments into the medium, I watered it in with 1g of straight de-chlorinated water ph'd to 6.6 @ 74℉. It will take a week for the microbes to begin breaking it down and will last for 3 weeks or so. I'll monitor them and decide on whether I'll give them another top dress or let them ride.
I've also increased the power to the HLG 650R's the the Trolmaster Hydro X Controller to 75% which has them pulling 990w at the wall and have them hung 32" above canopy. I also starting adding in 4 hours of UVA during the middle of the light cycle for the remainder of flower. I've been monitoring their leaf temperatures and they're running 71-73℉ which is perfect! I have the AutoPilot APC8200 co2 Controller set to 1100ppm with a 100ppm window and the AC Infinity Cloudline T6 controller set to maintain a 74℉ temperature in the tent while the lights are on.
1/21- I'm watering these thirsty girls daily with straight de-chlorinated water ph'd it to 6.6 @ 74℉ and they're both thriving! The #1 pheno being roughly a week ahead of the #2 is starting to flower nicely. The #2 pheno, while different behind her sister, is finally beginning to get her act together a is making flowers!🧐
1/23- I watered/fed both testers today with 0.5g of de-chlorinated water each with GreenGro's Natures Brix and Granular Myco mixed in, after which I added 1 tsp/g of unsulfured molasses and then ph'd it to 6.6 @ 74℉. They'll be getting only one more feed from here moving forward as they will take a little longer than the other testers in the run that are well into flower now.
1/25- Yesterday I didn't water but continued today with 0.75g for the #1, and 0.5g for the #2, of straight de-chlorinated water ph'd to 6.6 @ 74℉.
They're both looking really healthy and both into flower! I'm really looking forward to Week Four of flower where they should start to reveal how they're going to look after stretching!😍💚
😎💚 Thank you for checking out my passion in life! Please visit as often as you wish and I hope you enjoy this journey as much as I know I will! Grow Strong! 💪😎🤙
Likes
30
Share


@Sticky_fingaz
Follow
BIG BIG apologies to Heather from fast buds & to Growdiaries & anyone who follows.
The past few months have been a massive struggle, not just with temperatures & growing weed but on a personal level.
My wife has been very poorly & with covid and everything going on, it's put a massive strain on us all!!
I've tries to maintain an active presence on Instagram but that's about all I've physically had time for.
I've put this update together today, so far into the grow now it almost seems pointless.
I lost my original Mimosa due to high temps & high RH. Moving into the attic at that time of year was a mistake. It has cost me a small fortune to keep things alive. I've had to purchase an air con unit, more fans & just more of everything to be honest.
My purple punch is almost ready to harvest, any time within the next couple of days, followed shortly by Bruce Banner & Kosher cake.
I wont be winning any awards for this Diary & I feel bad as I was supposed to be show casing what 420 Fast buds has to offer & I've failed...miserably.
I hope you can make sense of all the pictures I've included....just a mass photo frenzy over the past few weeks.
Thanks to everyone & all your comments.
Wishing you all the best.
One Love ❤️


Likes
1
Share

@GoodTimesOrganics
Follow
Hi liebe Community and Welcome Back! 🌿💚
Die kleinen Äffchen wachsen prächtig! 🌄🐒
Ab jetzt habe ich die Diaries afgesplittet.
Einmal hier im Vergleichsgrow mit Weedefix von denen diese Woche der Wachstumsdünger zum Einsatz kam.
Bilder der Growpalette folgen noch!
Für den ultimativen Vergleich kommen bald noch zwei neue Diaries mit zwei identischen Stecklingen um genau zu beobachten wie was performed.
Die Pflanzen entwickeln sich super gut und sind sehr robust.
Die Seitentriebe bilden sich immer weiter aus. Die Blattform ist schön Breit und Buschig.
Die Umgebungsgegebenheiten sind aktuell gut:
—————
🌞 Temp: 24
🌚 Temp: 18°C bis 19°C
💨 RH: 58%
VPD: 0,91 kPa
💡ppfd: 330 mpm
—————
Viele Grüße 👋
Likes
10
Share


@DeepRootsGrowTrees
Follow
COSMOS F1 CBD
ROYAL QUEEN SEEDS
This lady was my first grow in a solo cup from start to finish so I was satisfied with the grow. Knowing she would flip about 5 weeks and growing in organic soil I knew she would not get that big. She still produced frosty dense buds and was about a foot tall. Stay Growing!!
Thank you for stopping by and taking a look it's much appreciated!!
THANK YOU ROYAL QUEEEN SEEDS!!
COSMOS F1 CBD/ROYAL QUEEN SEEDS

Likes
17
Share


@ConradThePeaceful
Follow
11/6 Fed and watered. Each took a full gallon.
11/8 They are really drinking up the water. They were dry already so I watered each with a full gallon.
11/10 Watered each with a full gallon
11/13 Watered and fed each with a gallon.


