
Processing
Likes
Comments
Share


Likes
9
Share


@Siriuz
Follow
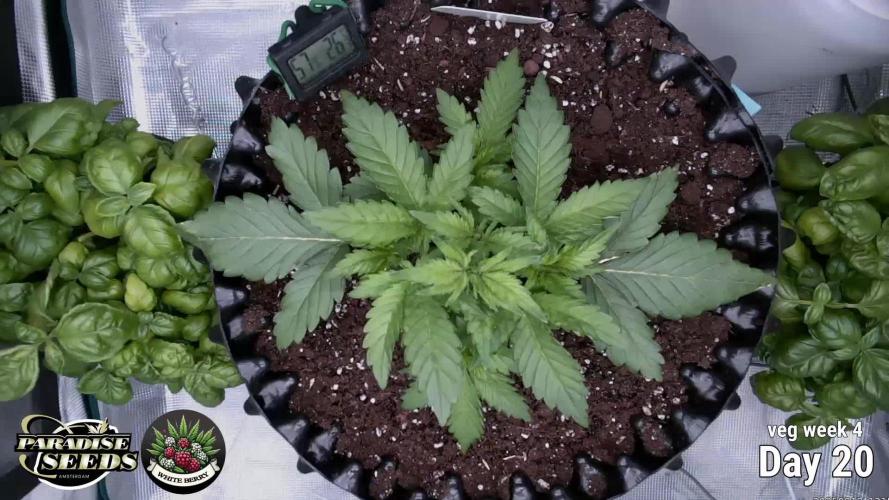
Ok guys so she was bushy again and so we did defoliation again.
You can see the difference and then after that started flowering even more
Plus the fact we are increasing the amount of molasses added to the soil plus the floranova bloom nutes.
They are very thirsty girls, taking around 1.5-2lts per 48 hrs
So almost like a 1 liter per 24 hrs
Very good SoG to make them feel even more comfortable
Going to change schedule from 24/0 to 19/5 and see if they evolve!
Thinking about adding some humus to the soil as well, other than that they have been under good conditions
Temp is steady at day time around 24C top and night time is 18-19C minimum
RH around 45-60%
Mostly 45% control environment with AC
Cant wait to see big colas coming soon!
Have fun enjoy the videos!

Likes
58
Share


@MadeInGermany
Follow
Hi everyone ☺️.
Today the New Aeroponic Diary begins, as before with the wonderful variety Gelato from Zamnesia .
This time I planned to leave the full 8 cuttings instead of 3 as in the last run.
For test purposes I would like to give a very short vegi time this time.
To be precise, I would like to switch them to flowering a few days after rooting.
Since the growth is extremely extreme on Aero, I think that a few days will be enough to get 8 little trees 😋.
Of course everything is documented and uploaded.
Today the cuttings were cut, brushed with clone gel and placed in the aero system 😃.
Of course, the entire system was cleaned very time-consuming with disinfectant after the last run, and all seals, pumps, etc. were checked for their function, so that the new run could start today 👌👍.
As with the last Aero grow, the Canna Aqua range 😊 serves as nutrients.
I wish you lots of fun when you start the diary, stay healthy 🙏🏻 and let it grow 🍀👌
You can buy This Strain at :
www.Zamnesia.com
☝️🏼☝️🏼☝️🏼☝️🏼☝️🏼☝️🏼
Strain
Gelato clone from mother (Zamnesia )
☝️
Genetics: Wedding Cake x Gelato x Gelato 33
👍
Vega lamp: 2 x Todogrow LED CXB3590 COB 55 W
1 x Sanlight S2W 62 W
💡
Flower lamp : 2 x Todogrow LED CXB3590 COB 55 W
1 x Sanlight S2W 62 W
💡 ☝️
Grow Aero System : Growtool 0.8
☝️
Fertilizer:
Canna Aqua Vega A + B , Canna Aqua Flores A + B , Rizotonic, Cannazym, CANNA Boost, Pk 13/14, Canna Cal / Mag, Canna Ph - Grow, Canna Ph-Bloom
☝️🌱
Water:
Osmosis water mixed with normal water (24 hours stale that the chlorine evaporates) to 0.2 EG. Add Cal / Mag to 0.4 Ec Ph with ph- to 5.2 - 5.8
💦 💧

Likes
13
Share


@GrowGuy97
Follow
Got everything moved around & the new carbon filter, fans & lights so hopefully I got better coverage with less power👍🏼 Topped 1 of the Gelato OGs today was getting way taller than the rest we will see how she bounces back! Everything else seems to be going great!
Day 22 topped & trimmed them up a bit
Day 23 started LST on a few
Day 24 started mainline on one of the GZ
Day 25 trimmed them a little more today


Likes
46
Share


@ernest_twwg
Follow
March 21st:
I finally got a camera up and running, so i was a little impatient and took pictures last night. I hope the video works!
Light intensity made it up to 100% with no negative effects over the week.
Second week of no nutrients! It doesn't seem to mind so far.
Those nugs are still getting bigger and bigger. They are starting to weigh down the branches and make them bend downward.
She still smells like a freshly opened bag of sour skittles. The trichomes creamed up a bit since i checked them last week, so i might only need to wait another week! But, i'm still going to expect it to finish in two to three weeks.


Likes
26
Share


@CapeGrows
Follow
We are nearing the end of this grow and so far everything is taking shape very nicely. I did a quick 2 day flush with some florakleen from GHE and then got back to the bloom nutrients. I did this just to clean the roots a little and get rid of any unwanted salt build up. This will hopefully set us up for a strong finish. Really impressed with the marshydro fc3000 thus far. For next week i will push the EC levels quite a bit, remove any unwanted popcorn nugs and try set it up for a strong finish.

Likes
18
Share

@sellem
Follow
Just a nice 10 Day dry followed by some curing. It already smells really pungent in the glasses. Really happy with the result in total! couldve probably gone a bit crazier on the training. 😈

Likes
21
Share
@MadeInGermany
Follow
Flowering day 22
since time change
to 12/12 h.
Hey guys :-)
Another great week that is over.
They all develop exactly as it should be 💚.
Since the last leaf and substrate application against tripse, I finally haven't seen any of the little biters 👍.
Watering was done twice this week with 1.3 l each time (see table above for nutrients).
The lowest shoots were removed so that the energy is not wasted in the lower part :-) .
Otherwise, as always, everything was cleaned and checked.
Fresh osmosis water was filled with stale tap water in a 100 L tank for the coming week 👍.
Have fun and stay healthy 💚🙏🏻
👇🏼👇🏼👇🏼👇🏼👇🏼👇🏼👇🏼👇🏼👇🏼👇🏼👇🏼👇🏼
You can buy this Nutrients at :
https://greenbuzzliquids.com/en/shop/
With the discount code: Made_in_Germany you get a discount of 15% on all products from an order value of 100 euros.
👇🏼👇🏼👇🏼👇🏼👇🏼👇🏼👇🏼👇🏼👇🏼👇🏼👇🏼👇🏼
You can buy this strain at :
Clearwater Seeds
Water 💧 💧💧
Osmosis water mixed with normal water (24 hours stale that the chlorine evaporates) to 0.2 EC. Add Cal / Mag to 0.4 Ec Ph with Organic Ph - to 5.8 - 6.5
MadeInGermany


Likes
27
Share


@as_smas_ter
Follow
really this girl could of gone longer ideally. due to my other plant finishing so quickly and using the tent for drying she had to come down at the same time. she went 65 days and was showing ambers. this was my first organic grow and first time using soil. I defiantly learned a lot and cant wait to get on to my next grow. highly recommend barneys farm for seeds.

Likes
29
Share


@eldruida_lamota
Follow
Venga familia que ya viene la cosecha, que ganas que tenia ya de darles machetazo.
No veas que pinta que tienen estas plantas.
No son grandes pero si están bien gordas.
No soy de plantar autoflorecientes pero e de comentar que con este cultivo e hasta disfrutado. Pronto la cataremos 💨💨💨.
Agrobeta:
https://www.agrobeta.com/agrobetatiendaonline/36-abonos-canamo
Mars hydro:
Code discount: EL420
https://www.mars-hydro.com/
Hasta aquí es todo , espero que lo disfrutéis, buenos humos 💨💨.

Likes
2
Share


@705project
Follow
Since Day 56, I moved her into the new tent sizing 150*150*200 cm and 450W Grow light
Likes
25
Share


@Mr2toke
Follow
Day 68 - 21/11/23
OG Kush is doing her thing nicely!
Trichomes are looking 50% cloudy with some amber domes peaking.
She's showing me a bunch of different colours!! every other nug has a different look, different hue!
Once the medium dries up a little more, Im gonna start the flush.
it's a waiting game now
23/11/23
A lot more cloudy trichomes today. OG Kush was flushed until substantial runoff.
We're getting close!
Likes
32
Share


@Hawkbo
Follow
Sorry for the delay was in a wedding this weekend came home and been trimmin like a dog the past few days and didnt have time to do the update but I'll do another one before tuesday to get back on track. As of Friday sept 6 its day 46. In the video the plants from back left to right are ..
Gelato-> Cream Cookies -> Gelato
Middle row from left to right are Lemon A.K 1 -> 6 Shooter-> Lemon A.K
Front is Tester 5 -> Lemon A.K -> Tester 26
5 is prob gunna be done first
Likes
14
Share


@SamDo
Follow
🇺🇸 Week 9 of Growth – Mother Gorilla 🇺🇸
Hey everyone, we’re back for Week 9 of growth for the Mother Gorilla from Royal Queen Seeds.
This week wasn’t great—the plant struggled to recover after the defoliation.
I had major pH fluctuations all week, which really slowed down growth.
Now at Week 9, I really want to switch to flowering, but the plant isn’t developing well enough.
For the past three weeks, things haven’t been going smoothly, and it’s frustrating.
This morning, after returning from the weekend, pH had risen to 6.4, which is way too high for hydro at this stage.
So I flushed the reservoir and started fresh with a new, properly adjusted nutrient solution.
I kept all the nutrients the same, and all other parameters remain unchanged.
Now, my main focus this week is keeping the nutrient solution stable so the plant can resume healthy growth.
Nothing else to report—just pH fluctuations and slowed growth.
The plant really needs to regain strength before flowering, or it’ll be a problem.
See you next week!
⸻
🇫🇷 Semaine 9 de Croissance – Mother Gorilla 🇫🇷
Salut tout le monde, on est de retour pour la semaine 9 de croissance de la Mother Gorilla de chez Royal Queen Seeds.
Cette semaine n’a pas été top, la plante a eu du mal à récupérer après la défoliation.
J’ai eu de grosses fluctuations de pH toute la semaine, ce qui a ralenti la croissance.
On est à 9 semaines de croissance, et j’aimerais vraiment passer en floraison, mais la plante ne se développe pas assez bien.
Ça fait trois semaines que ça ne se passe pas comme prévu, et c’est frustrant.
Ce matin, en rentrant du week-end, le pH était monté à 6,4, ce qui est bien trop élevé pour l’hydro à ce stade.
J’ai donc vidé la soupe et préparé une nouvelle solution nutritive ajustée.
J’ai gardé les mêmes nutriments, et toutes les constantes restent inchangées.
Cette semaine, mon objectif est de stabiliser la solution nutritive pour que la plante puisse reprendre une bonne croissance.
Rien d’autre à signaler, à part les fluctuations de pH et le ralentissement.
Elle doit vraiment reprendre de la vigueur avant la floraison, sinon ça risque d’être compliqué.
À la semaine prochaine !
🤘😎
Processing
Likes
70
Share


@CBD_Sweden
Follow
2017-09-11. Kl 12.00. Week 3 starts. I have cleaned the whole room for the new week and gave the girls water and nutes. Added videos and pics. Girl is 11 cm high.
---------------------------------------------------------------------------------------------------------
2017-09-12. Kl 10.00. New pics and video.
--------------------------------------------------------
2017-09-13. Kl 22.00. Added new video.
----------------------------------------------------
2017-09-15. KL 10.00. New pics and video. The girl is 14 cm high.
---------------------------------------------------------------------------
2017-09-16. Kl 10.00. The girl is starting to grow little better now and i hope she is picking up the pace. Added new videos.

Processing
Likes
18
Share


@UKauto
Follow
Still steady away with her, no growth to get exited about really.
Finished with all the topping and just keeping a level canopy while the growth on the second set of branches catches up. Especially the top branch on the pictures.
Seems to be really held back compared to the opposite branch.
I've defoliated quite a bit, just to clear some space and get light through to all the new growth.
Just waiting it out now and gonna flip lights when everything is caught up.
Collected plenty of pollen from the Mi5 to dust her with, going to try get one half pollinated and leave the other, probably get a few stray seeds on the other half but I don't mind really.


Likes
26
Share


@TheCannaProphet
Follow
Week 2
7/26- All the girl's are doing great. I had to use some horticulture wire to prop up a couple of the girls that got a little 'top heavy'. Giving 12oz water ph'd to 6.3-6.5 as needed 2 hours after 'lights on' around each plant, and every other day in the saucers (1/4g/ea) to allow the medium to
wick it up and stay moist. Temp's running 72-81deg with an average RH of 55-60%. I'd like to have the RH a bit higher but the girl's seem to be doing fine at the present. 😎Ordered another HLG 650R with the supplemental UV Bar to replace the two SunSystems 315 CMH's....should be a game changer! 💪 Also have an AC Infinity 6" exhaust system w/controller on the way to replace the Hurricane 400cfm fan I'm currently running along with another TerraBloom 6'x24" carbon filter as my current filter is losing efficiency.
7/27- Watered today ph'd to 6.4 with 2 tbsp/gallon unsulfured molasses added. I split 2 1/2g between the eight girls by pouring 12oz around each plant and then dividing the rest in their saucers to be wicked up. Temp's, RH and CO2 all on point!
7/28- Light watering today with straight non-chlorinated water ph'd to 6.5. Growth is looking great across the board. Even the late starters, Seedsman Zkittles #1 & #2, are coming along nicely! All the ladies are averaging in height between 2 1/2' - 3 1/2" and should be getting ready to explode as their root systems become more established and are able to start taking in more nutrients. Fans are running 24/7 to strengthen the stalks....they're gonna need it to support the buds these ladies will be sporting in a couple months!
7-29- Watered all through the bottom today with straight .5g non-chlorinated water ph'd to 6.3. Temp's, RH, CO2 and VPD all on point. Unhooked carbon filter from hose as it's losing efficiency restricting exhaust air flow. Girl's all growing STRONG especially the #1 Seedsman Gelato OG in Fox Farm/Nature's Living Soil mix and the FastBuds Purple Lemonade #2 also in the Fox Farms/Nature's Living Soil mix with the Seedsman Gelato OG #2 in SOHUM soil is getting close. I appears the two girl's in SOHUM soil are not quite as tall as the others but are leafing out well and are stocky with close node spacing.....hmmm?
7/30- Lift checked all the pots and gave 2 1/2g straight non-chlorinated water ph'd to 6.4 with 2 tbsp of unsulfured molasses added. I split the 2 1/2g evenly between all eight giving 20oz through the top and the remainder in the pans to be wicked up. I turned up the HLG 650R to 400w at the wall and kept the height the same. My AC Infinity Cloudline T6 exhaust and new Terrabloom 6x24" carbon filter came today, as did the UV bar from HLG for the HLG 650R that'll be here on the 3rd.....CAN'T WAIT!!! All the girl's are really doing well and starting to begin 'gettin it on'! All are healthy and running between 3-4" tall. Side note: While installing the new exhaust fan setup on of my pooches sneaked in the room and munched off a half of a shade leaf on the #1 Purple Lemonade....she's definitely got good taste!😆 In the process of installing the AC Infinity fan I relocated it and the filter to the left side of the tent and re-routed the cold air intake hoses so that both enter the tent at the bottom and are positioned at either side of the tent. I setup the AC Infinity which is a breeze, set all my high/low limits and alarms and let here run! Temperatures now are running 72-81 deg. and RH is remaining stable @ 55%, CO2@800ppm. All in all a good day!😎👍
7/31- Water looks good on all the girls. I'll just top water lightly today with straight de-chlorinated water ph'd to 6.5. The AC Infinity is really a 'game changer' as temp's are now staying in a stable range without having to adjust the settings on my Ideal Air 14k BTU AC unit...niceee! All my ladies are finishing up their second week like champs and I'm looking forward to the next few weeks as when their root systems reach the 'super-soil' they are going to hopefully have some explosive growth. I'll also be evaluating all of them in the coming week to determine candidates for topping and LST to begin.
8/1- The second HLG 650R came today! I tidied up the tent before installing the 650R: moved EXHALE CO2 bags-one on each side, vacuumed, took care of any loose hanger cords and re-positioned the three thermometers/hygrometers. I installed the second HLG 650R w/UV bar in the tent and set both lights to 400w @ the wall and have both boards centered, level and hung @ 36" from the soil. These lights are AWESOME! I checked temp's on the boards & drivers after they were running for 4 hours: 98deg on the drivers and 94deg on the board...pretty freakin sweeet! Gave the girl's a day off from water as they all looked GTG and are all getting ready to really turn on! I plan on hitting them early tomorrow morning with a good watering. Temp's-RH-VPD all on point for this week. I've been continuing to run the humidifier set @ 60% RH and I'm going so far as to ph the water going into it to see if it makes a difference as my well water runs 7.8ph @225ppm dissolved solids and I hypothesized that as the plants were absorbing the moisture from the air it might be beneficial to have that moisture at the correct ph.....we'll see I guess!
Likes
25
Share


@Sators
Follow
Day 36. topping for seven branches.
Day 38. Water with 2L nutrients mix.
Day 39. does super cropping for four brunches.
Day 40. Switch to 12/12h