
Likes
Comments
Share


@LocoT
Follow
Comenzaré este diario con un esqueje de una Moby - D de BSF, este es un esqueje bastante particular ya que salió por casualidad, se me quebró la planta madre en la punta y tuve que realizar un corte en diagonal con tijeras desinfectadas para completar de cortarla. Esta punta ya tenia aproximadamente unos 4 a 5 centímetros de altura, por lo que inmediatamente lo puse en un vaso con agua. luego de la pena porque se me quebró un lindo apical, pensé en untar el esqueje en un poco de aloe vera y pasarlo a un vaso plástico de 0,5 Litros, en sustrato Light mix de biobizz. pero el sustrato lo mezcle con perlita para intentar mantener mas la humedad. una vez listo el esqueje en su medio de propagación lo deje 24 horas en oscuridad absoluta para luego darle por 4 semanas de luz del tenue de (30w) (14 luz / 10 oscuridad).
23 de octubre: Le agregue mulch de trigo a la maceta.

Likes
6
Share


@Naujas
Follow
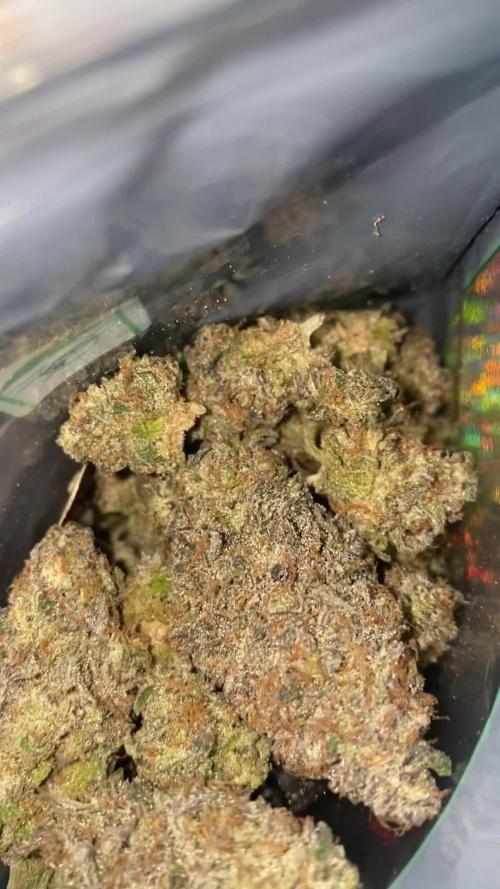
That's how I know the crop was harvested too early:( ..... but only because someone started visiting my place of cultivation and took my two girls, and left two, so that he wouldn't come back a second time and take them, I decided to cut her down earlier:( that's it such news awaited me when I returned from vacation, but overall the girl looked very beautiful, although she got a lot of stress when the snails ate her, but she endured it and recovered very well:) I will dry the bigger flowers and make bubble hash from the rest, good luck to everyone be careful in nature :).

Likes
1
Share

@Maksim_Maksimov
Follow
On first week of flowering I cut all lowers at bush and thinned center little bit, growth crazy, soon will hang scrog so branches not fall.

Likes
82
Share


@MiyaguiOkPolilla
Follow
Hola cultivadores 🌊🌊🏄♂️
Una semana más ha pasado para esta chica, su primer semana asomándose a conocer el mundo real, donde los calores le dan duro pero se resiste abrazando al sol, apuntando con sus hojas al cielo.
Así la encontré hoy, bajo el domo que usamos para mantener un ambiente húmedo y darle a sus raíces la posibilidad de expandirse entre el aireado sustrato. 💦♻️
El suelo parece estar bastante bien, cada vez que entierro los palillos chinos a partir de unos 4 cm por debajo de la superficie se mantiene húmedo pero no abundante. Sólo recibe 1 litro de agua cada dos días con una dosis de MicroVita®️ y algunas heces de cabra
No mucho más que decir, solo que deseo ver ese fenotipo de duckfoot para disfrutarla en mi terraza, donde recibe aprox 7 horas de luz directa y otras 8 indirectamente.
Intentaré no alimentar con minerales hasta la cuarta semana de floración ya que he planificado el sustrato 🤞🌱
Smokin' love
Un saludo grande a esos seres que siempre están por ahí, haciendo crecer el mundo!
Likes
15
Share


@Ctsbestsmoke
Follow
So I just transplanted them into one gallon pots before they go into the growace aircube. The one that the helmet took off some of the leaf is starting to actually wanna live and still growing she’s a little runt as you see in the pictures but I have faith in her. I think they will sit in these pots for a week then into the ebb and flow system. Can’t wait to see what that system has to offer once I know I will have a 10% off link for anyone who’s interested in buying one. Until next week happy growing. So glad I got a garden back man it was driving me insane not having any plants!


Likes
3
Share


@GorillaTia
Follow
Piante spettacolari, attraenti , la resina abbonda e l’odore è forte e molto buono
Tra poche ore si raccoglie , radici pulite con risciacquo di 2 settimane 😋😜


Likes
19
Share


@420DeepGrow
Follow
Gracias al equipo de Royal Queen Seeds, Marshydro, XpertNutrients y Trolmaster, sin ellos esto no seria posible.
💐🍁 Gelato #44:
Los criadores de Tyson 2.0 criaron Gelato 44 a partir de cepas finas. Al cruzar la Sunset Sherbet y la Thin Mint Girl Scout Cookies, crearon un híbrido de dominancia índica que asesta fuertes golpes en el cuerpo y la cabeza.
Su contenido de THC del 22% crea sinergia con terpenos colocantes para ablandar los músculos
Mantenla hidratada y con una dieta constante y pasará por la fase de floración en unas ocho semanas. Las plantas de interior alcanzan una altura máxima de 120 cm y producen 400-450 g/m², mientras que sus homólogas de exterior alcanzan los 180 cm y producen hasta 600 g por planta.
🚀 Consigue aqui tus semillas:
https://www.royalqueenseeds.es/rqs-semillas-cannabis-tyson/664-dynamite-diesel.html
💡TS-3000 + TS-1000: se usaran dos de las lámparas de la serie TS de Marshydro, para cubrir todas las necesidades de las plantas durante el ciclo de cultivo, uso las dos lámparas en floracion para llegar a toda la carpa de 1.50 x 1.50 x 1.80.
https://marshydro.eu/products/mars-hydro-ts-3000-led-grow-light/
🏠 : Marshydro 1.50 x 1.50 x 1.80, carpa 100% estanca con ventanas laterales para llegar a todos los lugares durante el grow
https://marshydro.eu/products/diy-150x150x200cm-grow-tent-kit
🌬️💨 Marshydro 6inch + filtro carbon para evitar olores indeseables.
https://marshydro.eu/products/ifresh-smart-6inch-filter-kits/
💻 Trolmaster Tent-X TCS-1 como controlador de luz, optimiza tu cultivo con la última tecnología del mercado, desde donde puedes controlar todos los parametros.
https://www.trolmaster.com/Products/Details/TCS-1
📆 Semana 2:
Fantástica semana, estan creciendo de una forma espectacular gracias a la ayuda de @marshydro, @xpertnutrients y @trolmaster.
Se puede apreciar un tercer nudo aunque la aplicación de cola de caballo y el estar en una maceta pequeña ha influido en el tamaño de ella, se recupera muy rápido 😁.
Esta semana espero trasplantar a la maceta definitiva.
Potencia de la lámpara: 50%


Likes
179
Share


@Tropicannibis_Todd
Follow
💩Holy Crap We Are Back At It And Loving It💩
Growmies we are at DAY 42 and she's just killing💀it👌
👉We are in full flowering mode and she's doing great 👈 Everything is looking good even the Tiny Cup 🥤
So Shit , I gave them just a tad to much nutes at the start of feeding 👈 But I have since fixed it
So I'm still doing some low stress training 🙃 and some defolation 😳
Lights being readjusted and chart updated .........👍rain water to be used entire growth👈
👉I used NutriNPK for nutrients for my grows and welcome anyone to give them a try .👈
👉 www.nutrinpk.com 👈
NutriNPK Cal MAG 14-0-14
NutriNPK Grow 28-14-14
NutriNPK Bloom 8-20-30
NutriNPK Bloom Booster 0-52-34
I GOT MULTIPLE DIARIES ON THE GO 😱 please check them out 😎
👉THANKS FOR TAKING THE TIME TO GO OVER MY DIARIES 👈
Likes
9
Share


@timbarin
Follow
25/Aug
Another week passed by and she is filling up the net slowly. All green and lush enjoying the notnao cool breeze from the fan. I hope the temp will drop a bit next week. Will let me increase the wattage


Likes
30
Share


@SAC87
Follow
Day 49 Flower
Hey Growers. I did a flush last week to get my runoff closer to 1050. I’m not sure why this happens that I get tip burn doing FFW. Maybe I start ramping up flower nutes too much too quickly. I have tip burn on my Blue Dream too. I’ve gotta come up with a solution as it buggers everything up. Flushing and Dealing with tip burn instead of packing on size.
This is a 10 wk strain so I’m not as concerned cuz there’s lots of time and I think I got ahead of it. The nugs are smaller, marble to golf ball sized but hard as a rock already. The smell is of over ripe lemon when it get that sweet and Hazey earthy woody characteristic. I’m going to feed 2 more weeks and try the Advanced Nutrient Overdrive that I have kicking around. Then flush heavy for 1 ish weeks and hopefully get a nice fade.
The Vipar spectra XS2000 is doing a great job, it has me wondering if I could use it to flower a 4x4 of autos. Its super strong. My poor man’s light mover has the plants getting a ton of light every other day with a nice rest in between. There is no light burn or yellowing, a tiny bit of leaf edge curl that goes away during its rest day. I am very happy with this light and know it’ll blow up whatever I run in here next.
Happy 420 &
Happy Growing 🌱
Likes
3
Share

@AestheticGenetix
Follow
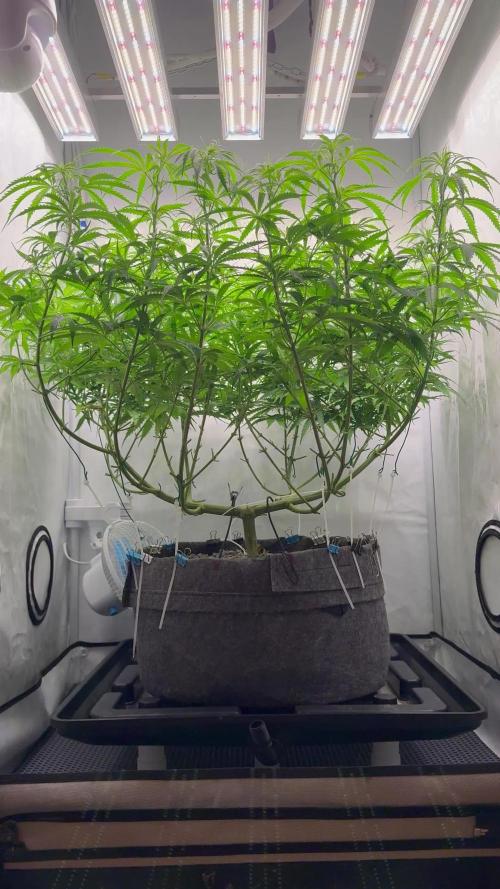
Oh man I'm excited about this one now. I think I may try and fill this tent out with this just this one plant.
Earth box and manual scrog on this Gelato. After getting her in there and realizing how easy she is to bend over and how easy it will be to get a monster plant with this set up, I'm super stoked. This will probably end up being a super long veg time but that's okay.
This is exciting for me. Something different.
Likes
39
Share


@valiotoro
Follow
Hello everyone 👋
Last week for the Auto Cinderella Jack from Dutch Passion ❤️🔥
Plain water💧
I will harvest in 2-3 times first the top buds
Amazing smell of citrus & pine 🍋🌲
The buds are easy to trim,very fat & sticky 🤩
2-3 plants left then finitooo 👌
Have a wonderful day 😎
Likes
2
Share


@BigGGrows
Follow
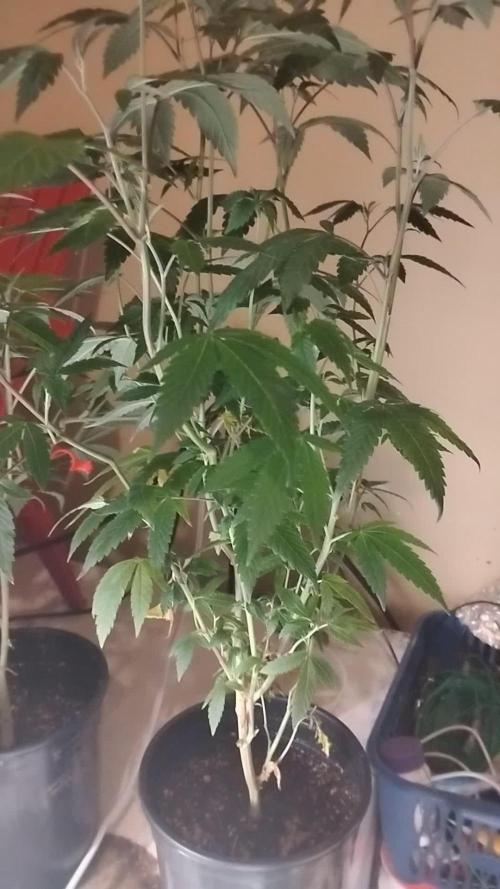
This week has yielded positive results from the FIM And LST. I topped the internodal new branching that grew from the FIM job as well this week and the 2 extra tops are growing in response on each branching. She is now under a 4 bulb vivosun T5 6500K fixture and is responding very well to the light changes. Her stems are begging to give off terpines when rubbed. She smells of tart sweet lemons and diesel fuel haha. I am very happy about this grow and am expecting preflower to begin soon.

Likes
85
Share

@Tropicannibis_Todd
Follow
Start of day 42 ...... Nov 20 Start of week 3 of Flowering ........ 6 Weeks in
Check out the full grow video on latest weekly update
Super Exceptional Growth Daily
Still adjusting LST when needed and leaf tucking.......
Water Only when needed but its drinking more every otherday and adjusting lights when needed......
Rain Water Only .......
( DAY 48 AND IT SHOWS ZERO DEFICIENCIES ) IM ALSO DOING VERY LITTLE, SLIGHT DEFOLIATION
( DAY 48 AND YET ZERO RESIN PRODUCTION ) I am a little concerned due to the amount of bud developing but time will tell ??.....
I hope you enjoy my growlog...


Likes
6
Share


@Hommero75
Follow
Seed were put In a cup with water and after 72 hrs it germinated. It was put in soil and after 2 days sprouted.


Likes
13
Share


@Bryankush
Follow
Bene finite le 3 settimane di fioritura ha dei calici ben gonfi e con un profumo tropicale spettacolare😁🤤
Giorno 2 la sera viene annaffiata con 2L di acqua a 980ppm
Giorno 7 viene annaffiata con 2L di acqua a 1000ppm