
Likes
Comments
Share


@AsNoriu
Follow
First week indoors done !!! And they BULK ;) Love it !!! Trichs stacking well, they don't look so leafy anymore and overall it will be nice result with wild forest strawberry flavour ...
Finishing indoors - works !!!
Middle of the week. Girls drink like crazy, bulks up and looking really nice, just watered and thinking its the one before last one .... Loads of dead leaves, they eat themself nicely and will award me with clean smoke at the end ..
Wild forest strawberry smell faded away tho, a bit sad, maybe he is still in the bud .
5th day of week. They are ready !!! Checked all plants, first ambers, even fresh pistils here and there, loads of fan leaves where eaten, plants just finished perfect. Purple colours here and there and full maturity in my eyes.
Still one more light watering, 48 hours of darkness and chop hopefully on sunday, next wednesday - latest.
Happy growing !


Likes
2
Share

@ElCapitol
Follow
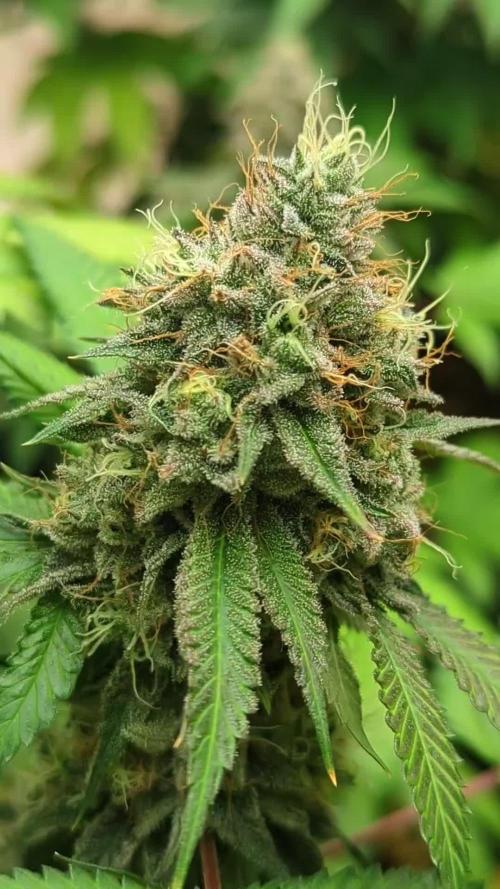
Left this on a feed as the buds still need to fatten more, trichs are very heavy already though. Such a lovely delicate sweet smell to this plant as it matures, really unique. Buds are nice and tight. Maybe 21 days on this to really finish it off. The runt has produced a nice little cola :)

Likes
5
Share


@Elevated_97
Follow
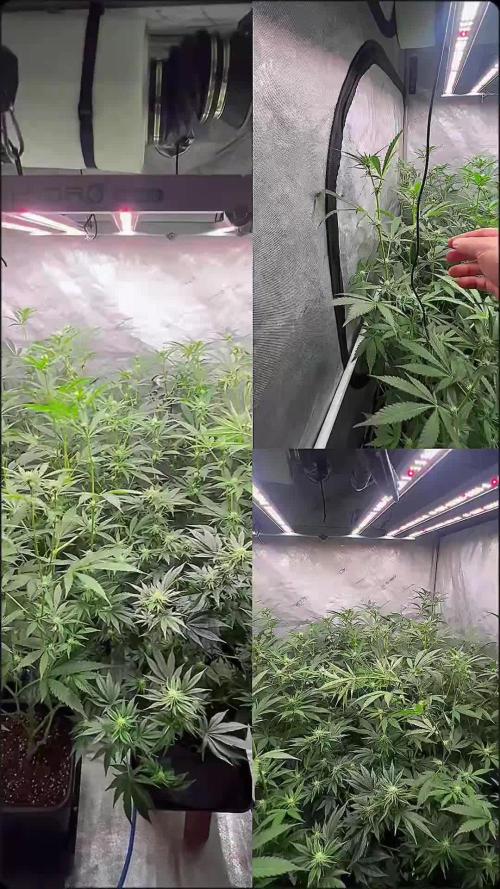
A normal week in the tent nothing new besides fabulous growth from the girls, so much so in fact that I plan to slip to flower in a week or so to keep them from out growing my tent. So excited to start the next phase!!!

Likes
36
Share


@MadeInGermany
Follow
Hey everyone .
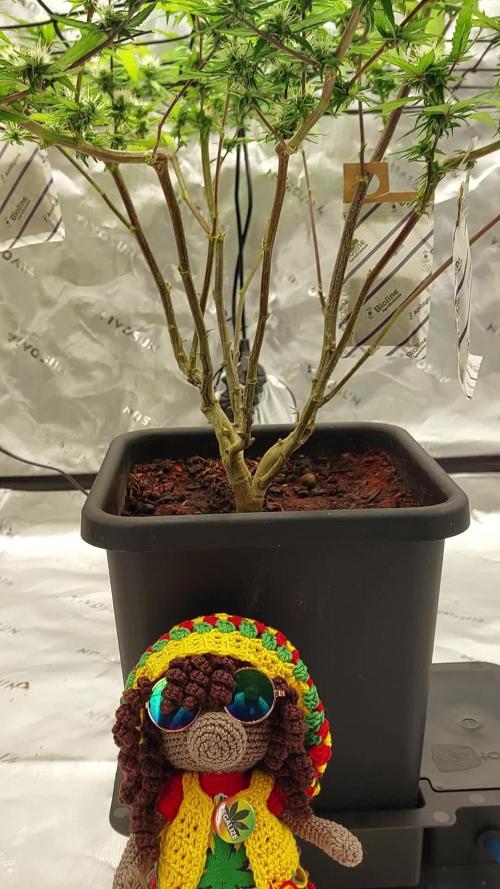
This week she was left in her 1 L pot, and will not be in the 11 L pot until next week :-).
She was topped again and accepted it super 😃.
By the time she is repotted next week and given Green House Powder Feeding for the first time, she will have received a small portion of Canna Vega :-).
Otherwise it grows very quickly and vigorously, and they look beautiful 😍👌.
I wish you all a lot of fun with the new update, stay healthy and let it grow 🙏🏻👍
You can buy this Strain at :
https://sweetseeds.es/de/sweet-skunk-f1-fast-version/
Type:
Sweet Skunk F1 Fast Version
☝️🏼
Genetics:
Sweet Skunk Auto (SWS34)
X
Early Skunk
👍
Vega lamp:
2 x Todogrow Led
Quantum Board 100 W
💡
Bloom Lamp :
2 x Todogrow Led
Cxb 3590 COB 3500 K 205W
💡💡☝️🏼
Soil :
Canna Coco Professional +
☝️🏼
Fertilizer:
Green House Powder Feeding
☝️🏼🌱
Water:
Osmosis water mixed with normal water (24 hours stale that the chlorine evaporates) to 0.2 EC. Add Cal / Mag to 0.4 Ec Ph with Organic Ph - to 5.5 - 5.8 .

Likes
31
Share


@Santica_Garden
Follow
This is how the ladies are looking, not much to update same old same old, they are just packing on their Budz, well see how they look in the next 7 days. More info on the video I uploaded.
Happy Growing guys 👍🏾

Likes
8
Share


@SoakingThePot
Follow
Week 6 of flower for the Fastbuds banana purple punch and gorilla cookies. The gorilla cookies has a real strong hazy smell to it and the banana purple punch has a real fruity smell to it. The strawberry banana from Fastbuds is flowering nicely a couple weeks behind.


Likes
5
Share


@Mrg7667
Follow
Smells like Rubber bands coated in a berry sugar or berry sryup very interesting on the nose!
Harvested day 67 ish maybe a couple more hard ot tell outdoor Split the harvest into drying buds and some to made into fresh frozen hash. i can dry weigh the fresh frozen buds and put that weight in the wet section and i will put the to smoke buds in the dry weight section so total between the two will be the whole plant
Drying was a big mishap got condensation around day 10 of drying and it caused some mold 🤦♂️ right around the time i was going to cure!
Found a peroxide soak that ill post butt it seemed to take off all the mold without affecting tricomb heads! Had to re dry for another week afterward i feel like the re dry maybe messed with the terps because it definitely never got the smell back like i thought but who knows slmost 3 weeks into cure coukd get better but doubt it

Likes
10
Share

@Dankdan02
Follow
Es geht straff richtung ende, der duft ist wild und ich freue mich schon das die gute bald fertig ist
Likes
8
Share

@MistaOC
Follow
10.02. F22
Day 22 of flower and things are looking absolutely world-class.
The stretch is finally starting to slow down. I began applying HST at around 1.03 m, carefully bending the tops to control vertical growth. Without intervention, I’m convinced these ladies would have easily pushed toward 1.30 m or more. The vigor is unreal. The canopy is now much more controlled and evenly distributed — exactly what I was aiming for.
Honestly, this is by far my strongest grow so far. Everything just aligns perfectly right now. The AutoPots are running flawlessly, the BioTabs nutrients are performing exceptionally well, and the genetics from Paradise Seeds are simply outstanding. The plants are powerful, healthy, and full of energy.
There’s not much more to say — it’s one of those moments where you just stand in front of the tent and think: this is it.
I’m beyond excited to see how this finishes. Can’t wait for the end result.

Likes
2
Share


Likes
24
Share


@Alpha_Green
Follow
Hello Week 8:
Everything runs like clockwork.
PK tea secret recipe works at full speed. Tomorrow morning there will be the next vaccination. I think then the growth rate will explode generatively exponentially high...
The Sweet Seeds girls should be ready soon, which means their last PK tea and then only gentle watering.
Today finally arrives my Sweet Seeds shipment "Jealousy Z XL" from Spain...
I think that my crowning debut will be in my new Homebox Ambient XL yes !!
Likes
30
Share


@datrobspeoria
Follow
Did well with how cold it was this winter and I am in a major flareup since August and have done a poor job with taking care of them like I would have liked to..
Overall I want to grow this one again someday as I know I can do much better however I am very pleased with the outcome and Awesome line Seedsman😎

Likes
126
Share

@Mr_und_Ms_Lue_Roots
Follow
Guten Tag zusammen,
Wir sind in Woche 4 der Blütephase angekommen. Bisher läuft es ganz gut. Die Blütenbildung ist voll im gange und so sollte es auch sein, denn nach dem Entlauben letzter Woche galt ihre ganze Konzentration nämlich darauf.
Makro und Mikronährstoffe sind sehr gefragt. Wir versuchen einmal am Tag, ca.1 Liter Nährstofflösung in den Topf zu geben. Aber es gibt auch Tage bzw. eher Wochenenden, wo sie mal etwas auf Diät sind da wir nicht Vorort sind xD
Bisher haben wir dort aber trotz allem, zusammen eine super gute Chemie entwickelt.
Ansonsten zur re vege, die obigen Blätter sind schon dreiblattfinger. Jüngere Blätter beginnen sich zu Rollen was ein gutes Zeichen ist. Farblich gesehen und gesundheitlich passt es bei ihr aber auch. Dennoch haben wir den Haupttrieb getoppt, da es zu viel Masse für das kleine 60x 60x 120 cm Zelt gab. Somit auch nochmal ein wenig Schimmel gefahr vermieden.
Ja ansonsten wünschen wir allen Growmies eine mega und erfolgreiche Woche! Genießt das des letztigen warmen Wetters und vielen Dank fürs vorbeischauen!
VG 😎✌️

Likes
7
Share

@Mrg7667
Follow
Amazing week! Starting to smell absolutely Devine! Some cherry funk to cherry funk with a hash back and some with just lighter hashy lind of smell all looking great except one oheno growing funky finger nugs (one of the better smelling phenos tho)
Need to clone 4,6,3!
Likes
18
Share


@growingpepini
Follow
Leaves turned yellow so we took her away from direct sunlight. She has not been watered for 3 days and the yellow spots seem to be going away. We are still not sure about keeping her on the shadow or taking her back to direct sunlight.
Likes
120
Share


@DogDoctorOfficial
Follow
The Harvest Prelude:
After a patient wait and 48 hours of darkness, the moment arrived. The Tropical Tangie Lego Ninja, standing proudly like a silent guardian, was ready for the grand harvest. The sound of each cut echoed through the grow space, reminiscent of felling a mighty tree. The compact structure of the buds was awe-inspiring, a testament to the ninja's disciplined growth.
The Lego Ninja, like a stoic warrior, was then hung upside down, beginning a two-week drying ritual. Maintaining an ambient temperature of around 21°C and a relative humidity of 60%, this slow-drying process allowed the buds to retain their essence, preserving the symphony of terpenes and cannabinoids.
The trimming phase unfolded like a fragrant masterpiece. Each bud, adorned with a glistening layer of resin, transformed the trimming process into a sensory delight. The zesty aroma of oranges enveloped the room, a tangible expression of the tropical lineage. The compact buds made every snip a careful dance, revealing an abundance of frosty trichomes.
The moment of reckoning arrived with the scale's unveiling. The Tropical Tangie Lego Ninja, from a single plant, bestowed upon me 309 grams of dried medicine. Each gram was a treasure trove of cannabinoids, a promise of euphoria and relief. The sheer compactness of the buds translated into a concentrated potency that left me in awe.
In parallel, the clones, nurtured with equal care, showcased a fascinating divergence. A twist in the tale unfolded as the intense oranges of the mother transitioned into vibrant tangerines. This unique expression, I believe, was a testament to the clones weathering a summer heatwave differently, bringing forth a distinct personality.
The clones, resilient and generous, gifted me a bountiful 549 grams of pure joy. This now my keeper of the garden, an embodiment of the Lego Ninja's legacy. The harvest dance, though familiar, carried the nuances of tangerine zest, a refreshing twist that left me eager to explore its intricacies.
Both harvests shared a common thread—their resinous abundance. The trim bin, akin to a treasure chest, gleamed with golden trichomes and fragrant joy. Sticky fingers became a badge of honor, a tangible connection to the resinous richness that filled the room.
Shout Outs:
No harvest report is complete without expressions of gratitude. A special nod to @DutchPassion_Official for crafting the genetic marvel that is the Tropical Tangie Lego Ninja. Their expertise paved the way for this epic journey, and I tip my hat in acknowledgment.
In conclusion:
As the dust settles on this epic harvest saga, my heart brims with happiness and excitement. The Tropical Tangie Lego Ninja has proven itself not just as a plant but as a living masterpiece. Stay tuned for the smoke report, where we delve into the true essence of this botanical ninja's legacy. Until then, fellow cultivators, may your gardens flourish, and your harvests be as bountiful as the joy they bring.
As always thank you all for stopping by, for the love and for it all , this journey of mine wold just not be the same without you guys, the love and support is very much appreciated and i fell honored and blessed with you all in my life<3 <3 <3
#aptus #aptusplanttech #aptusgang #aptusfamily #aptustrueplantscience #inbalancewithnature #trueplantscience
With true love comes happiness <3 <3 <3 Always believe in your self and always do things expecting nothing and with an open heart , be a giver and the universe will give back to you in ways you could not even imagine so <3 <3 <3
Friendly reminder all you see here is pure research and for educational purposes only
<3 <3 <3 Growers Love To you All <3 <3 <3
P.S- I must extend my sincerest apologies for the missing video reports. Regrettably, Grow Diaries is still facing some technical issues that are preventing me from uploading them. Rest assured, as soon as the situation is resolved, I'll share those videos to give you an even closer look at this fascinating journey. or in my case apparently GD dont let me do uploads over 100mb with is super small file if you working and editing videos , doing my best here to upload them all but GD is not making my life easy on this <3 <3 <3


Likes
2
Share


@fabialien
Follow
Lunes 26 de Agosto 2024, segunda semana de vida de estas preciosas, siguen en giffy, próximamente trasplantar a macetita de cartón, iremos a Walmart a comprar sustratito para ese trasplante.


Likes
16
Share


@Ginger_gnome
Follow
Damn has the buds started to fatten up. The Kmintz plants are really starting to get some beautiful bud production going on. Thw Tarantula Genetics Platinum OG Punch Breath is starting to get some gorgeous color in the buds and lots of frosting on the buds. End of week 5 and the plants are starting to look top notch.
Plant size
Kmintz #1 - 37"
Kmintz #2 - 32"
Platinum OG Punch Breath - 42"
Apple Punch-? - 37"
Well that's all so far. Happy growing everyone!!!

Likes
7
Share


@Krautbauern
Follow
With this thick headbud, there is a risk of getting wet and bad weather and we dont want any budrod
so we cut the headbud after 66 days from seed to harvest we took away some fan leafs and hung it up to dry.
the lower buds may need a few more days.
Its really unbelieveble how much resin she produces.
smoking report is following