
Likes
Comments
Share


@eldruida_lamota
Follow
De nuevo familia, vuelvo actualizar una semana más estas critical a granel que me regalaron en growbarato.
Las flores siguen echando pelos y formándose, mientras por otra parte va produciendo bien de resina.
Es una variedad que e cultivado ya muchas veces es algo que siempre tendrá un espacio en mi habitación.
.
La humedad esta al 45% la temperatura está entre 21/25 grados , y como siempre el ph , ya que es de lo más importante,está en 5,8/6,0.
.
AgroBeta:
1 ml x L Flowering black line , vía radicular.
0,2 ml x L Beta shark, vía radicular.
0.5 gr x L mega PK , vía radicular.
0,8 ml x L Terminator, vía radicular.
0,5 gr x L Engordacogollos, vía radicular.
0,3 ml x L Tucán , vía radicular.
0,1 ml x L Betazyme, vía radicular.
0,3 ml x L Tricoma, vía radicular.
0,05 ml x L Gold Joker, vía radicular.
0,2 ml x L Silver, vía radicular.
.
Hasta aquí todo familia 🕸️ , un saludo y buenos humos fumetillas💨💨💨.

Likes
44
Share


@Ukfarmer420
Follow
I transplanted today, really big root ball for a 10 day old plant, transplanted into a 3gal fabric pot using bio bizz all mix soil it has 5 weeks worth of nutrients so just add water, I will be treating for deficiencies when the come using the full biobizz organic liquid range


Likes
14
Share


@GodZilla_Owner
Follow
Week 11 Update – Harvest Time Approaching! 🌱✂️
BioBizz#1 – BT51
She’s done! She hasn’t had any water for the past five days and will be harvested later this week.
AN#4 – BT51
She still needs a little more time—probably another 1-2 weeks before she’s fully ready.
AN#3 – BT47
Somehow, she’s managing despite the extremely close distance to the light. I haven’t held back on PPFD at all, but she’s handling it like a champ. Super curious to see what kind of yield she’ll bring in! 😅
Likes
81
Share


@Hou_Stone
Follow
Let's remember, in week 6 one of my king's tart had been broken in 2 because of the tension due to my bad LST.
This plant grows much taller than the others. I'm trying to lower his height by doing HST. Currently she does not seem to complain about it.
I preferred to remove my net this week, to more easily access my plants and water them. I hope the branches will hold
I cut a lot of leaf this week. I hear different opinions that say it's beneficial others not... At least it will have the advantage of lowering the humidity.
---------------------------------------------------------------------------
- Water: tap water at 300 PPM, I add 0.7G of Hybrid powder and 0.3g of booster PK+ per liter to reach 950PPM and I adjust the PH to 5.8. I watered daily until water drained from the pot (to release nutrients from previous waterings) and I take a 3-4 day watering break to let it dry out before resuming a daily watering schedule.
-Daytime temperature: 22-26°C
-Night temperature: 20-24°C
-Humidity: 50-75% ( Too high but it's hard to lower it... I need advice please contact me if you have :) )
-Lamp: Mars Hydro FC3000. intensity 90% at 35cm from the top leaves
-Room: Mars Hydro 100x100x180cm
-Extractor: Mars hydro 402 CFM Max. power 3/10
-Substrate : 70% coco, 25% perlite, 5% vermiculite.
My instagram : https://www.instagram.com/p/CuMhQ_BsjRP/?utm_source=ig_web_copy_link&igshid=MzRlODBiNWFlZA==
Looking for MarsHydro equipment for your crop? 🔥
You can use my promo codes! 🙏😻
"houstone3" for: TS LED Grow Light, Tent, Ventilation for 3% off
"houstone5" for: FC&FC-E&SP LED Grow Lights; Grow Tent Kits for 5% off
https://www.mars-hydro.com/?acc=hou-stone

Likes
23
Share


@Gram_Solo
Follow
Well Everyone!!
Here we are! 😁
Nearly at the end of the Eternity Grow Cup journey! 🙌🔥👽🙌🔥
Just want to first say a massive Thankyou to Zamnesia & Plagron for letting me compete in this contest. Would not be here without you! absolute legends😎
I had an absolute blast making the videos every week and showcasing the Grow
Huge Thankyouuu to everyone who liked, followed and commented on the diary! I have been hooked for weeks on this! and its thanks to all you guys! haha Much love!! 💚💚
I Appreciate it soo much. 💚💚💚
I have Harvested 2 of the Runtz first which were darked out for 3 days in a 3x3.
We have 3 more in flower for another week or 2 as they are little behind schedule!
There are 2 plants which I will be flushing next week as they have really packed out now.
We got 1 straggler but looks like she's fattening up good! and will follow suit very soon! 😎
🌳Plant 1 Harvested and Drying now
The size of this momma Runtz is mad!
After loosing one of the main stems in early flower, she powered through and made 2 massive fat colas!
Hardly ran into any problems with this plant other than loosing a main stem which turned out to be glorious in the end! 💥
She is now drying in the 3x3. I'm aiming for 10 days drying. Smell is absolutely unreal!
I would normally do longer but as I have took most of the main fan leaves off I think it will be a bit quicker this harvest.
🌳Plant 2 Harvested and Drying now - Another whopper! super sticky colas all over it!
I decided to leave a few more fan leaves on this one for now but may take more this week
aiming for 10 days again! couldn't' be happier with the results, Hardly ran into any nutrient problems throughout.
We had a few pale leaves early flower due to overwatering but she soon recovered and powered through! Smells like victory!
Could not be happier with the Results so far! 2 down 3 to go! cant wait to get a weigh on them fat colas! I will take some more snaps over the next few weeks
and show the dried and final trimmed bud of the 2 harvested and hopefully get them uploaded before the contest time expires.
First time using the Green Sensation from Plagron! I will 100% be investing in some more or maybe win some lmao!
I can see a dramatic difference in Weight and health of the Autos grown! Green stems and healthy leaves , PHAT BUDS!!! 😜😜😜
3 more Plants to go not long now!!!! I Will add another flowering week in next 2 days and show the other 3 still in action!
Going to Update this harvest page in the next 2 weeks with dry weigh results and Smoke review to follow!!
Update 25/05/25
3 remaining Plants 🌳🌳🌳 have now been harvested and curing in the grove bags.
there are 2 plants that have a very minty fresh smell, smells well good when u open the bags! hits your nostrils hard!
The other is very lemony earthy fresh stuff , some big fat nuggies and popcorns on all 3 . smells so good!
FINAL WEIGH 10.89 Ounce from 5 plants! - Jackpot! 🥇🥇🥇🥇🥇
💥💥💥💥💥
Well that's it! its been emotional! All 5 harvested 😎 this is the ennnnnnnd! my only friennddd!
Good luck to everyone in the contest! 👍
Peace Out!
Gram_Solo 👽

Likes
5
Share


@Sativa763
Follow
Sooo another update :
Week 4
This week starting with Mulch, using hay, first time for me.
Plants Are looking very good and are growing Nice.
Snapped a Branch on the Right one ..
Sad. Very sad.
Switch will be done at may 1st so in realtime we Are on day 45 of flower!
Lets say they are still alive ✌️
See you soon
Happy growing

Likes
126
Share

@Natrona
Follow
Divine Seeds Auto V.2 Contest
👉Sponsored Grow👈
Auto Black Opium
W14F9 8/31- 9/6
8/31 I did some pics and trichome checks. The trichomes are still mostly clear.
With the lock out resolved, finally black opium is developing some pinks and oranges in her buds. I see pistils still pushing out when her trichomes are still clear.
I think at least 3 more weeks are needed.
Thank you all for your continued support and encouragement. Your likes and comments motivate me to keep sharing my journey. Let’s continue to learn to grow together!
Stay green, growers love 💚🌿,
💫Natrona💫

Likes
11
Share


@Pot_Portraits
Follow
Gelato 44 is doing great, she is coming closer to make some beautiful flowers and I will use some stakes to stabilize her a bid,
the weight of the flowers will be pushing her over I think.
Plant turned out beautiful so far, great trichome production and an incredible smell.
The feeding stays the same for now, I just added some Bio Grow from RQS.

Likes
14
Share

@MrGrowDiarie
Follow
Day 113
The leaves are still a healthy green, with only minor fading visible on the lower foliage, which is expected at this stage as the plant begins to draw stored nutrients from older leaves. The sugar leaves surrounding the buds show a perfect balance of color, and the pistils are gradually turning amber and curling inward, signaling that the harvest window is approaching.
The plant's overall posture is strong, with branches supporting the weight of the buds nicely - a good indicator of strong stems and well-managed airflow. The grow space looks clean and stable, maintaining ideal environmental control for these crucial final days.
Likes
45
Share


@Robbaus
Follow
Ciao a tutti! Ho finalmente finito il mio primo giro in idroponica. Dunque, al netto dei miei errori che avevo messo in preventivo, è un metodo davvero ottimo per coltivare. Salta subito all'occhio la velocità palese con cui crescono le piante, molto di più rispetto al metodo classico a terra. A suo favore posso anche dire che lascia molto più pulito il box non avendo terra e quant'altro. I vasi da svuotare sono pratici, mi sono segnato però delle tacche per segnare i livelli a diversi litri, da poter capire come fare quando si deve rabboccare di acqua.
Le note dolenti. Beh innanzitutto sconsigliato assolutamente a luglio e agosto per via delle temperature, l'acqua nel vaso dovrebbe stare a 22 gradi al massimo, io stavo almeno a 5 in più. Poi, avendo 35 litri d'acqua in 3 vasi e avendo 10 prodotti da utilizzare nella quantità di 2 ml/l, non posso dire che sia la via più economica. Anche se bisogna valutare anche che, soprattutto in vegetativa, si rabboccano i prodotti anche a distanza di 2 settimane,quindi con ampie pause tra una volta e l'altra.
Ho sbagliato a calcolare l'allungamento quando le ho girate in fioritura, si sono allungate almeno il doppio di quello che pensavo e così facendo non si sono formati dei bei fiori apicali grossi, ma tanti fiori sulla stessa ramificazione e quindi ci ho rimesso almeno in impatto visivo di sicuro. Però questa è una cosa che dipende dalla velocità dell'idroponica, la prossima volta lo so e mi comporterò di conseguenza.
Nota dolente assai: la muffa. Ho sbagliato a volerla fare nel periodo estivo, fa troppo caldo e per mitigare la temperatura ho usato anche l'umidificatore in fioritura. Errore madornale, ho buttato via 60-70 grammi. Già l'estate scorsa ho avuto problemi di temperatura, la prossima sicuramente non coltiverò, sono stato un cretino.

Likes
64
Share


@Wastent91
Follow
Eccoci ragazzi siamo a più della metà di fioritura.. Purtroppo poca resina, ma le cime sono belle compatte e dure, non c'è molto aroma nella aria, speriamo che migliori nelle prossime settimane, purtroppo ho fatto qualche errore forse con questa ragazza, ho dato troppi nutrienti e troppo poco calcio e magnesio.. Staremo a vedere come procede e cosa ne esce fuori, come struttura è davvero una pianta imponente, praticamente l ho solo stoppata due volte e per il resto l ho lasciata crescere nel modo più naturale possibile, senza defogliare o togliere rami, infatti è diventata un mostro come grandezza, ma purtroppo per ora c'è poca sostanza di quello che mi interessa veramente è avere tanta resina.. Speriamo continui ad ingrossarsi, provvederò a mettere dei sostegni, anche se penso che non ne abbia bisogno dato che la struttura ad albero di Natale, sembra bella solida.. Grazie ad anesia seeds che ha reso possibile tutto ciò, hanno delle genetiche grandiose! Il prossimo ciclo di sicuro metterò di nuovo loro perché esce Dell erba meravigliosamente potente! 💪😸🌱🌿🥦🧑🌾🤞🍀😽💨🔥

Likes
8
Share


@Bryankush
Follow
Giorno 1 molto bene le ragazze sono state defogliate per entrare pulite nella terza settimana di fioritura
Giorno 7 annaffiata con 2L di acqua

Likes
5
Share


@LittleBigTrees
Follow
Still in small pots, I've pulled a few fan leaves and feeding once a day.
Trichomes are starting to show now.
Likes
141
Share


Likes
23
Share

@therealgrowmie
Follow
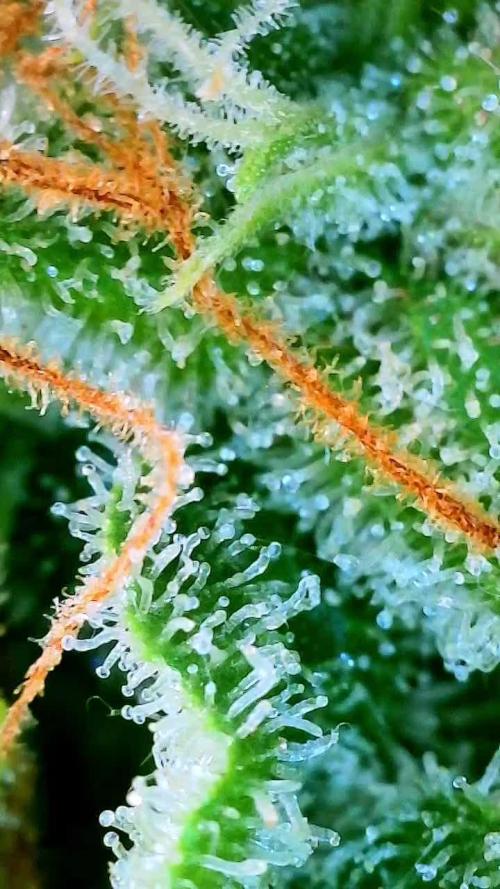
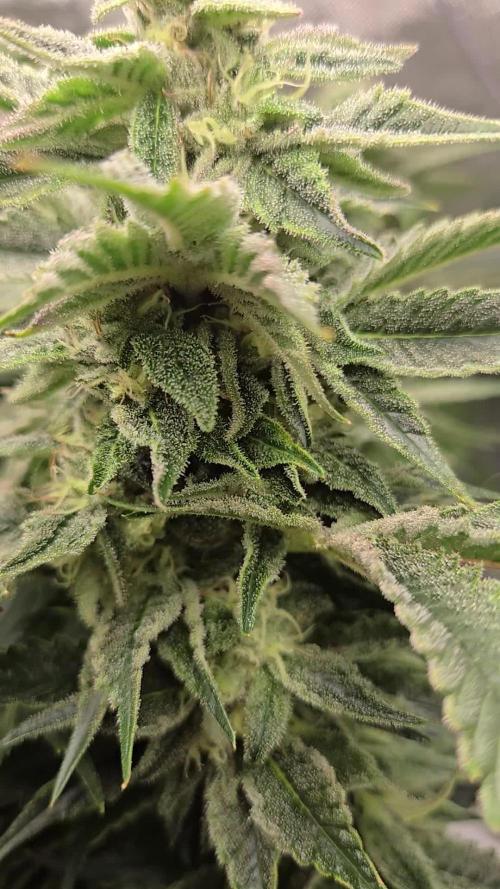
Looking at the canopy now, it really feels like everything came together at the right time. The two Northern Lights are stacking thick, frosty colas with that classic dense structure, while the Critical is entering her final phase, fading from green into those lime-yellow tones as she pulls the last energy from her leaves.
The buds are fully formed and swelling hard. Everywhere you look, it’s just resin, a proper blanket of trichomes covering the flowers and sugar leaves. Under closer inspection, most trichomes are cloudy now, with the first ambers starting to show, especially on the edges. Pistils are turning orange and curling inward, another clear sign that the finish line is close.
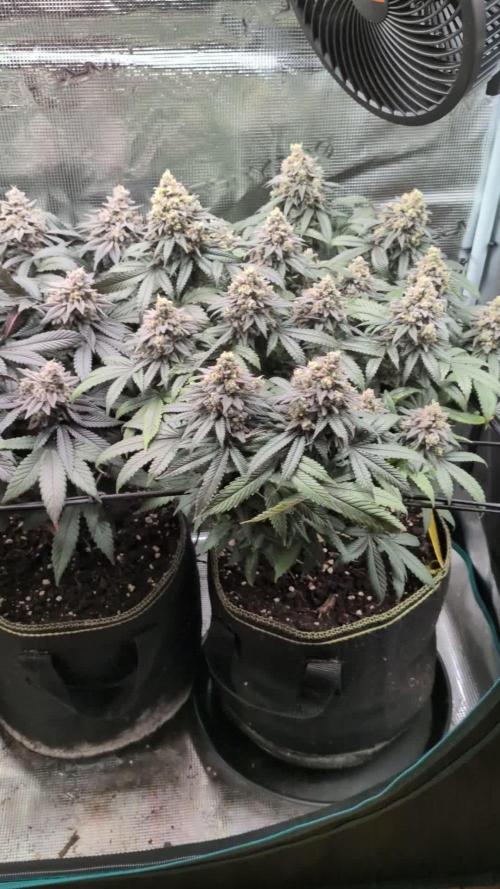
The differences between the strains really stand out at this point. The Northern Lights plants are darker, more compact, and absolutely dripping in frost, while the Critical leans lighter in color with a more pronounced fade and slightly airier, but still chunky buds. Together, they fill the tent with a balanced, even canopy — every top sitting right in the sweet spot under the light.
We’re officially inside the harvest window now. From what I’m seeing, I’d estimate about 7–12 days left. It’s one of those moments where patience really matters. Chopping earlier would keep things a bit more uplifting, but giving them a few more days will push more amber trichomes and deepen the effect.
Right now, they’re close — but not quite at their absolute peak. I’m letting them ride just a little longer to fully mature and finish strong.
Overall, this run has been alright. The environment stayed dialed in, the plants responded well, and now they’re rewarding that with proper, high-quality flowers.
Stats so far:
💧 Watering: Every third day
🌡️ Temp: 26–28°C
💦 Humidity: 65% RH
📈 VPD: ~1.18 kPa
💡 Light: ~700 PPFD
Likes
11
Share


@BrigadeDesTerps
Follow
Jour 76
Et commence à développer leur pistils
Les plantes sont saine et prennent beaucoup de hauteur je dois en palisser quelques une
J’ai fais un thé de compost oxygéné pour les booster pour la floraison
Recette :
5g cendre coque de ricin
25g biochar
5 gr levure de bière
4gr pollen d’abeille
7gr ortie micronisé
5gr spiruline
10gr tourteau de karanga
8gr Kelp
20gr zéolithe chabasit
5gr de consoude
3gr hydrolysât de Kelp
5gr vers de farine
12,5gr bactérie soluble
5gr levure saccharomyces cerevisae souche myco 6420
12,5gr de prêle sauvage sécher
125gr lombricompost
2gr big foot mycorhize gold
Mycorrhizae (400 propagules per gram)
Endomycorrhiza
Glomus aggregatum -100 propagules/gram
Glomus etunicatum – 100 prop/gram
Glomus intraradices – 100 prop/gram
Glomus mosseae – 100 prop/gram
Bacillus subtilis – 350,000,000 cfu/gram
Bacillus licheniformis – 200,000,000 cfu/gram
Bacillus megaterium – 200,000,000 cfu/gram
Bacillus simplex – 200,000,000 cfu/gram


Likes
2
Share


@Lacremelabs
Follow
I planted 3 seeds to germinate, but only one sprouted. Sad.
After it emerged in the coco, the first watering was done with aloe vera juice. The next day, it was irrigated with Azospirillum, a bacteria that promotes plant growth, fixing N.
The third watering was done with an aerated tea consisting of mycorrhizae, molasses, and worm castings.
The fourth watering was done with fertilizer, with a ppm of 700. I used Plant Prod and Calcium Nitrate.
For the fifth watering, I repeated the tea, and finally, another watering with fertilizer, with a slightly lower ppm (541).
All waterings maintained a pH between 5.5-5.8.

Likes
3
Share


@Saltlife420
Follow
Week 5: A little yellowing on the leaves this week. We believe we have a Mag deficiency. Will adjust when watering. Did a flush due to this as well with Cal/Mag in the water.
Defoliation: We took a lot more off this week due to the growth spurt.
LST: using paper clips for LST and it is working amazingly. They have really adjusted well to it.
Height (inches): GSC1 21.5; GSC2 15.5; GSC3 15; Delight 17
7.19.22: The back left GSC grew 3 inches overnight - crazy!!! Raised the light to accommodate it and placed the other girls on a box to be at her level.

Processing
Likes
6
Share


@Frosty905budz
Follow
Week 1 of Flower
Completed 36hrs of darkness
Now 12on 12 off
Lights lowered to 18inch above plant
Adding flowing nutrients see info
Likes
13
Share


@masonandjayden
Follow
Week 2 of flower everything has been growing great praying leaves from start till now. Been really healthy four super sour s1 from copy cat genetixx 2 peanutbutter souffle from ilgm and 1 pressure clone from a cultivator in my neighborhood. Excited to see results in about 6-7 weeks
