
Processing
Likes
Comments
Share


@Firsttimegrowercanada
Follow
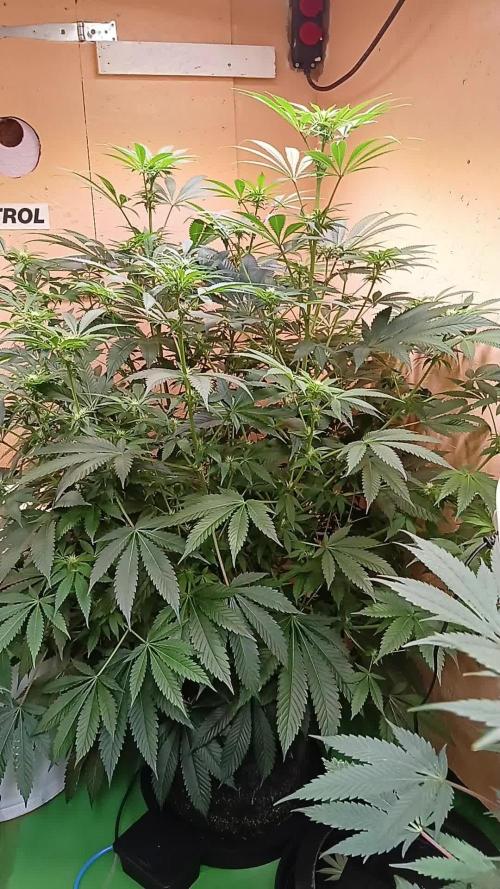
Day 1 Week 10. Added AN Big Bud to the feeding as per Advanced Nutrients feeding calculator. Still fighting to keep the stretch under control. And the RH is hitting 80% leaving the door partially unzipped. Ordered a small Dehumidifier to help. Changed the cover picture in celebration of an election.
Day 3 week 10. Added a dehumidifier to help bring the RH inline. Sofia and Claudia are starting to show their flowers. Happy girls make happy grower.
Day 5 week 10. Each morning a defoliation, and the next day grown in again. The girls have grown enough to see where they are joined from their single seed.

Likes
5
Share


@CannaIGrow
Follow
This plant seems to have grown much denser and better than my first plant. I just got the ac infinity ventilation setup with controller 69 for my 2x2, still trying to learn, hopefully grow #3 goes even better. Stay tuned
Likes
7
Share


@420keef
Follow
Plant had some rough times because of the heat but he survived, opened him up a bit because he was coming to close to my light, any tips are always welcome :)
Likes
16
Share


@Siriuz
Follow
Very happy to start my new Collection from sweet seeds 👽🌱
Thanks a lot for all your kindess
May God bless you always
We are running photoperiod
For the very first time
I think its time for us to grow big
And hopefully we get her into bloom
Happy growing everyone
Day 1 - Place seed into peat pellet and left her fully in a dark
RH was 45/60%
Temp 22/25C
Day 2 - took her out of the dark to get light for 12 HRS
Then back to darkness again
Until next morning
Day 3 - She is finally up and got to fix her a lil since its root was not attach well to peat pellet, just cover her lightly with more Peat moss and place better its root and cotyledons for better growing
She is all set and good to grow
Happy growing everyone 🌱👽


Likes
7
Share


@Eddjack
Follow
Ci siamo !!! No vedo l ora di farmi il regalo di natale. Odora di dolce, fragola e zucchero. Il terreno e carico di nutrienti infatti credo che questa settimana andrà ad acqua . Piena di gemme appiccicose e profumate sarà pronta prima di natale speriamo bene.
Dajeforte growers!

Likes
8
Share

@Mrs_Larimar
Follow
2026-06-04
I barely can enter the room, so i made aroom video
The room started with 7 Plants, now 4 are reaming into the room
they are thriving in all possible directions
growing very vigour
Setup & Method
The plants are growing in an Autopot system using the Biotabs "just add water" strategy.
Setup process:
1. Mix in Startrex
2. Add Silicium Flash
3. Add Biotabs tablets
4. Add Mycotrex
5. Water with Bactrex
This turns any soil into a living, active growing medium. Combined with Autopot, it acts as a cheat code for effortless growth — resulting in large, healthy plants with an excellent and flavorful end product.
Feeding & Maintenance Plan
• Refreshing mycorrhiza and microbes with Mycotrex and Bactrex
• Applying compost tea to all plants
• If any deficiencies appear: top-dress with Silicium Flash
• Continuing the "just add water" strategy otherwise

Likes
9
Share


@Chuckwaggon420
Follow
This week with this girl has been awesome she has really started to take off now that her soil is rite! She grew over 5" in the last week and that's what I chose to take for my clones. 2 to be exact and hopefully will have better results with this go around.
Took me 2 clones off this mom plant so now she has been topped twice. Hopefully with the lessons from personalsmoke will end up with a couple clones of puffinz. They look sad at the moment but I havnt seen what normaly happens to clones 24 hours later.
I give momma about 330 ml of de-clorinated 6.8 ph water every 2 or 3 days when the hydrometer goes around 3. She is in living soil so for now will just sit how we are and just straight water to make her happy!
Thanks everyone for the love
All sent back 10

Likes
5
Share


@CanarianGrow92
Follow
Week 3 for our strawberry gorilla 🦍 from fastbuds 🍁
We removed the 2 lower branches and leaves. We gave some master root this week.
Some of the plants already showed the first preflowers, flowering is starting soon!
We also placed a net above just in case we need to sustain the buds in later flowering
Likes
15
Share


@electabruce420
Follow
F1 for this mad dog, will turn to flowering in a couple of days. This plant is growing super strong and fast, biggest of the bunch, I'm trying to keep her from stretching, want to flowr them short and bushy. Hopefully they go through flowering just fine.

Likes
18
Share


@valiotoro
Follow
Hello everyone 😎
Week 5 of flower for the Amnesia Zkittlez🍭
One is ready,as always harvest in 2-3 times first the top buds✂️
Very nice smell super sweet🤤
The buds are super sticky🔥
For the others max 2-3 more weeks.
Likes
70
Share


@Santica_Garden
Follow
Dark Phoenix Grow is going good, could have done a better job but you learn from your mistakes. Uploaded a video for you guys with all the information, any questions just ask away guys 👍🏾🌱💚

Processing
Likes
19
Share


@Fire_Farmer
Follow
Not much to report really, everything is in order and on track✅
The tallest plant has grown 16cm end of week 2 so 1 last week of potential stretch at that rate or hopefully less and it should all remain manageable 🤞
Facing some heat issues but it doesn't seem to be stressing my ladies they are loving life right now 🌞
Its been 25celcius here last few days and that translated to 28celcius in the tent🌡️
Gonna steal a few leaves here and there this week but nothing major, I'm happy enough with the canopy and its bud-sites 👌
Buds are developing nicely, hopefully I'll still get some dense nugs even though they are only wearing 6L shoes 👠
In the end though my main goal is clean and tasty smoke and ive been getting some nice fruity smells from the stem rub, especially the Zorro x Zkittlez #1 I'm getting a lot of lemon and lime from her 🍋🍇⛽
As for clean that's on me, in the great debate of flushing I'm all for it. I get that true organics is a different story but in coco which is what I'm using I notice the difference 🥥
I use bottled nutes which aim to be as close to organic as you can get in a bottle, Cellmax Bio always give me nice flavour and I'm just testing Buddha's Tree Organicus now alongside Cellmax Additives but I still always flush 🌊
Well that's all folks 🐰
Thanks for tuning in🙏
One Love💚
Fire Farmer🔥👨🌾
Likes
10
Share


@colla69
Follow
Going strong
It seems to need a little more airspace for the roots to breathe
Likes
79
Share


@bioaccessory
Follow
Минус одна растиха, и сразу в боксе как-то пусто 😏 Цикл для медицины продолжается, поэтому окончательные выводы будем делать позже. Хотя уже сейчас очевидно, что между харвестами разных сортов будет не меньше месяца.
upd 08.11. добавил фото высушенных шишек, получилось даже больше, чем я планировал
Спасибо, что заглянули, и будьте здоровы! 🙏
Likes
10
Share


@HideAndFly420
Follow
Day 71👋🌱
Started flushing. Giving ph controlled water at 6.2/6.5, I check TDS to water owerflowing from pot, bringing it to 50ppm from 400.
Now I’ll start checking trichomes every three days, I’d like a 60% white and 40% amber.
Day 72👋🌱🌱
Hi all growers, how is going?
Second flush, baut maybe the real first one😎,
i gave 10 lt of ph controled water (6.5) and was checking ppm from water coming out. i gave water unitl it reach 400 ppm, my water is 200 ppm,
i hope i'll bring it to 50 ppm for next flush in 3 days.
This lady is so fat, and tasty already i can smell chocolate and pinus, i'm sure they're going to fatten up 😋😉
Day 77🌱🌱🌱 🌱🌱🌱🌱
Keep washing it with ph controlled water, water now looks cleanest and buds are really blooming now, leaves are loosing color in favour to buds, i think i've got ther 6.7 days left to this lady cut.
Let's see!!!!
Let’se go!😋
Likes
14
Share


@LokalGrenz
Follow
The Amnesia haze 2 is turning light green yellowish some told me it could be deficiency or it could be just flowering taking energy from the leaves but I’m not sure I used Gaia green bloom recently thinking it would help I’m going to too water that haze from here out the other have and sour I’m going to continue to bottom feed
I took some trichome pics I don’t think there ready yet but I think I’m getting close to the date I feel the the amnesia haze 2 is going to hit 90+ days tho kind of hope not cause the other haze and
sour are probably going be done sooner I want to fry them all at the same time
March 7th I think the haze #2 and Sour d is ready but the other Haze is not I’m pretty sure I have another week pre maybe even two for it to be near ready I need the tent to harvest and dry what’s ready I’m going try leave the ready ones in for another week in hope it doesn’t mess them up


Likes
10
Share


@DeepRootsGrowTrees
Follow
ROYAL QUEEN CBG AUTO
Week #12 Overall
Week #9 Flower
This week she's doing good she continues to pack on weight and she looks fantastic with her white and red hairs just covering the buds!! Stay Growing!!
ROYAL QUEEN SEEDS
ROYAL QUEEN CBG AUTO

Likes
6
Share

@FeebleSnane
Follow
This plant came down after 115 days of life, and 59 days of flower.
I enjoyed everything about this plant for the entire grow. It didn't give me any problems with nutrients that were hard to handle. It had minor burns at the tips, but that's usually what I'm looking for in my nutrient levels - right at the limit. The plant became super smelly towards the end. So much so that I got a letter about it 😶. It got even smellier when it was trimming. I'm really looking forward to seeing how these buds will look after drying up. I'm really hoping to see extra dense buds with some heft to them.
Likes
1
Share

@bavarian_original
Follow
Die Seeds mit SeedTreatment gecodet - danach in einen 1L Topf mit Seedtreatment und Boron von rootinn


