Likes
Comments
Share
Big week! I got my new EarthBoxes and a bunch of goodies. I picked up the Probiotic Farmer's Alliance kit from BuildASoil, so I also got some EM-1, Kashi Blend, dolomite lime and Malibu compost. Alongside that I picked up Colorado Worm Compost (vermicompost), Gnarley Barley (malted barley, corn and hemp) and Craft Blend (aprox 3-5-2 organic mix). Unfortunately there was a bag of soil missing, so I ended up using my own mix though I am somewhat scared of it being too clay-heavy for the SIP. I inoculated with EM-1 and began fermenting a batch of activated EM-1 to make the bottle last longer. It looks about a week from LST, after that I hope to set up a two-tier SCROG setup and begin growing the bushes. I will begin spraying AEM-1/EM-FPE/EM-5 alternatively once a week for IPM, I will try to avoid using neem this round (unless I find this approach lacking). I also brewed a batch of EM-FPE with aloe that smells incredible, I can't wait to give it a go.
Likes
5
Share
Got the trellis net up, got about an inch of new cola growth, should be long enough to bend soon...might top agian at that point. DLI is at 47 light at 70 percent. Adjusted light height to dli and Upped to 7 this am.
Processing
Likes
32
Share
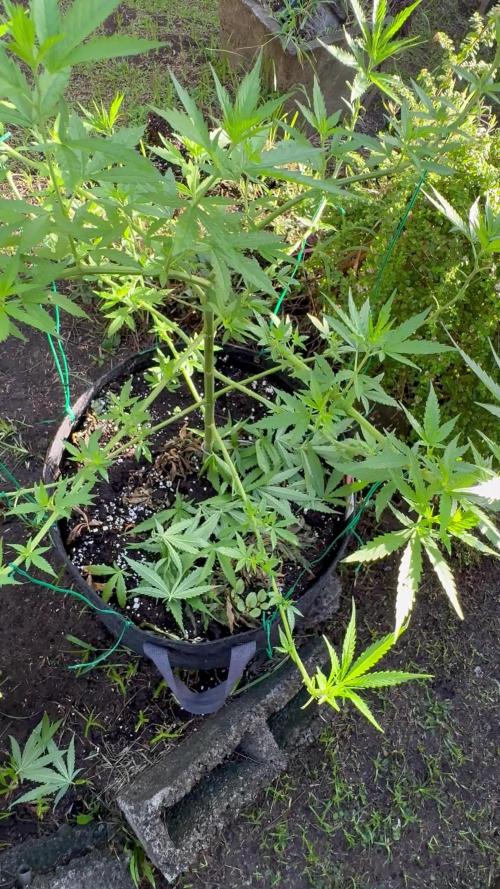
26 18/7/20 And.. She's topped! You can see the video of the procedure. Now let's hope everything will be ok! 27 She's doing fine, no signs of stress at all. So today I gently bent her to start with lst since she's already showing pre flowers. 29 Today I added mulch! I used shredded straw and grass clippings. I also upgraded her lst. I love using natural elements as little sticks to help with lst! Unfortunately with the mulch the photos are a bit confused. And today we had a little friend, a bumblebee! 🐝 as far as I know, there are no other outdoor cannabis plants in the surroundings so I'm not afraid of accidental pollination. She's clearly concentrating on her 2 new "tops".
Likes
2
Share
@Valley
Follow
Buds werden immer dicker, Klebriger und süßer im Geruch Cold Flush wird anfang nächster Woche einmal durchgeführt
Likes
32
Share
7/10 - Lowered light just an inch, plants still looked like they were stretching up a bit. Currently at 29" 7/11 - May be light stress, I'm not sure. But a spot has popped up on the older Gelato, which my wife has affectionally named Mal. Also noticing some warping in the leaves, it dosnt look terrible, definitely keeping a close eye on it. While checking out the girls this morning, found 3 or 4 gnats flying around. Killed them all, will monitor. I am allowing the soil to dry out before I water again, currently the top layer is mostly dry. 7/12 - Everything is looking great today, found 1 gnat this morning. Soil looks dry, stuck a soil moisture meter to the bottom of the cups, reads on the dry/moist line. Will probably water tomorrow. 7/13 - Plants looking good this morning, nice amount of growth overnight. Watered roughly 100ml each, slowly until water started to drip from drainage hole. I poked around the soil before watering, to try to find any gnats and i didnt see any fly up. As soon as water hit the soil, i saw about 3 fly up, tried to kill them. I am going to keep air blowing on the plants, to hopefully keep the gnats at bay. Will be getting some yellow sticky pads as well. The tent has been getting a little warm lately, in the lows 80's, up to 83. I decided to dim the light to 75%, and bring it closer. Light is currently at 75% 24". Overall I am very happy this week. 7/14 - Alright, so it has come down to pest management already. When I checked the girls out this morning, I found a lot of gnats. So I mixed in a little bit of diatomaceous earth into the top 3/4" of soil. Hopefully it doesn't cake up on me when i water next time. The original plan was to wait and ride them out to transplant, but when i saw the amount I gnats, I knew I had to do something. They did not like that at all, ill check back later tonight to see what carnage has been wrought to the gnats. Other than the gnat problem, the girls have been looking very good. I am a little concerned for Regina, she seems to be growing a little slower, and had some strange coloring in the growing fan leaves. I think she will pull through though. I saw a VPD chart that says my RH should be around 65-70% right now. So I'm shooting for that. I set up a little humidifier inside the tent. 7/15 - So it looks like the DE did the job, I poked around in the soil and couldn't find any gnats. Also I lifted the light up a little, to keep the canopy at 24". I ended up transplanting today, may be a little early, but it'l be alright. Dusted the transplant site and the root ball with great white myko. Added some more DE to the top of the pots to keep the gnats at bay. 7/16 - Nothing really going on today, the ladies are enjoying their new home, lots of growth over night. Didnt see any gnats today!
Likes
1
Share
@jaydee702
Follow
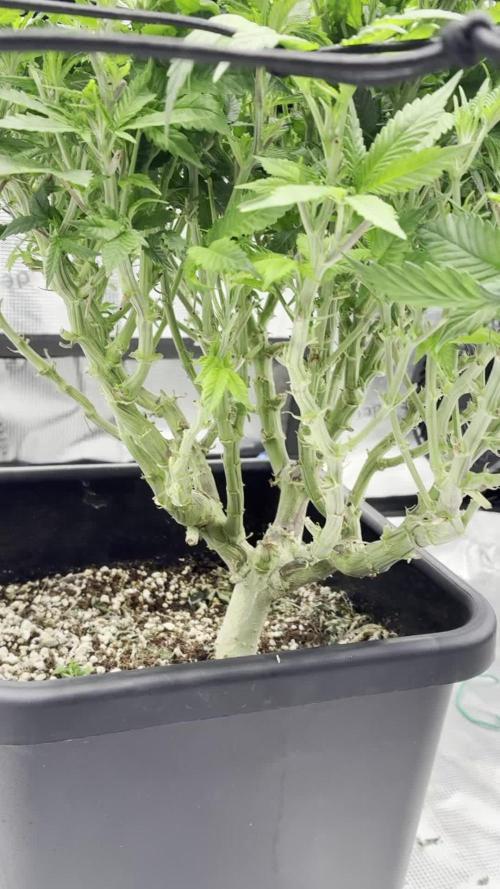
Started bending branches LST creating more tops recieving light creating a bigger yeild at harvest.did not need any topping due to all the main branches a flowerproduces when put back in vegetive state.
Likes
19
Share
Week commencing Friday 29/01/21; - Switched from veg nutes to bloom nutes as the flowering had definitely started. Using half dosage and alternating feeds with clean water and nutrient water. - Acquired a Brita 8.2l filter tank to remove chlorine, lead etc. Couldn't hurt! - Dramatic height increase from the previous week. - Strange right angle clawing on two of the fat bananas. Pretty sure it's heat stress. - The water intake has increased to at least 750ml per plant. - Some lower tier leaves discoloured. Again, I'm pretty sure it's heat stress. - Stopped the LST this week. The stems have become very rigid and I don't want to risk damage. - I have definitely run out of space and have employed SOG by default. I'll defoliate further next week as I don't want to shock the plants in the early stages of flowering. - The heat is peaking too high and I have started opening the door for ventilation. No extraction is causing all sorts of heat regulation problems. God knows what the peaks are when I'm not here. - I have ordered a digital hygrometer that will display 24 hour highs and lows of temp and RH.
Likes
6
Share
@GODAXE
Follow
11.08.2024 officially D132 from seed. this girls has became a realy fat lady she take 25% of the 5x5 tent. she is bushy like hell even if i have removed all fan leave. Need to do some root prunning as the air stone is completly embed in the root ball, witch is really most darker that it should be, my nuts solution lightly die the roots but not this far. In the process i realized that the air stone was completly cloged, probably what cause the leave burn ,so switch it and add a second one for safety. the remaining root have been wash and get soak in 1% H2O2 solution for few hours. really worried about bud roted, i decide to go for a 2 or maybe 3 shot harvest as lower and inner cola arent definitively ready and can still build up. and some of tops cola show mostly milky trichrome and few amber one. so 1st harvested from big top cola and some smaller side one for a total weight of 733.5g of wet sticky bud. looking for around 5oz of dry bud, so expecting easily 3/4pond from this mama😜
Likes
34
Share
@JonnoSA
Follow
Ok Soo it's week 8. Tangerine dream #2 is coming down. Blue dream #2 is very close. Ther rest of the plants need another week or two. The trichomes are still clear. No signs of amber just yet. I'm convinced the burnt tips and now curling leaves on the blue dream#1 is due to light stress. I dropped the lights down two weeks earlier and it seems this pheno is not to happy about it. The rest of the plants seem to be in great health. The tangerine dream#1 is starting to show sign of yellowing Wich is fantastic timing. The others not so much. I will say its the only negative with this line of nutrients. They are very easy to use however different plants take up nutes at different rates. So it makes it tricky to dose each plant individual perfectly. I will up load photos when I take down the plants and again later when I have them dried and on the scales. I'm super stoked with the grow so far. Not much to complain about. It was not easy with all the power outages. But the crop looks fantastic all things considered 🤙🤙
Processing
Likes
13
Share
@GrowGuy97
Follow
Day 3 of flower & these ladies are stretching great! We are having a bit of a calmag Deficiency right now but currently in the process of trying to fix it so hopefully they bounce back! The Gelato OG from seedsman is a monster to only be 42 days old not sure if I just got a good pheno or what happened but compared to the other gelato beside it from the same bag it looks like a completely different plant! Can’t wait to see how the buds turn out! Happy growing friends!✌️🏼🙏🏼 Day 4 of flower - recharge water at 6.5 Day 5 of flower - ladies are really starting to fill out & stretch, can’t wait to see how this run turns out✌️🏼🌱 Day 7 of flower - Not much to say everything is going great so far! Thanks for following & happy growing friends✌️🏼🌱 Day 8 of flower - They are all stretching & growing so much everyday! Couldn’t be happier so far!👍🏼🤙🏼 Day 9 of flower - end of week 7 things seem to be going great so far, fingers crossed we can keep it this way through harvest! Happy growing friends & thanks for watching!✌️🏼🌱
Likes
4
Share
Auto pots are on. Reservoir is at EC 2.2 and ph 5.5 SF2000 light 24 inches above plants 100% added 1ml of calmag per litre on day 19 Day 13 - raised lights to 36 inches. At 100% PPFD of around 600. Plants started reacting very well.
Likes
6
Share
Not much has changed other than size. I have her locked down in a ring to direct even growth. She will stay in the pattern for another week or so before I'll release the branches and move her to the 4x4 flowering tent. I'd like to note that I have also removed the first 2 nodes on every branch on the entire plant. And cleaned up all growth for the first 5 nodes from the main stalk. As well as any branch that is facing down.
Likes
6
Share
Flowering day 65 since clock change to 12/12 Hey guys :-) . It's so far, the lady is ripe and will be cut at the bottom end in the coming days and hung upside down in the drying tent :-) . Next week there will be an extra update on how they are hanging. Watering would be done twice this week with 1 l each (nutrients see table above) Otherwise it was checked and everything was cleaned. Have fun and stay healthy 💚🙏🏻 👇🏼👇🏼👇🏼👇🏼👇🏼👇🏼👇🏼👇🏼👇🏼👇🏼👇🏼👇🏼 You can buy this Nutrients at : https://greenbuzzliquids.com/en/shop/ With the discount code: Made_in_Germany you get a discount of 15% on all products from an order value of 100 euros. 👇🏼👇🏼👇🏼👇🏼👇🏼👇🏼👇🏼👇🏼👇🏼👇🏼👇🏼👇🏼 You can buy this Strain at https://pcg.international/shop/pcg-int/ Water 💧 💧💧 Osmosis water mixed with normal water (24 hours stale that the chlorine evaporates) to 0.2 EC. Add Cal / Mag to 0.4 Ec Ph with Organic Ph - to 5.8 - 6.5 MadeInGermany
Likes
25
Share
@kizdog
Follow
Busy week for sure. At the start of the week I started seeing the trichomes develop round heads as they were maturing. It's been very cool to see the difference in them every day. I had some trouble at the start of the week getting the ATS300 angled correctly because of my Dad's cowboy setup, but it definitely worked for a while and I'm grateful. Luckily, we managed to get an AC Infinity 642 ordered and got her in there ASAP. The tent is 72 inches tall, and it's only supposed to be 60! That gave me some extra room above my canopy for the light/exhaust etc. and actually saved me a bit to be honest. Although this was started as a 2x2 grow and I had no intention of straying from that, my plant became such a beast that I did all of this to be safe. My second grow will be a lot more organised! I installed an upper trellis a couple of days after putting the 642 up. Again, I became a bit disorganized with training (for example, I took my LST ties off too early, removed my lower scrog net when I took her out of the 2x2, and I focused a bit more on defoliation). This net will pretty much be for support only, but it will definitely help even out the canopy. The trichomes, again, are looking great as I hope the pics show. Just anxious I defoliated too much as a novice because I don't want my buds to grow slowly. I also had an issue with high heat (28-30C) for the first couple days in the 642 while I was sorting the ventilation and placement of the dehumidifier. Now it's sorted. Adding PK 13/14 this week coming up! Thanks for reading! Happy growing 👊 KIZDOG
Likes
21
Share
16/07 gave her the chop after 8 days flush and 2 days darkness. Aiming for at least 10 days drying time. My scales couldn't read her wet weight without being cut up, which in not doing yet.
Processing
Likes
15
Share
En ésta ocasión tenemos la suerte de probar una RED POISON AUTOMATICA DE SWEED SEEDS 🔥 Esta maravilla es una Hibridación entre una de las variedades más apreciadas de su catálogo, la Green Poison®️(SWS14), y una exótica genética autofloreciente de flores moradas y ancestros Kush pakistaníes. Red Poison Auto®️ (SWS39) crece con aspecto de híbrido índico-sativo. Demuestra un gran vigor híbrido desde los primeros estadios de crecimiento. Desarrolla un tallo fuerte y ramas laterales largas y flexibles. Produce grandes cogollos compactos cargados de aromática resina. Los aromas y sabores son muy agradables e intensos, dulces y afrutados con un fondo suave de Skunk. Con esta descripción oficial de la propia página de Sweed Seeds se nos hace la boca agua con solo leerlo. Iremos viendo el transcurso de esta pequeña para ver en lo que se convierte de aquí a 3 meses aproximadamente 😊👌 Día 1: Hemos germinando la planta en un mini-invernadero con una luz LED de 20W, con 28°C y una humedad del 60%. Día 2: La plantula ha salido y hemos transplantado al armario y a su maceta final. Una maceta de 7L con una mezcla de sustrato de Top CropComplete Mix y Biobizz Light Mix en una proporción de 70/30. Todas las maceta tienen 3mg de Micro Vita para protegerla de las plagas. Hemos regado con 1L de agua con 1ml de Deep Underground de Top Crop (enrraizador) para que empiece a crear el sistema radicular lo mas fuerte posible. La temperatura en el armario es de 30°C con una HR de 60%. El armario tiene incorporado un humificador 🔥 Día 3: Estoy usando una bombilla de sodio de 400W en un armario 1x1x2 con lo cual emite bastante calor y las plantas se secan bastante rapido. Estoy intentando subir la HR al maximo con ayuda de un humidificador y con agua pulverizada para mantener el entorno en un punto optimo pero es una tarea difícil. Hemos vuelto a regar las plantas con agua 💧 pH6 a 30ºC con 200 PPM. Día 4: Sigo trabajando en mantener la temperatura y humedad en unos parametros optimos, por el momento tenemos: •Día 30°C y 50-60% HR •Noche: 26°C y 50-60% HR
Likes
85
Share
@Grey_Wolf
Follow
How To Make and Use Organic Super Soil Seedsman Seeds Peyote Wifi Harvest Well here we are at the conclusion to many months of planning and preparation plus another 23 weeks of Growing. I Did a lot of reading and researching super soils and how they are made before I decided to actually make some . Then I thought to myself I should document the whole process from start to finish in diary form. This way any other growers who are interested can have a basic idea of where to start. and the likely conditions they may face. All of this began way back in August of 2019 when I first mixed the super soil mix (which can be found by looking at week one) aproximately Three months after that I started this grow and 23 weeks later Here we are at the end. Along the way I described the methods I was using to keep the soil fully active and productive at all times. Plus also some of my pre planning tips for flowering time. For example in week four.... I innoculated with the Mycorrhizal kit as instructed on the packaging next week I'll give the soil some help by feeding some seaweed solution mixed with mollasses and worm castings. This will provide a boost for both the plant via the roots and also benefit the millions of tiny microbes that live within the soil. Simply mixing and using the super soil as is will still work fine however by keeping the soil in perfect health as well as the Plant itself will pay dividends come harvest time. Week Six.... It can pay to plan ahead now for when the plant gets bigger and will need support. With this in mind I am going to use a premade wire Tomato type cage that is 1.5m high. This will hopefully provide enough support for the plants frame when it goes into Flower Next year. Planning ahead can sometimes help prevent potential issues from effecting your grow. Some things to think about and plan ahead for are as I mentioned Plant stability and support when it gets bigger. Week nine..... Planning ahead still I decided to dig a big hole aprox 1.5 meters by 80cm and to a depth of about 4 foot . Took a few hours of digging and shovelling but the end result with the plant lowered down into it makes it worth my effort and Back pain that will follow 😏 By doing this I have created a much cooler Root zone by having the pot well below surface level But Ive also knocked 4 feet off the overall plants profile which will aid me in my other concerns being Security. Week thirteen.... Diamotaceous Earth acts as a bug deterrent and can't hurt the plant in any way. I also mix some into the worm tea that I feed straight to the soil as Diatomaceous Earth is a fantastic source of Silica which we all know is extremely beneficial to your Plants Health. As Far as my super soil is concerned , so far I have not needed to feed the plants any fertilisers as the soil is providing everything the plant needs. All ive been adding is biodynamic food for the soil itself to keep everything under the surface happy and well nourished. Once flowering begins next month I will need to add an organic Booster to the soil that will replace any depleted resources. ***** But not everything went smoothly in fact I did the most damage to the plant in Week 17 I decided to be stupid and spray all my girls with potassium bicarbonate thinking it would "mold proof" my plants WRONG all did was burn the absolute shit out of the leaves. From then on it was a constant struggle to get this girl to produce anything because along with the foliar burning I also had to contend with next to no sunshine for many days at a time plus the constant leaf dropping no doubt reduced my potential yield. ****** Not everything was Doom and gloom either in fact by Week twenty one.... The Quality however is definately showing itself, with every single bud covered in visible frosty looking trichomes. The smell is really really Funky with undertones of spices. So even tho I'll probably only get around half of what I was hoping for ,the bud that I do get will be straight up fire. 👌 In the Final week before I chopped .... The Buds although very delicate and light, look very Frosty and Delectable. As for the super soil it is absolutely chock full of nutritional value so I will use it to Grow a fine crop of Broad beans this coming Winter. The growing of Legumes in the soil will actually benefit the soils health in many ways including making the nitrogen within the soil more readily available. **** On the 18th of March 2020 I chopped her down and hung the plant upside down in the greenhouse overnight. Next day I removed all the buds and stripped them off the branches. The buds then went into a hanging drying rack until adequately Dried for the trimming. After the first trim the buds went into paper bags for more drying time (aprox 3-5 days depending on temp rh weather etc) They then got a bit more of a trim and went into the Jars for Curing. I have had quite a few bongs of this already and I must say it is Really good hey!! So in Conclusion I hope that this Diary may help somebody who may be interested in growing organically with soil outdoors or indoors as well as provide an insight into how the use of all natural ingrediants can produce Good buds. Whilst this particular plant didn't get Big buds the Quality was outstanding and you only need to check out some of the other plants I have growing in the same soil mix as to the validity of of its Fertility. Now we come to the End of this Grow I'd like to thank a few growers who offered advice and/or support along the way @ROM101 @Med_in_Tropic @F4m0u5 @Shooey @MagicMan @Spinnnn Thanks guys I appreciate it Also thankyou you for reading this Diary and please leave a like at the end if you liked it Cheers Grey_Wolf Post harvest notes ; its now the 1st of May and the Broad beans and Peas that I planted in the super soil are doing very nicely this will not only provide me and my family quality organic food for our table but also the growing of legumes helps fix nitrogen to the soil and keeps it living and healthy for the next time I need it for canna 👍💪 Best way to be folks self sustainable and recycling your soil mixes will help reduce our footprint on the planet and save us money too 👍 So what are you waiting for Grab some basic organic ingrediants and make yourself some Organic super soil 👍👌 ##### Final update for this diary 31st May 2020 It's been just over 2 months since I harvested this Peyote Wifi plant and the buds have been curing for that time . Today I chose a bud to test and I am blown away by the perplexity of the high and taste profile , Bloody amazing 👍####### Thats it folks All over now after 3 months of making the soil then another 24 weeks of growing the plant and then another 2 months of curing to get to here 31st May 2020 It was a great fun grow and I hope I have inspired some of you to try making your own batch of Organic super soil 👍
Likes
152
Share
VIDEO ADDED: DEC 29 2020! -- PHOTOS ADDED: DEC 27 2020! MORE COMING VIDEO?! -- Smell is starting to come down from the fresh cut, definitely has a great look to the bud as the cure goes on, have two 8 gram boveda packs in there after a few days with one that was WAY too big for it 😂 Brought down my Chocolate Mint OG in my other diary right now as well, way more weight to that last plant... probably more than both these Chem Bombs combined, great genetics over @Humboldt_seed_organization 😎 -- PHOTOS ADDED: DEC 23 2020! MORE COMING! -- DEC 19 2020 - Harvest Day Chem-Bomb Auto .. DONE. Step-Brothers ... CHOPPED. Buds.. TRIMMED. Giving them my first bud wash tomorrow! Already juiced the lemon, have the spring water, and off-brand baking soda because COVID has every place sold out of Arm&Hammer 😂 Dale: 50 Grams Wet Buds/Stem 15 Grams Trim/Larf = Total 65 Grams Wet Brennan: 55 Grams Wet Buds/Stem 12 Grams Trim/Larf = 67 Grams Wet Total Wet: 132 Grams (Buds/Stems/Trim) Looks like I'm getting in and around the "1 Ounce per Auto Plant" range with my basic soil/hand feed system. The CMOG from my other diary looks like it will be my first 1OZ plant when it dries. With my past experience of wet buds drying out to about half of bud weight, I'm hoping that they both come in JUST under an Oz a piece. Going to update with more pictures, going to take a couple days to dry and get a good weight and hopefully get somewhere close to the 64 grams of the ONLY sized Boveda packs I have right now 😇 -- UPDATE - Dec 20 2020 - Cure Day 😵😭 i once again got my hopes up by pulling the classic male "over-exaggerating" and all the wet weight came from the main stems. After 3 days or so of drying both plants together came in just under an ounce. The smell is great and I have no doubt it's quality bud but I need to up my density game somehow for sure. New nutrients or better set up, still very low-end with all my equipment as I've just slowly been finding affordable pieces to add as I go. Maybe more light? Feel free to hit me up below with ideas short of switching to a Hydro set up 😹 I can hardly afford my bags of soil so I definitely couldnt keep up with the financial costs of a Hydro set up yet 😓 Have had a few bowls of the dried/uncured bud and it's very nice, clean, and crazy good for being uncured at this point. Just the classic flower taste from the chlorophyll but the pineapple/tropical taste is coming through nice already. Final Stats: 26g Dried Bud 26g Trim -- Thanks for checking in! Will be updating soon and posting more pictures! Throw down a like and/or follow so I can return the favour 🙌 -- IG: @GlazedGrow (DM and let me know you're from Grow Diaries so i can follow back!)
Likes
14
Share
@Kakui
Follow
22 Diciembre: Hoy se pasó a etapa vegetativa nuevamente, se regó abundantemente de manera manual con lanza de riego para bajar la EC del sustrato a rangos vegetativos(3.5~6.0), se obtuvo runoff de 5.9pH y 5.0EC, durante los siguientes días se debe seguir bajando la EC con más cantidad de disparos al día.