


Likes
Comments
Share





Likes
26
Share


@Sickone
Follow
Leider sind die letzten Wochen nicht sauber geführt worden auf dieser Seite da ich die Plattform aufgrund der ständigen Upload und Verbindungsprobleme etwas aus den Augen verloren habe.
Allen Ladys geht es soweit ganz gut 2 Blühen schon fröhlich vor sich her und gehen vermutlich in die Endphase über während die andere langsam anfängt sich in die höhe zu Skretchen.
Lampe: Mars Hydro FC evo 1500 / China LED mit angeblichen 700W ( Vermutlich eher um die 100-150 )
Abluft hinzugefügt da die Luftfeuchtigkeit die letzten Wochen extrem hoch wahren und die Ladys es nicht so gut vertragen haben.
Gedüngt wurde das erste mal jetzt am 13.05.24 mit BioBizz Bloom / Grow / Top Max
PPFD: Zwischen 950 und 1000
DLI: 60
Ich werde die fehlenden Wochen noch editieren Bilder etc. habe ich alles noch.

Processing
Likes
39
Share


@Vincenzo
Follow
Il profumo è inebriante e forte, la resina aumenta di gg in gg. Il raccolto lo farò Venerdì o Sabato✌️🏻😉🌞✌️🏻

Likes
24
Share


@GrowGuy97
Follow
Day 35 - All still growing very strong, both plants that aren’t being mainlined are very short & bushy but have a lot of bud sights! This strain has taken very well to mainlining as well, the double mainline is up to 8 tops now and doing great! Thank you to everyone for following & make sure to check back for daily updates! Happy growing friends!✌️🏼🌱

Likes
10
Share

@GreenHobbit
Follow
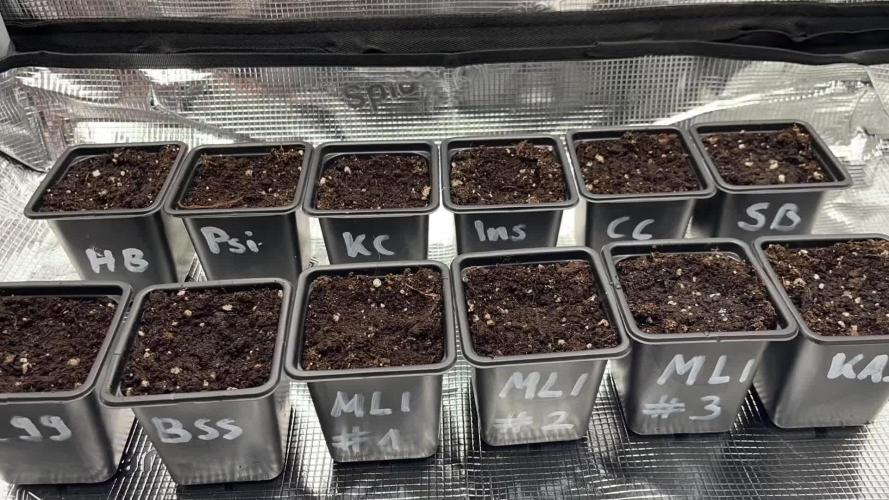
Killer A5 Haze. 😈💚
Die Killer gehörte bei der Keimung zunächst zu den Nachzüglern und bekam noch etwas zusätzliche Zeit im feuchten Küchentuch.
Mittlerweile hat sie davon nicht mehr viel übriggelassen. Sie hat einen der längeren Stiele der Gruppe entwickelt, gleichzeitig aber bereits ein kräftiges erstes echtes Blattpaar und deutlich sichtbaren neuen Austrieb.
Der lange Stiel kommt mir sogar entgegen: Beim Umtopfen wird der kleine Ballen einfach 2–3 cm tiefer eingesetzt.
Und diese Kleine bekommt später sowieso eine Sonderbehandlung: eine Killer A5 Haze und ein Solo 70x70cm SCROG. 😏
Heute ein Sämling auf Stelzen – irgendwann hoffentlich ein komplettes grünes Dach.
Let the Killer grow. 😈

Likes
1
Share

@Dendegrow
Follow
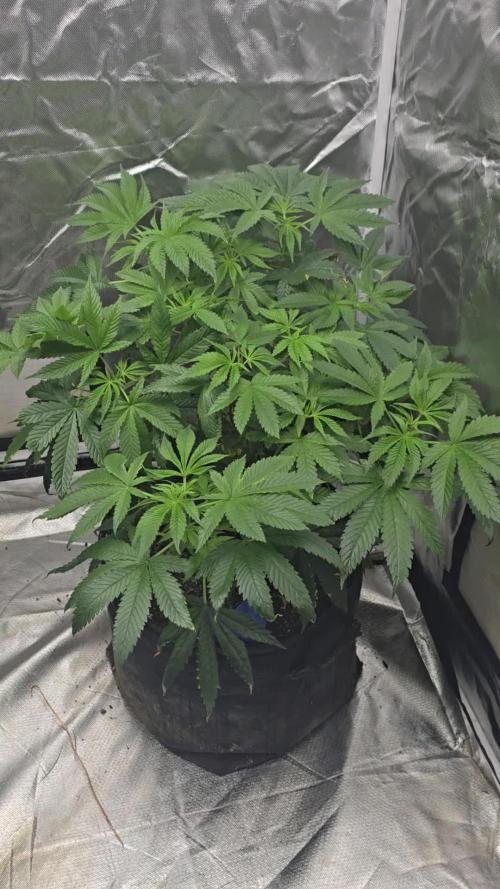
🌈 Mental Rainbow (Sweet Seeds) – Week 7 | Flowering Day 1 🌸
Here we go – the bloom begins! 🚀 Yesterday I flipped her, so today is officially Day 1 of flowering. She’s thriving in my own homemade Living Soil, and the root structure is crazy thanks to my custom booster 🌱.
The smell is already phenomenal – sweet, intense and super fresh 🌿💨. Today I removed a few leaves 🍃✂️ to let the light penetrate deeper into the canopy. She also got just a light dose of Greenhouse Feeding Bloom – nothing heavy, since the Living Soil is already full of life ✨.
This lady looks ready for a colorful journey – follow along to see how bright this rainbow will shine 🌈🔥.
---
🌈 Mental Rainbow (Sweet Seeds) – Woche 7 | Blütetag 1 🌸
Jetzt geht’s los – die Blüte startet! 🚀 Gestern umgestellt, heute offiziell Tag 1. Sie wächst in meiner selbstgemachten Living Soil Erde und hat durch meinen eigenen Booster eine extrem starke Wurzelstruktur entwickelt 🌱.
Der Geruch ist schon jetzt phänomenal – süß, intensiv und richtig frisch 🌿💨. Heute habe ich ein paar Blätter entfernt 🍃✂️, damit das Licht besser nach unten kommt. Dazu gab’s eine kleine Portion Greenhouse Feeding Bloom – nur ganz leicht, da die Living Soil schon genug Power hat ✨.
Das wird ein richtig bunter Run – bleibt dran und schaut zu, wie dieses Rainbow in voller Pracht erstrahlt 🌈🔥.


Likes
29
Share


@CannbellFarms
Follow
22/11/22
- Most plants starting to have yellow sites, pre flower approaching soon! Just waiting to see some pistils before moving onto bloom nutes
25/11/22
- last heavy defoliation and light training
- moved onto bloom Nutes for the remaining 3 days of the week
Per 5L
20ml Bloom A+B
10ml Voodoo
10ml Piranha
10ml Bud Candy

Processing
Likes
18
Share


@Cannibalgardens
Follow
This strain is doing great and agent shown any signs of stress of deficiency she is doing great . Today I put her into the home she will stay in for the remainder of the grow and have given her some more nutes the organic kind and she loves it .. This girl is a great plant and will be full of surprises no dought.
Cheers and thanks for checking in ...

Likes
14
Share

@GERGrowDesigns
Follow
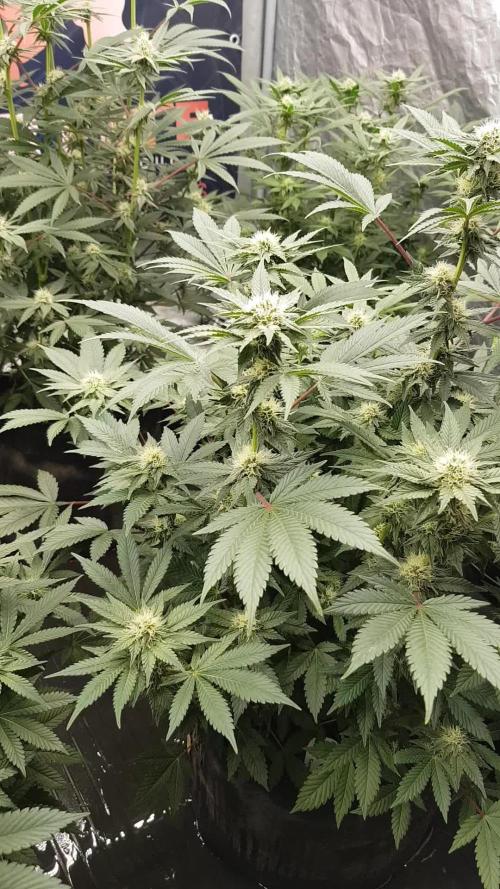
Welcome to Flower Week 3 of SuperStrains Amnesia
I'm excited to share my grow journey with you from my
SuperStrains Project . It's going to be an incredible ride, full of learning, growing, and connecting with fellow growers from all around the world!
For this Project , I’ve chosen the Feminized Photo Strain Amnesia :
Here’s what I’m working with:
• 🌱 Tent: 225x150x150
• 🧑🌾 Breeder Company: SuperStrains
• 💧 Humidity Range: 50
• ⏳ Flowering Time: 10 Weeks
• Strain Info: 25%THC
• 🌡️ Temperature: 26
• 🍵 Pot Size: 20
• Nutrient Brand: Hy-Pro
• ⚡ Lights : 600W x 2
A huge thank you to SuperStrains for allowing me to try my Best with this amazing collection from Photo Strains they managed to Sponsore side by side with theyre Hy-Pro Nutriets . Big thanks for supporting the grower community worldwide! Your genetics and passion speak for themselves!
I would truly appreciate every bit of feedback, help, questions, or discussions – and of course, your likes and interactions mean the world to me as I try to stand out in this exciting competition!
Let’s grow together – and don’t forget to stop by again to see the latest updates!
Happy growing!
Stay lifted and stay curious!
Peace & Buds!

Likes
4
Share

@DogDoctorOfficial
Follow
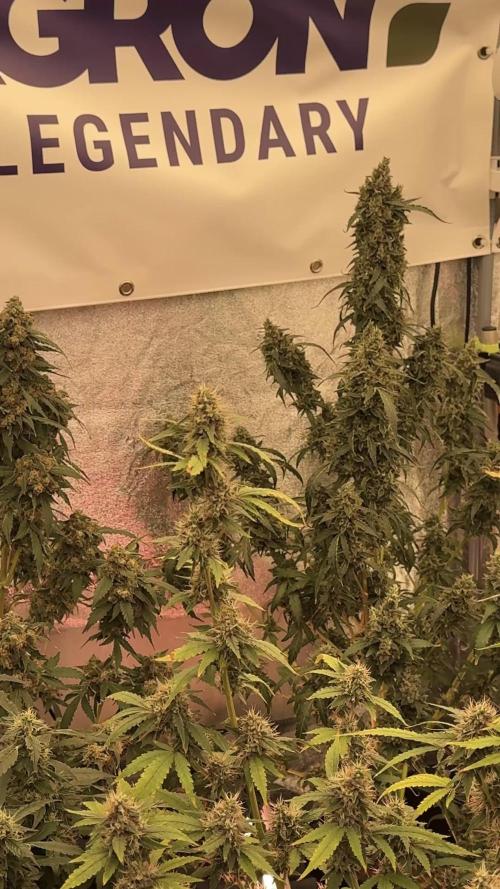
🚂 8×8 Adventure – Week 12
🌸 Cash Express – Pheno A
💨 She's Moving Fast — And Now She's Starting To Talk
Hello everyone, and welcome back to another chapter of the 8×8 Adventure! 🌱💚
And Cash Express Pheno A...
Well...
She's moving.
And she's moving FAST.
😂🚂💨
Last week we talked about letting the plants do their thing.
This week?
Cash Express seems to have taken that as a personal challenge.
Because she's definitely doing her thing.
She's developing.
She's progressing.
She's putting on flowers.
She's changing.
And now...
she's starting to smell.
A LOT.
👃🌸😂
And that's when you really start paying attention.
Because there is something special about reaching the stage where the plant doesn't just look like it's flowering...
you can actually start experiencing the flowering process with another sense.
The aroma is becoming part of her story.
And I'm very curious to see where this girl is going.
────────────────────────
🌱 The 8×8 Adventure — Same Room, Different Stories
For anyone discovering this diary now, welcome to the 8×8 Adventure.
This project is all about putting different genetics and phenotypes into the same general environment and allowing each one to show us what she naturally wants to become.
Twelve plants.
Different genetics.
Different phenotypes.
One room.
One 12/12 lighting strategy.
One irrigation system.
One general nutritional approach.
One lighting ecosystem.
One grower.
And somehow...
twelve completely different stories.
That's what makes this project so much fun.
Because even when the environment is shared, the plants don't read the same script.
Some are compact.
Some are tall.
Some are incredibly frosty.
Some develop unusual structures.
Some move slowly.
And some...
like Cash Express Pheno A...
suddenly decide:
"Right.
Let's get moving."
😂🚂💨
And she's certainly moving now.
────────────────────────
🚂 She's Picking Up Speed
This week, the biggest thing I'm noticing is simply progression.
She's moving quickly.
The flowers are becoming more established.
The plant is changing noticeably.
And the whole structure is beginning to look increasingly like a proper late-flowering plant rather than a plant that's still deciding what she wants to become.
There's momentum.
And I really like seeing that.
Because this is the stage where the plants start revealing more of their final personality.
Earlier in the cycle, we were mostly watching architecture.
Stretch.
Branches.
Canopy.
Training.
Structure.
Now?
The flowers are becoming the main event.
And Cash Express is starting to put some serious effort into that part of the story.
────────────────────────
🌸 Maybe Not The Prettiest Girl...
I'm going to be honest.
😂
She may not be the prettiest girl in the room.
And that's okay.
Beauty is subjective.
And when you've got twelve different plants sitting beside each other, there are always going to be some that immediately grab your attention more than others.
Cash Express Pheno A isn't necessarily the girl that makes you stop from across the room and say:
"OH MY GOD!"
😂
But then you look closer.
And you start seeing her.
Her structure.
Her flowers.
Her individuality.
Her little peculiarities.
And suddenly you realize:
She's got charm.
She's got character.
She's got her own kind of beauty.
And that's actually something I really appreciate.
Because not every phenotype needs to be conventionally beautiful to be fascinating.
Sometimes the unusual ones are the ones you remember.
And Cash Express is definitely becoming memorable.
────────────────────────
✨ Beauty Is Not Always About Perfection
That's one of the things this entire project keeps teaching me.
If I judged every plant purely by appearance...
I'd miss half the story.
Some plants are extremely symmetrical.
Some are incredibly frosty.
Some have perfect-looking flowers.
Some have crazy structures.
Some are compact.
Some are stretched.
Some are simply...
different.
And Cash Express Pheno A falls into that last category for me.
She's not necessarily the picture-perfect princess of the tent.
But she's interesting.
She's unique.
She's developing quickly.
And now she's giving us something else to pay attention to:
her aroma.
And honestly?
I'll take interesting over predictable any day.
😂🚂🌸
────────────────────────
👃 Oh... Now She's Starting To Smell
This is the part that has really caught my attention.
She's starting to smell.
And not just:
"Maybe if I put my nose close enough..."
No.
She's starting to make herself known.
😂👃💨
The aroma is becoming noticeable enough that I find myself paying attention whenever I'm around her.
And that's exciting.
Because aroma development is another piece of the phenotype puzzle.
The visual appearance tells us one thing.
The structure tells us another.
The flowering speed tells us another.
And then the plant starts telling us something through its aroma.
Now I'm curious.
What is she going to smell like as she continues developing?
How much stronger will that expression become?
What kind of character is going to come through?
And where is all of this going?
I don't know.
But I'm very interested in finding out.
────────────────────────
💡 Still Under The Same Lighting Experiment
And just like everyone else in the 8×8, Cash Express Pheno A is still experiencing the upgraded lighting environment.
Future of Grow supplied us with two additional Black Series 600W fixtures for this experiment.
The additional fixtures initially pushed the available PPFD higher than we wanted.
So we brought the output down.
We're currently running around:
🔌 59% power from the plug
with approximately:
☀️ 1,500 PPFD across the upper canopy.
And Cash Express is right there underneath all those photons.
She's not receiving a special lighting treatment.
She's not getting a secret little VIP setting.
She's getting the same general room environment as the other girls.
And yet...
look at how differently she's expressing herself.
That's the fun.
Same light.
Different plant.
Different response.
────────────────────────
☀️ Photons In — Cash Express Out
This is one of my favourite parts of the experiment.
We provide the photons.
The plant decides what to do with them.
And Cash Express seems to have decided:
"I'm going to turn these into flowers...
and then I'm going to make the whole room smell."
😂💨🌸
Fair enough.
That's a pretty good use of photons.
The upper canopy is receiving strong light.
The lower portions naturally receive less depending on plant height and structure.
And the plant itself decides how to position its leaves and flowers within that three-dimensional environment.
We're not trying to force every plant into exactly the same shape.
We're watching how each phenotype uses the space.
And Cash Express is certainly using hers.
────────────────────────
🥥 Nutrition — A Small Step Back For The Whole Room
The nutritional program has also been adjusted slightly this week across the entire room.
Terra Bloom has been reduced from:
🌸 2.3 ml/L
to:
🌸 2.0 ml/L
This brought the EC down slightly to:
⚡ ~2.05 mS/cm
The rest of the current recipe remains:
🌱 Pure Zym — 1 ml/L
🌿 Power Buds — 1 ml/L
🍯 Sugar Royal — 1 ml/L
⚗️ pH Plus — 0.03 ml/L
🍋 Lemon Kick — 0.03 ml/L
🌸 Terra Bloom — 2.0 ml/L
Again, this is a room-wide adjustment.
We're not trying to micromanage every plant individually.
We're allowing the whole room to progress together while watching how each phenotype responds.
And Cash Express?
She's moving beautifully.
────────────────────────
💧 Still Providing — Still Watching
The current irrigation is around:
💧 1.4 L per plant / 24 hours
And the rest of the room remains under the same general environmental strategy.
We're not making dramatic changes.
We're not trying to force her into another stage.
We're simply continuing to provide consistency.
Because at this point...
the plants are doing most of the work.
Our job is becoming increasingly simple.
Observe.
Maintain.
Provide.
Document.
And let them finish their stories.
────────────────────────
🌡️ Week 12 – Current Room Conditions
The current room conditions are approximately:
🌸 Flowering: Week 12
💡 Light schedule: 12/12
☀️ Upper-canopy PPFD: ~1,500
🔌 Future of Grow Black Series output: ~59% from the plug
🌡️ Day temperature: ~27°C
🌙 Night temperature: ~25°C
💧 Relative humidity: ~60%
⚗️ pH: ~6.04
⚡ EC: ~2.05 mS/cm
🌡️ Solution temperature: ~25.2°C
🌱 Substrate temperature: ~26°C
🌬️ CO₂: ~693 ppm
🌱 Pot size: 15 L
💦 Irrigation: ~1.4 L/plant/24h
Same room.
Same environment.
Same general nutrition.
Same lighting philosophy.
Same irrigation.
Different Cash Express.
And she's certainly giving us something to watch.
────────────────────────
🌿 The Plant Doesn't Need Us To Make Her Interesting
This is another thing I really like about this stage.
We're not doing anything special to make Cash Express interesting.
She's doing that herself.
We're not training her into some crazy shape.
We're not manipulating her to create a particular appearance.
We're not forcing her to behave differently.
She's simply progressing naturally.
And the more she develops...
the more personality becomes visible.
That's exactly what I wanted from the 8×8 Adventure.
I wanted to see what these individual phenotypes would do when given the same general opportunity.
Cash Express is giving us her answer.
And I like the answer.
────────────────────────
🌸 The Flowers Are Becoming Serious
The flowering structure continues developing.
The flowers are becoming more substantial.
The plant is clearly moving forward.
And this is the part where I start getting excited about the next few weeks.
Because once the plant gets into this rhythm...
you can almost feel the momentum.
Every week starts bringing more visible change.
The flowers become more defined.
The plant becomes more obviously floral.
The aroma develops.
The overall structure starts looking increasingly mature.
And Cash Express?
She's entering that stage now.
She's not finished.
Not even close to writing the final chapter.
But she's definitely moving.
And moving quickly.
────────────────────────
🔬 Her Uniqueness Is Becoming More Obvious
This is another reason I'm glad we're documenting her individually.
If you put Cash Express Pheno A beside another phenotype and simply called them both "Cash Express," you'd miss a lot.
This girl has her own expression.
Her own pace.
Her own structure.
Her own visual personality.
And now...
her own aroma is starting to become part of the picture.
That's what phenotype hunting is about.
You don't just want to know:
"What strain is this?"
You want to know:
"What does this individual plant do?"
And Cash Express Pheno A is slowly but surely answering that question.
────────────────────────
📸 The Camera Sees What The Eye Sometimes Misses
One of the things I love about documenting these plants every week is that the camera gives me another way to compare their development.
Standing in the room, sometimes the changes don't feel enormous.
Then I look at photographs from a few weeks ago...
and suddenly:
Whoa.
She's changed.
The flowers are more developed.
The structure is different.
The plant has progressed.
And that's why these weekly photographs matter.
They're not just pretty pictures.
They're a timeline.
They're evidence of the journey.
And Cash Express is building a pretty interesting timeline.
────────────────────────
💨 The Smell Is Becoming Part Of The Story
This deserves another mention because it's something I really noticed this week.
She's starting to make herself known.
😂💨
And I think that's a beautiful milestone in a flowering plant.
The visual side has been there for weeks.
Now the aromatic side is beginning to join the conversation.
And that makes me even more curious.
Because we don't know yet how strong this expression will become.
We don't know exactly where the aroma is going to develop.
And I'm not going to pretend I know what the final result will be.
We're going to find out.
That's the fun.
Let the plant show us.
────────────────────────
🚂 Cash Express Is Moving Fast
If I had to summarize this week in one sentence, it would probably be:
"She's moving."
😂🚂💨
She's moving quickly.
She's developing.
She's becoming more floral.
She's becoming more aromatic.
And she's becoming increasingly interesting.
Maybe she's not the prettiest girl in the room.
But she's certainly one of the girls I want to keep watching.
Because there's something happening here.
And I want to see where it goes.
────────────────────────
🧠 Same Environment — Different Result
This is probably the biggest lesson of the entire 8×8 Adventure.
We can standardize the environment as much as possible.
We can standardize the lighting.
We can standardize the irrigation.
We can standardize the nutrition.
We can monitor temperature.
We can monitor humidity.
We can monitor CO₂.
And still...
the plants will express themselves differently.
That's genetics.
That's phenotype.
And that's exactly why I wanted twelve individual diaries.
Cash Express Pheno A is giving us another piece of that puzzle.
She's fast.
She's unique.
She's aromatic.
She's got charm.
And she's becoming increasingly interesting as the weeks pass.
────────────────────────
🔭 Looking Ahead — Where Is She Going?
Now I'm genuinely curious.
Because the next stage should be very interesting.
She's moving quickly.
She's starting to smell.
The flowers are developing.
The plant is becoming increasingly mature.
So where does she go from here?
How much more will those flowers develop?
How much stronger will the aroma become?
How will the final structure evolve?
What kind of expression is hiding underneath all of this?
I don't know.
And I don't want to guess.
Let's just watch.
Let's document.
Let's photograph.
Let's smell.
😂💨
And let's see what Cash Express decides to become.
────────────────────────
❤️ Final Thoughts — Give Her The Spotlight
Week 12.
And Cash Express Pheno A is moving.
Fast.
She's not necessarily the prettiest plant in the room.
And I'm perfectly comfortable saying that.
Because beauty isn't a competition.
And this girl has something else.
Charm.
Character.
Uniqueness.
Personality.
And now...
aroma.
She's starting to smell.
She's developing quickly.
She's becoming increasingly floral.
And she's giving me another reason to stop beside her and take a closer look.
She's not trying to be somebody else.
She's just being Cash Express.
And honestly?
That's exactly what I want.
This project isn't about finding twelve identical plants.
It's about discovering twelve individual expressions.
And this one is giving us a very interesting one.
So let's make her shine.
Let's give her the spotlight.
Let's appreciate the flowers.
Let's appreciate the structure.
Let's appreciate the weird little details that make her different.
Let's appreciate the aroma that's starting to fill the air.
And most importantly...
let's see where this girl goes.
🚂🌸💨
She's moving.
She's moving fast.
And I'm enjoying the ride.
────────────────────────
🙏 Thank You
A huge thank you to Zamnesia for these Cash Express genetics and for giving us the opportunity to explore these individual phenotypes throughout the 8×8 Adventure.
Thank you to Plagron for supporting the nutritional side of the journey and helping us continue adjusting the flowering program as the room progresses.
A massive thank you to Future of Grow for the Black Series lighting and especially for providing the two additional Black Series 600W fixtures we're testing in this room.
Having more lighting capability, controlling the output and watching how these different plants respond has been one of the most interesting parts of this experiment.
Thank you to Lumiflora for bringing additional lighting deeper into the canopy and helping us think about the plants as three-dimensional structures.
Thank you to TrolMaster for helping us keep the environment under control behind the scenes.
And, of course...
thank you to everyone following this crazy 8×8 Adventure on GrowDiaries.
Every week we discover something a little different.
A different shape.
A different rhythm.
A different colour.
A different flowering structure.
A different personality.
And now...
a different smell.
😂💨🌸
Cash Express Pheno A may not be the prettiest girl in the room.
But she's certainly got something.
She's unique.
She's charming.
She's developing quickly.
And she's starting to make herself known.
So let's keep watching.
Let's keep documenting.
Let's keep learning.
And let's give this girl the spotlight she deserves.
Because sometimes...
the most interesting plant isn't the one that immediately catches your eye.
Sometimes...
it's the one that makes you come back for another look.
Cash Express Pheno A?
She's becoming that girl.
🚂🌸💚
Until next week...
Keep moving, beautiful girl.
We're watching.
Growers Love & Happy Growing! 🌱💚
Processing
Likes
20
Share


Processing
Likes
4
Share


@DrewbieDoobieNoobie
Follow
Hello again, hope you are all well and safe, Week 8 was a good week. The ladies are showing there hairs and the CS MILF is going balls out "literally" The clones are moving along I am looking forward to seeing what comes of them I'm on the fence about how much to pollenate just get a few or leave MILF (A) in the tent and just hit everything, the clones are a week behind in flower so depending how soon the (A) MILF Pollen takes to pop I should have a two week window on the pollination... Anyway The Mom's are drinking a lot 1.5 gallons each. This weeks feeding was just water with the last of the Mammoth P and a small dose of Rock Super Charger I forgot to add this in the week one photos I got this the same time I got the Beans same Show ROCK vender free sample, I am using it as my PK booster. that and all the topdressing form last week its all about Bud and Pollen production so I will be keeping an eye on MILF A in the next 7-14 days and I hope I can Catch it before it Shoots its wad in the tent. P.S. The time-lapse got corrupts and I only got 1 or 2 days😡 Peace Ya'll
Likes
15
Share


@Dunk_Junk
Follow
Day 63 - Flowers just starting. They're looking nice. Through the week I've chopped quite a few leaves off her to allow light penetration.
Likes
6
Share


@ZalySk
Follow
F39: Lovin this plant. Starting to get smellier too. Love the fluffy nug appearance.
F45: plant is starting to get brown hairs. Slowly on the decline now, maybe three more weeks.

Likes
1
Share


@420Baddie
Follow
She really had a growth spurt! She seems very happy! Hope things keep going smoothly.

Likes
Comments
Share


@JararacaHaze
Follow
Vigorous Males, Strong Clones, and Bud Formation
This week was full of action in the grow! Two out of the three males are in full bloom, and I’m actively collecting pollen. They are impressive plants, with strong structures and large pollen sacs. If everything stays on track, I believe the females will be ready for pollination in about a week.
Observations:
All 18 clones have successfully rooted! Some have already entered the vegetative stage and are receiving supplemental light at nightfall to keep their growth steady.
The plants responded very well to the light defoliation I did earlier. Now, the buds are starting to take shape, showing great progress in the flowering phase.
To optimize this stage, I spaced out the pots, ensuring better airflow and increased light penetration, which should support full and healthy flowering.
This week, I plan to top off the pots with more substrate, ensuring the plants have enough space and nutrients to reach their full potential.
Next Steps:
Keep monitoring the males and collecting pollen at the right time.
Watch the females closely to determine the ideal moment for planned pollinations.
Observe the clones' growth and adjust care as needed.
The grow is on the right track, and expectations for the coming days are high!
Likes
Comments
Share


