
Likes
Comments
Share


@ThrashedTV_BakedByGlaze
Follow
VIDEO ADDED: DEC 29 2020!
--
PHOTOS ADDED: DEC 27 2020! MORE COMING
VIDEO?!
--
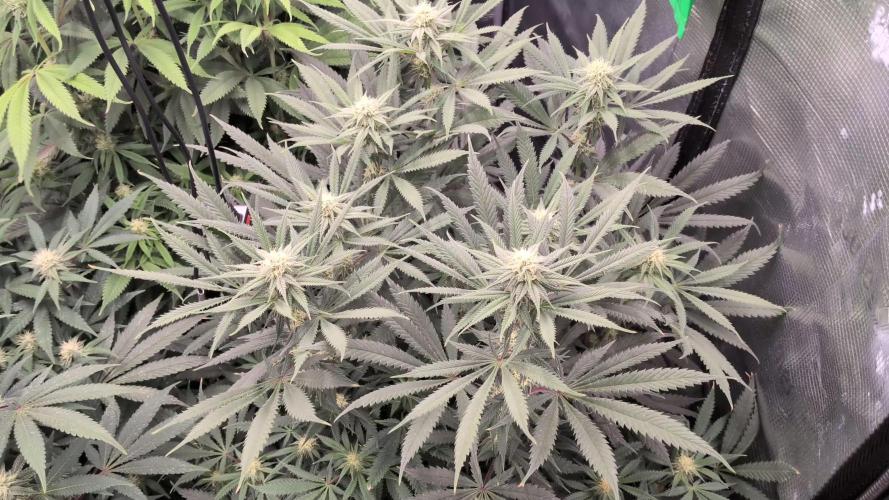
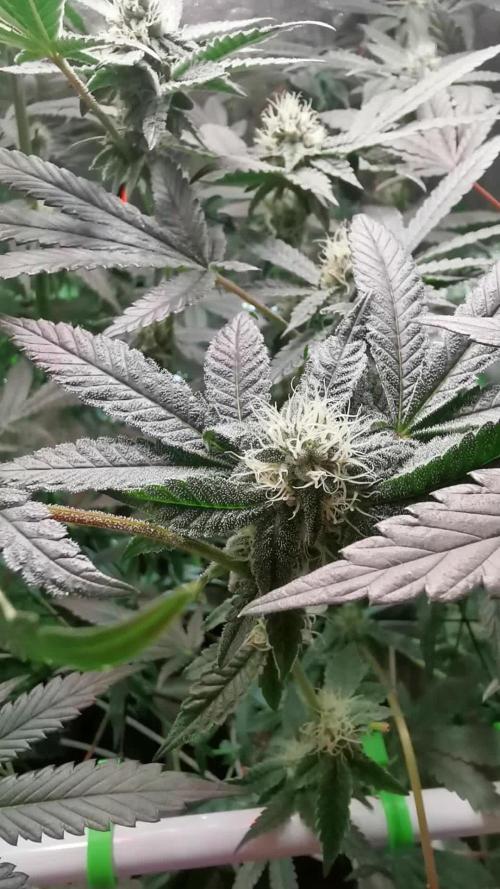
Smell is starting to come down from the fresh cut, definitely has a great look to the bud as the cure goes on, have two 8 gram boveda packs in there after a few days with one that was WAY too big for it 😂
Brought down my Chocolate Mint OG in my other diary right now as well, way more weight to that last plant... probably more than both these Chem Bombs combined, great genetics over @Humboldt_seed_organization 😎
--
PHOTOS ADDED: DEC 23 2020! MORE COMING!
--
DEC 19 2020 - Harvest Day
Chem-Bomb Auto .. DONE.
Step-Brothers ... CHOPPED.
Buds.. TRIMMED.
Giving them my first bud wash tomorrow! Already juiced the lemon, have the spring water, and off-brand baking soda because COVID has every place sold out of Arm&Hammer 😂
Dale: 50 Grams Wet Buds/Stem
15 Grams Trim/Larf = Total 65 Grams Wet
Brennan: 55 Grams Wet Buds/Stem
12 Grams Trim/Larf = 67 Grams Wet
Total Wet: 132 Grams (Buds/Stems/Trim)
Looks like I'm getting in and around the "1 Ounce per Auto Plant" range with my basic soil/hand feed system. The CMOG from my other diary looks like it will be my first 1OZ plant when it dries.
With my past experience of wet buds drying out to about half of bud weight, I'm hoping that they both come in JUST under an Oz a piece.
Going to update with more pictures, going to take a couple days to dry and get a good weight and hopefully get somewhere close to the 64 grams of the ONLY sized Boveda packs I have right now 😇
--
UPDATE - Dec 20 2020 - Cure Day
😵😭 i once again got my hopes up by pulling the classic male "over-exaggerating" and all the wet weight came from the main stems. After 3 days or so of drying both plants together came in just under an ounce. The smell is great and I have no doubt it's quality bud but I need to up my density game somehow for sure. New nutrients or better set up, still very low-end with all my equipment as I've just slowly been finding affordable pieces to add as I go. Maybe more light? Feel free to hit me up below with ideas short of switching to a Hydro set up 😹 I can hardly afford my bags of soil so I definitely couldnt keep up with the financial costs of a Hydro set up yet 😓
Have had a few bowls of the dried/uncured bud and it's very nice, clean, and crazy good for being uncured at this point. Just the classic flower taste from the chlorophyll but the pineapple/tropical taste is coming through nice already.
Final Stats:
26g Dried Bud
26g Trim
--
Thanks for checking in! Will be updating soon and posting more pictures! Throw down a like and/or follow so I can return the favour 🙌
--
IG: @GlazedGrow (DM and let me know you're from Grow Diaries so i can follow back!)

Likes
14
Share


@shabibo420
Follow
I'm doing a lot of leaf tucking every other day, I started using Bloom nutes, and doing LST here and there.

Likes
9
Share


@HIAZ_urbanbudfarmer
Follow
Hi gromie's, well were at day 29 of flowering & day 64 in total.
She has grown some really nice chunky dense buds & has a fairly strong sweet/ lemon/citrus smell to her.
She is getting closer to harvest, starting to get cloudy trichomes & pistills starting to change colour, Calyx closed & swelling. Nice & sticky!

Likes
73
Share


@MisterZ
Follow
Bienvenue dans ce nouveau diary,
Cette fois j'ai choisi une nouvelle variété dans le cadre d'un sponsoring de kannabia. C'est difficile de choisir dans leur catalogue, on a envie de tout cultiver ! J'ai donc choisi et reçu un sachet de chaque variété go fast. Merci les amis de @kannabia, je suis très heureux de cultiver ces variétés. Je vais m'appliquer.
Mon espace est petit, je ne vais cultiver qu'une plante à la fois. J'ai mis une graine en germination dans un verre d'eau. En même temps j'arrose le pot textile de 11 litres d'un litre d'eau très lentement. Lorsque la graine sombre au fond du , elle est rehydratée et posée directement dans son pot. La germination a pris 5 jours.
J'ai essayé un time lapse pour la germination, j'ai encore quelques paramètres à régler.
Voilà pour l'instant tout va bien !

Likes
64
Share


@Hempface86
Follow
Well, she is definitely getting there. She is extremely stinky. I'm starting to show some beautiful colors... When I open my front door this smells smacjs you right in the face and it is heavenly... Thank you so much to Kannabia Seeds i must say.I am happy then I take this over the rs11 because she is absolutely stunning. The nugs are rock and I mean rock hard, and like I said, this smell is top notch... I think she has about a week tops left and she is getting the chop ... I hope everyone is doing well, thank you to everybody. I really appreciate everyone showing support and understanding that it's nothing personal that I haven't been liking and talking as much... I am, however, coming around the hump, so I should be more active in the future... I hope always well God bless everyone ✌️


Likes
51
Share


@GERGrowDesigns
Follow
Welcome to my Dutch Passion Diaries Competition 2025 entry!
For this competition, I’ve chosen the Indoor Feminized strain: Ice Cream Haze
Media from Week 19 or Flower week 8-9 After Moving into the New Tent for the flower weeks. Stage.
Here’s what I’m working with for the Final Tent after Moving for the Flower time :
• 🌱 Tent: 220x150x150
• 🧑🌾 Breeder Company: Dutch Passion
• 💧 Humidity Range: 40
• ⏳ Flowering Time: 8W-10W
• Strain Info: 20-25%THC, Sativa
• 🌡️ Temperature: 26
• 🍵 Pot Size: 0.5l
• Nutrient Brand: Narcos
• ⚡ Lights : 720W x 2
Dimmed to 400w Each at the Moment. Because of Heatwave ⭐
A huge thank you to Dutch Passion for allowing me to be a part of this amazing competition and for supporting the grower community worldwide! Your genetics and passion speak for themselves!
Curious to try these strains for yourself?
You can check them out and support me at the same time through my personal link:
https://dutch-passion.com/?a_aid=GGD
I would truly appreciate every bit of feedback, help, questions, or discussions – and of course, your likes and interactions mean the world to me as I try to stand out in this exciting competition!
Let’s grow together – and don’t forget to stop by again to see the latest updates!
Happy growing!
Stay lifted and stay curious!
Peace & Buds!

Likes
3
Share

@Thedibber
Follow
Bottom left is the badazz og cheese she's smelling dank and hopefully gives me some dank medicine

Likes
7
Share


@Dankbudz1
Follow
He’s had a light defoliation and been shaped a little more these next few week will get instresting that’s for sure come checkout my yt channel for a few shorts up on their thanks for all the ❤️ ✌️


Likes
15
Share


@BicRed
Follow
6th week of flowering.
The flowers are almost fully formed, they just need to fatten up and share.
It's noticeable that they're drinking a lot of water and also that it's hotter than the previous months, so it evaporates faster.

Likes
13
Share


@DrBud420
Follow
17.05.
I don't have anything special to say, of course the weather is terrible... it's 6-7 at night, 15-16 during the day, so they're inside... the temperature inside is 20-21 during the day, at night from 15 to 17 when it's this cold...
the plants were exactly 3 weeks old yesterday, today they entered the fourth week and most likely they will wait inside for the fifth week as well because the weather is terrible and there is no point in transplanting yet.
Stay High!

Likes
36
Share


@nonick123
Follow
Día 129 (07/10) Riego con 750 / 1.000 ml H2O de osmosis
Empiezan a moderarse las temperaturas con 28 ºC de máxima
Día 130 (08/10) Riego con 500 / 1.000 ml H2O de ósmosis
Las temperaturas están sobre 25 °C
Día 131 (09/10) Riego con 500 / 750 ml H2O de ósmosis
OnionOG #1 empieza a mostrar signos de que está en la fase final de floración!
Día 132 (10/10) Riego con 750 / 1,250 ml H2O de ósmosis
He revisado los tricomas de todas las plantas y OnionOG #1 está casi a punto!
Estamos a solo 2 días de la ventana de cosecha según el banco 😍💥💨😁
Día 133 (11/10) Riego con 750 / 1,250 ml H2O de ósmosis
Día 134 (12/10) Riego con 500 / 1.000 ml H2O de ósmosis
Día 135 (13/10) Riego con 1 litro H2O pH 6,5 + Kelp Hidrolizado 0,3 g/L
💦Nutrients by Lurpe Solutions - www.lurpenaturalsolutions.com
🌱Substrate PRO-MIX HP BACILLUS + MYCORRHIZAE - www.pthorticulture.com/en/products/pro-mix-hp-biostimulant-plus-mycorrhizae


Likes
9
Share

@HomeToGrow
Follow
Moin,
Die 4. Blütewoche ist ab heute offiziell vorbei.
Die Blütenbildung ist im vollen Gange und die kleinen aber sehr kompakten Buds stacken sich langsam aber sicher immer mehr. Die Terpenen gehen klar in Richtung pures Candy, gefühlt ändert sich da trotzdem jeden Tag die Nuancen im Terpenprofil.
Nach dem Lolipopping bleibt die Struktur weiter offen, viele neue Blätter wurden nicht gebildet wodurch eine weitere entlaubung in den kommenden Wochen eher unwahrscheinlich ist. Vorallem will ich die Pflanze auch nicht weiter stressen, da sie wohl zum Zwittern neigen und generell schwer zu kultivieren sein soll. Bisher kann ich das nicht bestätigen, kein einziger Mangel, keine Anzeichen von größeren Stress und auch sonst läuft es wirklich gut. Trotzdem sehe ich genug Gründe warum der Ertrag am Ende vermutlich nicht allzu viel sein wird. Eine offene Struktur, kleine Blätter, dünne Stämme etc. Für die großen Erträge grow ich diesen Strain und generell auch nicht, Terps überalles!
Hey,
As of today, the fourth week of flowering is officially over.
Flowering is in full swing, and the small but very compact buds are slowly but surely piling up more and more. The terpenes are clearly leaning toward pure candy, though it feels like the nuances in the terpene profile are still changing every day.
After lollipopping, the structure remains open; not many new leaves have formed, making further defoliation in the coming weeks rather unlikely. Above all, I don’t want to stress the plant any further, as it’s said to be prone to feminization and generally difficult to cultivate. So far, I can’t confirm that, not a single deficiency, no signs of major stress, and everything else is going really well. Still, I see enough reasons why the yield probably won’t be all that great in the end: an open structure, small leaves, thin stems, etc. I’m not growing this strain or any strain, terpenes are what matter most!


Likes
8
Share


@all_about_420
Follow
Wir biegen mit großen Schritten auf die Zielgerade der intensiven Blütenphase ein. Auf den aktuellen Bildern zeigt sich eine faszinierende optische Entwicklung: An den dicht stehenden Bud-Strukturen setzt eine feine, dunkle Pigmentierung ein, welche die wunderschönen Farbeigenschaften dieser Fast Buds Genetik untermauert. Doch das absolute Highlight dieser Woche ist die beginnende, extrem klebrige Harzproduktion. Die Zuckerblätter überziehen sich zunehmend mit einem glitzernden Teppich aus feinsten Trichomen, der bereits erahnen lässt, wie potent die Blüten werden. Das komplette System von Advanced Nutrients greift weiterhin perfekt und versorgt das dichte Blätterdach ohne jegliche Mängelerscheinungen, während die Buds kräftig an Masse zulegen.
Likes
3
Share


@MrAutoflower
Follow
Plant is doing fine, just a few issues with pests so I had to remove infected leafs but no big deal. Plant is 90 cm high and stopped growing, I think anonther 2 or 3 weeks to harvest. Had to support is with a bamboo stick because the top is getting heavy and its quite windy at night on my balcony. I posted some random pictures and videos from the last few weeks, hope you like them.
Processing
Likes
1
Share


Likes
15
Share


@AdamCajda
Follow
Decided to chop one girl early. If I'm honest I was very worried about the yield, because for the fort half of the flowering it didn't look very promissing but holy cow, just the first plant had 70g on it. I accidentally snapped two main colas in early stage so it would be probably more. However 3 girls are still running for at least a week or two so it looks like I will achieve 200g and probably well over which is awesome.
Most importanltly, buds are super dense. Finally! I can't wait to finish with proper flush and curing.
Humidity is now at constant 60% and can't really do much about it. Weather outside is also a bit humid, but i'm running 3 fans inside with pretty good extractor fan so hopefully no mould issues this time. I feel like the strain also help a lot.
I will probably chop one girl in few days or a week and then the last monster looks like it will be ready little bit later than the rest so I will give it some extra time.

Likes
13
Share


@GrowNugzCanada
Follow
Great week. Put in soil on the 29 and seen the cute little head this morning. Pic is from the evening
Oct 3 is the end of the first week. And have been impressed. She is standing on her own with no support.