Processing
Likes
Comments
Share


@TheFairyBudMother
Follow
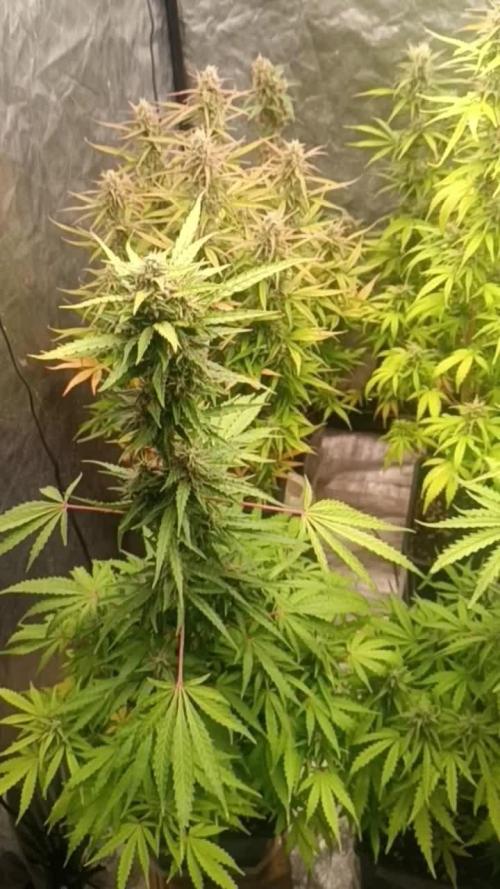
Adding in a 65 W Horticulture Lighting Group quantum board has really helped my dessert cheese develop! This plant has nice even growth and thick stems and branches! It’s shorter than the sativas, with fatter leaves.
The ambient humidity has been dry. I used a cool steam vaporizer with some lavender and eucalyptus oils to add some h2o to the air and gas out potential insects. Having the remaining pots in larger containers has helped stabilize the humidity.
Added nematodes day 37

Likes
9
Share


@Smokey_J26
Follow
A nice bit of growth this week, one girl is shorter than the other 2, and slightly behind in terms of growth. Hoping to see a good spurt now with the first application of Evo 2.0 spray on day 25, abit more nutrients added and lights turned up to 400w. Onwards and upwards 🌱💯

Likes
8
Share


@KannaKullektiv
Follow
Week 9 – Orange Apricot Glue XL Auto
The final stretch. Buds are fully developed, covered in trichomes, and bursting with citrus and apricot aromas. The resin production is at its peak, and the living soil has done its job. Like her neighbor, she won’t be standing much longer—harvest is just days away.

Likes
75
Share


@KCChiefers
Follow
Day 36-
LST adjustments. Each lady received almost a full gallon of water each. I also dosed each gallon with 4ml cal mag plus. I guess I would consider this week 1 of flowering. Next watering I'll introduce bloom nutrients. They getting hairy! I feel like I'm also seeing some improvement in each plant after Foliar Spray, so I'm hoping after this watering they'll perk up and not have more sick leaves to look at.
Day 37-
I did a few LST adjustments on the smaller plants. "Blue Marker" is getting pretty stiff so I'm afraid to tie her down and have only been tucking leaves. Probably just going to try to keep her spread out as much as I can do. No more LST for her.
Day 38-
They've been drinking alot of water and are thirsty! Now normally I water once a week, but they may need it before their next water time. Lowered the lights to 18" above canopy. Will see if I get any canoes or not when I get back home tomorrow evening. It smells good when I open the tent as well 👌. Only uphill from here on!
Day 39-
Ladies didn't show any light stress to me lowering them down to 18". Blue Marker looks like she needs to be watered. The other two are still heavy. Probably be watering blue marker tomorrow evening and starting bloom nutrients.
Day 40-
Watered Blue Marker today with 4ml/gal CalMag+ and 2tsp/gallon of Old Age Bloom. Will be watering Yellow Marker tomorrow with the same ratio. The runt still probably has a few more days until she's ready for a drink.
Day 41-
Watered Yellow Marker with 4ml/gal CalMag+ and 2tsp/gal of Old Age Bloom. Will be watering the runt tomorrow. Went ahead and snapped a lower bud site on the runt. Didn't look promising enough to warrant keeping it. As you can see in the picture, most of the leaves were shriveled up on it anyways. I also tucked fan leaves on all plants and measured Blue Marker (17.5in) tall and Yellow Marker is about 1ft tall.
Day 42-
Watered "Runt" with 4ml/gal CalMag+ and 2 tsp/gal of Old Age Bloom. All plants new growth looks better and doesn't look like it's traveling up plant. More and more bud sites are popping up. Yellow Marker looks farther along than Blue Marker. End of week 6!

Likes
90
Share


@DreamIT
Follow
🍊🏵️ Red Mandarine x9 SoG X ViparSpectra XS1000🍊🏵️
🏵️8.6 ...
🏵️9.6 Last day before harvest, yeah !!!!! It is really gorgeous !!!
🏵️10.6 ...
🏵️11.6 ...
🏵️12.6 ...
🏵️13.6 ...
🏵️14.6 Latest photos of the plants still in pots, they are already hanging ready to be cleaned
_________________________________________________________________________________________
❓ Are you new to the world of the cultivation and don't know where to safely buy your seeds?
😮From SweetSeeds you can find award-winning, sweet, fast, fragrant, beautiful, and delicious genetics !!!
✅http: //bit.ly/SweetSeeds_
______________________________________________
👀 Are you looking for a good lamp to start with? 👀
🌞Viparspectra has something more than the others, take a look at their site.
⏩ Use "GDVIP" for an extra discount or "ViparDreamIT" for an extra 5 %% discount
👀 Search for it on Amazon
✅Amazon US: https://amzn.to/30xSTVq
✅Amazon Canada: https://amzn.to/38udUVe
✅Viparspectra UE: bit.ly/ViparspectraUE
👀 Watch my ViparSpectra XS1000 unboxing on YouTube, leave a like and write to the channel 🦄
✅http://bit.ly/UnboxingViparSpectraDreamIT
______________________________________________
📷🥇 Follow the best photos on Instagram 🥇📷
https://www.instagram.com/dreamit420/
🔻🔻Leave a comment with your opinion if you pass by here🔻🔻
🤟🦄💚 Thank you and enjoy the growth 💚🦄🤟
Likes
4
Share


@LittleBigTrees
Follow
So we're in week 3 veg , they've mostly outgrown their mutated leaves now and looking strong.

Likes
5
Share


@BombBuds
Follow
Also die schauen Mega aus und die buds schwellen jetzt auch schön an und die Pflanzen an sich sind super.
ABER
Die scheiß Viecher gehen nicht weg!
Jetzt sind die Trauermahlen endlich weg und auf einmal sind thripse da. Zwar nicht allzu viele aber sie sind da…..
Daher werd ich nächsten grow als Substrat einen großen Teil cocos benutzen. Das soll steril sein und die Viecher mögen es nicht! Abgesehen davon soll man damit auch bessere Erträge reinholen können und die terpen gehakte sind anscheinend auch höher.
Die terps sind krass! Sowas hätte ich nicht erwartet. Bin sehr erstaunt das riecht richtig nach 10/10 topshelf! Hut ab an Lit farms
Ab jetzt werden ein bisschen weniger Nährstoffe gegeben und ab nächster Woche die Wassermenge leicht reduziert.
Likes
19
Share


@Chucky324
Follow
Hello. This is the end of week 8 and the beginning of week 9 of flowering.
I started my flushing on Sun. Ph adjusted tap water. Our tap water here is between 7 and 7.5 and has to be adjusted
If I put 1 drop of ph down per gallon... I get about 5.7 ph. Good to grow with.
I'm hoping to start harvest on Aug 11th and that will be 10 weeks in flowering. Just the way I like it.
Next flush will be on Thur.
We've reached the end of the underground comic... Weirdo #9.
Look for more weird comics in my other diaries and I'll continue putting them in my new diaries.
OK. Have Fun.
Chuck.

Likes
8
Share


Likes
11
Share


@Cryptovirus
Follow
I had to harvest early as the plant is in a very very small pot and is trying to suicide

Likes
19
Share


@Arcadium
Follow
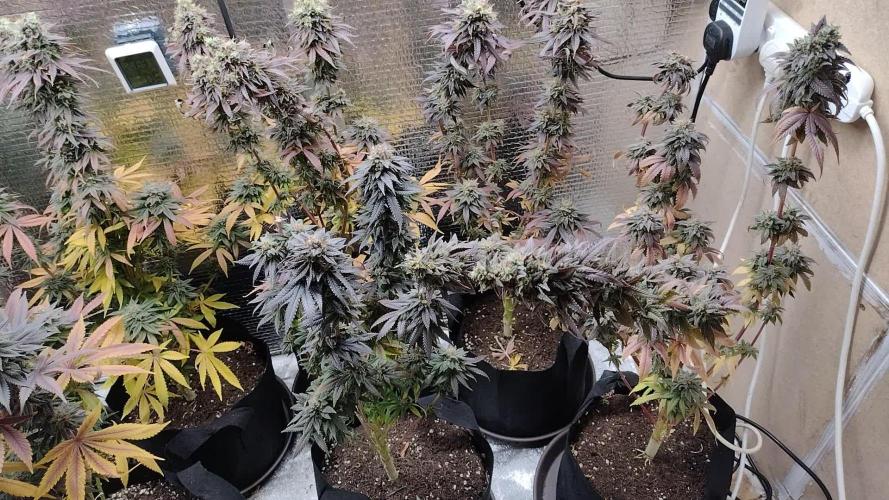
Hot dry week, had a wild storm roll through with tons of lighting, but barely a drop of rain. Added one last layer of netting for support. Removed a few more inner nodes that weren't keeping up with canopy.
Did another batch of compost tea this week, spray of LCPT. Will start BT next week as I've seen some cattepillars.
Flowering is coming along nicely as well, lots of pistils, and node tightening.

Likes
56
Share


@Prilyfe13
Follow
May 17, 2024 Day 92
This is the last week of the Flowering phase. I'll be harvesting most likely next midweek or earlier. The goal is to harvest by the end of the week, but I don't think they will be done.
Banana Purple Punch A looks amazing! Her branches are nice and leaning. Not too much, just enough. She's also starting to show signs of fade. Or at least unhappy leaves turning yellow. One weird thing I noticed is the back leaves all have signs of nitrogen toxicity. What's weird is that I haven't used nitrogen in over a week and the last time I used it, I did a quarter dose. This should not be happening. I'm confused.
Other than that, it's the end and I'm not worried about it, but it's still weird. Any insight?
Banana Purple Punch B looks great as well. Tons of orange pistils and lots of frost. What's nice is that a lot of that frost is still clear trichomes. Imagine what they will look like in the end. I'm so excited!
Both plants still have water in their basins, so I'm going to let them drain out and most likely not water again. It should be about a week for them to dry out completely. Perfect timing for harvest.
I may put Banana Purple Punch A in a dark period while Banana Purple Punch B finishes up for a couple days. I'm doing the same thing with my Tropicana Cookies.
Lighting. Well, it hasn't changed. Lol. Duh. Hahahahaha. Another week of this light intensity.
I've all but given up on the environment. It's got tons of airflow and lots of light. The temp is fine. It's just the damned humidity. I give up. I'll just keep removing the plants from the tent as need be.
I didn't touch Banana Purple Punch A today though. She is propping up the last Tropicana Cookies for the next 2 days. I will however, make sure to inspect her as much as I can. And as soon as she is freed up, I'll be flipping her around. And pulling her away from the side of the tent. Same with Banana Purple Punch B. Both are squished for the moment.
I also managed to get all 4 Sour Diesel plants in the tent after pulling one of the Tropicana Cookies. So these ladies are a bit tight for now. But only for a couple of days. If that. I was considering putting the Sour Diesel in the back and keeping the Tropicana Cookies up front for ease of access, but that will just cause chaos with bendy floppy branches. So I'm leaving it. It all fits. Snug as the Tetris skills I had to use to make it happen.
Grow System Environment:
Temp: 76.4°
RH: 61.4%
VPD: 1.17 kPa
Quick update on lighting:
I had to increase the light power up to 80% for the Sour Diesels now in the tent. They were at like 16 mol/m²/d instead of the 20 to 25 mol/m²/d it should be. Anyway, so the light was increased. It didn't change much. Some spots went back up to 40 mol/m²/d, and some went up to 38 mol/m²/d. Overall the spread is 34 to 40 mol/m²/d. These 2 should t have any issues with the light increase. I wonder if it will help along the maturing process. I don't know science. Maybe the dark does? Maybe they both do and just in different ways. Yah, that's it.
May 18, 2024
Watering day. Both ladies got a full gallon reservoir refill of plain water today. No sense in running the Flawless Finish anymore. They have mere days left to maybe a week. I'll just keep extending the time until I'm right. Lol. Hopefully it will be the last watering. Neither plant is thirsty at all, so it should take around a week for the reservoirs to empty.
Banana Purple Punch A looks great! She is nearly ready. No fade yet though. I don't really understand. Is she not fading because she isn't done yet? Or is this just how it's going to be? Insight? Lol.
Banana Purple Punch B is coming along nicely. I don't think she is near done yet. I don't get why they are taking so long. Either way, when she's done, there will be some amazing bud.
The light isn't hurting anything that I can tell. So it will stay the same.
The environment is an absolute mess now. With more power to the light comes more heat. Now I'm stuck in the mid 60s for humidity and 78° for the temp. All bad. I've been checking each plant for mold, mildew, bud rot and anything else that doesn't look right. So far we're safe.
Grow System Environment:
Temp: 75.4°
RH: 64.2%
VPD: 1.06 kPa
Can you say horrible environment? I'm so screwed. Even if I don't get any issues like bud rot, the humidity is doing a toll on trichome production.
Update: After some research, I have found that high humidity can cause plant production to slow down significantly. That could be the problem I'm facing right now. My humidity is entirely way too high and the plants aren't able to take in water. And some other science I'm sure.
Also, I've noticed the leaves on Banana Purple Punch A are really shiny and clawing just like nitrogen toxicity, but I'm in the second week of plain water and flushing agent. What gives? If anyone knows, I would greatly appreciate a comment or a DM. Thanks!
May 19, 2024
Not a lot to do today. No watering or trichomes.
Banana Purple Punch A is being weird with this nitrogen toxicity during flush. How would that work? Anyway, her leaves are starting to die off a little but no fade. Still, she has huge buds that smell wonderful.
Banana Purple Punch B is starting to show a bit of color in her leaves. Just a hint of purple but just a hint. If she fades, it won't be for a bit.
But it's time I don't really have. Let's hope she starts to fade quickly. Both have been in plain water for a week and before that a week of Flawless Finish. Must be more nutrients in the soil.
Nothing to talk about with lighting. We all know where it's at.
The environment. I'm really confused. So a week of high humidity and my room is also humid. Today, it's low humidity and my room is still high. Even with the door open from outside it's still high. Why? What sorcery is this? Anyway, the tent is still stuck at 65% humidity and temps are down to 73°.
Grow System Environment:
Temp: 72.5°
RH: 68.3%
VPD: 0.84 kPa
May 20, 2024
We are starting to fade! Finally! Both ladies are starting to fade in their own way. No watering today. They definitely don't need it at all. Maybe a half gallon before the drying period.
Banana Purple Punch A is fading in her own messed up unhappy way. Her leaves are super shiny and clawing like she has nitrogen toxicity, but she's flushing. I don't get it. Leaves are canoeing and turning yellow. Maybe this is her fading in the most messed up way. But she's fading. Some of her leaves are starting to get a purple hue. Her buds are super fat and stinky. It's wonderful.
Banana Purple Punch B is the picture of a perfect small plant. She is fading like a normal plant. She's getting purple hues on her leaves, buds are developing purple as well. By the end, I hope to have a couple deep purple plants. I'm still wondering why it's taking so long. They should have been done weeks ago.
The lighting is the same.
The environment is the same. Although, it dropped to 40% outside yesterday and the humidity stubbornly stayed in the mid 60s. It makes no sense. Anyway, I'm stuck at 65% still and the temp is finally under control again. I have it a bit low for the last bit of flowering at 73° it's going to be hot today, so I'm hoping my room stays cool. Maybe the humidity will drop again and I can try to get the humidity to come down.
Grow System Environment:
Temp: 72.6°
RH: 67.7%
VPD: 0.86 kPa
May 21, 2024
Trichome day! Some good things happening today.
Both ladies are looking great! They finally have some fade going on. Not a lot, but some.
Banana Purple Punch A is almost out of water. I'm going to let her dry out a bit more and then add another half gallon to her reservoir. Her trichomes are starting to show more amber. Maybe 5% now? About 10% clear and the rest are cloudy. She still has a bit more time to go. I'd say another 5 to 7 days? Maybe slightly less? Hopefully slightly less.
Banana Purple Punch B has a saturated bottom. I think it's because the roots never grew out of the container, so the soil is sucking up all the water and I guess the roots are not? I'm not sure, but I can def say that she is barely drinking. I'll pull the wicks tomorrow.
Her trichomes are looking great. She has around the same as her sister plant. About 5% amber, 10% clear and the rest cloudy.
Both plants have huge dense buds. I can only imagine how much more dense they will get over the next few days while they finish up.
We finally got the central air on in the house. It made all the difference in the environment. Well, that was until it shut off and then my room needed assistance. In the form of wet cold air. Definitely not good there, but the AC will kick on in no time. It's 80° out today, so I expect the central air to kick on anytime now.
When it's on, the humidity drops to 56% and the temp stays at 74°. Very nice.
Grow System Environment:
Temp: 72.7°
RH: 62.9%
VPD: 1.00 kPa
May 22, 2024
Nothing to do today with these two. I might have to water Banana Purple Punch A in a little while. I was hoping I could get away with it, but I think she is dried up enough for another half gallon of tap water PHed to 6.1.
Banana Purple Punch A looks good but has clear signs of previous stress. Interesting. Her tops are leaning even harder now. Those buds must be super heavy. The branches are pretty thick.
Banana Purple Punch B looks amazing. Purple is coming in quickly. Her buds are definitely denser and fatter now. Probably as big as they will get. Now it's just time for her to mature.
I have a small problem. I have 1 Tropicana Cookies left and 4 Sour Diesels in pre-flower in the tent as well. Suffice it to say, I need to make room for the Sour Diesels to stretch. And that could start anyway now. I'm concerned I'm going to run into massive crowding and cause mold. As it is, the humidity is still really high, so I don't want to risk it.
All that being said, I might now be able to wait for perfect doneness with these ladies. I might have to harvest them in a matter of a couple days. The last Tropicana Cookies in the tent should be pulled either tomorrow or the next day, unless the Sour Diesels start to significantly stretch, then all three including these two will have to be pulled.
So there you go have it. My current issue is space for 7 plants in a 3x3 tent. I know, I'm ridiculous. But you gotta do what you gotta do.
On a side note, I'm wondering what I'm doing wrong to always have plants go way past their time. Seriously, it kind of messes with my schedule. For example the Sour Diesels. Those were planted on 4/20 and these ladies were supposed to be fully done a week later. But it's been 4 more weeks and they still aren't done. Total wrench in my plans. What could I be doing wrong?
The environment is still a mess. The central air hasn't kicked on yet, so I'm relying on my own portable AC. The problem with that is it blows out really humid air when the compressor kicks off. So my humidity is high again. Over 60% yet again. The temp is fine at 75°.
Grow System Environment:
Temp: 75.7°
RH: 59.4%
VPD: 1.20 kPa
May 23, 2024
Last day of the week and we have some real purple coming in now. Especially on Banana Purple Punch B. Most of her tops are now a nice deep purple. Leaves are also getting the nice purple hue as well.
Banana Purple Punch A looks great. Lots of leaning branches now. She should be ready for harvest in just a few days. Not as much purple as I'd hoped, but it's fine. Her buds still look fantastic.
Banana Purple Punch B is quite nice. She has super heavy tops and should be ready in maybe 5 days. There's still too many white pistils on the lowers. I can't express how nicely the purple is coming in. A little late from what I've seen in other grows, but here nonetheless.
She still hasn't finished her gallon of water and it's been well into a week. I think I'll turn off the bottom feed system for her tomorrow. It should be perfect timing for her last week of life.
I definitely cannot change the lighting for these two. The Sour Diesels need more of it. I'll have to drop it down soon, they are growing pretty fast and starting to seriously pray. Too much.
So the light will remain her for now. I might still lower the light and turn down the intensity. I'm not sure yet.
The environment is starting to calm down. Not quite fast enough for my liking to be honest. Currently the temp is around 76.5° and the humidity is still high at 61%, but it will drop in a little while. Maybe we can get down to 50% today.
Update: I've decided to give these two no more than a week to finish up. Both of the Tropicana Cookies are out now and they are taking around 5 days to dry, maybe 7. But no longer than that. The other reason is the Sour Diesels that are now sharing the tent are in pre-flower and will need the space ASAP.
Grow System Environment:
Temp: 76.2°
RH: 60.6%
VPD: 1.18 kPa
Likes
2
Share

@eldruida_lamota
Follow
Vamos familia, actualizamos la cuarta semana de floración de estas Runtz de MSNL.
La temperatura que estuvo entre los 24-26 grados y humedad dentro de los rangos correctos.
En cuanto a las plantas las veo verde sano, estiraron bien y ensancharon bastante también.
Se nota que los nutrientes de la marca Agrobeta cubre todas las necesidades de cada ejemplar.
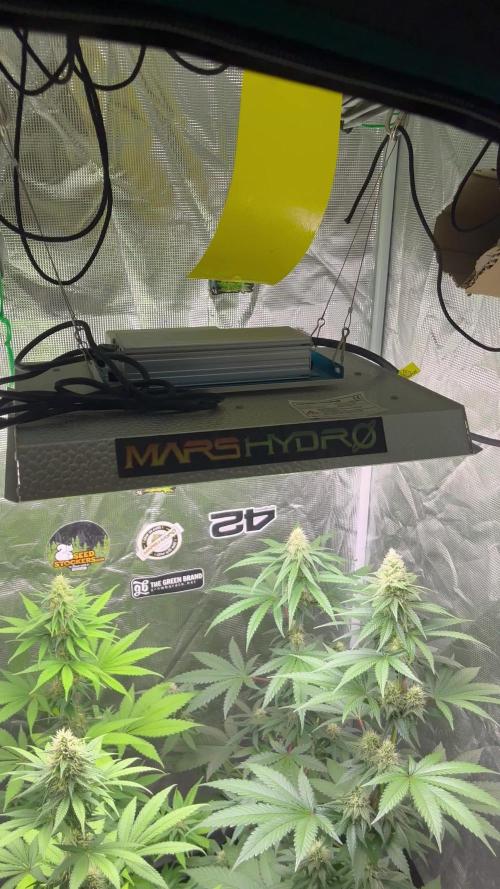
Las flores empezaron a formarse, por el momento todo correcto, os dejé también alguna novedad y un cambio en la sala, agradecer al equipo de Mars hydro por el nuevo TSW2000. (los últimos 5 años cultive solo con los leds de esta marca).
- os dejo por aquí un CÓDIGO: Eldruida
Descuento para la tienda de MARS HYDRO.
https://www.mars-hydro.com
Hasta aquí todo, Buenos humos 💨💨💨
Likes
1
Share


@UDUDUDUDU
Follow
fkkin second one dried up
contacting customer support and I will neVer grow Royal Queen again 🦁
Waste of time and waste of money ' a plant that cant handle a little REAL wind and sunshine and REAL dort aint a plant worth smoking'
Likes
18
Share


@Jays_Not_Here_Man
Follow
Week 5 (Day 35) Flower- the week was uneventful. Building stacks, no issues, it’s been rainy here so the humidity has been high, the old dehumidifier is getting a workout 💪 I lowered the light an inch, might not seem like much, but I’ll watch and see if they can handle it. Full feed of nutrients tomorrow when the lights come on😎
Likes
4
Share


@FourTwenty_Plants
Follow
So cut of a few bud sites that were too low or under the net. I also had some nutrient problems with the FBA2504 shes more hungry then the other 2 plants but that should be sorted out by now, or at least thats what I hope.😅😂
Also I wanted to mention that the terps on the FBA2504 give me some Super Lemon Haze vibes and shes also looking like a sativa dominant strain so who knows maybe I got 4 Haze crossings in my tent rn🔥.
Purple Haze seems to be the fastest out of the 3 she is a fast one for sure.
The Frostbanger has some purple pistils forming.
Likes
34
Share


@AshBrand
Follow
11/24/21 - They look really good for how overgrown they are becoming. We need to move the light to the top of the tent soon.
11/25/21 - Still need to move the light to the top of the tent but all plants look reeeally good and are flowering.
11/26/21 - So far so good. They are drinking more water so we have increased feedings. Once the light gets moved to the top all plants will be getting sufficient light.
11/27/21 - We moved the light way up to the top and bumped the light to about 70% power. See today’s picture!
11/28/21 - The plants look amazing! Check out the video from today. Basically we are just letting the plants flower. Feeding as needed.
11/29/21 - The girls are doing great and are budding nicely. Huge flowers are opening up!
11/30/21 - Tomorrow will be the start of Week 3 of flower! We are so excited to have these plants and watching them go crazy in flower.


Likes
14
Share