The Grow Awards 2026 🏆 


Likes
Comments
Share
@DrGanj
Follow
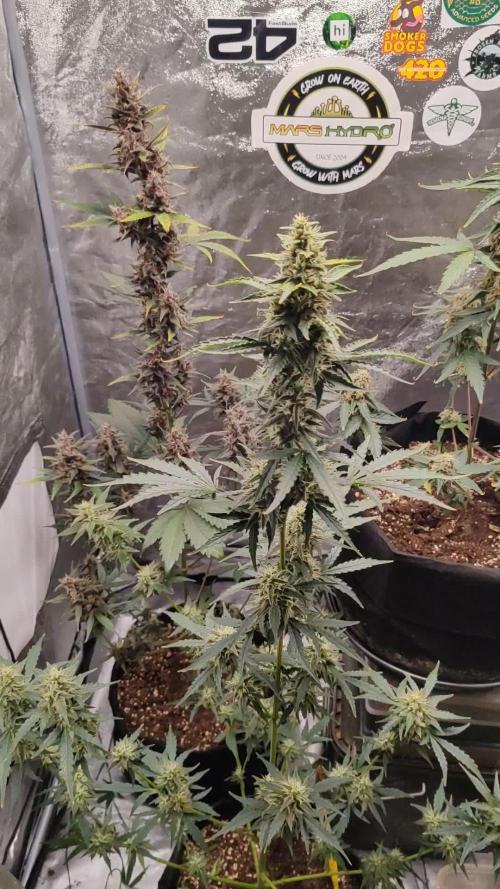
This plant was a dream to grow, wish I'd taken cuts. Halfway through dry at 7 days. Drying at 55 - 60 % RH and 17 - 19 degrees C. I anticipate she'll be done between 10 - 14 days total dry time and I'll then trim and update weights on this Harvest.
133.75g total after trim. She's a nice smoke, very happy.


Likes
12
Share
@pek710
Follow
Now is the time for beginning the lst.
Everybody looks great, there's only orange sherbet FF that is too small in my opinion to be bondaged.
I gave a bit too much of fishmix last week so it will be only water for this week.
Still 2 to 4 weeks under neons, got to keep them as low as possible so they can have light on each leave


Likes
21
Share
@SmithicusAlbertaCanada
Follow
This week, looks like good bud growth. These ladies are starting to thicken out, and I'm looking forward to seeing the next couple weeks growth!
I hope you enjoy the little videos I'm doing, maybe one day I'll add some commentary 😄
Thanks for taking a look! 🙏
Likes
10
Share
@Minuteman_Organics
Follow
Beginning of week 4!!! What a glorious week it's been!
I had some friend watch my plants when I went away for a weekend. Bad idea. Plants experienced severe drought. I attempted my best and fortunately saved everyone but had some minor damage...
I'm incredibly worried about male cannabis pollen entering the tents as some flowers did open up before I had a chance to remove them while I was away. I get them a good washdown with water to hopefully kill and pollen but we shall see what happens. My only saving grace was that all the males were isolated in their own tent with an exhaust fan pointed away from the female tents.
Stretch is officially done!!!!. Some kept going for about 3 weeks especially the zed blacks which all stretched like crazy. The hash plants has moderate stretch. Rainbow belts very minimal.

Likes
12
Share
@Socal6pak
Follow
Received TWO 5packs of rhino Ryder as freebies. Gonna grow these outdoors and see how they do. Gonna take advantage of socal sunshine. Only 4 out 5 sprouted. It’s old beans I think. So that’s a good pop rate. I think.
Likes
14
Share
@GodG420
Follow
Very stable medium-sized strain. This plant has never been trimmed and didn't make lots of leaves, it has developed big dense buds with fast grow process!
Likes
17
Share
@Drtomb
Follow
5 days away from trim. Flush is over 15 days in and the leaves are showing it. Smell is extremely potent snd crystals are sitting with about 5% amber.

Likes
17
Share
@ChunkeyMunkey420
Follow
Plants doing well. Sfl 100 gets given with first water of week after feeding.


Likes
20
Share
@pifflestikkz
Follow
Day 98
Day 63 Flower
30/05/24 Thursday
Finally the time has come!!
The fox tails aren't a issue for me as it's Percy smoke, and to be fair, there decent fox tails 😍😂.
The plant is huge for a auto.
I have wet trimmed,
Removed all excess stem.
Wet bud weight is 587g
Wet trim is 35g
I will update dry weight and smoke report 👌
Thank you to everyone who liked, commented and followed 🙌
Love for the grow 💚
Till next time ✌️

Likes
24
Share
@Lowkey_Doc
Follow
I didn’t join Grow diaries until this week so here’s where I am at!
I plan to stay using this, I respect the community it feels like home, any way about the grow...
WALTER WHITE/ MEPHISTO
I have grown this plant before and she is definitely one of my favorite strains from Mephisto.
It has a citrus, berry smell.
The smoke is smooth and creamy.
Week 4; Day 25 of flower(update)
~Average~
Temp: 76-83
RH: 42%-52%
PH: 5.9-6.2
NOTES: This week the trichrome production was on the run. They started to put on.
I am happy with the smell in the grow room/ tent.
I notice some tip burn so I am going to give two waters at a ph of 6.0 then go back to the schedule.
I am hoping these ladies do me as well as the first run I had with them!
Happy growing, Gromies🤙🏽
Week 5

Likes
16
Share
@Geili_Seili_fireinfireout
Follow
Seit tag 22 ca. Beginn ich sie jeeeden tag mehr zu lieben

Likes
13
Share
@Adriplnks
Follow
Las 2 más pequeñas, se adelantan y empiezan a madurar antes que las demás, ya tienen algún pelillo marrón, y sueltan una cantidad de resina increíble.
Las más grandes y con cogollos más gordos, empiezan a doblarse, así que voy atando las que no aguantan el peso
Likes
11
Share
@ganjaman24
Follow
It’s bern roughly two months these guys have been growing! Lst’d Both but untied the gg because I wasn’t sure she was benefiting from it so I’m going to do it over. These ladies (I hope) will start their flower journey next week when I revive my new flower tent 😎..stay tuned for some epic buds..I hope!!

Likes
5
Share
@dauntless
Follow
Week 4 starts Sunday July 17, 2022
Plants seem really nice and healthy. I really like Flora Nova, its a great product. 300ppm and the plants love it, even though the Gaia Green is in the mix, it seems to just love this combo, ever since I repotted with the amendments in the soil, and watered with Flora Nova Bloom (mix it crazy well before using) the plants just look really happy and green. It's not an organic product, maybe like 30% organic -- just like me haha.
I think by week's end we will be caught up and ready to intensify lights, threw the SF1000 in the tent finally for more light, but so far just keeping only the Phlizon white light full spectrum COBs on and the RB lights off, and not using the SF-1000 at all even though its mostly white. Despite what Phlizon says, the COBs are great during veg, the RB not so much. I like the COBs so much better than the smaller LEDs for veg.
July 19, 2022
Turned on the SF-1000 to 60% and measured light, I'm happy with it. I have another strain growing next to these and the extra light will help during flower as a side light but it will most likely hit the canopy too. The growth is vigorous right now. Added pics, today is day 28 since they were dropped into water
July 23, 2022
Tomorrow starts week 5, growth is super green, no funky yellow or leaf drama. Stalks are getting much thicker and stronger. Turned the lights up this week, added the 2nd COB, and temps are just fine! Who knew. Anyway, they look like they are very close to pre-flower. Added some tent mates for a future grow, check out the grow area vid. Maybe I forgot to mention added worm castings this week...
Likes
16
Share
@Rinna
Follow
I’ll update ya’ll on the smells and tastes after drying and curing! So far both are packed with ice and smell very potent, a little overpowering still, so I want to give it some time before they’re cures and can show their true terpene profile!

Processing
Likes
20
Share
@Mr_nugs_lover_David
Follow
She's looking so beautiful,very nice strain to grow for sure,I'm trying to give her a good shape before flowering starts. I add organic liquids nuts only once a week and looks like she loves it,let's keep up the work!! 💚💛❤️🌱🤩

Processing
Likes
13
Share
@medigrow
Follow
This plant is growing very rapidly. Many of side branches due to tie down technique and all of them are same height. Very promising. Now I see signs of pre flowering, so I add a ''bud candy'' nutrient.
Likes
6
Share
@GrowIT
Follow
The second week arrived! And the pot is in the secret gardeeen 🤩💣 the up is going very low but is not a problem!


