


Likes
2
Share


@Qaggy
Follow
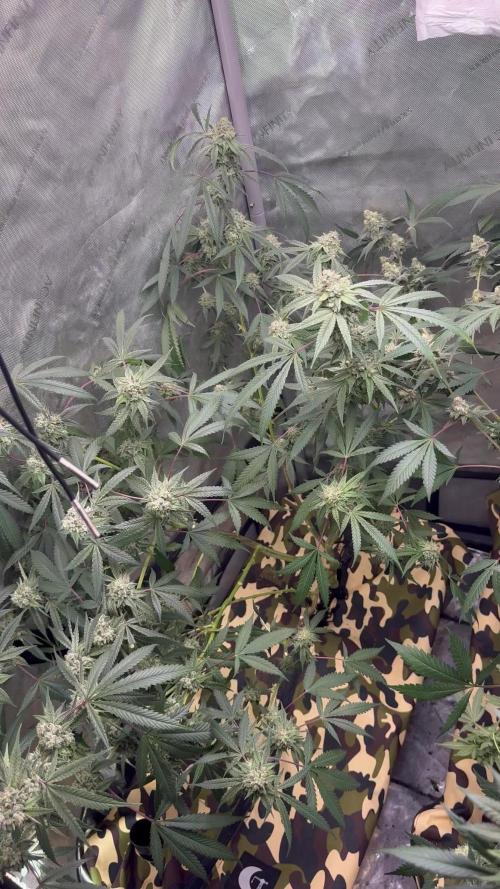
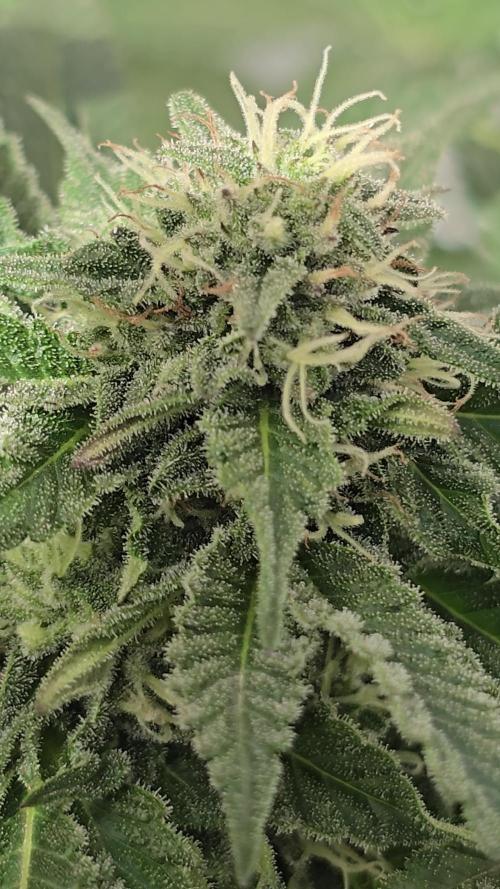
Great growth from all the girls this week.
Stretched massively.
I have done a major defoliation to let more light to bud sights. 95% flowers are in light now. I will do another Small defoliation next week.
Dry amended top soil with bat guano, worm castings and bio life. Should be enough to bring them into mid flower.
I had a slight fungus knat issue but got some nematodes and they are starting to clear along with sticky traps.
I have also taken cuttings from a few of the girls to cross a few of the stronger strains and create my own strain. First time I will be doing this so excited to see how it turns out.

Likes
12
Share


@ZzTooRightOGzZ
Follow
She doing so good after the lst I did earlier this week.
Topped her towards the end of week 3.


Likes
5
Share


@MediciGrade
Follow
Transplanted into the 3 gallon medical buckets from thebucketcompany. Everything still going smoothly. Plants are happy under the gavita at 40% power and 50 inches above the top of the plants.
Likes
13
Share


@CalimannpackZ
Follow
Just added Mephisto 3 sour crinkles and 2 double grapes to the equation. It was meant to be 4 sour crinkles but one seed still ent popped so I’m hoping it will! On to the grow where I haven’t trained any plants it’s a fight for space but I’m happy with most of the plants few fast buds wedding still ent properly flowered yet week 7 on but am happy with a couple glues and the 3 runtz the runtz is frosty! The grape Walkers are starting to swell and fill out big time I am happy so far with it all had a couple burns and defincys through the 7 weeks so far but got over them! The grape walkers are the big budded plants then the frosty ones at the back are runtz then the rest are glues! Started defoliating plants


Likes
22
Share


@SkunkyDog420
Follow
Hallo zusammen 🤙.
Alle 3 Pflanzen sind geerntet.
Wir sehen uns in 2 Wochen mit dem Erntebericht.
Bis dann 🤙

Likes
11
Share


@KennyC
Follow
350W total of this lamps. Day 99 (11.1) she’s shining at night ✨❄️
Day 105, flushed.
Will cut her a week from now :))
(18.1)
I really like Green Crack, lot of buds popping everywhere like popcorn. I had lollippoed this one, like 3x. Everytime i got 7-10 stems popping with lil tiny buds popping. This is the final. I’ll try GC nxt round with my new HPS 600W ;)
Likes
150
Share


@RussianGrower
Follow
I welcome all my like-minded people who are in different parts of the world. I thank everyone who provides moral support to Russian plant growers. 👍
It's me again-an underground Russian grower with some experience with different strains of cannabis. Subscribe to my diary if you want to follow my progress and learn a lot about the life Of Russian growers, and the difficulties they face every day👊
Today my have my plants 62 day life. 9 weeks. today I visited my underground production.
As I will have difficulties in financial investments, I had to collect from improvised materials additional ventilation and air filtration. In addition, I installed forced ventilation at the entrance with a computer power supply.
Bubblelicious Auto-with the genetics of this cannabis variety I was familiar before, so knew what to expect from these plants. I can say one thing, it is the most delicious and sweetest sort of marijuana I grow. Also, it produces a lot of oils which I think it is suitable for extraction or cooking cannabis food. I look forward to the harvest
Neville's Haze Auto - this variety of cannabis shows an unprecedented strength in growth, its flowering only in the early stages, and should take a long time before its full sexual maturity.
In addition, I made my girls an intimate haircut, so that their genitals become like full-fledged women.
In General, I'm doing well, thanks to this resource and the advice received here, I manage to fight with the stench, I'm free and I'm not going to finish my activities. Until next time. 😉


Likes
4
Share


@RaverKushAndHaze
Follow
Erba molto resinosa e buon odore i fiori sono più aperti e meno compatti della gelato ma è una pianta generosa anche se purtroppo ha patito il caldo è una pianta da fare sotto i 25 gradi e attenti hai fertilizzanti e umidità e molto suscettibile all'oidio.. fumata buona erba non troppo potente va bene per la giornata lavorare tranquillamente e potersi permette una pausa 4:20 rilassante ma ancora operativo per svolgere le attivita lavorative e giornaliere. Buon divertimento spero di iniziare un altro diario fast buds con la smootie e gorilla e lsd con purple lemonade per le varietà viola e vedere la stabilità.
Ps buona stabilita su questa versio e original di white widow auto
Likes
Comments
Share

@DmbTexasRanger
Follow
Loving my earthboxes. The only downfall is that they are too heavy without a trellis. I’m tying them up the best I can.


Likes
9
Share


@Bigg_soum
Follow
Started too flush for 14 Day. I am very impressed for the result for my first grow 🤔 in addition its auto plant so less good than fem but the bud is sooo
dense I am chocked aha. Happy growing everybody and Thanks for the share and comments🙏 I will come back as soon as possible to show the buds once they have dried.

Likes
7
Share


@Cogollo_eu
Follow
**Encontrarás la traducción a español al final de la descripción**
From/Desde: 08/03/19 || To/Hasta: 14/03/19
From day/Desde día: 15 || To day/Hasta día: 21
You can find the Gorillas Diary here:
** Podéis encontrar el diario de las Gorilla aquí:**
https://growdiaries.com/diaries/25675-makingmoney-with-gorilla-mm-vs-gorilla
-----IMAGES & VIDEOS-----
Video 1:
7 days TimeLapse, +/- 1 image each 180 secs @ 30 fps, you can see how beauty is the dance of this babies and how are they growing. This is a fast timelapse adjusted to 1 minute for instagram, if you want to see the 3:21 min complete video (1fx60s 30fps) it's uploaded on the gorillas diary named abobe.
Video 6:
An overview video of the babies, moments before i performed the first topping/man-linning/prunning/LST on the biggest gorilla. The other one is recovering at time from those ugly color marks she has on them leaves. As the leaves seems not healthy i decided to not perform the man-lining on this one until it has a pair of healthy main leaves on which i can trust to guide.
-----WEEK SUMMARY-----
I traveled to Venice this week and i have very few photos, also i returned with a terrible flu, so i'm not going to take too much photos for the next week too, i'm so sorry.
The Money Makers are growing healthy and equitative, with very short nodal distances as you can see in photos 4 & 5, i'm not going to perform the same main-lining technique i'm doing with the gorilla, i'm going to test some things. With the Money Makers i'm going to perform something similar to the man lining but with 3 or 4 floors, i'll be twisting the main branch to create a circular horizontal proppagation with 6 or 8 branches. First i will fix the heights of the floors and then i will push them horizontally. Let's see where they go ;).
-----WATERING CALENDAR-----
12/03/19 - 700 ml with all week nutrients @ 0.95 E.C. PH5.9
12/03/19 - FOLIAR - Used about 25 ml of (200 ml water with 1ml Pro Active, 2 ml Plant Vitality + and 0.1 ml Foliar Spray)
*****ESPAÑOL*****
-----IMÁGENES & VÍDEOS-----
Vídeo 1:
TimeLapse de 7 días, +/- 1 imagen cada 180 segundos @ 30fps, observad la maravillosa danza de las nenas y cómo crecen. Esta es una versión rápida de 1 minuto que cree para instagram, si queréis ver el vídeo completo de 3:21 min (1fx60s 30fps), está subido en el diario de las gorilas que nombro en la cabecera de la descripción.
Video 7:
Un vídeo general del armario, está grabado momentos antes de realizar las técnicas de cultivo sobre la mejor de las gorilas. La otra se sigue reponiendo de esas manchas feas que le salieron en las hojas. Ya que las hojas parecen enfermas, he decidido no hacer el man-lining hasta que no tenga un par de hojas saludables en las que poder confiar para hacer el guiado y alimentar los brotes.
-----SUMARIO SEMANAL-----
Las Money Makers están creciendo sanas y equitativas entre si, con distancias internodales cortas como podéis ver en las imágenes 4 y 5, no voy a realizar el mismo man-lining que estoy realizando sobre una de las gorilas, pues voy a probar cosas. Con las Money Makers voy a realizar algo similar al man-lining pero respetando 3 o 4 pisos de las plantas, giraré el tallo principal para crear una propagación horizontal circular de las plantas con 6 u 8 ramas. Primero ajustaré las alturas de los pisos y luego las expandiré horizontalmente. Veamos hacia donde van ;).
-----WATERING CALENDAR-----
12/03/19 - 700 ml con todos los nutrientes semanales @ 0,95 E.C. PH5,9
12/03/19 - FOLIAR - He usado unos 25 ml de (200 ml de agua con 1ml Pro Active, 2 ml Plant Vitality + y 0,1 ml Foliar Spray)

Processing
Likes
Comments
Share


Likes
9
Share


@Deelicious
Follow
Hey everyone!
Week 2 is going well for these ladies :)
Day09:
The two Auto Somango Glue seem to be happy, healthy and are growing strong. The two Auto Afghan Skunk however, showed a weird claw-like curl on their second set of leaves.
They're still growing and I don't see any kind of discoloration on those leaves, though.
I've been watering sparingly, 0.5L every 48h approximately, so I'm thinking they may be stressing due to too much light...? I brought the light inensity down to 75% and raised it 10cm yesterday to see what happens.
The Auto Afghan Skunk 1 is already showing signs of improvement. Hopefully the other one will too - fingers crossed!
I'm just guessing honestly 😏 Any suggestions would be welcome and highly appreciated!
----
Day 14:
I've definitely overwatered these girls. I was following my instinct based on my experience using HID lights, which generate a lot more heat and cause for 1. plants drinking more and 2. faster water evaporation.
Of course LEDs don't genrate as much heat and I need to adjust my watering habits...! 😏 Should have payed closer attention, but hey, you live you learn right?
Luckily growth isn't stunted and the two Somango Glue keep growing strong :) The two Afghan Skunk seem to be suffering a bit more from overwatering, but they're showing signs of recovery so I'm confident they'll bounce back 💪
The girls got a 200ml watering on day 10 and didn't get any water since then. Waiting for the pots to dry out some more before next watering.
I turned off the fan inside the tent so the girls can have a little more heat too. Hoping that will help dry out the soil faster
This was it for week 2!
Take care and have a great week
Thanks for looking 👊

Processing
Likes
40
Share


@Tazard
Follow
She looks totally awesome check out her leaves and side growth!!!! No sign whatsoever of male flowers from my S1 seeds!

Likes
27
Share


@Jens_420
Follow
Moin moin,
Melde mich hier auch mal wieder. Meine Blueberry sieht momentan recht gut aus und neigt sich ihrem Ende. Die Haare sind fast alle braun und langsam werden die Trichome auch langsam bräunlich. Sie fängt schon an die Nährstoffe aus den Blättern zu ziehen, das sieht man jetzt nicht so gut auf den Bildern aber in echt ist das Grün wirklich sehr hell geworden.