
Likes
Comments
Share


@Mr_Maes
Follow
I will be starting the flush a week earlier then I expected these girls are clouding up super fast. The Jack Herer will need another 2 week at the least. But the Tangie and Durban Poison will for sure be done sooner.


Likes
1
Share

@GreenEldritchGardens
Follow
She is not drinking much anymore and her leaves are starting to curl upwards, which normally is the sign of ripping, so I looked with microscope and it's looking good. 1 more week shall be it, so next week I'll not post update on this one.
The smell really goes into Lime or citrus with the sweet undertones of Critical, really nice, will go well with the summer comming!

Likes
48
Share


@Nvchods3
Follow
buenas cultivad@res
Ya retire la malla scrog y dentro de unos dias procedere al amado momento de la cosecha !!
Gracias a todos por las buenas vibras 🤝🏽🙌🏽

Likes
5
Share


@CannaIGrow
Follow
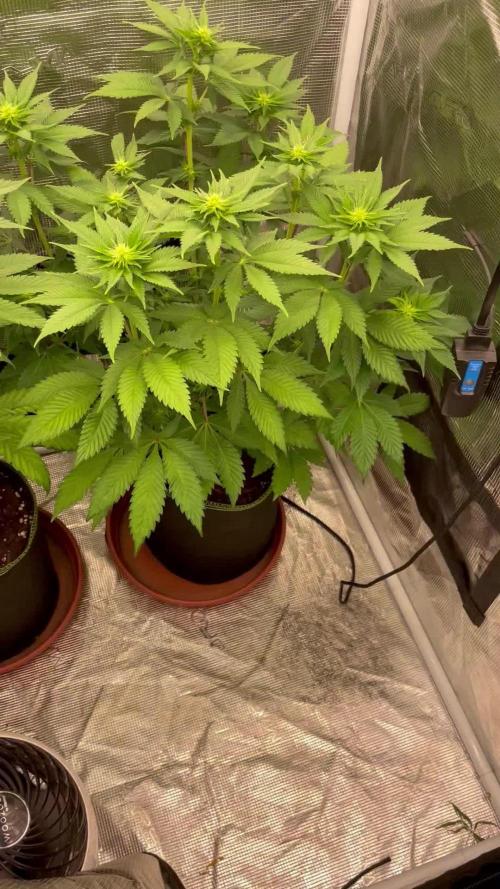
This plant seems to have grown much denser and better than my first plant. I just got the ac infinity ventilation setup with controller 69 for my 2x2, still trying to learn, hopefully grow #3 goes even better. Stay tuned


Likes
162
Share


@nonick123
Follow
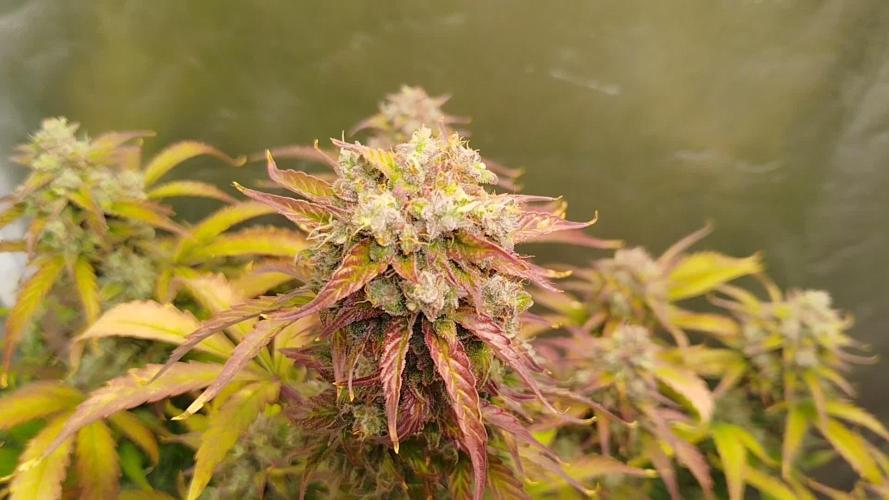
Día 72 (18/12/2023)
Empiezan las temperaturas frías... (tengo las luces encendidas de 20:00 a 8:00...)
Día 74 (20/12/2023)
Cogollos engordando y poniéndose duros a velocidad de crucero
Los colores morados de esta cepa son cada vez más profundos 😍
Día 75 (21/12/2023)
Riego: 1 litro H2O + Melaza 1 ml / l + Alga Bloom 3,5 ml / l + Sugar Royal 1 ml / l + Power Buds 1 ml / l + Green Sensation 1 ml / l - pH 6,24 - 875 PPMs
Desde esta semana, añado nutrientes Cal-Mag Amino 1 ml/l y Enzymes 2 ml/l de XpertNutrients
Día 76 (22/12/2023)
Nuestra planta se queda sola en la tienda porque su compañera se ha vuelto hermie... Espero no la haya polinizado
Relleno la parte superior del sustrato con 3 cm de Light Mix, ya que se ha compactado mucho
Riego muy despacio con 500 ml de H2O para que se asiente
Día 78 (24/12/2023)
Reviso diariamente en espera que no sea hermie o se haya polinizado
De momento todo va bien....
Añado un par de vídeos para que veáis los espectaculares colores morados que están mostrando 😍
En 20 años cultivando, nunca había visto una cepa tan bonita. Im in love 😂
Processing
Likes
9
Share


@VIPgrower
Follow
Week 12 and humidity in room is higher then I like at night 60 and duringlighys on to need dumhumidifer badly I think or maybe all good no signs of mould that’s for sure so I tried supercropping for 1st time they seemed to like the 1st to tops I did and the all peeled up and getting more light so I did it A couple more tops will see if it makes difference or not check out the vid and pics

Likes
17
Share


@NOJON
Follow
nice harvest , very resinious , gluing my fingers.
i ll update when it will be dry. i hope something like 100g on this plant but i will be happy if i have 80g.
i dried a bud in oven to try the effect , it's mainly indica effect, goos to watch a movie or doing relax activity, to drawing, or making music.


Likes
25
Share


@Herbz_Unkraut
Follow
i accidently bought some unbuffered coco and mixed it with my ussual earth, had major calmag problems in mid-flower but i´m still pleased with the results...also had a little trouble with mold at the end due to bad weather and high humidity in the final weeks of the grow, had to remove a few buds and harvest early @ day 55 of flower....but there's still alot of great looking buds left for me to enjoy and all look mostly done...
Just harvested and hung them upside down, currently drying them at constant 19.5-20.5°C and 50-60% RH..will update as soon as they are dry

Likes
162
Share

@nonick123
Follow
Bienvenidos al diario de GG4 Sherbet FF patrocinado por FastBuds
Muchas gracias a @Fast_Buds por enviarme estas semillas! Espero que tener una cosecha espectacular!
He elegido esta genética porque en los diarios y en su ficha técnica se habla de fuerte resistencia a las bajas temperaturas, y este es un parámetro que no voy a poder controlar
05/10: Se coloca un semilla en vaso con agua filtrada (TDS 50 PPMs) + 3 gotas de agua oxigenada (H2O2) y se coloca en un lugar oscuro a 25 ºC durante 24 horas
06/10: Se prepara un maceta de 400 ml con sustrato Light Mix + 15% Coco + 10% Perlita
Se humedece la maceta hasta escorrentía con agua filtrada (TDS: 50 PPMs)
Se hace un agujero de 1 cm de profundidad, se coloca la semilla al azar en el agujero, se tapa con un poco de sustrato y se humedece ligeramente con agua en spray
Se coloca la maceta en propagador con 4 luces LED, que arrojan 200 - 300 PPFD (no se encenderá el LED hasta que germine!)
Likes
2
Share


@Saintvicious
Follow
Holy Lst. Getting crazy now for just a few weeks from seed. No stopping it now.


Likes
12
Share


@MadeInGermany
Follow
Flowering Day 9
Since time chance
To 12 / 12 h
Hey guys :-)
She grows great and is doing well in the flowering tent :-) .
Today everything below was cleaned and defoliated :-) .
A lot was removed because this time it was quite cramped in the tent and you don't lose your energy in the lowest shoots :-) .
This week it was poured twice with 1.2 l each.
Everything was checked and it looks like all trips are slowly but surely gone :-)
have fun and stay healthy 🙏🏻💚
Was poured 2 times with 1 l each.
I'm looking forward to the start of flowering :-)
have fun and stay healthy 🙏🏻
👇🏼👇🏼👇🏼👇🏼👇🏼👇🏼👇🏼👇🏼👇🏼👇🏼👇🏼👇🏼
You can buy this Nutrients at :
https://greenbuzzliquids.com/en/shop/
With the discount code: Made_in_Germany you get a discount of 15% on all products from an order value of 100 euros.
👇🏼👇🏼👇🏼👇🏼👇🏼👇🏼👇🏼👇🏼👇🏼👇🏼👇🏼👇🏼
Water 💧 💧💧
Osmosis water mixed with normal water (24 hours stale that the chlorine evaporates) to 0.2 EC. Add Cal / Mag to 0.4 Ec Ph with Organic Ph - to 5.8 - 6.4
MadeInGermany

Likes
14
Share


@jomolhari
Follow
Materials used during the process:
Pharmacy and stuff from drugstore: ethyl alcohol; syringes; mask; latex gloves; sterile cotton wool; chloramphenicol; gentamicin sulfate; hydrogen peroxide.
Containers and some junk: foil; cling film; container 50 l; elastic bands; 1 liter cans with drilled caps (3-5 holes); disposable food containers 1 l; plastic basin 12 l; cardboard box 50 l (from my PC speakers); zip locks for storing prints and rehydrating spores; a piece of chalk; paraffin candle; A4 paper for drying.
Garden shop: vermiculite; perlite; expanded clay; coconut; spray; thermometer.
In the kitchen: a pan for pasteurization (rofl tyndallization); rehydration pan; microwave; airfryer; glasses, spoons, scoops and other common items in the kitchen.
Tools: knife; scissors; tweezers.
Also: spore prints of P.C. Ecuador from previous cycles.
May Shiva favors you.
Peace.


Likes
1
Share

@sunshinegroww
Follow
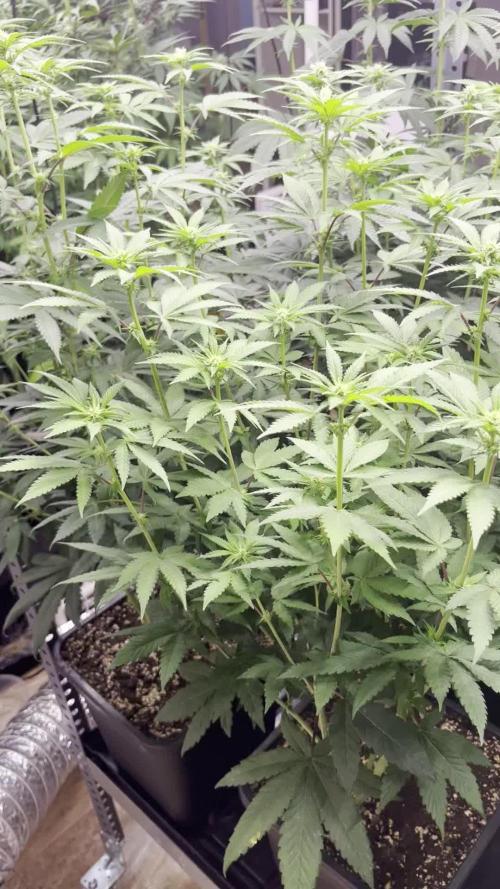
Well stretch looks like its over now ,had some defoliation as to increase airflow,she looks happy as ever lets gooooooo

Likes
15
Share


@jayizrollin
Follow
First grow finally done! .
I battled a lot of inconsistencies with my environment and watering schedule.
Despite this, and my big top gun growing pollen sacs, I had a great grow, and seedless buds!
Top Gun 1 Gal harvested 25 grams dry
Top Gun 5 Gal harvested 60 grams dry
I really enjoyed the 1 gallon a lot more, easier to manage and rooted up the whole pot, going to try 3 gals next grow.

Likes
4
Share

@Ribemarti
Follow
ESTE CULTIVO VA MUY BIEN, LAS 5 PLANTAS MAS GRANDES SON LAS QUE ESTAVAN EN EL ALMARIO GRANDE Y LAS OTRAS LA DEL SCROG
DE MOMENTO ESTOY REGANDO TODAS LAS PLANTAS IGUALES YA QUE LAS PEQUEÑAS SOLO SE LLEVAN UNA SEMANA DE DIFERENCIA
SI NO PASA NADA SE VERAN BUENOS BRAZOS
YA QUE SON MAS PEQUEÑAS COMO A MI ME GUSTAN
EC 1200 PH 6,5 Y 2 LITROS DE SOLUCIÓN

Likes
Comments
Share


@GrowDiaries
Follow
Best Breeder 2025
Hats off to Cookies—our GrowDiaries.com growers picked them as Best Breeder 2025! Huge props to our community for voting! #GrowDiaries
@spannabis_official @cookiesbarcelona @cookiessf
Likes
47
Share


@terpproducer
Follow
👇 This week:
---
Watered again but this week i started using alga bloom instead of grow + Calmag
PPFD at canopy height approximately 450-600, VPD ~1.1 - 1.3
Last defo before flower + lollipopping
Running autopot reservoir with PH 5.5 (Cleaning once a week)
Feeding autopots inside the tray with 1L plagron alga 5ml/L + additives (once a week)
Testing Orange Creampop #2 on HLVd because she is much smaller than her sisters
---
Happy growing and thanks for checking out my report! I really appreciate you! 😁💪🙏