
Likes
Comments
Share


@SalocinSpecial
Follow
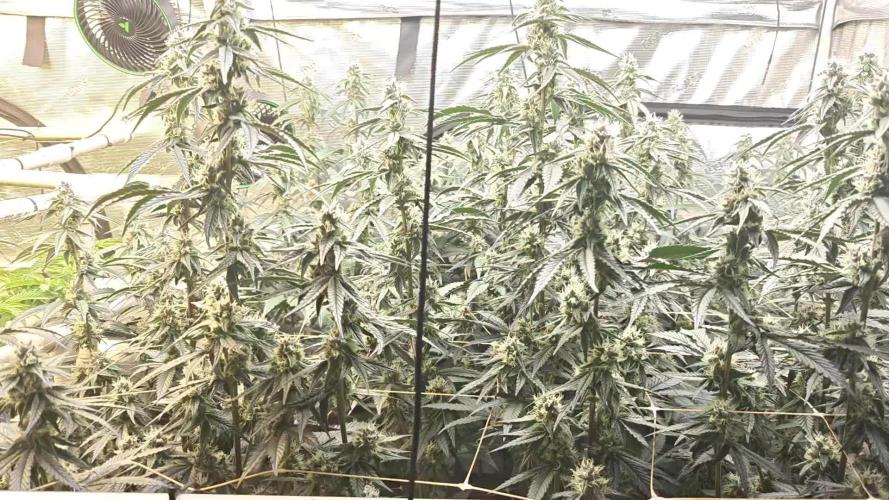
D68 (28/01/2021): First official day of week 6 in bloom and first official day (second in reality) of pre harvest flush. The smell is strong when I open the tent! It does not take long for the whole room to smell dank and even outside the room.
- temp: 24-25C light ON ; 20-22C light OFF
- no water
- RH: 49-52% light ON ; 49-50% light OFF
D69 (29/01/2021): I did a first proper flush today by running approximately 2.5 gallons of water trough the medium. There is still a lot of nutrients in the medium. I might do the exact same flush tomorrow. The PH of the run off is high (around PH7-7.1). This is an other reason to flush again tomorrow. I also reduced the light ON schedule by two hours. So now 18h hours ON and 6 hours OFF. I will continue reducing the ON period until they are ready for a complete dark period. I also try to reduce the air temperature.
- temp: 24-25C light ON ; 19-20C light OFF
- water: PH6.4, 135PPM, 2.5 gallons each
- run off: PH7 and 680PPM for Glue Gelato ; PH7.1 and 560PPM for Banana Kush
- RH: 47% light ON ; 48-53% light OFF
D70 (30/01/2021): I did a second flush since I was not satisfied with run off PPM of yesterday. Today, the run off PPM is under 300 which is what I wanted. The run off PH is still high with 7.1. Banana Kush is ripening with the pistils slowly turning brown. Glue Gelato look sooooo yummy and I can't wait to harvest it. There is a small color change in some leaves but I'm expecting more in the next days.
- temp: 23-24C light ON ; 19C light OFF
- water: PH6.4, 125PPM, 2.5 gallons each
- run off: PH7.1 and 260PPM for Glue Gelato ; PH7.1 and 250PPM for Banana Kush
- RH: 46% light ON ; 46-48% light OFF
D71 (31/01/2021): Glue Gelato is changing color. I'm checking trichomes everyday on both girls and no amber yet.
- temp: 23-24C light ON ; 19C light OFF
- no water
- RH: 45% light ON ; 49-50% light OFF
D72 (01/02/2021): Well well well...the clock is ticking for those girls. Glue Gelato is now having a couple of amber trichomes. Banana Kush don't have any. Overall Banana Kush has less trichomes and fluffier buds. This girls is not ready yet but I will need to chop her down at the same time has the Glue Gelato because my drying space is the tent I'm growing in. I will try to push the Banana Kush to ripen faster by lifting up the lamp at 16 inches from top bud and by reducing of 2 hours the day period for a 16 hours light ON and 8 hours light OFF. But at least all Banana Kush trichomes looks milky.
- temp: 23-24C light ON ; 18-19C light OFF
- water: PH6.2, 123PPM, less then a gallon each
- run off: PH7.4 and 200PPM for Glue Gelato ; PH7.4 and 287PPM for Banana Kush
- RH: 45% light ON ; 40-45% light OFF
D73 (02/02/2021): I gave water probably for the last time today. Trichomes on Glue Gelato are starting to amber on top buds. Not a lot of amber but you can see that all the trichomes are starting to degrade by curling down slowly. Trichomes on Banana Kush are not amber at all but they all look milky. Glue Gelato is ready to harvest but Banana Kush need more time. It's tough to make a decision to chop or not since they are not at the same stage of growth. I want to place them in a complete 48 hours of darkness before harvest. 1h less light today for a 15h light ON and 9h light OFF. The lamps are now at 20 inches.
- temp: 23-24C light ON ; 18-19C light OFF
- water: less then a gallon each
- RH: 45% light ON ; 40-45% light OFF
D74 (03/02/2021): Glue Gelato is ready for 48h of darkness. I will take her out of the tent and place her in an other room without light. I will try to maintain a proper environment in this room and if it smells to strong or if the condition are not good I will replace her in the tent and both will start the 48h darkness. The idea is to give Banana Kush 2 more days to ripe and swoll more. After 48h, I will chop Glue Gelato and place her in the tent to start drying. Banana Kush will then start her 48h darkness. I don't know if this strategy is good but I will monitor everything closely and react if something is wrong.
- temp: 22-23C light ON ; 19C light OFF
- no water
- RH: 47% light ON ; 43-45% light OFF


Likes
5
Share


@Kinghaze
Follow
Harvest day !
The plants are chopped and are hanging to dry.
I put in a dehumidifier and a humidifier to control the humidity around 60%.
The goal is to dry for 10 to 14 days.
Then i will trim and cure them in grove bags for 6 weeks.
I put the mutant straight in a zip lock in the freezer.
I will make fresh frozen bubble hash (full spectrum) out of this one.
I will update if the buds are dry en trimmed 🍀✌️

Likes
18
Share


@BrownsBuds
Follow
Plants were left for 8 days between watering, the soil was very dry and plant leaves drooping. Watered them with 1 litre each yesterday but have noticed yellowing of leaves on the bottom. Thinking this might be due to under watering I am not sure. Apart from that the flowers themselves are looking fine. Night temps are now 18 deg and 24 daytime and humidity at 50% I have also now put in a small fan at floor level in the space of where the 4th pot was so this now gives lower air movement.

Processing
Likes
20
Share


@victor_lion
Follow
This is a strain that is very easy to grow and resistant, after the fourth week it sticks a lug, and does not need a lot of vitamins, it grew with only 13 and 12 hours of light and went through cloudy days and a lot of humidity

Likes
42
Share


@m0use
Follow
welcome everyone to my Strawberry Tent GrowOFF
I will be showcaseing 6 diffrent starberry autoflowers from 6 diffrent breeders, we will see what ones win the superfichal awards of: Best In Tent, Best Smell, Best Buds, Best Yeild, Best Taste, Best Form and Best High. 6 plants and 7 awards, I have a feeling some of the strains may take 2 or 3 of the awards and a few of them may not make it to fruition. The tests will be blind and then matched to a key at the end to find out who is who to avoid as much bias as I can given that I some of my firends will be the sole judges for most of these catagories.
+ [Best In Tent] = Over all best plant in the tent.
+ [Best Smell] = The best smelling plant based of my sences fresh & cured will be raited
+ [Best Buds] = The best looking buds visually, colour, density and frost will be raited
+ [Best Yeild] = The heavyist yeilder of them all, total grams/OZ will be raited
+ [Best Taste] = The tastyist tasteing buds, peronsal prefrence based on the gunipigs I outsouce to smoke/vape the buds.
+ [Best Form] = The best growth pattern and form out of the plants, nothing to strechy or compact.
+ [Best High] = The best feeling buds from getting stoned, peronsal prefrence based on the gunipigs I outsouce to smoke/vape the buds.
I would like to extend a big thank you for all the sponsors of this grow. From Lighting to Nutrients to the Seeds themselfs.
#1 Medic Grow LED Lights, I will be useing 2x 240w MiniSun2's dimmed to aorund 60-80% at peak flower.
https://medicgrow.com/
https://growdiaries.com/grow-lights/medic-grow
#2 Metrop Nutrients, They have sent me a starter pack that I will use to grow these ladies out. https://metrop.net/
https://metrop.store/products/startbox
#3 all the brands who donated to the cause, in no pictular order:
Exotic Seeds, Pure Instinto, Seedsman, Original Sensible Seeds, Fastbuds & *Barneys farm*
**indacate the seed was gifted to me from another grower and the breeder did not choose to partiscapte in this growOFF but are part of it anyway.
https://www.exoticseed.eu/products/strawberry-cola-auto
https://pureinstinto.com/product/strawberry-shortcake-autoflower-cannabis-seeds/
https://www.seedsman.com/us-en/strawberry-cheesecake-auto-feminised-seeds-sman-strchcake-auto-fem
https://originalsensible.com/original-sensible-seeds-strawberry-pie-auto~22096
https://2fast4buds.com/seeds/strawberry-pie-auto
https://www.barneysfarm.com/strawberry-cheesecake-auto-569
I will be growing these in a coir/perlite medium with liquid hydrophonic nutrients.
The pot size will be 2 Gal each for 12Gal total medium in a 2x4 tent under a potentinla maxium of 480W via the 2x Medic Grow Mini Sun 2's LED Lights. Germination methyod will be the same, soaking seeds in water then into the final pots medium.
They will be getting a 18/6 light scheulde from start to finish and a PH of between 6.2-6.5 for the entire grow. I will be useing some root incolulents to help the plants form a strong and healty realnship with the medium. From what I can tell this should go smoothly without many issues. I have a few good friedns on here who only grow in hydro so if I run into any issues I am going to hit them up and learn some new things.
Good Luck to all the brands competeing. I will host a question poll to see who thinks what one will susceed the most. and Maybe open it to eveyone to help rate the best looking buds catgory.
One thing to note is I am mixing all my nutrients into a massive pail that is about 2Gal and I mix it till it hits a desired EC point, so the measurements of ml/l is a bit of a guesstimate. I know its in the ruff ball park area of what I added but it could be off by a bit.
m0use


Likes
2
Share


@eldruida_lamota
Follow
Que pasa familia, vamos con la octava semana de floración de estas Orange Sherbet Fast Flowering, de FastBuds.
Agradezco a Agrobeta todos los kits obtenidos de ellos 🙏.
Vamos al lío, El ph se controla en 6.2 , la temperatura la tenemos entre 22/24 grados y la humedad ronda el 50%, añadimos ya varios productos de la gama de Agrobeta.
Las próximas semanas veremos cómo avanzan.
Agrobeta:
https://www.agrobeta.com/agrobetatiendaonline/36-abonos-canamo
Hasta aquí todo, Buenos humos 💨💨💨
Likes
Comments
Share

@Drtomb
Follow
Onto day 35 since flipping to 12/12. Ive basically gone into autopilot mode. The plants have completed the stretch and have really started to harden up the buds. This strain is a 60 Day strain however it will be running 67 days due to an upcoming trip.
Take a look at the video, everything is looking lovely.
Processing
Likes
18
Share


@CanadianFillmore
Follow
Week 8 begins, the final feed! Divine storm 1&2 are both looking good, however DS1 appears to be a bit bigger in size and bud development. Both ladies are very frosty, I definitely understand the hype around in house genetics!
Thanks for stopping by, tune in next week for the flush 👽🌳🔥
Likes
18
Share


@Dunk_Junk
Follow
Wow she's still growing nicely!!
27cm more this week!
She's looking nice.


Likes
9
Share


@GrowerGaz
Follow
Day 39
Just some light lst and removing a few fan leaves. Did the fourth water change today and upped the ppm to 0.9

Likes
7
Share


@ROY4L_GU4RD
Follow
Day 53 of flower today. I filled the reservoir from empty and stopped using the macro. I replaced it with General hydroponics Ripen at 5ml a gallon. Everything is frosty and smells good. As far looks I like the RC the best and the PE the least. I'm going to end up with a sheet ton of it out of the 3 so I hope I'm wrong! 😆
I'm going to do a lower defoliation mid week to get more air flowing. RH is stable but I just want to be careful 🧐 being this close to the finish line. This is definitely one of the easiest runs I've had. It seems PE is pretty maxed when it comes to nutrition but LMC and RC could take a bit more. My PE phenotype is super stretchy compared to them as well.


Likes
1
Share


@PositiveEnergy
Follow
Week 4 looks good gorilla zkittlez it’s beginning to flowering I will amend the soil soon

Likes
25
Share


@Kakui
Follow
Veg44, defoliación grande, y ajuste de amarras. Siempre digo que será la última defoliación y termino defoliando más, ahora a qué crezcan un poco más antes del cambio 12/12
Veg46, las plantas están ya recuperadas y creciendo a buen ritmo.
Veg48, riego con solo Sensizym y Sensi CalMag, con pH 6.3 y EC 0.8, drenaje de EC 1.9 y pH 6.1(ok). Debido al crecimiento de debe ajustar amarras y quitar una que otra hoja.

Likes
6
Share


@Flex1
Follow
Day 40 from sprout: The watering helped the 30gal out after 1 day.
3/30 and 4/1 i topped each plant and continue to tuck leaves. Some defoliation on the lower fan leaves that were touching the medium a bit. I will defoliate a little more this week. Scrog will come out in another week or so.
I am seeing some canoeing at the very top of each plant. Could be a pH thing or from heat but chances are its a pH thing. I'll keep an eye on it and lower the water pH i am giving it if it persists.
Gave the 2L pot some water (a little top and mostly bottom water) on 4/1. Medium was looking very dry on top but wasnt showing signs of needing water so i didnt give it much.

Likes
4
Share


@Leroybrown
Follow
Today is week 5 now since dropped in water to be honest I think these are growing slow compared to other peoples. I changed a couple of things like upped wattage of metal halide from 250 to 400 and started giving full strength nute from half strength which I should of give 3 quarter strength instead of full because I can see a slight tip burn so will back of a little. Water every day till run off. At some point this week I will top for the first time to get the main line thing up and going.
See you next week peace.
Likes
38
Share


@Wicked_Stix
Follow
Gorilla Cookies is growing well. Making some nice progress. I had to give them some organic calmag because that is all I could get locally but it seems to be working. pH has held steady and the leaf color is looking great on all the plants. Haven't had to do any maintainence this week other than defoliate a few bottom leaves and spread some branches out a little. Plants are growing bigger than I thought they would so I will have to figure something out to get them spread further apart soon. Just going to keep the juice pumping and the lights beaming. Hoping to get them under the QB lights soon. She is 28 days old in a 16 oz cup. No roots have grown out of the cup at any time. No roots have been trimmed or touched. Happy growing everyone!
Likes
5
Share


@Mr_nugs_lover_David
Follow
Her aroma is suuper citric and strong, beautiful strain to grow and very strong purple color, she's not gonna produce too much but like every girl in my garden she's gonna give top quality purple buds,the flowers are very sticky and frosty, can't wait to try her, she's got the exact same aroma as her sisters. So will see how she ends up performing on this diary peace 🌱💚✌️
Likes
33
Share


