The Grow Awards 2026 🏆 


Likes
Comments
Share
@MrRaid
Follow
It was an ugly short plant but big bud turned out well need to let it cure not hard to grow made a couple mistakes but still did well was hoping to get 70g but ended up with 56g

Likes
20
Share
@MeaCulpa
Follow
Hey Folks,
unfortunately “Olivia” didn’t make it. The seed came up and even “obstetric assistance” was in vain.
But all the other ladies are doing well.
I mixed in some leftover BioBizzLight and FullMix. About 10% each. Clay balls down there for about 10% as drainage. 70% is Plagron Coco.
I give 25% Light.
For my birthday there was a ProFan+20W for me. Every now and then you have to give yourself a gift. And I don't regret it. It provides good wind and is more economical than my old one.
I copied the “Homemade Airpots” from Lemonhazelover. Thank you again for that.
I wish everyone a nice weekend.


Processing
Likes
13
Share
@kevgrow
Follow
Hey Guys its End of week 3 from the day these girls were placed in a jar, hoping they are females :)
Plant #1 is looking great, started slow but picked up quickly
1st time of transplanting, it was a success, I was nervous.
1st week of nutrients, I tried to feed 1/3 to start
Looking forward in training and topping my plants in week 4. Hopefully ill be able to detect there genders.
Will read more info on cloning and will try to grow the same strains outdoors, off Course thats if they are girlas :)
Stay tuned guys and thanks for all the support!
Likes
229
Share
@Crashoverite
Follow
Week 6
Hi everyone 😀
So far this little grow it's a pure joy for me.
No major issues. One of the girls aka "Nuna" it's a bit late in flowering. She was bit shy from the start and last week defoliation definitely did not helped her but I'm sure she will catch to others. All 3 looking very healthy and growth is still very fast.
Still waiting for better flower development before apply any of the flowering nutrients. I have try this several times years back and results on yield were much better if flowering nutrients are applied later in flowering stage. Hopefully it works the same with autoflowers 🤞
Have a great week eweryone
I will keep updating this week progress every couple of days.
Thanks for stopping by
Peace ✌️
28/08 Day 36
Changed watering time schedule for the morning to keep humidity at night a bit lower level. During the 18h schedule humidity 50-55 at night up to 68.
30/08 Day 38
So far all good. Girls are growing still in rapid speed. I can tell this girl likes grow big leaves. I have just defoliate from the big ones just over a week ago and again back to the forest :)
31/08 Day 39
This morning soil was way too dry and need to poured almost 1 liter to each pot. From tomorrow 500-600ml per 24h.
02/09 Day 41
2 of the girls developing flowers very well and still growing in rapid speed. Noticed that 3rd girl having issues to switch to flowering.
Noticed some nutrients deficiency on 3 leaves. Using spring water for watering and must be to soft on calcium and magnesium. Have little hope that calmag will have this sorted. Started blooming nutrients + fish shit from today
03/09 Day 42
It's seems that slow develop girl started flowering :) not sure but possibly new nutrients and lowered humidity helped. Did some defoliation from bigger leaves on 2 better developed girls.
It's the end of the week 6
Stay tuned for more updates on following week.
Peace ✌️

Likes
26
Share
@Drgreen13
Follow
Enjoyed growing the red poison©️ just wish all 3 were purple but thats the luck of the draw i suppose. Spider farmer light still going strong after 2 years and my cheap ass iropro 250w light off amazon (90quid) seams to be alright for the space i have, i switched to hesi nutrients towards the end of this crop as i ran out and found it ideal that every i need is inside the hesi starter box, ill be interested to see the results in the next crop, so please follow for more diaries. Peace and stay high, stay fly. #420everyday


Likes
34
Share
@Hempface86
Follow
Ladies and gentlemen today is day 80 and as you can see, we still have a ways to go.. As always I'd like to thank Zamnesia Seeds and Plagron for putting this contest together 💚 .. as you guys can see, this girl has got some size to her especially for being in a smaller pot .. she is a little low on nitrogen but I don't think she has more than 3 weeks left so i'm kind of torn as to whether or not I should hit her with some .. i think next feeding, I'll give her a little nitrogen, and then that'll be it. Aside from another feeding or two of green sensation, then we flush .. i hope everybody's doing well and so are there ladies 🙏 .. god bless everybody and happy growin ✌️

Likes
12
Share
@I_Identify_As_A_Dan
Follow
Update on the back right plant that was having issues, flushed it seemed to continue pushing out yellow leaves. We've also just stopped load shedding so hopefully i wont have humidity spikes anymore😇
Still doing same minor defoliation of leaves hiding bud sights. Feels like were getting close to the end now. Starting to have in mind about flushing every plant but don't want to do that too prematurely 😛
Likes
5
Share
@CannaIGrow
Follow
Very few white pistols left. I have started checking tricomes now for peak harvest time (hopefully) lol. 11/9/22 Added tricome pics and video to this week. Starting to turn milky, which is what I want, so I'll be keeping an eye on her.
Likes
9
Share
@Lifesgarden420
Follow
This beautiful lady is getting huge and those nuggets are so dense they are so Frosty she is going to provide some wonderful rosin yeah yeah she's almost ready maybe two more weeks

Likes
2
Share
@Hidden
Follow
:
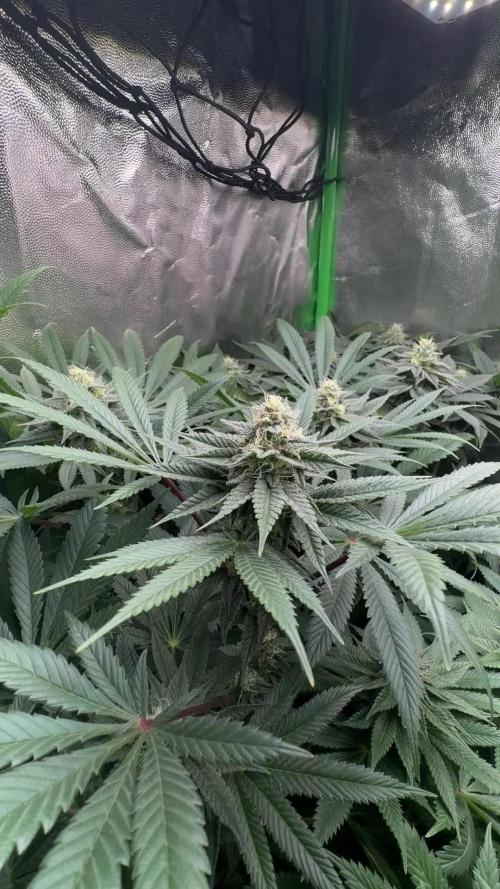
End of week #6, and I’m extremely happy with the results so far, especially considering the conditions inside the tent — it’s quite small with limited airflow. The plants are in full bloom and still bulking up nicely. A strong aroma is starting to fill the space (my roommates are already complaining about the smell!). I’ve been following the BioBizz feeding schedule to the letter, carefully keeping the pH between 6.3 and 6.5, and watering every other day without skipping nutrients. As shown in previous weeks, my RHC #2 has become the tallest plant, and it’s clearly the one that will produce the biggest and fattest colas. RHC #1, on the other hand, is denser but its colas aren’t as large. Overall, I’m very pleased with the progress and now eagerly waiting for the moment to start the drying process.
I assume that eventually the colas will start turning red, although there’s only about a 60% chance of that happening. RHC #1 is already showing some color on its leaves, which is a good sign. Once it’s fully mature, the colors should become more intense — hopefully shifting into a deep, vibrant red. I’m really looking forward to seeing that transformation take place as the plants reach their final stages.
😍
Likes
52
Share
@DogDoctorOfficial
Follow
I am absolutely in love with my Cosmos Girl from Royal Queen Seeds! She's growing beautifully and it's amazing to see her develop day by day. I was surprised to see that she's developing 3 branches per node, but it's clear that she's adapting well to her surroundings and growing strong. Her inter node space is great, which tells me that she's receiving the right amount of light and nutrients to grow properly.
I'm a big believer in using quality organic nutrients, and that's why I trust no other brand in organics than Aptus Holland. Their products have never let me down, and I know that I can rely on them to provide my plant with the best possible nutrients for her growth and development.
I was thrilled to see that Cosmos started her pre-flower stage on day 28. This is a crucial time in her development, as it marks the transition from vegetative growth to the flowering stage. I can't wait to see her produce flowers and eventually develop into beautiful buds!
Overall, I'm so passionate about this plant and I'm putting all of my love and attention into her growth. It's an amazing experience to see her thrive under my care, and I'm excited to see what the future holds for my Cosmos plant!
As she is entering the flower stage i did apply for the last time , may be lets see, NutriSpary, a must for me in all my gardens . NutriSpray from Aptus is a fantastic product that provides a range of benefits for plants during their growth and development. This product is designed to be used as a foliar spray, meaning it is applied directly to the leaves of the plant.
One of the main benefits of NutriSpray is that it contains a range of essential micronutrients that are necessary for plant growth. These micronutrients include iron, manganese, zinc, and copper, which are all crucial for healthy plant development. By providing these nutrients directly to the leaves of the plant, NutriSpray helps to ensure that they are absorbed quickly and efficiently, which can lead to faster growth and better overall health.
Another benefit of NutriSpray is that it can help to increase the plant's resistance to stress. This is because it contains plant extracts that are known to have anti-stress properties. By applying NutriSpray regularly, you can help to protect your plants from a range of environmental stresses, such as temperature changes, drought, and pests.
NutriSpray is also easy to use and can be applied at any time during the plant's growth cycle. Simply mix the recommended amount of NutriSpray with water and spray it directly onto the leaves of the plant. This product is especially useful during periods of rapid growth, when plants may need an extra boost of nutrients to keep up with their development.
Overall, NutriSpray from Aptus is a fantastic product that provides a range of benefits for plants. From providing essential micronutrients to increasing stress resistance, this product is an excellent choice for any grower who wants to ensure that their plants are healthy and strong.
Man so exited hahaha lets stay tuned on this one, i know i will hihihi she promises great things
As always thank you all for stopping by and for supporting me on this journey, i am super passion about growing and fell blessed to have you all with me on this new journey <3 <3 <3
Genetics - RQS COSMOS F1
Ligth - LUMATEK ZEUS 465 COMPACT PRO
Food - APTUS HOLLAND
All info and full product details can be find in can find @
https://www.royalqueenseeds.com
https://aptus-holland.com/
https://autopot.co.uk/
https://lumatek-lighting.com/
With true love comes happiness <3<3<3 Always believe in your self and always do things expecting nothing and with an open heart , be a giver and the universe will give back to you in ways you could not even imagine so <3<3<3
<3 <3 <3 Growers love to you all <3 <3 <3
Cosmos F1: The World's First F1 CBD Cannabis Variety
Cosmos F1 is the largest autoflowering cultivar in RQS catalogue of F1 hybrids. With her tall, typical Christmas tree structure and bright green foliage, Cosmos F1 is a testament to the beauty and vigour of Cannabis sativa. Plus, thanks to her pure genetics, which descend from Oregon CBD, she boasts the highest CBD concentration in our entire F1 seed selection.
Aromas, Flavors, and Effects of Cosmos F1: A Vibrant CBD Super Variety
True to the pure lineage from which she descends, Cosmos F1 boasts a delicious aroma that combines the freshness of crisp pine with the full-bodied, almost creamy aroma of modern Cookies varieties, and an unmistakable peppery bite. Thanks to her high concentration of CBD and low levels of THC, Cosmos F1 offers a balanced effect without intoxication. Cosmos F1’s terpene profile is dominated by myrcene, farnesene, limonene, pinene, and caryophyllene. Combined with high concentrations of CBD, Cosmos F1 produces a clear, meditative effect that relaxes the body while leaving the mind functioning and focused. Her effects help unite the mind and body, creating a state of cosmic order.

Likes
27
Share
@MrJones
Follow
OSS Cheese XXL
╰⊰🔹Started 03.10.24🔹╰⊰
🌾 - Popped The Seeds On 03.10.24
🌞 - Environment - 80F / 65% RH
🌾 - Training - Defoliating the buds as needed, a little at a time; they should be pretty clean by the time harvest comes.
⚱️ - 2-Gallon 📊6.2 PH
💧 - Feeding - Using Horti Late Bloom 0-24-26, Cal 12-0-0
🌞 - Mars Hydro FC-4800
🕷️ - IPM - CannControl from Mammoth and Mosquito Bits
╰⊰🔹WEEKLY REPORT🔹╰⊰
📝 Notes - This ends the two weeks of using the High Fortified P&K of the Horti-Late Bloom 0-24-26; you will be watering with H20 PHed to 6.2; when growing this strain, you are going to want to pull the branches down so buds at the nodes have plenty of airflow, stay on top of the defoliation, as this cultivar appears to be a leafy one, with that said these girls are worth growing the terpenes are strong with a foul citrus, definitely a likable skunk smell!
🗓️06.08.24 Feeding 2x Dail with Horti Cal and Horti Late Bloom
🗓️06.09.24 Feeding 2x Dail with Horti Cal and Horti Late Bloom
🗓️06.10.24 Feeding 2x Dail with Horti Cal and Horti Late Bloom
🗓️06.11.24 Feeding 2x Dail with Horti Cal and Horti Late Bloom
🗓️06.12.24 Feeding 2x Dail with Horti Cal and Horti Late Bloom
🗓️06.13.24 Feeding 2x Dail with Horti Cal and Horti Late Bloom
🗓️06.14.24 Feeding 2x Dail with Horti Cal and Horti Late Bloom
📝Fertigation injects fertilizers into an irrigation system to supply dissolved nutrients and water to crops.
╰⊰🔹STRAIN INFO🔹⊱╮
Cheese XXL cannabis seeds are a unique blend of Afghan Kush x Super Skunk, producing the most pungent dank weed. Cheese XXL is the third commercially available edition released by Original Sensible using and developing these Afghan and Skunk genetics. The first release of these genetics was their Skunk Afghani. The second improved version was Stinkin' Bishop, which had an enhanced and more potent THC content and was more intense in terms of smell. The third and improved release on a similar theme is this Cheese XXL, which has a similar THC content but an enhanced heavier yield. The smoke is incredible, with an outstanding flavor of pungent skunk and spicy, extra strong mature cheese created by the dominant terpene myrcene with its earthy solid scent accompanied by caryophyllene and pinene, which combine to create a peppery acrid cheesy odor. THC levels are exceptionally high in this Cheese strain, and the effect is well-balanced, developing mental and body relaxation with a remarkable alleviation of stress and depression.
The intense solid aroma starts early in the flowering period; if you're growing Cheese XXL indoors, you'll need plenty of ventilation to disperse these babies' stinky "road kill" aroma! Cheese XXL is a cheese strain suited to indoor setups and thrives outdoors well. These feminized marijuana seeds are incredibly resistant to mold and disease and produce a substantial harvest that professional and amateur growers can quickly achieve. These Cheese weed seeds are outstanding. Break open the buds ready for use, and you'll see why the stench will make your eyes water!
Cheese XXL from Original Sensible Seeds is a great choice to break into the commercial market of growing cannabis, so if you're looking to buy something special with extreme yield, potency, and flavor, Cheese XXL cannabis seeds are simply the best choice.

Likes
13
Share
@Robeeriegenetics
Follow
First week of flowering in the bag, trying out a new deep voice in my videos does it sound sexy? Let me know in the comments. seeing a little bit of stress on the leaves, but nothing major. The new developing growth is green so everything seems to be going well. I’m gonna give it another week and then I’ll defoliate. So far so good. having a little trouble reversing the wrath rock, candy icy cuts. but I’m not worried. I have backups of the mothers and I have backups of those backups so I’ll definitely still be able to take another shot after seeing the results from this grow ….


Likes
3
Share
@GrowBro87
Follow
Diese Woche habe ich beide Pflanzen entlaubt, sodass mehr Licht an die Blüten kommt. Gegossen wurde etwa alle 2-3 Tage und gedüngt nach Herstellerangabe mit 50% Wachstumsdünger und 50% Blütendünger. Beide Pflanzen entwickeln sich gut und ich hoffe es bleibt auch so.
Likes
8
Share
@MadeInGermany
Follow
Hey guys :-)
The lady has developed very nicely this week 👍.
Since there will be space in the flowering tent for the next 10 days and it will then be switched over, I will no longer use any training.
I'm looking forward to when the bloom starts :-)
Otherwise everything was cleaned and checked.
Have fun and stay healthy 💚🙏🏻
👇🏼👇🏼👇🏼👇🏼👇🏼👇🏼👇🏼👇🏼👇🏼👇🏼👇🏼👇🏼
You can buy this Nutrients at :
https://greenbuzzliquids.com/en/shop/
With the discount code: Made_in_Germany you get a discount of 15% on all products from an order value of 100 euros.
👇🏼👇🏼👇🏼👇🏼👇🏼👇🏼👇🏼👇🏼👇🏼👇🏼👇🏼👇🏼
You can buy this strain at :
Greenhouse seeds Company
Water 💧 💧💧
Osmosis water mixed with normal water (24 hours stale that the chlorine evaporates) to 0.2 EC. Add Cal / Mag to 0.4 Ec Ph with Organic Ph - to 5.8 - 6.4
MadeInGermany


Likes
Comments
Share
@Lucidite
Follow
Sat 7/8:
- Transplanted a runted Purple Lemonade auto into a small plastic pot (1/2 litre), from 3 gal fabric pot. Put it back in the veg tent where there is more room. It is wasting space in the flowering tent. Suspect over watering early on as issue.
- Shifted a Grapefruit auto from the veg tent to the flowering tent to replace the Purple Lemonade. A little early, so it is on a pedestal to reach the canopy.
- Planted a Fastberry and a Gorilla Cookie auto.
- Harvested 20g wet from the CBD20:1 (8w).
Sun 8/8:
- Changed light cycle from 18/6 to 20/4.
- Fed plants, varying mixture by plant age. CBD20:1 is now only on water at every feed.
- Tied main stem down on Grapefruit auto (3w).
- Set up endoscope camera to capture the Grapefruit response to LST.
- Continued lollipopping Strawberry Pie (5w) and Kosher Cake(4w).
Tues 10/8:
- both the Gorilla Cookie and the Fastberry seeds popped. I’ve put them under icecream containers in the veg tent so they don’t dry out too quickly.
Wed 11/8:
- Small targeted watering with no feed.
Thurs 12/8:
- feed plants that needed to be watered.
Sat 14/8:
- Harvested the remaining CBD20:1 at 9 weeks, 73g wet
- Harvested undersized Lemon Pie at 8 weeks, 26g wet.
- Planted a Gelato auto and a Wedding Cheesecake auto from Fast Buds.
Next weeks diary: https://growdiaries.com/diaries/118288-grow-journal-by-lucidite
Likes
73
Share
@Herbz_Unkraut
Follow
1 plant was very ripe, 1 plant was almost perfect to harvest and the 3rd could take another 1-2 weeks...but it was end of 10th week of flower and i had to go on vacation, so i perhaps choped 1 plant abit too early....still awesome result!
