
Likes
Comments
Share


@GrownwithLED
Follow
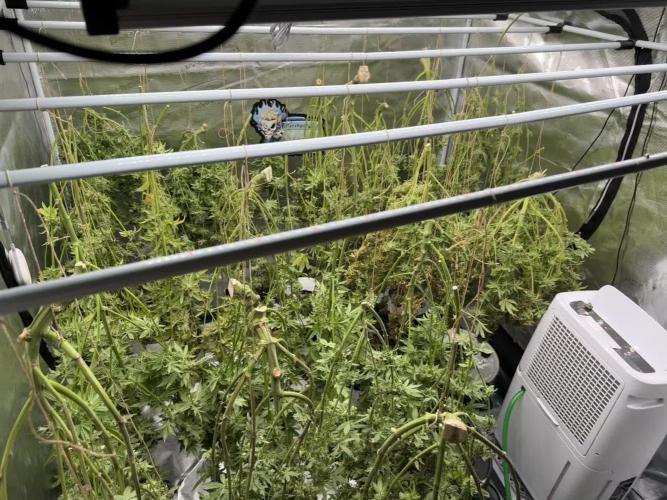
During week 7 the 3 plants continue to grow outstandingly well! The BADAZZ-CHEESE and ZHEETOS from BIG BUDDHA SEEDDS have a healthy green color and grow so much foliage that I have to defoliate on a regular basis. On day 43 (=flowering day 19) I take off all bigger fan leaves in order to ensure a better airflow thru the closet. The humidity is unfortunately still on the high side and sometimes exceeds 80% in the daily maximum, that is MUCH too high during flowering. I increased the dose of BIO NOVA nutrients according to their feeding scheme and all plants LOVE IT! The ZHEETOS #1 plant grows much taller than her sister ZHEETOS #2, therefore I decide to SUPER-CROP her on Day 48 (=FD 23). This technique developed by SOMA from SOMA-SEEDS is one of my favorites and I use it since years in order to bush out plants, which grow to high. Appr. 15-20 cm from the top of the plant, right above an internode, I take the main stem between two fingers and press very hard until I can feel the fibres inside the stem brake. By slowly pressing all around the diameter of the stem I create a weak spot at which I bend over the stem, so it looks 90-180 degrees downward. I do this very carefully to NOT BRAKE the outer skin of the stem while I bend the stem downwards. Even if some fibres brake, the stem will repair itself within a few days to a week and then start to point upwards again...👍😃 During the time the main stem needs to repair itself, all other side-stems will grow more upwards and this makes the plant bush out more. At the same time a super-cropped plant will produce bigger buds at harvest time, than a plant where you did not do that. Somehow the plant reacts to being hurt by getting stronger and producing more! CHECK OUT THE VIDEO ABOVE TO SEE ME SUPER-CROP! 😎 I also took a video ONE DAY after the procedure (on DAY 49), in order to show how resilient the plant is and how much she immediately repairs herself. Already then the main top has turned and points upwards to the light again, ITS FANTASTIC TO SEE! Simply a miracle plant...


Likes
3
Share


@PhinolaGreen
Follow
Bilder und weitere Informationen folgen im weiteren Verlauf. Ich bin soweit zufrieden, die Ladys hängen jetzt zum Trocknen.

Likes
24
Share


@DeepRootsGrowTrees
Follow
SWISS DREAM ROSE🌹 CBD AUTO
KANNABIA SEEDS
WEEK #5 Overall June 23rd-30th
Week #2 Flower
This week I had to adjust the feeding a little as she got a few burn spots on the leaves new organic soil and nutrients so learning what the plant wants and doesn't want.
Stay Growing!!
Kannabia.com
SWISS DREAM RIDE🌹 AUTO


Likes
14
Share


@Grandillustrator
Follow
Really liked the growing the strain , smells were unreal and a nice smooth bit of smoke 💨 will be trying more sweet seeds strains

Likes
13
Share

@DeepRootsGrowTrees
Follow
JOANNE'S CBD / ROYAL QUEEN SEEDS
WEEK #13 OVERALL
WEEK #1 FLOWER
This week she was flipped to 12/12
starting her first week of flower she's almost caught up to the other plants she's still a little smaller but doing her thing!! Stay Growing!!
Thank you for stopping by and taking a look it's much appreciated!!
THANK YOU ROYAL QUEEN SEEDS!!
BUDTRAINER.COM BUD CLIPS
ROYAL QUEEN SEEDS / JOANNE'S CBD


Processing
Likes
14
Share


@kevgrow
Follow
Hey Friends, end of Week 10 from seed
Colas are looking Very nice
Noticed some orange color on some leaf tips so I lowered the amount nutrition when feeding
I used a magnifier to have a closer look at the colas, trichomes used to looked like little crystals, now they are bigger and cloudy.
So far no amber coloring on trichomes
I need some advice as to when I should begin flushing and harvest
Smell is slowly getting stronger, like a muffin with a small touch of gas ⛽️
Looking Forward in seeing some bud growth in the following week, will keep you guys posted!
Likes
1
Share


@fabialien
Follow
Lunes 19 Agosto 2024
Primera semana de plangulas, desafortunadamente solo dos de 4 blueberrys se dieron, de orange Blossom 3 de 3, una va muy débil pero las demás van muy muy bien, a ver que tal se van desarrollando.

Likes
33
Share


@Master_weeda
Follow
Bonjour à tous les padawans et maîtres jedis
Pour cette semaine début du rinçage car les trichomes sont bien laiteux et commence à ambré
j'arrose donc avec 2 litres d'eau ph6.3
Je réitère à chaque fois que le pot est léger pendant une dizaine de jours
Une belle plante avec une forte odeur je me languis de la goûter elle sent vraiment très bon

Likes
13
Share


@GanjaFarmar
Follow
Okay so my favourite batch of all. This plant smells soo citrusy and fruity! Its got a similar texture and smell to Amnesia.
Ive been flushing these for the past week. Hopefully harvest these this week.
Not bad for no training and topping.
Ill be posting soon this week about the harvest!
One love!

Likes
23
Share


@Puraweeda
Follow
Uniquement de l'eau à l'arrosage. Je réduis progressivement le temps de lumière. Puissance de la lampe 60% à cause de la chaleur.

Likes
11
Share


@Goltala
Follow
week 2 - bumped up the lux from 8k to 20k
Noticed some rust spots possibly due to calcium deficiency so I fed with calimagic.
Growing fast!

Likes
184
Share


@OrganicNature420
Follow
Germination date 🌱 12/07/2021
Day 57 09/09/2021
Strain 🍁 SinCity seeds YUZU SORBET
(Purple yuzu x whitenightmare)
THC% • Unknown
💡 Mars Hydro FC4800
• Power draw 480W + 5%
• Max coverage 5 x 5
• LED 2070pcsSamsungLM30B1&Osram660nm
• Max Yield 2.5g / watt
• Noise level 0 DB
• Removable Driver +2m cable
• Daisy chain (multiple lights)
https://marshydroled.co.uk/products/mars-hydro-fc-4800-led-grow-light-samsunglm301b-commercial-greenhouse-medical-indoor-kit 🇬🇧
https://www.mars-hydro.com/buy-fc-4800-480w-4x4-energy-saving-full-spectrum-commercial-led-grow-light-mars-hydro-for-sale 🇺🇸
PROMO CODE • (ORG420) DISCOUNT 👍🏻 marshydroled.com
⛺ Mars Hydro 120 x 120 x 200cm
📤📥 AC infinity 6inch
💧 10lt dehumidifier
❄️ 3.1kw air con system
💉 Nutrients GreenBuzzLiquids
Organic Grow Liquid • 1-4ml until 2wk flower
Organic Bloom Liquid • 2-4ml flower stage
Organic More PK • 2-4ml +wk3 of flower
Organic Calmag • 1-2ml/lt whole grow
Fast Plants Spray • first 3days at night lights off
More Roots • 2-5ml veg +2wks flower
Fast Buds • 5ml +wk2 of veg until 1wk flower
Humic Acid Plus • 2-5ml whole grow
Growzyme • 2-5ml whole grow
Big Fruits • 2-5ml flower stage
Clean Fruits • 5ml flush 1wk
Ph powder
Root Gel
Living Organics
PROMO CODE • organicnature420 15% off ✌️🏼
https://greenbuzzliquids.com/
🥥 Growing Media • Coco Coir
Notes 📝
The only one showing leaf damage. Not entirely sure what it is but doesn't seem to effecting plant growth or the other 3. Been taking off any leafs with brown spots on and to be fair its been minimal 3 or 4 at most. Did see some small fruit flys In the room so will have to give the room a spray down. Apart from that the girls are looking healthy.
Lights been turned upto %75 for week 2 of flower so will see how it goes 👍🏻💡 .. girls loving the light well happy with the FC4800.. energy saving compared to the spiderfarmer. I was running spiderfarmer full power by end of veg and that was around 440w from the wall. The FC4800 has only been pulling half of that from the wall and even now at %75 is still only running 360watts.. money saver and Plants are looking beast.
Nutrients are killing it, no problems at all. This is only my 2nd coco grow and 1st with this Nutrient company. Brilliant community with greenbuzz, help always at hand if you need it 👍🏻 massive thanks to both company's for letting me try out their products 💚💡💉
Happy growing fam ❤️🌱🍁👍🏻
Likes
1
Share

@Ninjabuds
Follow
Growace.com air cube discount code NINJABUDS
ELUFAH.com and amazon Elufah products discount code NINJABUDS
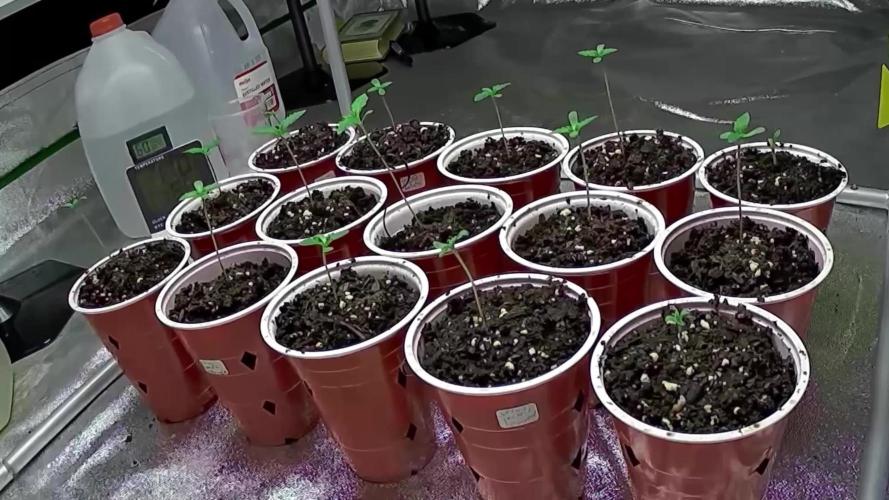
I finally choose witch 6 plants I am going to keep and I transplanted them into the air cubes
Slurricaine was a hard one to choose both of the seedlings were both healthy and strong
Also I set up the grow pro’s under canopy lights getting them ready for when the plants are ready for those to kick on
Likes
22
Share


@Changman
Follow
What a surprising week this has been. Unfortunately our Elixir CBD instead of producing a healthy 20 to 30 grams dry yeild has seemed to know only expect to give us 5 grams if we lucky😞.Our Pineapple Express#2 is growing expectionally well standing at 42CM all she needs is some training hopefully its not too late.Our Blue Cheese is 7CM and Granddaddy black is 3CM.Our GSC is now about 12CM and our Purple Kush is about 17CM and Hindu Kush about 19CM they have all began training.


Likes
1
Share


@illyrian
Follow
I'm usually in the ph 6.4 / 6.5 flowering cycle and I went up to ppm 1800 / 2000
Canna flowering AB- pk13-14 -cannazym - boost my plants seem to like it. I'm open to your comments.
Likes
89
Share


@Nebula420
Follow
Finally I begin grow report of strain Gorilla Girl from Sweet Seeds,
Thanks you Sweet Seeds)))😘 The last time the plants blew away wind, and rip.😇
I love cookies, Gorilla girl is a sativa dominant hybrid of the legendary Gorilla Glue X Girl Scout Cookies.
Vegetation: will be in the outdoor for 35-40 days for natural light,
Flowering: in Indoor with 600w HID lamp,
Nutrients: from GHE, and Advanced Nutrients .
Pot Size: 4Gal - soil/perlite 50/50.
Gorilla Girl : This strain is the resulting hybrid from the cross between two of the most famous and powerful genetics coming from the USA: Gorilla Glue X Girl Scout Cookies.
The GSC specimen used for this cross comes from the phenotype known as “Thin Mint”. An Indica-Sativa hybrid with Sativa predominance.
Gorilla Girl®️ is a strain with a very powerful effect, featuring very high THC levels that can reach to between 20% and 25% in optimum growing conditions. Some specimens can even exceed these levels. The resin production of this strain is copious, covering all the flower calyxes with aromatic trichomes. The buds are very resinous and compact.
Gorilla Girl®️ features intense taste and aroma, with cypress tones and a touch of wood, complemented with hints of earth and citrus.
The plants look like balanced Indica-Sativa hybrids, very productive and vigorous, with long and flexible side branches.
Indica/Sativa 40% / 60%
THC 19-25%
CBD 0,1%
Indoor Yield 400-550 g/m2
Outdoor Yield 350-600 g/plant
Indoor Blooming 9 weeks
Outdoor Harvest late September
Sex Feminized
Effects Psychoactive, Euphoria, Stimulating, Creativity, Happiness
Flavor Cypress, CITRIC, Earthy, Woody


Likes
33
Share


@PEAKYPLANTERS
Follow
Welcome back together again, brother farmers.We meet again together to test qquqques We get together again to discuss a new variety from the catalog of our friends at wse
The photos speak for themselves ... it is one of the fastest varieties in this tent.
He follows the feeding respecting the times and with a little training a nice bush has opened 🌱😉
