
Likes
Comments
Share


@Major_Perkinsly
Follow
Just about ready for harvest. Middle of this week will be 9 weeks of flower. I think they still need just a few more days. I had a chance to sample some nuggage I've trimmed in the past week or two and it's really got my excitement through the roof
Happy with the way they look overall. Buds could be a bit bigger but can't really complain for my first grow. Have had issues with humidity and temp all winter. Apartment is too drafty for hvac to keep up. Not to mention the issue with the power loss a few weeks ago. Really just happy that it worked lol... looking forward to spring / summer
If I'm being completely honest, the tent smells like literal dogshit when I unzip it. But if i rub a sugar leaf between two fingers it smells like DANK. Very strong piney smell which I'm pleased with lol. The smell has emanated from the tent the past two weeks or so. Carbon filter has had trouble the scent is kind of overpowering
Can't keep my eyes off plant C; literally dripping in trichomes. It might be the smallest but it's the prettiest for sure. Check out the video. Plant D has the most bud mass.
Over the past few weeks I've been trimming away some of the lower bud sites and fan leaves along with some of the dying fan leaves. This is plants second week without nutes so as expected leaves are starting to turn darker in color. Likely will cut out water for a couple days right before cutting
Likes
118
Share


@GERGrowDesigns
Follow
Welcome to Week 8 or Flower Week 4 //Media From Day 49- 59 of Fast Version B Strain:
-Designers Club -
Special Thanks to John for hopping through my Messages to Join The SSSC/DP Photo
The Project will be Supported by Narcos Seeds to give the Strain the Perfect lifespan it could Deserve .
Light used for The Contest Grow :
Tenty Pro x4 200w in a space of
60x60 Homebox Ambiente Tent.
Were only Starting with 2 Plants from Fast Version B . One didnt worked well .
Both Topped Early at Day 9 as Project and Time Deadline from Contest .
Everything Doing Well ive done some Mainlining and Defoliation over the days .One Growed a little bit special at the topping .
Switched to Flower 12/12 today on Day 28 .
Installed Scrog System at Day 29
Nutriets used/using now in Flower Week 4 :
-Narcos Root Stim
-Narcos Bloom Stim
-Narcos Hydro A+B
-Narcos Magic Boost
-Narcos Narcozyme
-Narcos PK 13/14
-Narcos K20
-Narcos Crystal Sugar
Enough Talk from me , just Enjoy youre Seats and be a part of The Designers Club .
Good Luck to Everybody and Keep up Growing !
Likes
24
Share


@PrairieFrostGrow
Follow
*****Week 14 growth – March 6 to 12, 2021 – Week 5 flower ******
This girl keeps chugging along. Her resin rails are looking awesome. A little dark green maybe but not worried. Looking for some bud swelling to kick in!!
Bud Fusion being introduced this week. Into the last phase of feeding during flower now. Nitrogen is continued to be reduced as its late flower. Keeping up the feeding ppm this week as we are getting to the end. May be pushing them a little more than I should but finding out how they react for next run.
Still continuing to play with the light intensity and seeing how the girls react to my environment conditions when pushed harder. Could have backed off and stayed with 100, 300, 600, 900 PAR levels at the different stages but I have trying to go a little higher in the late stages and going over 1,000 PAR.
Little more detail…..
Mar 6/21, Day 29
- Dry out day
- Changed light cycle to 11/13 today to help with light intensity and reducing DLI.
- Light power reduced to 425 watts
Mar 7/21, Day 30
- Keeping up the feeding but reducing nitrogen.
- feeding with micro – 1.5, bloom – 2.5, ult B – 0.5, carbs – 1, B Storm – 2, S Storm – 2.5, Bud Fusion 0.15gr/l, Terp – 1.5, Jet Fuel – 0.5, Rezin 1
- 1150ppm and 6.0pH
- 2.5L
Mar 8/21, Day 31
- Watering with 2L feed from yesterday and 16L plain water
- Over shot the pH
- 400ppm and 5.9pH
Mar 9/21, Day 32
- Feeding again with Grow – 0.5, Micro – 1, Bloom – 1.5, Carbs – 1, Magnifical – 1
- Didn’t add many of the supplements
- 875ppm and 6.0pH
- 2.5L
Mar 10/21, Day 33
- Middle of the week and just giving some enzymes today
- Enzymes – 1.5ml
- 300ppm and 6.1pH
- 3L
Mar 11/21, Day 34
- Microbes again today
- Tap water with Jet Fuel – 1ml, Terpinator – 2ml, Nature’s Candy – 1.5ml, Rezin – 1ml, Ultimate B+ - 0.5ml, Recharge – 1tsp/gal
- 800ppm and 6.0pH
- 3L
Mar 12/21, Day 35
- Dry out day
- Been feed a couple of times this week so work with ¾ strength next week.
Likes
2
Share

@Nillenium
Follow
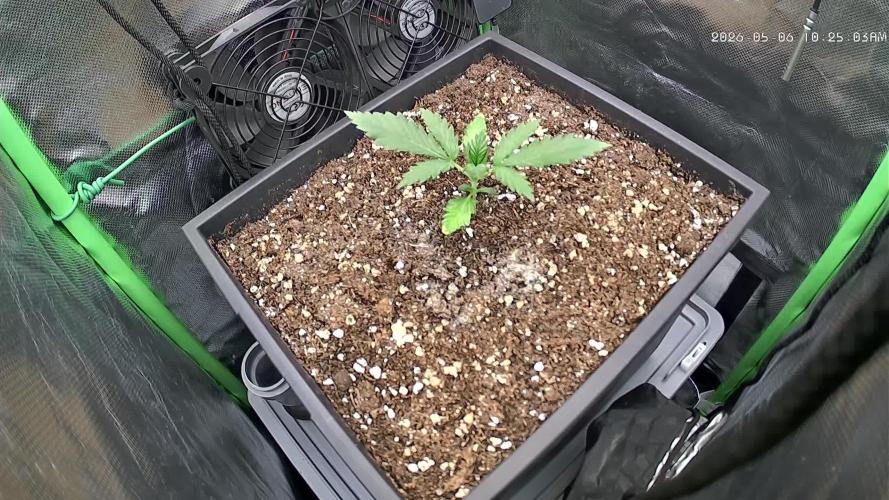
Woche 3
Dieses mal habe ich die Pflanze getoppt.
Ein bißchen LST gab es auch zum Ende der Woche und der Tank wurde komplett aufgefüllt.
Nun muss die gute 10 Tage alleine auskommen.

Likes
5
Share


@BombBuds
Follow
Letzte Woche!
Einmal noch gießen aber nur wenig damit die bissl trockenstress haben und trichome nochmal anziehen.
Keinen Dünger mehr und nur noch ph neutrales Wasser.
Geruch ist super geil! Aussehen ist auch ne 10/10. bin sehr gespannt aufs Endprodukt!
Likes
57
Share


@Silverback_Guerilla
Follow
2/8 - 2/14:
Still have the BJ's and GG's on plain water with Liquidsoil. I expect their last night alive will be next Friday.

Likes
10
Share


@Certifyed252
Follow
This week was a breeze...found a nice routine...plants are healthy...nothin to it👏👏👏 until next time growers...waitin on this budshow to start in the meantime 🤙🤟✈️

Likes
1
Share

@HoneyBlunt42
Follow
Day 84
The Durban plants are actively growing foliage and reaching for the light, despite being bent. Every day after the lights go out, I bend their tops parallel to the floor (training). Sometimes the stems break slightly, but they are still flexible enough to recover. In 2-3 weeks, I plan to transplant them to a permanent location, where there will be 20-30 cm of space above the tops for ventilation.
In the next cycle, I think four weeks of vegetation will be enough for ripening. At Gordem Delicatesies (GD), Brazilians have stretched in 20 weeks, sometimes faster. For me, this variety develops more slowly; I'm not chasing maximum speed. Meanwhile, the Jack Herer is ripening in the box above them.
I'm waiting for a manicure table (thanks to Mila for the tip!). As soon as it arrives, I'll start harvesting. I'm glad that with this device I can meet the deadlines precisely.
Day 87
They hit a lamp and set one top on fire. The others miraculously survived. Today I tied the plants to their pots again with wire. I bent them so they were 10-15 cm from the lamp.
Some were tighter. I cut out a 5-liter bag containing the lower branches, which were turning yellow from lack of light, and the leaves the plant had shed on its own. Watering was light but regular.
I watered 3 liters by hand on top of the automatic watering. I added 1.5 liters of Simplex Taste and 1.5 liters of Simplex Aroma Punch. I started adding Simplex SilliX again—organic silicon is needed to strengthen the stems. Right now they look rather stiff; they bend easily by hand. This is a plus in my situation, but in a couple of weeks I want to see stronger, more vigorous central colas in the box.
Mold was appearing on the dry leaves at the bottom that I didn't remove in time. I took out all the bushes and carefully removed all the dry and yellow leaves. I chose the ones that came off without effort. Their plant has already finished growing. After this procedure, the fan was able to blow air through the base, meaning less mold.
Young buds are ripening on both plants, about 1 cm in diameter. The upper leaves and flowers are healthy; they were eating the lower burdock leaves. It's interesting to watch the biofertilizer from Greens work. I'll add Simplex Mass and Simplex Power separately in the next few days. And after that, HB-101. I'll water with Fitosporin at least once. I also want to add "33 Bogatyrs" bacteria – @NBRZ recommended it.
Once a week, I manually pour a liter of solution with Simplex Taste (very similar to horse manure from the garden) and Simplex Aroma Punch – a potassium-sulfur additive to enhance aroma and flavor.

Likes
2
Share


@HashishOculus
Follow
Days 49–55 | June 23–29
The tent’s getting noticeably more fragrant - those complex notes of citrus, pine, and cardamom are now joined by a sharper diesel layer when the buds are disturbed. Buds are visibly denser this week, especially on the main colas. Stacking is steady, and trichomes are beginning to cloud ever so slightly, though most remain clear. No amber yet.
Lower leaf yellowing has continued - older fans fading out slowly - but now I’m starting to see yellowing creep up into the mid and upper canopy. Nothing aggressive, but it’s definitely progressed since last week. Fan leaves are still perky, and sugar leaves remain healthy, so I don’t suspect toxicity or major imbalance - just a steady drain of mobile nutrients as the plant puts all energy into flowers.
Fed with full nutrients mid-week (2L: 3 mL Micro / 1.5 mL Grow / 3.75 mL Bloom, pH 6.4), and removed a couple of fully yellowed fans from underneath. Soil has stayed evenly moist with good bag weight - I've been careful not to overdo watering volume to avoid damp pockets. RH is steady around 50–55%, with temps hovering ~25°C. VPD is within range.
No signs of foxtailing, stress, or pest pressure. Canopy is even under the trellis, light at ~36 cm above tops. Still tracking macros regularly - trichomes developing well.
Flush date is locked in for Week 11, based on travel plans - not trichome maturity. For now, the feed rhythm continues, and I’ll ride the line as long as I can to bulk up the flowers before transition.
Final swell ahead. Holding the line.

Likes
1
Share


@Herbangardener671
Follow
Vaped some lower buds and the taste is as advertised like tropical fruit or fruity pebbles

Likes
11
Share


@Krissci
Follow
Day 1 - watering and defoliation of both plants.
MC1 needed a trim badly to expose the nodes.
Mc2 much larger nodes naturally..light we defoliation
Likes
1
Share

@StillBlazin
Follow
Flower day 22 now, I planted the cuts 48 days ago I’m very happy with it. Defoliation on day 20 was very tough the strain has many small leafs took me and my girlfriend 4hours😤😅

Likes
241
Share


@Tropicannibis_Todd
Follow
💩Holy Crap We Are Back At It And Loving It💩
Growmies we are at DAY 35 and she's just killing💀it👌
👉We are in the Preflower stretch 👈
OMG I LOVE THE PINK PISTOLS 👈
So Shit , I gave them just a tad to much nutes on the last feeding 👈 But I have since fixed it
So I'm starting to pull her over and do some low stress training 🙃 and some defolation 😳
Lights being readjusted and chart updated .........👍rain water to be used entire growth👈
👉I used NutriNPK for nutrients for my grows and welcome anyone to give them a try .👈
👉 www.nutrinpk.com 👈
NutriNPK Cal MAG 14-0-14
NutriNPK Grow 28-14-14
NutriNPK Bloom 8-20-30
NutriNPK Bloom Booster 0-52-34
I GOT MULTIPLE DIARIES ON THE GO 😱 please check them out 😎
👉THANKS FOR TAKING THE TIME TO GO OVER MY DIARIES 👈
Likes
16
Share


@DudeGrowsWeed
Follow
This was the first grow of my own, and it went pretty smooth overall. I'll update the outcome, tastes & effects after it has dried. growdiaries.com has been a great experience so far, very happy! 😀
Final dry weight was 2.4oz!!!👍
Likes
28
Share


@Regenwurm
Follow
In dieser Woche wurden die Ladies einmal entlaubt und normal gegossen! Klimabedingungen sind gut, (Ich habe den Abstand etwas vergrößert auf 40 cm und fahre jetzt bei 100% um den korrekten ppfd wert zu haben und etwas mehr Wärme rein zu geben ) und die Blütebildung ist in vollem Gange …. Das Wachstum war diese Woche sehr gering…1-2 cm! Diese Woche gibt es das letzte mal Enzyme und der EC Wert steigt auf ca. 2.1 .
1 Pflanze (die kleinere) hat deutlich zugenommen und hat jetzt die gleiche Größe, die Blütenbildung ist jedoch leicht versetzt, so ca. 1 Woche zurück !
Tage der Keimungsphase = 5 Tage.
Tage in Wachstum = 21 Tage
Tage in der Blüte= 28 Tage
Gesamtzeit= 54 Tage
Wachstum h = ca. 2 cm
2 mal in dieser Woche mit Purolyt Mischung 1:25 besprüht
Lichtstärke: 100 %
PPFD: ca. 720 umol
Lichtabstand: 40 cm
Std Tag/Nacht: 18/12
Temperatur Tag: ca. 25,0 Grad
RLF Tag: 60%
Temperatur Nacht: 21 Grad
RLF Nacht: ca. 60 %
VPD Wert: ca. 0,9
PH Wert Wasser/Düngelösung: 5,8
EC Wert: 2,1
Ventilator Oszillation: Stufe 1
Befeuchter: an
Entfeuchter: an
Zusätzlicher Entfeuchter: 1 Stk. außerhalb vom Zelt im Raum
Bewässerung: 6* bewässert mit Wasser/Dünger mit den o.g. Mengen
Purolyt Besprühung: 2 mal
Controlling: Grow Control
Dünger: Plagron Coco
Licht: Pro Emit Vollspektrum
Abluft: EC Carbon Active 750 m3
Likes
22
Share


@Ghostguy1337
Follow
I am shocked at how beautiful these nugs are...I have never seen so many fat nugs in my life. Sticky, dense. I can wait until they are dried and cured.
Update: found some mold on 4 of my nicest nugs, so i trashed them. A real shame. I had to go away for a few days and i think it was a combo of having dense colas, with a humidity around 60%. Live and learn for next grow. Still have plenty left.

Likes
18
Share


@xtchill
Follow
Flipped to flower this week.
Experimenting with the short veg from seed.
Fingers crossed they bounce.

Likes
4
Share


@Urunascar
Follow
Las retiré de la luz LED para pasarlas a floración, enmende el suelo con compost de la vermicompostera, bokashi, restos de una pequeña poda de bajos mínima (para descartar ciertas ramas que se veían feas) y cubrí con mulch.
La alimentación va a ser esta durante las primeras 2 semanas de flora, luego 3 semanas igual pero sin el FPJ, quizás le de más potencia con un bioflores de biocanna qué tengo de sobra del año pasado.
Iba a hacer lst pero apenas intente mover hacia abajo las dos principales se abrió al medio, selle con precinto, a rezar para que se cicatrice bien de manera sana, esta semana voy a echarle trichodermas en la zona por las dudas


Likes
1
Share

@all_about_420
Follow
Ein kleines Highlight rettet das Logbuch dieser Woche: Ein 17-sekündiges Zeitraffer-Video dokumentiert die Tage meiner Abwesenheit. Während im ersten Teil primär die RS11 im Fokus steht, lässt sich im zweiten Abschnitt die Entwicklung dieser Lady hervorragend nachvollziehen. Das Bildmaterial offenbart jedoch auch die prognostizierte Schwachstelle. Die langen, grazilen Blütenstränge beginnen unter dem zunehmenden Gewicht der Blütenbildung nach und nach umzukippen und lehnen sich bereits deutlich gegen die Zeltwand. Der Babysitter hat in dieser Hinsicht leider nicht eingegriffen, sodass die Stabilisierung der Traphouse Genetics nun ganz oben auf der To-Do-Liste für meine Rückkehr steht. Die Harz- und Blütenproduktion läuft ungeachtet dessen auf Hochtouren weiter.


