The Grow Awards 2026 🏆 


Likes
Comments
Share
@4F1M6
Follow
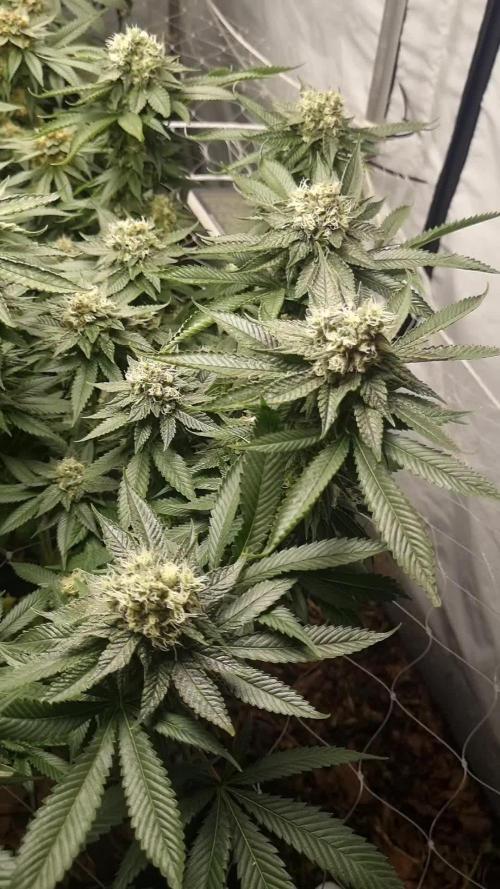
This ladys packing on to 4 fatty colas and stacking them to the tits. She has other branches obviously lol but the 4 colas are all sharing dominance and really getting fat. Bud structre is really coming in now. Very round and dense. Lots of flowers already piled on at every bud site. Trichomes are piling on thick already. This is gunna get mighty frosty!
I reduced the nitrogen dose again. I also stopped giving her vigorous. Its a pure bloom mix now as this lady is booming with flowers. Until next update. Happy growing and stay lit fam.

Likes
16
Share
@osmrducks
Follow
Day 29: The girls are looking great. I upped the nutes yesterday, as I have been giving them barely any at all. Will up them once again on next feeding. Looking like tomorrow. The main branch that I snapped off did not make it. Lesson learned on that one.
Day 30: Removed all other lights and added the HLG 550 V2 RSpec. Did some defoliation on the girls along with another feeding. Will do straight PH'd water next go. The girls are looking strong and healthy. 💪 Just on the small side. Still having to leave the tent wide open to subside temps and humidity.
Day 31: Nothing new to report. Looking very short and stubby and healthy!!
Day 32: Looking like they had some good stretching going on over the 3-day weekend. Will be needing fed tomorrow after work. May water a little less this time, as it is taking 2-3 days for them to dry out.
Day 33: Great stretch and bloom on the girls today! They are looking super healthy and strong! 💪 No smell yet.
Day 34: Girls are looking decent. Noticed some rusty looking splotches on the leaves. I'm thinking possibly Cal-Mag deficiency? Not sure.
Day 35: Not looking too happy today. I let them dry completely and watered with only Cal-Mag. Hoping the patchiness clears up for them!

Processing
Likes
2
Share
@Cogollo_eu
Follow
**Encontrarás la traducción a español al final de la descripción**
From/Desde: 09/09/19 || To/Hasta: 15/09/19
From day/Desde día: 08 || To day/Hasta día: 14
Blueberry Cookies Diary / Diario de las BlueBerry Cookies:
https://growdiaries.com/diaries/38769-dinafem-039-s-blueberry-cookies-at-the-ocean
-----IMAGES & VIDEOS-----
V1 - Transplanting day. I'm using 10 l Aeropots as final recipient. I've used:
- Small layer of ATAMI HydroRokz (perlite) at the bottom of the pot, just for cover bottom holes and to retain a bit of humidity
- Over the perlite i placed 1l of mixture with BioBizz "All Mix" and Volcanic Soil
- Again over, 1l of mixture with BioBizz "Light Mix" + Volcanic Soil & Guano
- And filled the rest with BioBizz "Light Mix" + Volcanic Soil
It's the second time that i broke half of the roots of a plant doing a transplant, It happened to me just for not being careful enough to hold the soil by the lower part. While this is no good, no further signs of that mistake other than the recorded video ;).
V2 - Quick show up on how to correct the color of photos taken under red/ping/purple light.
First I merge the HDR image from 3 bracketed shots, then I apply my custom color adjustment in the HDR resulting image.
As i show in the video, to correct the red light, you have to enhance the blue and green curves, just play with a point in the curves until you find the best adjustment for each of both curves. Then you should go to tones, and play a bit with reds, pinks & purples... and.... Voilá, you can see the results, easy and effective..... but no more easy than using the right white spectrum.
P1 - Cookies Showdown before transplant
P7 - Volcanic soil and Guano
-----WEEK SUMMARY-----
This week was very easy, i didn't do anything to these babies apart from the transplant. This is the first time im mixing something with the soil, I hope not to overfeed the Cookies with the nutes, as i'm going to use the same nutrients i was using.
The first 10 days they were growing in my 60x60x40 tent (DP60), with a terrible chinese light that i always use the first week wen I plant.
PandaGrow 100W (50W draw) - http://www.pdgrow.com/index.php?m=Show&a=index&cid=12&id=53
So after transplanting when i place the plans under the Quantum Board or the Platinum LED, i've notice it on them immediately, they really don't like this kind of chinese lights.
Thus after the transplant the plants has started to grow and wide much more and much quickly.
-----WATERING CALENDAR-----
12/09/19 DAY 11 - 1,5 l after transplant with all week nutrients @ 0.8 EC & PH5.8
*****ESPAÑOL*****
-----IMÁGENES & VÍDEOS-----
V1 - Día de transplante. Transplantaré a AeroPots de 10 l. Para el transplante he usado:
- Una capa pequeña de ATAMI HydroRokz (perlita) en el fondo de los tiestos, sólo para cubrir los agujeros y retener un pelín de humedad.
- Encima de la perlita he puesto 1 l de mezcla de BioBizz "All-Mix" con tierra volcánica
- De nuevo encima he puesto otro litro de mezcla de BioBizz "Light-Mix" con guano y tierra volcánica
- El resto está relleno con una mezcla de BioBizz "Light-Mix" con tierra volcánica
Es la segunda vez que se me parter unas raíces por la mitad en un transplante, eso me pasa por no ser lo suficientemente cuidadoso como para agarrar el sustrato por su parte baja. Esto no es algo bueno, pero he de admitir que aparte del mal rato de que se te partan las raíces, a la planta no le sucede nada de nada, sigue creciendo al mismo ritmo que su hermana.
V2 - Un ejemplo rápido de como corregir la iluminación de una foto tomada bajo un espectro rosado o rojizo
En el vídeo primero compilo el HDR compuesto de 3 fotografías horquilladas y una vez compilado le aplico mi ajuste de color.
Como muestro en el vídeo, para corregir este tipo de luces hay que realzar las curvas de color azul y verde, simplemente con un punto por encima de la mitad de la línea media hasta encontrar los puntos más adecuados para tu luz. una vez encontrados, sólo hay que ir a los tonos y ajustar un poquito el rojo, rosa y morado.
P1 - Muestra de las Cookies antes del transplante
P7 - Tierra volcánica y Guano
-----SUMARIO SEMANAL-----
Esta semana ha sido muy sencilla, no les he hecho absolutamente nada a las pequeñas a parte del transplante. Esta es la primera vez que mezclo algo con el sustrato y espero no sobrealimentar las cookies ya que voy a seguir usando los mismos nutrientes que he usado con anterioridad y de la misma manera.
Los primeros 10 días han crecido en mi tienda de 60x60x40 (DP60), con una luz china terrible:
PandaGrow 100W (50W draw) - http://www.pdgrow.com/index.php?m=Show&a=index&cid=12&id=53
Siempre uso esa luz los primeros días de cada cultivo, por lo que al cambiarlas a la Quantum o al Platinum LED lo noto al toque, realmente no les gusta nada la luz china esa, inmediatamente se ponen a crecer y ensanchar mucho mas.
-----CALENDARIO DE RIEGO-----
12/09/19 DÍA 11 - 1,5 l después del transplante con todos los nutrientes semanales @ 0.8 EC & PH5.8


Likes
8
Share
@Nutrient_gro
Follow
Really wish she got huge like my gorilla cookies. Buds are so nice. 🔥
Likes
9
Share
@FarmZOG
Follow
Day 66
Tops harvesting day, I will not hit the harvest button now cause my harvast its in phases, so I cut the tops first, bottoms and main colas base keep ripening for one more week.
The video (with sound) its a density test I invent after smoke this scissor hash hahaha (STFU) 😂😎

Likes
1
Share
@Jmaninthemidde420
Follow
Smoke is amazing. Barely needs a cure to even taste good. I’m sure a nice cure would bring the sweet caramel flavor out as there is a hint of it in the smoke. But I’m low on weed so this would have to do.


Likes
4
Share
@MandaleApical
Follow
6ta semana o 7manose la verdad. El finde año esta muy movido no hay tiempo paranada. Hace 2 semanas riego y xon 40 L semanales desde que ajuste el riego vi una mejora en terpenos y engorde. Los fenos mas grandes son uno muy dulce y el otro acido todos con toques de uva. Las del medio tienen terpenos mas suaves dulces.

Likes
8
Share
@Salokin
Follow
Plant has been developing nicely over the past 6 weeks. Fimming was not very successful, so I continued with super cropping the plant. She was switched to a 12/12 schedule a week ago and was fed flower nutes for the first time this week. She is definitely stretching, so I installed another scrod at 50 cm to distribute the canopy even further and add some support. She has been receiving ph balanced RO water and is at this stage continuously via drippers. Roots are al over the tank again, which has however proven as an advantage in the past.

Likes
3
Share
@MaltaHerbman
Follow
Auto Pablo Escobar – Divine Seeds
Day 1 above soil 🌱
Sprouted yesterday with a nice strong start. Keeping temperature around 26°C and gentle watering around the stem zone only. Light cycle 18/6 from the first day above ground. Curious to see how Pablo performs under this 3-month run.


Likes
2
Share
@Fyko12
Follow
Anfang vierte Blüte Woche Pflanzen sehen gut aus
Habe sie generell wenig gedüngt

Likes
29
Share
@TonyTrichomes
Follow
Not an overly impressive strain and I would say she was not that hard to grow. If I even grew this one again I would let it go naturally with some LST. Wanted more grape flavours but they don't really come through in the smoke. There's a bit of a sharp fruity smell that's sort of piney with a hint of fuel at the end. The smoke is not too flavourful in my opinion but that just means I didn't grow it well. Super tight nugs so be careful with humidity as stated above. Also she's a bit of a light feeder so be careful with your nutes. As you can see I burnt her tips and over fed her a lot. Not a bad yield though! I've only really smoked the lowers on this one so far so that gave me a bit of a racey high, just slightly racey. I would accredit that to the lowers not being mature enough at chop. The plant is super dense and since I mainlined it the lowers didn't receive enough light. I tried to let the lowers mature more but the plant stopped maturing when I chopped the tops, this caused stress and the plant just shut down basically. Not sure if I would grow Blimburn's GDP again until I grow the real GDP.


Likes
19
Share
@BUD_DIES
Follow
I’ve been so preoccupied with this plants beauty... that I haven’t cared to update. But here she is! Really proud of this first ever grow thus far. She drinks a gallon of water a day. Insane. so many white hairs.


Likes
13
Share
@FadedTotoro
Follow
The plant is a beast. Having a lot of light burn issues and I dimmed the LED but it still continued. I’m out of vertical space in the tent. Trying to keep her happy until harvest.
Processing
Likes
22
Share
@EelGrows
Follow
Week 10: This will be the final update before Harvest: I will update post harvest after the dry and weigh.
Day 64-66: Decided I would continue feeding them until I harvest since they could go 7 days longer. Albeit with a half dose of Calmg and Boost(micro). All White Cracks seem to be doing good. I realized a few days ago the outer plants underneath the blurple LEDs seemed to be showing slight signs of light stress(the leaves were bending away from the light instead of toward it). I lowered the Blurples a few days earlier so I raised them back up. These are some FROSTY plants...
Day 67-70: Going good, plants under the blurples responded postively to raising the lights. Seems I was wrong last week about these smelling stronger than the 4AM, it's actually the other way around lmao. But these are still some great smelling plants! Can't wait to dry and weigh that thicc double bud and main cola from WC#1! Hope it's not too airy, they look like pretty dense buds! Really bummed that I have to harvest this weekend, I would have liked to let #2 and #3 go for another week, but it's all good! Next time! Still this will probably the dankest shit I've smoked in a very long time 😂😎 #1 is probably the most mature at this point with about 90% cloudy and a 5-10% amber. #2 and #3 are the same with about 70-80% cloudy and a few amber.
This has been an awesome learning experience and I'm already thinking about ways to improve my next grow! These White Cracks have been quite resistant to my newbiness! Awesome plants to grow! Much easier to hanlde than the 4AM!

Likes
23
Share
@Master_weeda
Follow
Bonjour à tous les padawans et maîtres jedis
Pour la germination j'utilise la technique du sopalin
Pour faire germer vos graines dans du sopalin, vous aurez besoin :
Un Tupperware avec couvercle
Du Sopalin, ou autre quel papier de cuisine qui soit épais et qui retienne l’eau
Un verre d’eau
Si c’est l’hiver, vous placerez le Tupperware près d’une Box ou d’un Modem pour donner un peu de chaleur
Étapes de la germination:
faire germer vos graines de cannabis dans du sopalin
La première chose à faire est de tapisser le fond du Tupperware avec du sopalin, 2-3 feuilles suffiront. Si vous ne mettez qu’une feuille, elle captera peu d’eau et pourra sécher, vous mettrez donc plus de feuilles que pas assez.
Une fois les feuilles placées, versez l’eau du verre dessus, mais pas trop, juste de quoi imbiber toute la surface couverte par les feuilles. Vous aurez ainsi l’eau suffisante pour faire germer les graines sans avoir besoin d’essorer la feuille de papier.
Une fois les feuilles humidifiées, mettez vos graines par-dessus, et recouvrez le tout avec une autre couche de quelques serviettes. Une fois en place, humidifiez cette nouvelle couche.
faire germer vos graines de cannabis dans du sopalin
Lorsque vous graines seront placées entre les 2 couvertures de feuilles, fermez le Tupperware hermétiquement pour que l’eau reste bien dedans et que l’ensemble ne sèche pas malgré la chaleur.
Si vous êtes en hiver lorsque vous mettrez vos graines à germer, ou que les températures sont inférieures à 20°C, vous placerez le Tupperware sur votre Box ou modem jusqu’à germination, mais toujours en évitant le contact avec la lumière. Si vous êtes dans une zone au climat tempéré ou chaud, vous n’aurez qu’à placer le récipient avec les graines à l’ombre dans une armoire ou une caisse de rangement. Toutes les 24h, vous devrez vérifier l’état d’avancement de la germination. Si quelques-unes sont sorties mais pas d’autres, prenez celles qui ont germé pour les planter, laissez les autres dans le Tupperware et vérifier de nouveau le lendemain.
