
Likes
Comments
Share


@GrowZex
Follow
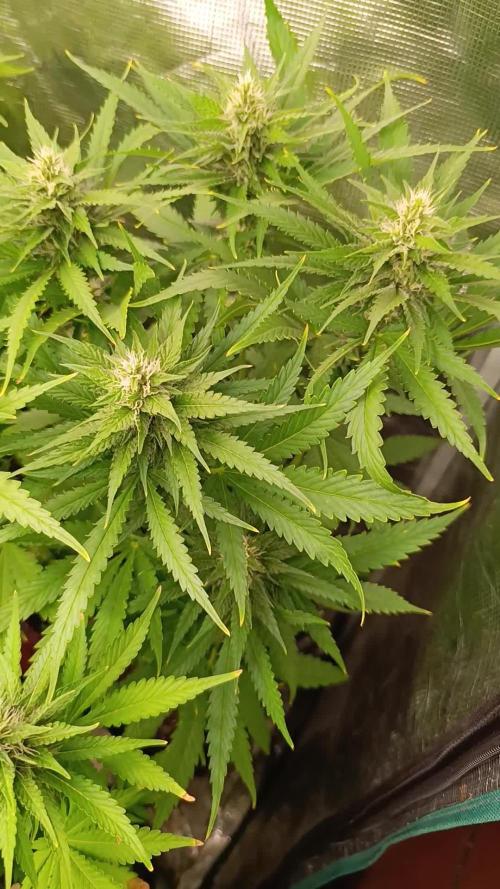
Started the diary late...
Basically vegged 4 plants for 4 weeks in airpots.
i prefer to used LED for veg. I get shorter internodes. I didnt feed the plants any additional nutrients so far, only water.
I did some low stress training and some topping so far.
Im looking to switch to 600w hps but its rly hot rn.

Likes
3
Share


@NocturnalGardner44
Follow
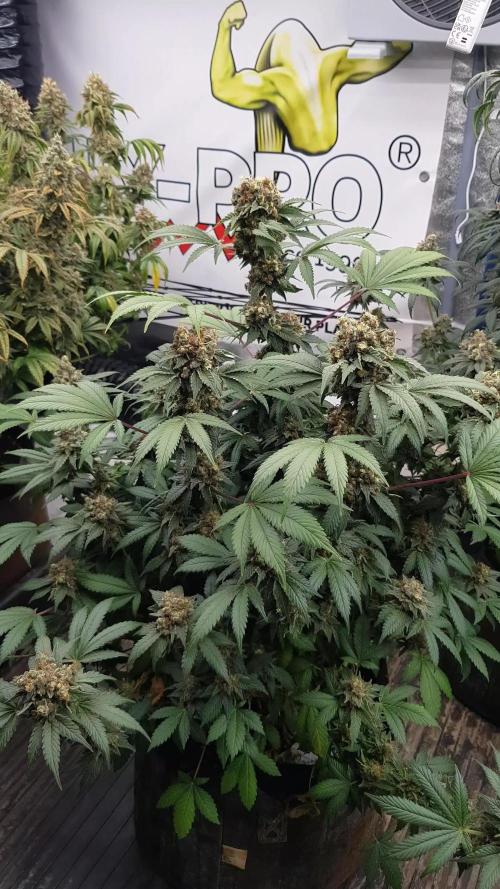
Caught up... things are going well, Bruce stretched like crazy and has evened up its canopy to the others idk if it's that big bud in it or what. Lilac has looked a solid week and half ahead of the others since flower, she looks wicked though, trichromes are starting to build. I've done my last training, I usually go hard on thinning but I'm trying to be conservative and only uncover buds under leaves. Still same feeding routine.. looking forward to the finish line but know this is an important time with terms and trichromes beginning to resonate... I sick at this guy's but I want to get better at chronicling my grows.. so hourly I will improve in the process of Journaling.


Likes
9
Share

@420DeepGrow
Follow
📆 Semana 5
La fase de engorde se intensifica y los cogollos aumentan de densidad y peso de forma notable. Los cálices comienzan a apilarse con mayor rapidez, los pistilos siguen siendo mayoritariamente blancos y la producción de tricomas se acelera, cubriendo cada vez más las flores y las hojas cercanas.
La planta concentra prácticamente toda su energía en el desarrollo floral. El consumo de agua continúa siendo elevado, aunque el crecimiento vegetativo ya es mínimo. Mantener una nutrición equilibrada y unas condiciones ambientales estables será clave para maximizar el tamaño, la calidad y la producción de resina sin provocar excesos de fertilización.
⚡ EC: 1.7-1.8
💧 pH: 6.2–6.5
🌡️ Agua: 21°C
🌫️ Humedad: 40–45%
💡 Intensidad: 1050–1150 PPFD
🔥 Nota de cultivo: La resina comienza a desarrollarse con fuerza y los cogollos ganan consistencia día a día. Mantener un buen equilibrio entre riego, nutrición y clima permitirá aprovechar al máximo esta etapa de engorde.
Seguimos creciendo fuerte 💪!

Likes
24
Share


@Rytmause
Follow
In middle of ripening faze,Girls getting huge and drinks about 2,5 L of water per day nice and sweet smel coming from tent just about 4 am when I waking up 😄 even these are all autos I got them nearly 3 months running and see it on another month or so also still no sings for any colours yet got 2 purple strains in lol next week 3 of them start flush week


Likes
10
Share


@Ieiogrow94
Follow
Eccoci di nuovo qui!!!
Super eccitato per questa nuova collab con Anesia Seeds, team davvero al top, che mi ha dato l’opportunità di testare questa nuova genetica e di condividere i progressi con tutti voi!!!
Un risultato inaspettato devo dirlo...
Strain 1 ha un odore molto forte sembra "salsiccia" ma quando la fumi davvero è molto pesante!!
Strain 2 molto più soft sia come odore che sapore ma comunque abbastanza interessante..
Nel complesso la consiglio per i colori che rilascia la pianta in fioritura tendendo al rosso specie nelle punte delle prendisole davvero molto bello da vedere..
Grazie a tutti per il supporto ❤️🍀🔥

Likes
12
Share


@KalooNie
Follow
These gals are doing fantastic! Smell is really starting to come out now, smells like a very strong citrus pine 👌🙌 Switched them to full strength flowering nutes and they're doing pretty well. I probably should have transitioned them a little earlier but a little stress doesn't hurt, they're growing just fine! Heat is also an issue but they'll manage 😅
8-4-18 :: Largest plant's bucket got empty on accident; Filled a 15gallon reservoir of full strength nutes and pumped the solution into the bucket as always. Next day my largest plant is dying and the other two are fine, looks like lockout. Flushed for a day and then added nutes, no improvement.. Orange pistils are appearing pretty fast on it too as if it's trying to ripen but not grow. My heart is broken😰
UPDATE: Realized I was an idiot and didn't plug up the holes I drilled into the top of the buckets (I stick a hose in there to fill them up) and the roots were exposed to light.


Likes
6
Share


@Cheechsdad
Follow
Any help on what may be happening with the slight browning? Maybe over watering? I have not used any nutes up until now with FFBB I would be surprised if burn but it does look like it by the tips


Processing
Likes
8
Share


@Dirtysouthgrower27
Follow
Dat 1 of flush 6/1
20 gallon of water
25ml of floraflush
35ml of fishshit
Likes
2
Share


@Travislynn21
Follow
Very satisfied so far. This is the second week if you don't count the first week from seed to poping up! Only watered it twice in two weeks. My mix drains well but holds the right moisture for growth. Next week will be the real proof of genetic quality!

Likes
59
Share


@MicrowGrow420
Follow
Getting close to switching her over to flower, she seems to be vegging well, fair few bud sites to watch develop, i also took some AG clones that are looking promising. The strain seems pretty hardy.

Likes
15
Share


@Stick
Follow
I made a full timelapse of the run, make sure to watch it in my harvest post!
This run was a full success, thanks to good genetics + good lights + good nutrients, I'm very happy with the outcome.
Thanks to everyone for reading this diary, and stay tuned for other grow reports! 😎👊
Likes
13
Share


@NanoLeaf
Follow
Were officially at the Flowering Stage!
I waited to name the week “Flowering” until all the plants are in flower.
The late training didn’t turn out too bad and I did the best I could to get as many bud sites as I possibly could and it seems to look like it turned out good but not great.
One of the two runts is not in flower yet and is growing faster and bigger by the day, the other one - let’s not even go there but for interest sake I’m going to keep watering it and see what happens. Perhaps one bud os better than none?
Installed my my brand new AC infinity T6 Inline fan and for the first time since starting this grow I think I have adequate air circulation and much better environmental control.
I also top dressed with Bio Grow and Bio Bloom (Green House Feeding) and a Tbsp of Mycorrhiza per plant.

Likes
28
Share


@Felloffthegrid420
Follow
Wow I say they are 13 foot tall some dank dank going on this year 🐜 killed one it was died and I pulled it up shit load ants stated coming out it was crazy but got cut for indoor this year and bad needing weed pulling going on crazy how sweet there smelling

Likes
5
Share


@Do_it_Dan
Follow
This week I have seen an explosion in growth, this lady is rather young and taking over majority of the other ladies, either way I ain't complaining, had a few humidity spike problems in the tent due to intake packing in, ordered a new one so fingers crossed next week is a better week for the garden.

Likes
4
Share


@leo2023
Follow
Very nice plant to grow. Beautiful flowers covered with trichomes. The smell is very lemon citrus flavourt. She gave a bit of a stretch. I think she isn’t the biggest yielder but definitely quality over quantity. Later on the results. Very pleased sofar!
I underestimate the density of the buds. Dry weight 375 gram of 5 plants. Pheno number 2 yielded almost 100 gram!
Powerfull lemon flavour with a touch of sour. Running pheno number 2 again!
Likes
11
Share
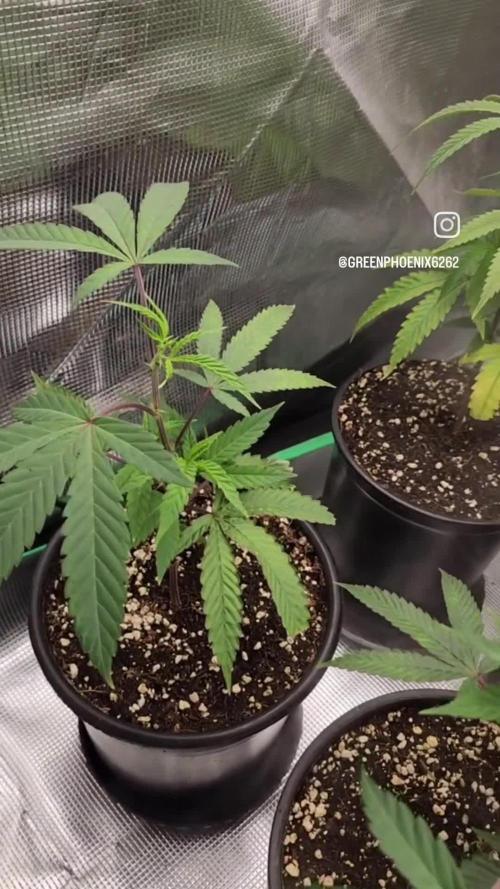

@GREENPHOENIX6262
Follow
*Disclosure: The mother has was flipped into flower 3 weeks ago - Veg weeks now are only for the clones*
03/08 - (M) - Since transplant into 4x4 she has doubled in size and cleared pre-flower accordingly - Nute feeds increased from once to twice a day - One week will be only nutes the following will be clean water.
03/08 - (C ) All clones are rocking out accordingly - All 7 were topped this week - I will only top once and let them run as is - slight increased nute feed for them to provide supplement for the topping - currently still in nursery (2x2).
03/12 (M) - The mother is just coming out of pre-flower and rocking accordingly since moving into the 4x4 - offsetting feeds (3 days - 1 feed every 12 hrs for 1 minute - 3 days no feed) the offsetting feeds seems to be giving me positive results in balancing wet and dry.
03/12 (C) - The clones are coming along accordingly as well - Since topping the off shoots are coming in nicely - all 7 have been moved into the 3x3

