
Likes
Comments
Share


@Mrs_Larimar
Follow
In the beginning i was alittle concerned because of the automaticStrain in a Microgrow. But those Ladies
took all like " Bosses".
The Rabbit and the lil white Sheep produced lots of Flowers.
What a Journey,
I enjoyed this "Egghunt " so much
Last Decemmber @Silky_smooth, wrote me, if i want to participate into a Challenge
called " Egghunt"
That means growing a Plant from Seed into 50g Of Soil// Medium
That means as much as fit into an Eggshell.
So i did not think a lot and said yes. And the " EGGHUNT" begun.
I started looking for funny // sweet little Growcontainers, and I found some Fancy ones.
Black Sheeps, white Sheeps, ( Eggcups) , and some Tealightholders, one like a Rabbit, and a " Bridge"
i filled Soil into the Cups, and Into the Sheepcups were under 10 gram of Soil. The " cups" from the Bridge had 35 g
Sooooo... challenge accepted!!
In the Beginning it was hard to me not to overwater them.But they Mastered my drownings very well
After 14 Days i had to manage the Feeding of the Girls. Until that time they only got Beneficals and the Nutes from the 10g Soil.
But i got some help from my Growmies, how to feed them , ( not over and underfeed).....Stoney gave me the Hint for an EC of 1000-1200
And so i did it
I mixed bigger amounts of Feedingsolution, and the little Cups were diving into the Feedingsolution daily.
I could see they got nice color and look fresh again.
The bigger they got, the more they liked to drink
Then i switched after 5 Weeks from Vegetation into Floweringmode.
So they were diving 2 times in the Day into the Feedingsolution. not every Day, but very often..
From there on, it became much easier to me. Because i could see what they need.
And the Fun began.
Buds were swelling, and Flowers were smelling.
In the last 2 Weeks i topdressed with laygranules, to keep humidity into the Cups
Until we reached Today..
So Today i cut them and ooked into the cups, and i got to say,,, i could snot see any sooil, only ROOTS....
Solid , totally woven Roots. Most of the Soil was flushed away from the divings.
But Plants looked good until last Day
CONCLUSION:
I learned so much in this Challenge.I learned so much about Watering/Feeding.. and having Fun on the Little Things
I feel like i have Grown, together with my little Plants. I feel very confident to do Soilless/ DWC or any other grow
hahaha... I feel like i can grow everything...
I hope you had the same Fun like me into that " EGGHUNT"
And thank you @Silky_smooth, for asking me to paricipate
Legalize that wonderful Plant!!!

Likes
20
Share


@eldruida_lamota
Follow
Que hay familia ya traigo la última semana de floración de estas Lava Cake de Zamnesia.
Vaya color que se marcan todavía, están bastante sanas , los tricomas están pegajosos , tiene unos aromas espectaculares, me tiene enamorado.Están ya a punto de caramelo.
Temperaturas máximas en 28 y mínimas en 25 y una humedad estable en torno al 36%.
Os comento que tengo un descuento y para que compréis en la web de Zamnesia de un 20%, el código es ZAMMIGD2023
The discount 20% and the code is ZAMMIGD2023
https://www.zamnesia.com/
Agrobeta:
https://www.agrobeta.com/agrobetatiendaonline/36-abonos-canamo
Mars hydro:
Code discount: EL420
https://www.mars-hydro.com/
Espero que lo disfrutéis, buenos humos 💨💨.


Likes
150
Share


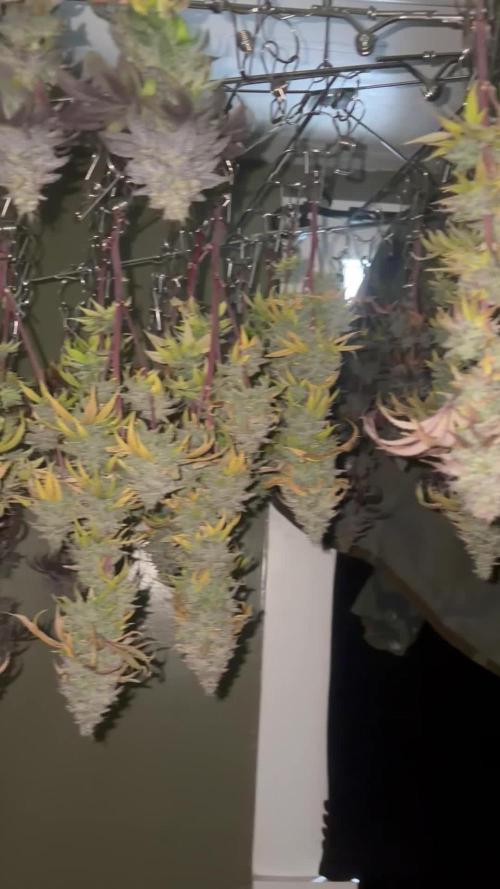
@RussianGrower
Follow
I welcome you from Russia my friends from different parts of the world. The end of 16 weeks has come. Plants already fully show their ripeness, and buds SAG from their weight. Soon I will be harvesting, as soon as I get the final dry product I will make the last update of this diary.


Likes
2
Share

@Jmaninthemidde420
Follow
Loved Ricky’s hash plant so much I got 2 more pack and 1 pack of bubbles


Likes
21
Share


@Bluemels
Follow
Nun, die vergangene Woche ist nicht so gut gelaufen....😞
Ich bin regelrecht in ein Schnippel-wahn verfallen...😱
Dann wollte ich ein Fehler mit dem nächsten ausgleichen, das Ende vom Lied kann man deutlich sehen.
Da wollte ich gleich alles richtig machen doch die Pflanze wurde dabei immer weniger.😭
Das dauert bis die Gute sich davon erholt...
Gestern habe ich über die verstümmelt Triebe noch Tütchen gefrimelt, um die Luftfeuchtigkeit um die Triebe herum zu erhöhen.
Und es hat zum Erfolg geführt! Sie haben sich deutlich innerhalb eines Tages deutlich gestreckt!😃
Allerdings muss ich alles gut im Auge behalten damit es in den Tütchen nicht zu feucht wird, deswegen habe ich heute je ein kleines Belüftungsloch in die Tütchen geschnitten.


Likes
9
Share


@Xabii
Follow
The ORP probe is not calibrated and values are to be taken with a grain of salt.
Values are average of the day.
DATE - °C - RH% (Tent Temp/RH)
20240822 22.3 60.0
20240823 23.0 65.7
20240824 24.1 72.8
20240825 22.1 62.6
20240826 21.9 59.7
20240827 22.1 62.1
20240828 24.4 63.7
DATE - PH
20240822 6.22
20240823 6.26
20240824 6.18
20240825 6.22
20240826 6.13
20240827 6.07
20240828 6.15
DATE - ORP (mV)
20240822 -17
20240823 51
20240824 25
20240825 28
20240826 -4
20240827 35
20240828 27
DATE - EC(us/cm)
20240822 2162
20240823 2157
20240824 2266
20240825 2151
20240826 2178
20240827 2257
20240828 2375
DATE - CF
20240822 21.62
20240823 21.57
20240824 22.66
20240825 21.51
20240826 21.78
20240827 22.57
20240828 23.75
DATE - °C (Reservoir)
20240822 20.6
20240823 20.8
20240824 21.9
20240825 20.3
20240826 20.0
20240827 20.4
20240828 21.9
Likes
7
Share


@Nikkov
Follow
well, another week and just watering as needed, it should have yielded a lot more this strain is also not known from a local seed bank but no problem. I think the temperature, because I spent most of it being very hot, didn't let them grow, well, but I'm already starting another cycle and soon I'll start posting more here in another grow =D
Likes
38
Share


@J_diaz420
Follow
Encantado de la oportunidad de crecer estás variedades, sin duda, llenaron todas mis espectativas 🍀😍🤩

Likes
10
Share


Likes
2
Share

@Elcogollosagrado
Follow
Esta semana ya entramos en floración, hay alguna planta más adelantada pero no es problema seguimos cn el avance


Likes
Comments
Share

@Enki_Weed
Follow
Week 8: Veg – Final Setup & Runtz Breakthrough 🌿
System-Status: Kompletter Nährlösungswechsel (35L) für den Endspurt der vegetativen Phase.
• pH-Wert: Stabil bei 6.1.
• EC-Wert: Konstant bei 1.24 mS/cm.
• Wassertemp: Optimal bei 19,9°C.
Nährstoff-Konfiguration (35L):
• Basis: Osmosewasser + CalMag (Grund-EC 0,45).
• Hesi Hydro Wuchs: Volle Dosis laut Leitfaden.
• Hesi Wurzel Complex: Reduziert (da Wurzelballen bei beiden Strains nun ausreichend etabliert).
• Hesi Power Zyme: 70 ml.
• Plagron Silic Rock: 35 ml (Vorbereitung auf den Blüte-Stretch).
Pflanzen-Update:
• AK47: Unverändert vital, kräftiges Blattwerk, bereit für 12/12.
• Runtz Lake Cake: Wurzel-Durchbruch bestätigt! Die Aufnahme läuft jetzt effizient, sie zeigt deutliches vegetatives Momentum.

Likes
43
Share


@Johnny2Fire4U
Follow
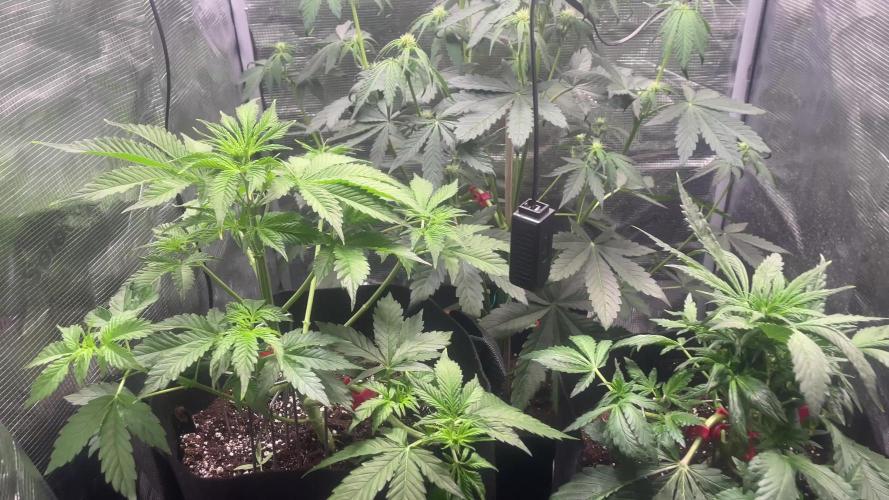
Transplant went good switched em to 5gallon pots. Just giving them some more ph'd water for this next week. Getting ready to flip these girls to flower.

Likes
4
Share


@CheeRz
Follow
Week 7 and both ladies are fully covered with trichomes and still very vital. If Gelato #2 continues to develop so well, I guess another 2.5 weeks to go.

Processing
Likes
15
Share


@Dico29
Follow
5th week of flower, the plant has stopped growing and focused on the buds.
Both plants look nice, I’m hoping the 3 gallon plant gets fatter before the end though.


Processing
Likes
67
Share


@GreenZealand
Follow
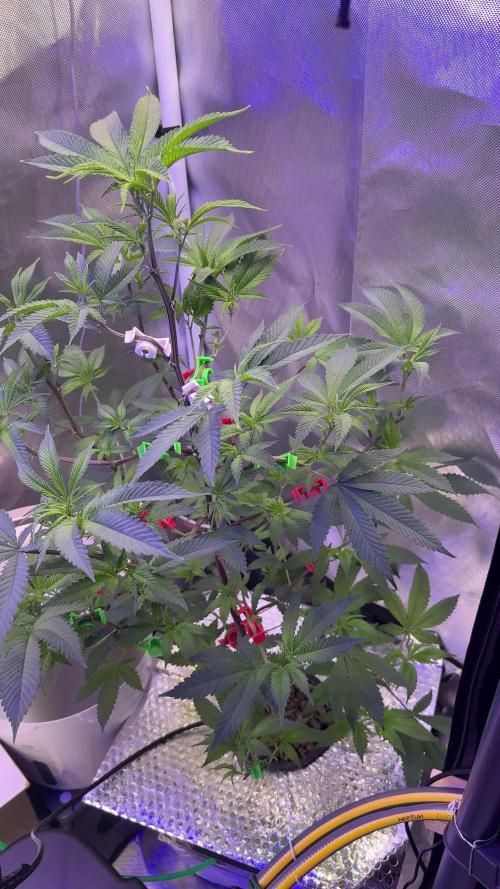
This is the week 2!
Well, the plant looks really healthy, and she kept growing up, straight to the light!
Good to see that even after the strange beginning, with the stem crooked, she recover her path!
This week, I'm also planning to start feeding them with some NPK.
Just need to read a little bit more about it and buy nutrients.
Probably I'll try Canna stuff. Anyone know if it's good?
