
Likes
Comments
Share


@Ganjaman19
Follow
Vegetation over end of week 8 I'm really happy with how these look I've ended up with 8 I'm happy to put into flower they are all different strains and range in size from 90cm to 120cm the strains are
Barney's farm
Wedding Cake
Pink Kush
Mimosa Evo
Runtz Muffin
Divine seeds
Divine Indica
Opium
Anesia seeds
Banana Kush
Pink Starburst
The feed I've used is great I really like this range and would recommend it to any grower and its all I will be using along with the Monkey Nutrients range these for me are the best European and UK Nutrients well worth anyone's money
I will be defoliating and lollipopping them soon so I can get as much exposure as possible
Also some of my cuttings have rooted so I can help my friend out I switched to Clonex rooting gel and have had some luck so I'm really happy (see pics)
Thanks for the help along this journey and thanks always to my sponsors
@HydroproWashington
@anesiaseeds
@Divineseeds
@monkeynutrients
See yous all next week with some better photos of each plant before and after some much needed defoliation
Peace out


Likes
33
Share


@MrFink
Follow
Last leg of the race for some of these girls! Excited to harvest and trim and cure them. Everything went fairly smoothly this week, looks like some serious burn on the one, but she is towards the end anyways. I started flushing some of them a week ago, and the one furthest along about 2 weeks ago. I’m glad because I’ll save on nutrients as a bonus! I’m excited for my next run, I think things have gone really well with this first grow despite all of the complications. Anyways I should have some harvest pictures next week, thanks for following my grow!


Likes
49
Share


@masterofsmeagol
Follow
8/29 Knowing I was going to have to yo to the hospital er again this morning with my wife I got up early and watered. We are supposed to get an inch of rain tomorrow but the bags were totally light. If I was going to be around I might've held off watering. Instead I watered everything one gallon and figured the rain will make up for the other 10 percent hopfully that will do it.
8/30 Rained overnight. Plants were soaked. Flowers are swelling. I defoliated a shit ton of yellow leaves the other day. I still don't think I have anything fungal but I'm keeping an eye u e out and am considering doing an application of plant doctor. We are suppised to get an inch of rain tonight and tomorrow I guess. My biddy said i shouod cover my plants because next week is going to be "great growing weather" but with the rain and then the sun it could be a recipe for disaster since I have some large flowers. I got my father's leaf blower running but it was leaking gas. Brought it to the repair shop and a buddy let me borrow his for thus storm. I and hit the plants with it this morning. It is super strong though. I need to be careful not to blow it right out of the bag!!! Or break branches. Of course after u left it started raining lightly. A nice rain that plants like but it's stopped. I'm wondering if I should go over and blast them again to keep them dry but I know it's going to rain off and on and it'd going to rain tonight. I'll check the weather and decide from there. So far things are going good. Still have some yellowing leaves and a few normal pests but that is to be expected.
UPDATE: Stopped raining so I went over
and shook off the plants then put the leaf blower to them. I made sure to get the interiors before I went and had shook things again by hand. Storage us low bur i took a video. Cant upload toll tomorrow. Buds are growing at an insane rate but im losing some fan leaves that just yellow and die. Im sure its senescence but its still wortisome. We are supposed to have a real good week of growing weather coming so I hope that doesn't change. I'll update tomorrow. That leafblower works awesome though.
8/31 Went over to an extremely sunny windy morning. I didn't even need to shake plants or use the leaf blower since I did it after it Rained last night. I'm worried the wind night dry my bags out today so I'll be sure to keep an eye on them. I defoliated a shit ton of leaves but apparently it's just senescence. I need to check the last time I fed. Trich development is going good. The smell was incredible this morning! Each strain has its own unique smell to it. We are supposed to have a real good week for growing so I'm looking forward to it. May do a preventative plant doctor app but I think it will be alright. I'll keep this updated.
UPDATE: Went over around one and plants were bone dry. The wind was RIDICULOUS! I added a few individual stakes and tied a couple loose branches. I got my tarp out and considered covering the cagecto protect from the wind. However I didn't have time to sanitize if and they had already been through it all night and day alwuth no breakages. Plants are strong and supported well. At least I hope. Plus the tarp would block the rest of the direct sun the plants are getting right now. The wind looked like it dud its worst and the trellis and supports held. I did add extra supports higher up the plant to prevent breakages. Found a moth larvae (yellow) and squished him. Also found some aphids but a few lady bugs and three lady bugs larvae so I think I'll be OK. I am really excited for this year. Flowers are really exploding! FORGOT TO PUT THE MOST IMPORTANT THING. WATERED EVERYTHING TWO GALLONS EXCEPT THE 10. WHICH GOT ONE.
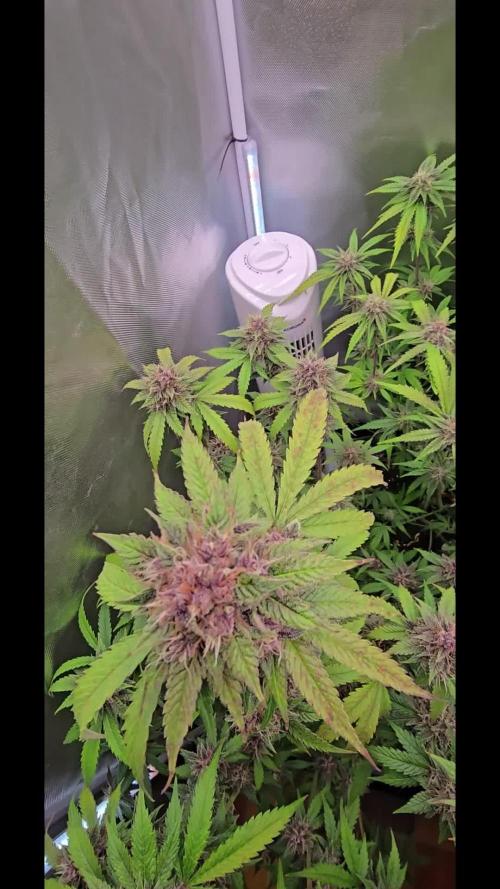
9/1 Forgot my phone on the daY I really needed it. It rained last night. The wind was the strongest i've seen in years. I would've tarped the cage but i couldn't find any of the bungee cords or zip ties. Probably good I didn't. No breaks. One plant had dark brown splotches ALL over the leaves! I picked them all off and took pictures and will consult my commercial buddy. I researched and asked a question on here. If it's septoria or something that could ruin my gorgeous garden I'd rather just junk the plant. It's big but it's the furthest behind flowering and I would not be heart broken if I had to get rid of that for the others. This week is supposed to be the best week we've had all summer so I'm expecting major growth. I'll update after conferring with other growers and making a decision. Looking online it seems like it could just be lack of nutes with the co dictionary we've been having. It IS time to feed and I haven't been feeding much. We'll see what he says.
UPDATE: AFTER RESEARCH AND CONSULTING WITH OTHER CONMERCIAL GROWERS I BELIEVE THAT THIS IS A NUTRIENT DEFICIENCY. I READ THAT RAPID TEMP FLUCTUATIONS AND HIGH WINDS CAN EFFECT THINGS LIKE THIS. IT DOES NOT APPEAR TO BE SEPTORIA (WHICH I'M EXPERIENCED WITH). I WAS THINKING ABOUT DOING AN APPLICATION OF PLANT DOCTOR BUT SINCE IT WAS SO FEW DAYS DURING THESE CONDITIONS IM GOING TO WAIT AND MONITOR THE PLANT. I DEFOLIATED ANY LEAF THAT WAS SUSPECT. FOUND AND KILLED A BUD WORM. I THINK THEY ARE STILL DIEING FROM THE BT. IT WAS LIKE STRETCHING UP FROM THE TOG OF A BIG NUG LIKE, "HERE I AM COME OUT ME OUT OF MY AGONY." ALSO FOUND LADY BUGS AND BEETLES AND THEIR LARVAE. IVE SEEN TGE VERY LOWER SECONDARY BRANCHES GET STRIPPED ON A COUPLE PLANTS BUT THATS WHY I LEFT THEM THERE. IF THEIR ARE EARWIGS THEY CAN HAVECTHE SHIT THAT I WAS GOING TO LOLLIPOP ANYWAY BECAUSE THATS WHAT THEY USUALLY GO FOR. THEY ARE DEFINATELY STRAIB DEPENDANT TOO. THEY LOVE ANYTHING BLUEBERRY BUT DONT TOUCH THE REST. MAYBE THERE IS JUST A COUPLE IN "THAT BAG". ILL HAVE TO GO AT NIGHT AND CHECK. IM EXCITED. MY FLOWERS ARE EXPLODING IN SIZE AND TRICHOME PRODUCTION. SEEIMG THAT I THINK THIS IS A NUTRIENT ISSUE AND MY FEEDING DAY WAS TODAY I FED EVERYTHING 1.75 PINTS OF NUTRIENT MIX TO EVERYTHING BUT THE 10 GALLON WHICH GOT LIKE 3/4 OF THE POWERADE BOTTLE. PLANTS SEEM HAPPY AFTER I FEED SO MAYBE I SHOULD UP THE FEEDING SCHEDULE. SINCE THE SOIL WAS ALREADY MOIST AND IT RAINED YESTERDAY I FED WITHOUT WATERING. HOPFULLY THAT WILL BE OKAY. I'VE DONE IT BEFORE.
Went back over at six and WOW! After this nice sunny day buds have swollen. Plants seemed to love the nutes. I think the nutes in my soil are fairly depleted so I just needed to adjust my feeding schedule. I didn't notice anymore calcium deficiency looking spots and I had defoliated a lot of leaves. Super excited moving forward. Pistols are changing color on one 10th p phenome and retracting into buds. This is is the fun time. As long as I can avoid the rot.
9/2 Says it didn't rain last night but my plants are dripping wet. If course the leafblower kept dying so I had to shake everything by hand. Hope that's good enough. Gonna be real sunny. Bags still had some heft to them. I'll check them later. Found a few leaves with what looks like the calcium deficiency on the sane plant and I just removed them. I really don't think it's anything to worry about. I'll update later.
UPDATE: Went back around 10 and everything looked good and was dry. Brought the leaf blower to be fixed. Should have it by the end of the day. Found and killed another pillar and some ants. Took a picture of a lady bug/beetle. This sunshine is making my buds explode!! I was thinking about checking again tonight but I think I can wait and water tomorrow. Bags are still fairly heavy. I did take another couple leaves off the plant that lopks like it might have a deficiency or something. The stalks are bigger than the bottom of a baseball bat. A couple almost like the fat end. Some 9f the best plants I've grown. I also took three short videos of a plant of each strain. Maybe if it's short it will upload quicker. Happy growing! UPDATE: I was back and forth today. I did some pruning and defoliation and then I noticed that my canary was light as hell. I waited until night and went back and had a couple starting to droop so i watered everything 2 gallons except the 10 and tub got 1. Everytime I see them it seems like they are bigger
9/3 Used the leaf blower this morning to get the dew off the buds. I shook them by hand before that. I'm noticing like a little army of lady bug larvae so any aphids I have are not going to be a problem. I have adults as well but is the babies that eat 10x what the adults do. I'm hoping they'll wipe put any bud worms. The weather is great this week all sunny. Making the buds explode in size and increasing terp production. This is the strongest smelling cannabis I've grown. Each strain. Has its own unique "funk" to it. Purple punch is really sweet and floral smelling. 10th planet is more gassy. I need to get some yellow sticky traps. I saw a couple fungus gnats on my canary. A late blooming blueberrycheese. It's the one that dries out the fastest but is more sativa leaning and drinks TONS of water. I have two that are that phenome. Losing yellow leaves but exploding with flowers. Noticed a couple more leaves with that calcium deficiency looking leaf. I just defoliated it. I'm really happy where I'm at right now.
9/4 Plants were covered in water this morning and the leaf blower wouldn't start. I shook everything off by hand. Each strain hasits own STRONG unique scent. One tenth planet phenome smells like bubble gum. I think I've got like two weeks and some of the flowers on ONE plant should be done. I'm planning to take the top half and then letting the bottom mature longer of its not whete I want it to be. The weather has been gorgeous. Sunny today. I'll need to water tonight I'm sure. UPDATE: WENT OVER AT 3PM AND PLANTS WERE DRY. WATERED EVERYTHING 2 GALLONS BIT THE 10 AND THE TUB. THEY GOT ONE. FLOWER DEVELOPMENT IS VISIBLE FROM MORNING TO NIGHT. I HAVE A TENTH PLANET THAT I BELIEVE WILL BE READY FOR HARVEST (AT LEAST THE TOPS) WITHIN A COUPLE WEEKS. PISTOLS ARE RETRACTING AND TURNING ORANGE ON THIS PHENOME AND RED ON THE OTHERS. I AM LOVING HOW THIS STRAIN LOOKS GROWING. I HAVE REAL HIGH HOPES FOR IT. I FAILED TOO MANY TIMES UPLOADING THE VIDEO AND PICTURES I TOOK SO ILL DO THAT TOMORROW. I CANT BELIEVE THE SWELKING GOING ON AND THE AROMA! THIS IS SUCH A WONDETFUL YLTIME OF YEAR. STILL FIND8NY SMALL SPOTS OF WHAT LOOKS LIKE CAL DEFICIENCY IN THAT ONE PLANT. IM STILL UNCERYAIN WHWT TO DO WITH THAT ONE.


Likes
27
Share


@Salokin
Follow
She was switched to flower this week, and is starting to stretch through the net. I decide not to let her grow any taller and rather save some time and let her stretch directly through screen, she seems very happy with the nutrients and will continue with this mix until she shows real signs of flower. And then will start the flower solution.
Likes
Comments
Share


@KannaGrowing
Follow
Esta semana, nuestras plantas empiezan a mostrar las primeras flores.
Ya tenemos la sala con las cuatro luminarias funcionando al 75% de su potencia y las he separado un poco más, ya que veo que con led, el espacio internodal es muy reducido.
Añadimos a la mezcla de fertilizantes CALMAG de BioBizz, que aportará un extra de calcio y magnesio.
Regamos cada tres días aproximadamente, una vez con fertilizantes y otra vez con agua.
Comenzamos a reducir la humedad relativa en la sala y desconectamos la calefacción en fase nocturna, para que empiecen a pasar un poco de frío.
Likes
1
Share


@ToxicStone
Follow
Heute das letzte mal Gedüngt, mit Bio Bloom und Wormcastings, dazu wurde mit dem Bio Enhancer gegossen.
Alles immer wie vom Hersteller angegeben verwendet.
Likes
4
Share


@KaavinKushing
Follow
Smell has increased in a good way. 2 of the 4 plants main colas are turning purple, very cool. One plant has yellowing of the leaves even though I stuck to fox farms recommend fertilizing schedule.
There is. 4” height difference between the 2 taller and shorter plants. This week I put some books under the shorter ladies to give an even canopy height.

Likes
59
Share

@Schnabeldino
Follow
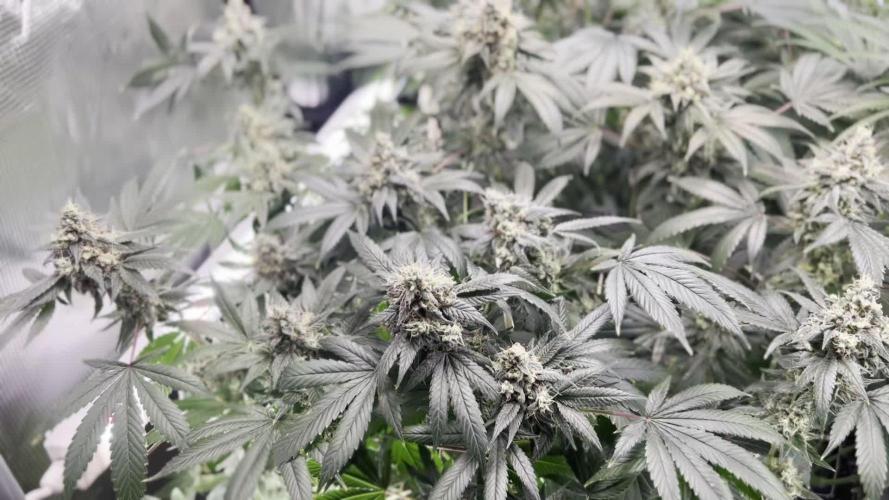
📅 Week 13 | Days 92–98 📅 🌼🌸🌺 Flowering Phase 🌼🌸🌺
Day 98 🌞 – Apple & Bananas
🔸 Apple & Bananas continues to progress nicely, although the buds are still relatively small compared to the other plants. They’ve become noticeably denser since last week and are now showing an impressive amount of resin production. Trichomes are mostly milky at this stage, with a few still clear . Everything seems to be on track timing-wise.
🔸 The smell is starting to evolve in a very interesting way – somewhat sweet and sour, hard to describe, but definitely more complex and pronounced than before. Very promising.
🔸 Humidity is still on the high side (currently 63%), but it has improved compared to last week. Today, I finally turned on the dehumidifier and cranked all clip fans to full power. RH is now maintained at a more stable 50–60%, which I'm happy with. The dehumidifier does increase temps by about 2–3°C, but that’s manageable.
🔸 She’s also drinking significantly less, which lines up with her moving deeper into the late flowering stage. I’ll give her 1 more weeks of Overdrive (Advanced Nutrients) and then switch to just water.
📈 Current Conditions
🌡️🔆 = 27°C
🌡️🌜 = 20°C
💨 VPD Target = 1.4 - 1.6
💨 Humidity = 63% → Target: below 60%
🔦 PPFD = 900 µmol (12/12)
🔦⌚ DLI = ~38
🛠️ Setup (unchanged)
💡 Lights: 2 x Sanlight Evo 4-120 @ 90%
⛺ Tent: 120 x 120 x 180
🍯 Pot Size: 18 liters
🌱 Medium: Bio-Bizz Light Mix
💊 Nutrients: Advanced Nutrients
💧 Water: Tap water (EC 0.5)

Processing
Likes
7
Share


@Dunk_Junk
Follow
Wow very good growth on her this week, doing VERY well in her tiny 1L airpot!
She has a really thick stem already.
I am worried she's not an autoflower though...
Let's leave her for a few more weeks and see if she enters flowering.
Likes
7
Share

@NSABND
Follow
Day 57 😁👌all the queens are ok 🙏
Day 58 the queens got some fertilizer 💪😃👍
Day 59 what should i say... everything seems to fine 😃🙏👍
Day 60 the queens got some fertilizer 💪😃👍
Day 61 all queens are in good shape 😃🙏

Likes
4
Share

@420DeepGrow
Follow
📆 Semana 10
La Ice Cream Haze encara su última semana con parte del trabajo ya hecho: una parte cortada en su punto y otra quedándose unos días más para apurar madurez. Los cogollos que continúan en la planta siguen endureciendo, con la resina cada vez más espesa y los tonos morados plenamente definidos. El aroma cremoso-afrutado se concentra aún más gracias al lavado previo.
Ahora solo toca mantener ambiente estable y dejar que esa segunda tanda llegue a su momento ideal.
✂️ Remate final: precisión, paciencia y doble cosecha afinada.
¡Seguimos creciendo fuerte 💪!

Likes
17
Share


@Sergio_721
Follow
pre-flowering
they still seem very loaded with nutrients in fact one has burnt tips so I am watering abundantly with only demineralized water when they drain they start to feed them.
I removed all the supports, we wait for the flowers 😂
Likes
6
Share


@eldruida_lamota
Follow
Vamos familia cosecha de Original de GrowBarato.
La verdad que el secado muy bien 7 días en Malla y a los botes, 40% humedad y 24 grados es la temperatura ambiental que han tenido en el secado.
Por lo demás de miedo os la recomiendo.
Gracias Agrobeta y Mars hydro , sin ellos este proyecto no sería igual 🙏.
Agrobeta:
https://www.agrobeta.com/agrobetatiendaonline/36-abonos-canamo
Mars hydro:
Code discount: EL420
https://www.mars-hydro.com/
Buenos humos.

Likes
13
Share


@Paultemp
Follow
Hi all!👊😊
Week 4 of veg
he love LST
I got 2 new lights Aelius led 300gh
😍

Likes
3
Share


@madcash
Follow
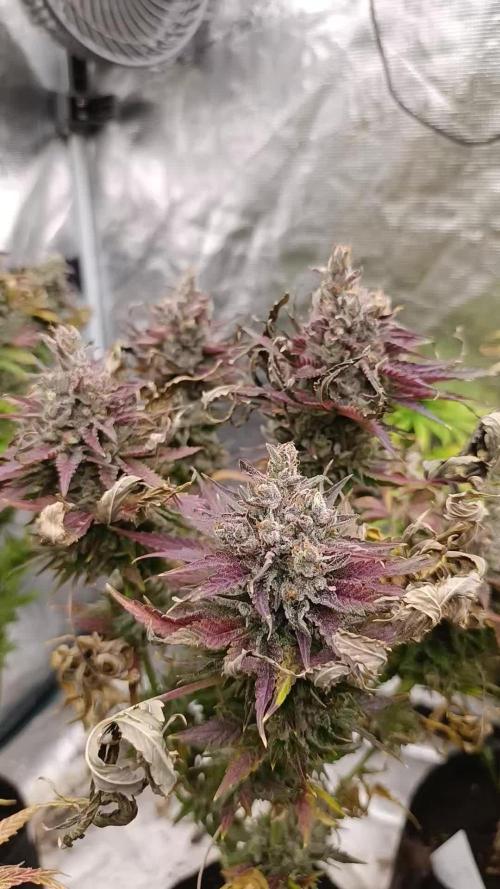
Last days, getting fat and frosty. Switching to 24 hr for the final few days before chop. Last water was on day 85. I feel like I could actually wait another week or 2 but want to have some Xmas gift for friends so that clock is ticking. Easily 10% amber trichs at the moment and will likely get more with full light and no water for the next couple of days. Harvest coming right up!
Likes
6
Share


@pzwags420
Follow
On day 3 week 3 of flower shes putting out a lot of preflowers and the tops are staring to put out pistils and start of sugar leaves. Im giving a max of 1100 ppfd on tops with an average of 900 ppfd on all tops. Im very happy with the pheno so far and look forward to her expressing her aroma! :)

Likes
4
Share

@NSABND
Follow
Day 29 massive leave cutting in the morning... but the queens seems to be ok 😃🙏👌👍the Z-Up strain has 5cm more then the others
Day 30 all queens are a little bit shocked from cutting 😩 ok chill today but tomorrow back to work bitches 😂😂😆😃🙏👍
Day 31 everything seems to be allright 😃🙏👌
Day 32 well the queens raise again 😃🙏👍
Day 33 i think this will be a really good grow 😃👌
Likes
241
Share


@Tropicannibis_Todd
Follow
💩Holy Crap We Are Back At It And Loving It💩
Growmies we are at DAY 35 and she's just killing💀it👌
👉We are in the Preflower stretch 👈
OMG I LOVE THE PINK PISTOLS 👈
So Shit , I gave them just a tad to much nutes on the last feeding 👈 But I have since fixed it
So I'm starting to pull her over and do some low stress training 🙃 and some defolation 😳
Lights being readjusted and chart updated .........👍rain water to be used entire growth👈
👉I used NutriNPK for nutrients for my grows and welcome anyone to give them a try .👈
👉 www.nutrinpk.com 👈
NutriNPK Cal MAG 14-0-14
NutriNPK Grow 28-14-14
NutriNPK Bloom 8-20-30
NutriNPK Bloom Booster 0-52-34
I GOT MULTIPLE DIARIES ON THE GO 😱 please check them out 😎
👉THANKS FOR TAKING THE TIME TO GO OVER MY DIARIES 👈
Likes
14
Share


@SkunkyDog
Follow
Hallo zusammen 🤙
Habe sie am 61 Blütetag geerntet
Wir sehen uns in 3 Wochen mit der Bewertung 😉🤙