
Likes
Comments
Share


@Daweed83
Follow
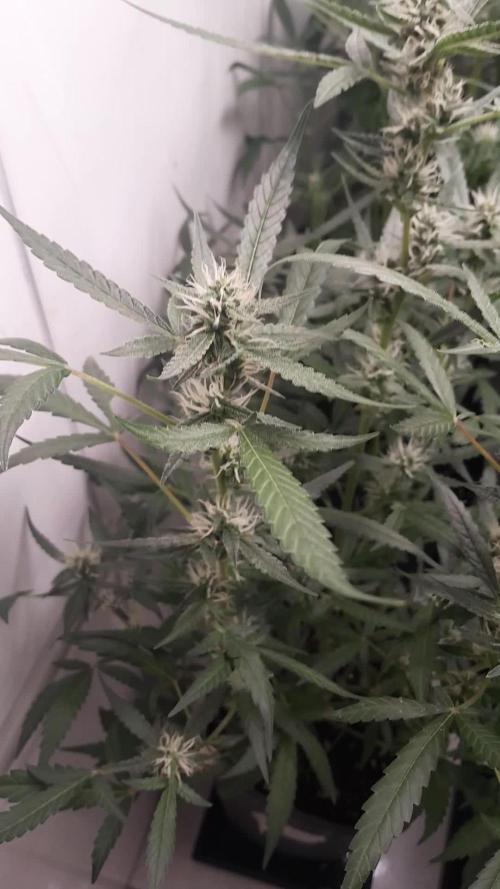
Entering the last 2 weeks of nutrients before flush. Still looking very healthy to me. Growth of buds look a bit slower now but other than that all good here! :) This pollen is getting me supeeer excited 😍
🖖🏽🖖🏽


Processing
Likes
19
Share


@MadeInGermany
Follow
Hi everyone 🤗.
Since she started to flower last week, she got Canna Flores and Canna Boost for the first time :-).
It develops very nicely, gets an even level and has a nice extension 👍.
Otherwise there is nothing to report this week :-).
I wish you all a nice weekend, stay healthy 🙏🏻 and let it grow 🌱
You can buy this Strain at :
https://greenhouseseeds.nl/
Type:
Wonder Pie
☝️🏼
Genetics:
Wedding Cake x OG Kush
👍😍
Vega lamp: 2 x Todogrow Led
Quantum Board 100 W
💡
Flower Lamp : 2 x Todogrow Led
Cxb 3590 COB 3500 K 205 W
💡💡☝️🏼
Earth: Canna Bio
☝️🏼
Fertilizer: Canna Bio
☝️🏼🌱
Water: Osmosis water mixed with normal water (24 hours stale that the chlorine evaporates) to 0.2 EC. Add Cal / Mag to 0.4 Ec Ph with Organic Ph - to 6.0


Likes
12
Share


@Chucky324
Follow
Hello, this is the end of week 2 and the beginning of week 3 of flowering.
Things are going good in here this week. Got some canopy mites for the thrips damage I've seen on some leaves.
You can see the little glass jars I used to hold the bran they come in the picture under the table.
The canopy mites eat the bran mites while they are in the package.
Got in here and did some LST and some fanleaf removal. I also removed the sucker branches. They take energy away from the plant.
I guess when they activated the Growdiaries 2.2 I couldn't log on for 5 days and got discouraged and didn't report last week.
The site didn't even work right. There was about 30 pictures when the home page was up, but all the other pages were without content.
Somehow my operating system didn't get through. But they fixed it and I'm here now.
Plant #1 smells wonderful, Sweet Lemon candy and I can smell the papaya in it too.
OK. Have Fun.
Chuck.

Likes
5
Share

@Jardineiro_Br
Follow
Reduzi a concentração do fertilizante e as plantas estão criando os botões agora, um pouco mais lentos talvez que o LSD, mas sétima semana e estou satisfeito com a aparência, apesar de ter limitado o fertilizante elas não apresentaram sinais de excesso final da sétima semana a geada chegou forte .
Processing
Likes
36
Share

@MadeInGermany
Follow
Hey everyone 🤗.
Another great week goes by in which both phenotypes have developed super 😀.
I think I will give you 1-2 weeks before they come into bloom .
Until then, I wish you a lot Spas with the update, stay healthy and let it grow 🍀
You can buy this Strain at :
https://sweetseeds.es/de/sweet-skunk-f1-fast-version/
Type:
Sweet Skunk F1 Fast Version
☝️🏼
Genetics:
Sweet Skunk Auto (SWS34)
X
Early Skunk
👍
Vega lamp:
2 x Todogrow Led
Quantum Board 100 W
💡
Bloom Lamp :
2 x Todogrow Led
Cxb 3590 COB 3500 K 205W
💡💡☝️🏼
Soil :
Canna Coco Professional +
☝️🏼
Fertilizer:
Green House Powder Feeding
☝️🏼🌱
Water:
Osmosis water mixed with normal water (24 hours stale that the chlorine evaporates) to 0.2 EC. Add Cal / Mag to 0.4 Ec Ph with Organic Ph - to 5.5 - 5.8 .


Likes
16
Share


@Sadhus
Follow
Rempotage en 13 litres, pleine santé rien a signaler, jolie feuille fine et pointues avec de belles dentelure bien prononcé , plantes très élancé, les sept sont très belles, encore une semaine ou deux et floraison et j'ai hâte de voir sa !
#kannabia
#madamegrow
#trolmaster

Processing
Likes
6
Share


@Andres
Follow
I was away with a lot of work outside the city. but I have returned. She will be healthy. With the first day of the first week in her third week of flowering, she will be a little sweet. She will be a citrus with a normal smell of 59 cm and that is for the time being.
Likes
5
Share


@Cannabees_grows7691
Follow
The Drip hydro has a measure sheet on their website if needed. Just watching the seedlings grow is an amazing experience.

Likes
32
Share


@ArtisticGrown
Follow
Over all it was a hell of a ride, but a good one. My first grow ever learned so much and still learning. Started with 4 plants ended with 3. One of them was mutated or something during veg so decided to pull. This strain grew strong and thrived the whole time. I learned a lot about ph and air flow and VPD still learning and trying to find that sweet spot! I loved getting to know these girls it’s crazy how plants talk to you! Also watching these girls flower and bloom! Into some sweet sticky dank yummy nuggs was amazing such a good feeling! Emm Over all I’m happy with 3 oz ready to keep on growing more and learn to get a better yeild! Super thankful and happy growing
Likes
20
Share


@TiRobotProds
Follow
Dernière semaine de Finition impeccable a 2ml/L.
Les trichromes sont à 45% laiteux 50%transparent 5% Ambrés.


Likes
12
Share


@CANNASIM
Follow
WEEK 1 of flower. This is insanely quick, veg for three weeks and on week 4 we are flowering strong.
It is raining a lot, so i had to use a top dressing, ingredients on the week 3, to manage the soil nutrients till the end of the cycle. About two table spoons.
Watering once a week, this girl is in a supersoil, very natural as a grow, nothing much complicated, no science fiction with fertilizer or chemistry.
I’m curious about the yield, and how much can i pull out of this way, with minimal work and a nearly inert soil. Let’s see how this experiment turns out.
Likes
7
Share

@Green_Zyphoria
Follow
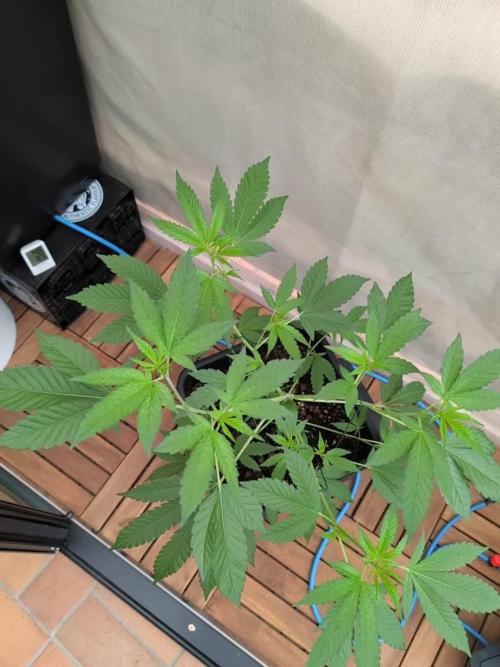
It was a pretty mixed week weather-wise. We had some beautiful sunshine, but also quite a few cloudy days—today, it's actually super cloudy.
At the beginning of the week, I paused the Autopot system to give the lady two specific top feeds:
First Feed: A fresh dose of nematodes to nipped any potential fungus gnat issues.
Second Feed (2 days later): A light snack of 2.5ml Orgatrex to feed the microbials and give the soil some extra sugars.
Yesterday, I finally restarted the Autopot system, so she is officially running on autopilot again! I also adjusted the LST a little bit further to keep her flat and wide, and now I’m just waiting for that explosive, bushy growth.
I’ve also included a picture of the whole setup today! The greenhouse is completely open in the back, but I’ve installed a fine insect screen there.
On the right side next to the GM, you can see a Orange Sherbet Auto, which is currently stretching and heading right into flower!
Likes
18
Share


@CraftedFlower
Follow
This plant was an absolute joy to grow. She was photogenic and really something that has stood out to most grows as far as looks go. The purples and hints of red caught everyone's eye. The vigor during veg was something I've never experienced; it was amazing. It seemed to enjoy being topped! I really wish flower had produced bigger buds, but they seem pretty dense, so I’m hopeful. Great job as usual Ethos!

Likes
3
Share


@Redeyebud
Follow
EC Problem not solved yet.
Clear water: 0.67
With nutrients: 2.5
Just trimmed some leafes. Vanilla Kush is slowly getting better but deep cheese is getting really huge.


Likes
17
Share


@3Dwarlord
Follow
I was pleased with the overall outcome of this grow. These weren't huge plants but I didn't expect them to be, I was pleased with the look, flavor and overall presentation. I feel like I have a lot of learn about the best techniques on curing and storage but I continue to develop strategies.
Likes
25
Share


@Bongman
Follow
Hi Guys,
Week 17. I think F2 is almost ready for harvest. I got some deficiencies on some of the leaves. WIll Upload photos when its time for her to wake up. I am scared that it might be light leaks due to the new 6 in fan I added for air out flow cause to temp is too high for flowering. The problem is the ducting. I used some cheap ducting that came as a package from my Phresh carbon filter... BE SURE TO CHECK FOR LIGHT LEAKS ON DUCTING and not just the grow area and the appliance lights. Will add more later.
9th June update: F2 is ready to be taken down. WIll Flush today and let it dry out for two or three days then its harvest time.
QUESTION: How to tell if nutrients are flushed. Leaf color/Deficiencies right before harvesting. For my two plants in this grow.
F1 - Healthy dark green color leaves, which was bigger and taller due to the early transplant to larger pot Mid Veg. I flushed a few days before harvest and almost all the leaves were healthy looking and dark green.
F2 - A lot of thin dried and yellowish brown leaves that look like a lot of different deficiencies, which was shorter but collas are much bigger. It is short because I didn't transplant until 2 weeks into flower. . About to flush and harvest this week but the leaves are all showing heavy deficiencies. Does that mean there are still a lot of stored nutrients in the plant?????? thanks for the help in advance.
BM

Likes
4
Share


@Thejimmey420
Follow
Diese Woche haben die Buds wieder einiges an Masse zugelegt die beiden headbuds sind fast so groß wie eine 1,5l pet Flasche mal gucken wo das noch hingeht. In der Woche wurde einmal das Wasser getauscht und Pk wurde wieder aus der Düngermischung entfernt . Ab Mitte der Woche habe ich noch eine sanlight evo 3-60 eingebaut die sind wie folgt gedimmt evo 3-60 hinten links ist bei 60 Prozent die rechts bei 80 die Lumatek Ats300w Pro ist bei 100 Prozent ec wert habe ich auf 1.16 gesenkt da sich sonst die Nährlösung immer weiter erhöhte Ph wurde in einem Bereich zwischen 5,8-6.2 gehalten. Die Tribe wurden mit Pflanzendraht gestützt .
