


Likes
26
Share


@Sickone
Follow
Ab geht es in die nächste Woche!
Auf Empfehlung habe ich BioBizz Alga Mic Und Acti Vera zu meinen Plan hinzugefügt um die Ladys etwas zu retten.
Zusätzlich habe ich der Lady etwas unter die Arme gegriffen indem ich alle vertrockneten Blätter entfernt habe.
Ich lasse mich mal überraschen wie sie sich auf den letzten Metern machen.

Likes
10
Share


@Fonzo412
Follow
This week will be day 56 on a very good grow. The girls seems to be happy in their environment .
Both plant are growing at a fast rate . But the Power plant fem have been growing taller with no real pistol showing .
The strawberry banana auto seems to grow wider. And is in an early flowering stage
Still have some small amount of yellowing of leaf 🍁 tips on both plants nothing major .
The strawberry 🍓 banana 🍌 auto has a glorious smell coming from it now mmhmm it’s also not the same smell twice 🤷♂️ but it smells great .
No major issue so far the girls seem to be going strong 💪 .
Also been doing some light defoliating of fan leaves I may top the power plant she’s getting to tall
. May need to do more defoliating on the strawberry 🍓 banana 🍌 auto since the buds are coming in a lot more rapidly.


Likes
30
Share


@valiotoro
Follow
Week 9🤓!!
Im entering in the last PuSsSh
Green ZenZaaation💥
FCE-6500 100% + adlite UV IR deep red🔛
Happy growing💚
Likes
11
Share


@TiRobotProds
Follow
Nous sommes à la 7ème de fruits gros colas principal, tête des tiges secondaire moyennement gros. Je n'envoie plus de nut irrigation a l'eau uniquement.

Likes
3
Share

@Phileed
Follow
By now I also cut the second Apple strudel so just papaya cookies and banana purple punch are left now, in the meantime the other are drying slowly, the guava is ready for trimming and curing. I’m very curious about the quantity from each plant now.
Happy growing!
Likes
Comments
Share

@MyLittleGarden
Follow
Vegetationswoche 7 - 01.06. – 08.06.2026
In der siebten Vegetationswoche entwickelte sich die Blue Sunset Sherbert weiterhin sehr stabil und gesund. Große Eingriffe gab es in dieser Woche kaum. Neben leichtem Low-Stress-Training mit Clips und etwas Entlaubung wurde die Pflanze weitestgehend in Ruhe gelassen, damit sie sich eigenständig weiterentwickeln konnte.
Zusätzlich wurde sie im Verlauf der Woche einmal mit etwa zwei Litern Wasser gegossen. Weitere Maßnahmen waren nicht notwendig.
Die Pflanze wirkt aktuell sehr vital und zeigt einen kräftigen, kompakten Wuchs. Besonders auffällig ist die buschige Struktur mit vielen Seitentrieben und dichter Blattmasse. Trotz ihres eher niedrigen Wuchses breitet sie sich zunehmend über das Beet aus und beginnt langsam, die verfügbare Fläche einzunehmen.
Das bisherige Toppen sowie das leichte Training scheinen der Pflanze gut bekommen zu sein. Insgesamt macht die Blue Sunset Sherbert weiterhin einen gesunden und stabilen Eindruck.

Likes
73
Share


@Roberts
Follow
Lilly X White Widow is doing well under the Spider Farmer G5000/UVR40 lights. I just changed the light times to 12/12. I will be doing a solution change to a blooming nutrition in a few days. Everything is looking great. Thank you Athena, Spider Farmer, and Ripper Seeds. 🤜🏻🤛🏻🌱🌱🌱
Thank you grow diaries community for the 👇likes👇, follows, comments, and subscriptions on my YouTube channel👇. ❄️🌱🍻
Happy Growing 🌱🌱🌱
https://youtube.com/channel/UCAhN7yRzWLpcaRHhMIQ7X4g
Spider Farmer Official Website Links:
US&Worldwide: https://www.spider-farmer.com
CA: https://spiderfarmer.ca
UK: https://spiderfarmer.co.uk
EU: https://spiderfarmer.eu
AU: https://spiderfarmer.com.au
G5000 Light Amazon Link:
amzn.to/4643esa
UVR 40:
https://www.amazon.com/dp/B0BR7SGTHS
Discount code: saveurcash (Stackable)

Likes
3
Share


@OldskoolHed
Follow
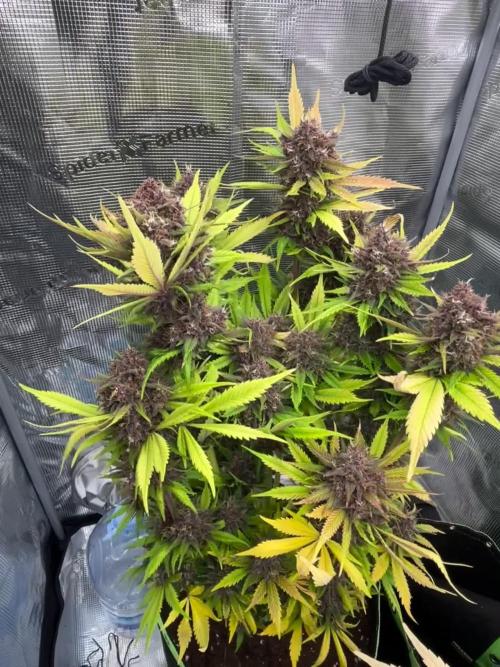
Almost to the end. Fading light violet and smelling fantastic like candy skunk. In full flush mode.
Processing
Likes
8
Share


Likes
32
Share


@ArtisticGrown
Follow
This weeks been good, still directing some of the colas so other plants can get light. 2 of my plants are battling for the room in the tent! So 2 other plants are struggling to catch up. Over all tho things are going well! Been watering with nutrients one day and then the other ph balanced water every other day nutrients. Started oxygenate my water. Should of done that a while ago! Happy growing 🌱✨


Likes
18
Share


@Luca90
Follow
Again week went smooth. Nothing much beside watering and checking out its progress but for the next weeks I guess there will be a lot to learn.. forgot to say that I was spraying leaves every day with neem oil to prevent most of the insects
Likes
7
Share


@Ninjabuds
Follow
The OG kush from rqs is a stellar plant. I grew the OG kush from rqs b4 but it turned out way different b4 it was all green and stacked really well with a hash smell and old school kinda growth. This plant is grayish black nugs with dense goofball size nugs with far internodal spacing. This plant has some super dense nugs with a dank smell with this really good other smell but I can’t put my finger on it kinda fruity but not the normal fruit smell. I can’t wait to smoke this plant when it’s dry and cured. This plant has really long stems that need some help so they don’t fall over the plant has a lot of bending to it so the branch’s can bend a lot without breaking witch is good for long stems but you have to hold them up somehow at the end of flower with steaks or string or something to hold it up right
Likes
29
Share


@Prilyfe13
Follow
May 3, 2024 Day 78
This week is the last week of nutrients before a week or so of flushing. I'm still not seeing any fade, but most of the buds are turning a beautiful purple pink color. At least on Tropicana Cookies. Tropicana C isn't quite there yet. Maybe a few days behind. Some purple is starting to show though.
No watering for today. I have the reservoirs full of diluted nutrients. I added a half gallon of plain PHed water yesterday. However, these plants aren't taking in much. The soil is getting saturated and the plants aren't drinking as much. I think it may be nutrient lockout. Or just the age of the plants. They slow down when nearing the end. How near, I don't really know. Maybe a week or so before harvest? Either way, the soil moisture used to be around 49% to 51% saturation. Now it's at 57% which has been unheard of through the whole run. I just can't tell which problem it is.
Tropicana Cookies looks great! Lots of bud through the whole plant, not big, but getting denser and slightly fatter. As I said before, her buds are getting super purple with tons of orange pistils. The trichomes are a mix of clear, cloudy and amber. Mostly clear and cloudy with amber being about 5% throughout.
Tropicana C looks great as well. One top is leaning hard and no wonder. It's covered top to bottom is dense bud. Still not big buds by any stretch of the imagination, but they seem hard as rocks. I haven't felt them to find out. I'll figure that out on trimming day after drying.
She doesn't have the purple coloring like her sister, at least not yet. Some buds are starting to show the purple, but nowhere near as much.
The lighting will be changed at some point within the week. Maybe closer to the end of the week. The light is far away enough where I shouldn't get any trichome issues. I definitely won't be getting light stress at all, so I may leave the light as it is for as long as I can.
The environment is still a little wonky. The temp is the same, hovering between 75° and 76°. I'm doing my best to keep it under 77° as 78° can cause a potential breakdown of trichomes. Gotta be careful at this crucial time.
Grow System Environment:
Temp: 73.2°
RH: 55.0%
VPD: 1.23 kPa
May 4, 2024
May the 4th be with you! Star Wars all the way!
A little bit of a thing for these two today.
First, I need to comment on how purple these buds are getting. Second, I think they only have days left. Maybe a week. But based on how they look and their trichomes, I wouldn't be surprised if they were ready in 5 days. That being said, I think it's time to start flushing.
There are a couple reasons I think they are almost ready.
For one, they have nearly all orange pistils. Just a few colas here and there. They still have a decent amount of white, but they will be gone later today if not tomorrow.
The trichomes are a good 60% cloudy, 30% clear and about 5% amber. I'm leaving 5% out for margin of error.
Finally, this could also be a lockout, they are taking significantly less water. At this stage it is to be expected, but I do have a nutrient issue with both of them. So it could be that as well. Or a combo of the two.
All that being said, I think it's safe to say they are ready for flushing.
Tropicana Cookies is noticably stronger than her sister, or her buds are just heavier. But, this lady has no hard leaning branches. Some leaning a bit inward, but that was how I trained them.
On the other hand, Tropicana C has quite a few branches leaning hard. I had to prop one up against a stronger cola to keep it up in place. Another is leaning inward so I have that propped between 2 other colas to prevent light blockage.
Both plants look kinda terrible right now with top leaves having spots everywhere from too much of something. Or lack of Phosphorus? Something. I need to learn this stuff.
I think the lesson learned here is to make sure to time everything properly and not pay attention to every detail in a feeding schedule. The one I used was based on 3 weeks of veg and 6 weeks of flower. I had 5 weeks of veg and am now on week 6.
Flowering seems to be on point, but the longer veg stage messed me up. So I will be following the feeding schedule provided by Advanced Nutrients. Just cut the nutrients way down.
The light power will be dropped this week. I plan on dropping it 10% mid week and another 10% by the end of the week. The DLI should drop back down to 40 mol/m²/d inside and 38 mol/m²/d outside. By end of week, I plan to have the DLI down to 38 mol/m²/d. However, I have 2 other plants in the tent that are about a week behind these two. So I may have to change my plans for lighting and leaves it up for the rest of the week and drop it down to 38 mol/m²/d next week. But I don't think I have more than a week left. Oh well. I also won't be able to run a dark period. The plants are too big to fit in a 2x2 tent. So they will be harvested right away.
I'll just keep the temp down below 75° for the rest of the week. The other strain is Banana Purple Punch, so it should benefit from the lower temps as well. I shouldn't have any trouble with mold or anything. The plants come out of the tent everyday and the airflow is fantastic. So the high humidity shouldn't be much of an issue. I'll do everything I can to drop it as much as possible anyway.
Grow System Environment:
Temp: 74.1°
RH: 57.9%
VPD: 1.19 kPa
May 5, 2024
A bit to do today. Both ladies need top offs. Tropicana Cookies much less so. Tropicana C is almost empty while Tropicana Cookies is about half full. She has to be super close to harvest. The trichomes show it as well. Not quite there, but almost. That being said, I'm switching to Flawless Finish for the rest of the grow. They will need about a week of flushing and then I think they will be done.
Tropicana Cookies is looking great! Her buds swelled up to an acceptable size. They definitely aren't nearly as big as my Gorilla Cookies, but that was an insane plant. Anyway, I'm not seeing any signs of fading. Just nutrient burn. However, I rarely get fade. Maybe it will start later this week. Anyway, I'll have to clean the reservoirs out. I may have to do that today. Just plain water though, then next watering will be Flawless Finish.
Tropicana C is definitely putting on weight. Her colas are starting to pull more and more branches down. Leaning everywhere. I have 2 that will completely fold over, so I have to wrap them around other branch leaves to lock them in place. Her buds aren't purple though. It's starting to come through now, but nowhere near as her sister plant. However, her pistils are like glowing orange. Beautiful. She still has a good 40% white pistils. I like to see a minimum of 75%, but I rely mostly on the trichomes. Regardless of color, she is still quite the beauty.
Both ladies are extremely strong to the nose now. Even with my exhaust fan at 100% power, it still doesn't pull all the smell out. It's could also be the combo of these two and the two Banana Purple Punch plants in there tent as well. Either way, they look and smell great!
The lighting will have to stay where it is for the rest of the week. I don't think it will be a problem. I have the light 24" away from the plants and shouldn't have any stress at all. The reason being is those two Banana Purple Punch plants. They still have a good 10 days left while these two only have about 5 to 7 days left. So it will stay exactly where it is.
The environment is driving me nuts. I can't for the life of me get the humidity to stay below 60%. I swear it's the gods messing with my shit. Lol. The temp is still controllable. I want to bring it to 74°, but then I risk higher humidity. But if I crank the heat, the temp could get too high and damage the trichomes. What a sticky place to be. I'll just have to open the door periodically throughout the day while this humidity is out of control.
Grow System Environment:
Temp: 73.0°
RH: 59.8%
VPD: 1.09 kPa
May 6, 2024
Not a lot going on today. No watering needed, no light changes, nothing. Just some pics and environmental adjustments.
Tropicana Cookies looks great! She's very close to harvest. I'll be checking trichomes again in 2 days. I'd say 5 days left on her. She just needs more amber trichomes. And she could do with less clear trichomes. Although, the majority of them are cloudy, this is an indica dominant strain. So I like a little more amber than that of a sativa.
Honestly, it levels out the harvest time. Sativa's take slightly longer so less amber means less time. More amber on the indica strains takes slightly longer than their shorter lifespan. So they tend to level out for harvest time.
Also, what I thought was more damage to the leaves, I'm starting to think it's the start of the fade. Even with the Flawless Finish flushing out the extra nutrients, the leaves are still showing "damage". So maybe it's the start of senescence? Or residual nutrients still in the soil. Probably that now that I think about it. It will take days for the issue to subside.
I'd also like to note that the damaged leaves aren't crispy at all. They still feel like they are very healthy. So instead of cutting them off like I planned, I'm going to leave them on and use them for a timeline for the rest of the plants.
Tropicana C also looks great! Her branches are bending over all over the place. Just the outside ones and taller colas. They may be small buds, but they are solid and a plethora of them.
I'm finally seeing purple. So she is definitely the same phenotype, just got slightly delayed by probably 3 days or so. I'd say give this one another 5 to 7 days. It's could be up to 10 days which is no big deal as I have other plants in the tent that won't be done for another week or 2. So I'm not too worried.
Both ladies have a crisp and fruity aroma. Even though it's a crispy smell, it's strong and engulfs the smell gland things in a citrus, sweet, fruity, I guess gassy and earthy aroma.
They aren't taking as much water in anymore, so it's definitely nearly time. I don't really see it doing much right away. As I said earlier, Tropicana Cookies is still advancing in the nutrient burn. Maybe it was a deficiency the whole time? Someone mentioned missing Phosphorus which I think is Big Bud that I used at the complete wrong time.
We aren't changing the light at all. The other 2 plants in the tent need it to be where it is for another week, and these 2 should be done in an week or less.
The environment is still wonky with the temp at 75° and the humidity at 58% and bouncing into 60%. I managed to get my room down to 48% earlier, but now it's up to 52%. I'll have to do my best to keep up with the temperature in the tent. Try to keep it below 75° if I can. Also, I really cannot get the temperature to drop below 67° at night. The average is and has been 68° for the majority of the grow. However, last night's humidity was absolutely insane with an average of 67%. I really can't stand weather sometimes. It's a good thing I pull my plants out everyday and inspect them. Otherwise I think I'd have some mold issues. So far we are good to go. I'm also opening the tent periodically throughout the day to let more dry air in and clear out the moisture to room level. Today should be good with the lower temps outside and in turn lower humidity.
Grow System Environment:
Temp: 73.8°
RH: 62.4%
VPD: 1.05 kPa
May 7, 2024
Not a lot going on today. I might top off the reservoirs tonight, but mostly tomorrow.
So leaf damage continues to spread. I swear this better be senescence. It's weird, because it's spotty. All over the place. Like not rust, but yellow and orange. It still looks like leaf damage to me. I don't know.
As I've said before, I don't get a lot of fade from my plants, so I'm not really sure what to look for. for example is this spotting. The timing is right for senescence, but I'm not really seeing solid color change. Is that "fade"? I can't see it as fade. It still looks like damage. I guess I'll see what happens over the next few days.
Tropicana Cookies looks great! Her buds are almost all purple now. Some of the lowers are still green, but I don't expect the whole plant to turn purple. However, it may happen over the next few days.
Tropicana C is weighing down a ton of tops now. They are falling over like dominos. Some are bending half way over. The tallest one has essentially collapsed under its own weight. I used some plant ties to hold it up with other tops. I had to weave a couple tops together just to keep them from falling over when I placed it back in the tent. Then they untangled and flopped over against the other plants and tent wall. A promising sign of some super dense buds. Considering how small they are, they must be heavy indeed. Super dense. I can't wait!
The smell is so strong now that it's permeating through my air sealed door into the rest of the house when the tent is open. I even have the exhaust fan, that runs to the outside of the house, at full power. And an AC unit that exhausts outside as well. Still the smell is wonderfully overwhelming. Excellent!
Lighting is staying the same until the end of the week. Then I'll be dropping it down to 36 mol/m²/d for the rest of the grow. It's to accommodate the other strain in the tent.
The environment is getting better. The humidity my room dropped down to 42%, so the humidity in the tent dropped to 54%. Not good at all, but much better than 60%+ for days. The temp is at 76°. I'd still like to see it at 74°, but I'll be able to do that when I get the humidity under control.
Grow System Environment:
Temp: 73.7°
RH: 54.6%
VPD: 1.25 kPa
May 8, 2024
Trichome Day! We only have pictures today. I'll do a video for next week. Speaking of next week, after checking the trichomes, I believe these two will be done by the end of next week. I know I'm pushing it off a bit, but they just aren't ready yet.
Tropicana Cookies has started to fade. Her sugar leaves and some of the fan leaves are developing beautiful dark purples. The rest of the leaves are starting to lighten up as well. We are looking super good.
Tropicana C on the other hand is a bit behind. I'd say 3 days maybe 4. No idea why, but she is. Also, her branches have to be weak AF to be bending all over the place. The buds aren't that big or heavy. So yah, just a weak plant. Definitely from my nutrient regimen. She smells great though and she is getting more purple in her buds, so she will hopefully turn out like her sister plant with super bright purple buds. I think they are the same phenotype, so this one should turn purple too. I think.
One issue I may run into is timing. I need to harvest both plants at the same time so I can fit the 4 sour diesels I have in the 3x3 with the other 2 that are currently going. It might be a tight call. If they are indeed 4 days apart, I may overdo it with Tropicana Cookies and possibly underdog it with Tropicana C. We shall see.
The lighting is just going to stay the same. There's no point in dropping it now. The other plants in the tent still need it and these 2 are so close to being done, it really won't matter.
The environment is a nightmare. I cannot get the humidity below 60% now. It may go down later this afternoon, but not enough. It's maddening. I'll just keep opening the tent every couple hours to let fresh air in, even though the exhaust fan is running full speed.
Grow System Environment:
Temp: 74.0°
RH: 57.6%
VPD: 1.19 kPa
May 9, 2024
It's the last day of week 11 and we are embarking on the final few days.
Nothing to do today, but there are a few notes I'd like to make.
Tropicana Cookies has mere days left. Her buds are almost all purple now from top to bottom. Not only that, but the leaves are also turning purple. Some of the bigger fans leaves are starting to fade. It started with the damaged ones and is slowly working through the other leaves. Just a few at a time.
Something I noticed is how much water her container is holding. I may have to pull the wicks. I guess it makes the most sense. I'll do that later today. Mostly because the bottom of the container is dripping saturated. I'm worried it will cause some last minute over watering issues.
Tropicana C is falling all over the place. And I mean all over. She has some weird bud growth as well. Some of the tops bent over, but not only that, folded over themselves where the tops are now facing the bottom of the container. It looks like I missed something when placing the plant back in the tent. It's just strange how she is doing this and the other one isn't at all.
But this one... I feel like all these bending branches are going to impact the light coverage for the whole plant. Especially the outside where the branches are just falling over. I don't have a support like that, and the other tops are too weak to hold the outside branches up. I'll just have to deal with it. If it comes out messed up and larfy, I'll just use it for concentrate.
I'm starting to get an idea of the potential yield. Both plants have tons of buds, but Tropicana C seems to have less dense buds, even though she in bending over everywhere. I'd say that Tropicana Cookies has a potential for 3 oz dried and trimmed. Tropicana C might yield 2.5 oz, but I'm thinking closer to 2 oz. We shall see. She still has a few days more. Maybe a week.
The light is the same. It's kind of a good thing. The leaning branches still need light, and they are about 2" lower than the light. That dropped the DLI a little and now I don't have to worry. However, it didn't do anything for Tropicana Cookies.
The environment is still kind of wonky. Day time temps are around 76° with the humidity still high at 55%. The night temp was really good though. The average was finally down to 66°. So that's good for the last few days.
Grow System Environment:
Temp: 72.6°
RH: 58.6%
VPD: 1.11 kPa


Likes
18
Share


@Borndlkramer
Follow
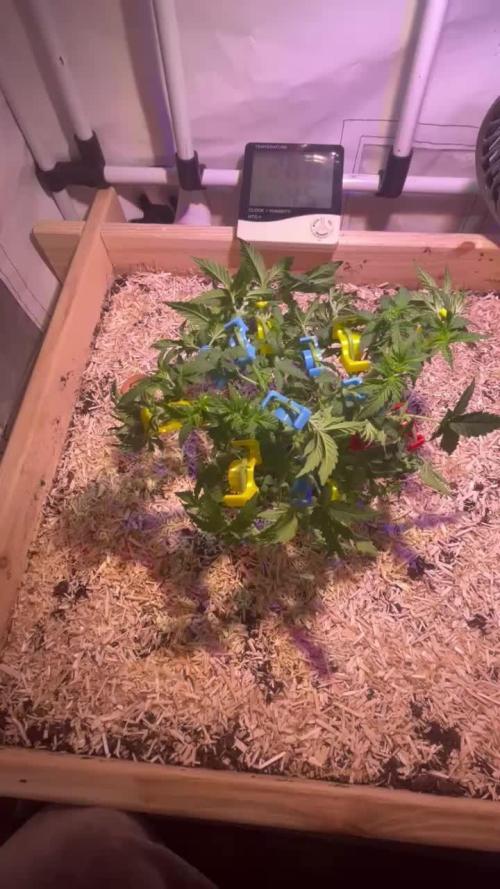
Die Pflanzen fühlen sich pudelwohl in den 15 Liter Töpfen. Jetzt habe ich alle vier Planzen getoppt.

Likes
9
Share


@L8bloomr1008
Follow
Start of week 8 for DG. Buds are still filling out. Wondering when of if I should flush her before harvest? Only been using Cronk Nutrients for a couple of weeks so I don’t think there should be too much of salt build up. Haven’t tested and ppm from runoff. She still showing a little bit of bite or light burn so I fed her plain ph’d water for 2 feeds in a row so we’ll see.
The GWK is starting week 7. She’s taller but still has a lot of filling out to do. She also showed a few leaves of nute burn but I’m pushing her. She had one plain water feeding this past week. She’s looks great though.
Flush or no flush? I think I’m a couple weeks out from DG harvest.
Likes
50
Share


@SuggaShane
Follow
First time running dwc. So this should be fun and interesting. I’m ready 🌱💪🏽