
Likes
Comments
Share


@Mrs_Larimar
Follow
May, 8th
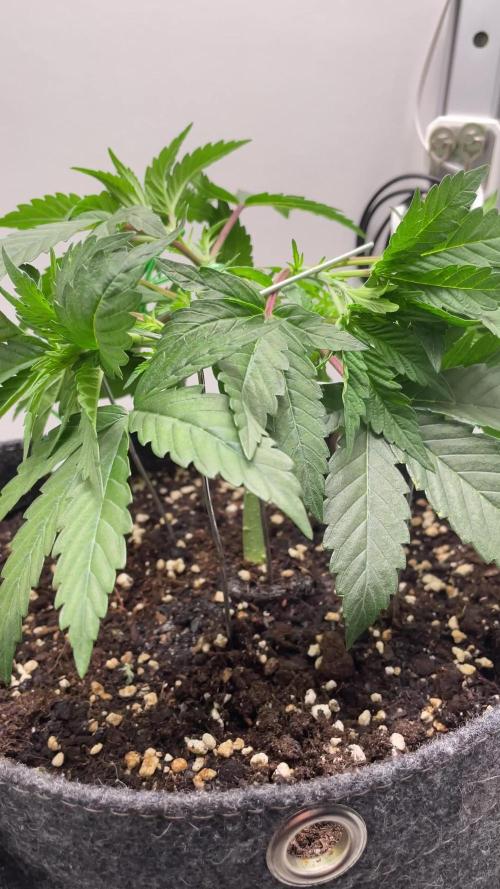
AFriend took Clones of her, so she already got her final " Haircut", before Flowering
She went into Floweringmode Today
So let us stay Courious what she shows us
She might be Big, because i waited until i could cut some Clones
but iam sure we find a good Place for her

Likes
57
Share


@LockDownGrow
Follow
Ok so the taste test is :
I like this over the girl scout cookies and the BlackBerry for daytime ,
It's a very nice euphoric head high that turns you into a creative genius , you feel like you could do anything you put your mind too, the buzz sticks around for a while too ,
It's really nice indeed , and a few months cure and she will smell fantastic ,

Likes
36
Share


@starke
Follow
I don't know where to start and I must admit I'm completely overwhelmed by this beautiful beautiful plant ❤️❤️❤️ Aaaaaaaaaaaaaaaaaaaaaaaaaaah, I'm so happy 😍😍😍
She is a blessing!
Excuse the outburst, but she is magical ☀️ I applaud you guys at Humboldt for creating such a wonderful strain 🙌
Some details upfront, before I rave some more:
- 134 Days in total: 70 Days in Veg, 64 Days in Flower with 128W LED in a 60x60x160cm tent
- 7 Days Drying regularly, 9 Days Drying in the Fridge
- 432g - Wet weight with stems
- 103g of those for Fresh Harvest Infused Oil - 190ml Olive oil with 30mg/ml THC & CBD - approx. 20g dry (for dry weight calc.)
- 87g for the DrZiggy's Low And Slow Drying in the fridge - 20g dry
- 242g for regular Drying @50% RH and 22°C - 55g dry
- 30g dried sticky trim in the freezer
Summary of my growing experience with this strain:
She takes well to massive training and a little neglect in the beginning, meaning she recovers well, which is what I want 😊 I didn't experience any major deficiencies. She had a little nitrogen deficiency during the later veg phase, which she showed with lighter green leaves. I blame this on my long veg time and my pot size of only 11l. She consumed all her soil and nutes by the end of veg. I will keep that in mind for my next grow. Since I increased my nitrogen levels so close to flowering phase, I overdid it a little on the nitrogen which showed a little bit during later flowering phase with downwards clawing leaves. So I will be more careful with nitrogen especially while transitioning into Flower. I did not flush this plant and she smokes already beautifully mild after only a couple of days of curing. Drying her took 7 days in the tent and 9 days in the fridge. She crusted up with lots of stickiness while drying and gave off a good bit of scissor hash & kief when trimming. Smoking her is a great and different experience to me. It's my first time with a 1:1 strain and I can definitely notice the CBD content. She shows in a very well balanced body high with a slight and gentle knock on the THC door. The first couple of days I felt a craving for higher THC which settled down after only a couple of days. Very interesting and definitely worth growing. So you guessed right, I totally recommend growing this beauty. Especially if you are interested in exploring a 1:1 THC:CBD strain with all its magical medicinal values 🙏
Why I grew this strain:
Like @Experimentgreen on here, I grew this strain for my Mama ❤️ She is open minded to trying to solve some of her health issues with these beautiful plants and the magic they bring but she also likes to have a bit of fun, she doesn't mind. So a 1:1 strain was quite handy. She suffers from neuropathic pain, arthritis in her joints, restless legs and insomnia. All very relatable issues and perfectly suitable to be introduced to some good CBD and THC content. She already has a little tolerance, since she is treating her restless legs with gummi bears I made with a strength of 1.5mg/gummi bear. This small dose already helps her on a daily for her restless legs. Beautiful 😍
So with this special mission in mind, I wanted to process the plant with only the very best options and create Cannabis Oil (Capsules) for my Mom to take. I chose a method called "Fresh Harvest Infused Cannabis oil" by the wonderful member SweetSue over at 420magazine: https://www.420magazine.com/community/threads/fresh-harvest-infused-cannabis-oil.363371/ I hope it's ok to relink, no need to duplicate already existing and well researched content, right? I will not go into detail and def. recommend reading through the whole thread. I only document the short version here, but feel free to ask me, I'm happy to share my experience. The oil I made has 30mg/ml of THC and CBD. That's a good value.
I calculated the strength the following:
75g fresh Flower in 200ml Olive Oil - with 10% CBD&THC
85% extraction efficiency with the infusion method
85% * 10% THC&CBD = 0.0850
0.0850 * 75g = 6.375 gram of available THC & CBD
6.375gram * 1000 = 6375mg/THC
6375mg/CBD
6375mg/200ml = 31.875mg/ml CBD & THC
I created capsules with 3mg per capsule. We are currently trying to find the right dose for her. She started taking one capsule 60-90min before bed for 3 days now and will increase by 1 capsule tonight. We continue until a max dose of 15mg/day but always re-evaluate how she feels. She's documenting her experience quite cute. Very heartwarming and powerful. So far she sleeps better and she falls asleep faster, which she hadn't done in a long while. Onset is pretty precisely between 60 and 90 minutes. She has not had any restless legs so far. I'm excited for her and can't wait to see where this takes us.
I also made her a salve/creme she uses as a topical on her joints. When she uses it early enough, before the big pain hits, she feels it helps. Of course this is not a science study and everything is purely based on personal experience. I thought I share, in case anyone is interested, also I want to give back a little, since I consume so much knowledge from all over the internet, including here, so thanks 🙏

Likes
8
Share


@Thepiedpiper
Follow
This week's been real fun seeing alot of purple coming in slow leaves are turning very purple I ditched the blurple light... it was good for supplemental lighting bit it started burning the tops a bit ... however I have 2 of the exact same plants strains are same ingrow both exact same and one is a green pheno looks scraggly and the left one is the ourple phenonwhich looks absolutely stunning they are like day and night crazy cause I have done nothing different with each and the ammount of issues from right to left plant have been drastic . Lots of purple on the tip calyxes' ! And the bottom of the nugs are very sticky smelly and very very fruity I cannot wait to chose this lady, trim cure going to be so much fun...

Likes
2
Share


@MrGrowDiarie
Follow
Day 28
She looks good but not perfect, wait for the next weeks ,also she is in preflower

Likes
10
Share


Likes
2
Share


@Ninjabuds
Follow
Ive got two Skunk Apple Runz plants(tossed 1 when I repotted the plants) with exotic-looking leaves and some great genetics. These are seeds I made and both the parents were top notch. They're both about five inches tall and growing strong they both seem to have the growth strength from the ricky bobby Unfortunately, one of them might not make it because of some damage or mutation im not sure, it just seems to have stop growing upward correctly but the other one's looking really healthy.
Happy late turkey day grow diaries world!!!! It's now day 24 from seed for all the seedlings I have going. The past few days the plants have really started to take off. There roots have really started to dig in. Every other water I am still giving 2ml per gal of fox farm grow big. I keep having to tell myself not to add any more nutes other than that. I don't want to fry my plants but I also want they to start jumping. I'm quite excited for the coming week, I think the next 7 days or so is when the plant really starts to transform and look more like a pot plant than just some random little green thing.
A few days ago I decided to move the plants from under my 55w cheep amazon light to under my spider farmer 100w newer version light with the good leds in it. The plants will hopefully be ready to up pot them here soon and get them in the large tent.
Sometimes when growing multiple different strains it can be really hard to balance giving to much or to little light. You don't want the faster growing plants to get to stretched out waiting on the slower plants to catch up
I spend Thanksgiving day morning transplanting the plants into 2gal pots. I am useing spme promix potting soil it's my 1st time tring this soil. It is actually doing really well the roots were all white and nice looking. I think next time I'm going to add some worm casting, kelp, granular mycos, and a little bit extra perlite. I just didn't have the money with christmas coming to splurge for all the extra stuff. I got rid of 2 plants 1 of the bubble og and 1 skunk apple runtz. There is only room for 10 pots in the 2x4 tent. I will peob only bring 8 of them to flower, always good to have back ups. Yesterday I also stuck the plants back under the 500w medicgrow mini sun 2 in my 2x4 tent. They did great under it the 2nd half the day I was happy they didn't get stressed. I had put them under that light a little early about 10 days ago or so. I am expecting in a week these plants will ge going crazy with growth
Likes
2
Share

@Bud_vista
Follow
Welcome to week 4 of my white truffle grow!
Till last week, she’s growing at a great speed. The half snapped branch seems to recover and keep growing fine. At week 4 I will do a little defoliation and maybe hanging in the trellis to the end of week 4. She’s not showing any sign of pre flower yet.
In the mid of Week 4 I installed the trellis and at this work, somehow, one of the very top branches snapped… I’m trying to save this one but let’s see how it works…
Until now, I’m really happy how good and fast this grow is.
Likes
8
Share


@Black_Widow
Follow
Привет садоводы -наркоманы !
Началась новая неделя
растение стоит на ripen и чувствует себя хорошо
активно пьет , а цветки становятся все более липкими
я решил не срезать его в субботу
подержу еще пол недели на Ripen и пол недели на воде
куст вырос больше среднего размера , такой из палатки вытащить не просто
но Harvest уже близок
Всем удачи!

Likes
13
Share


@Inhaledmonkfish
Follow
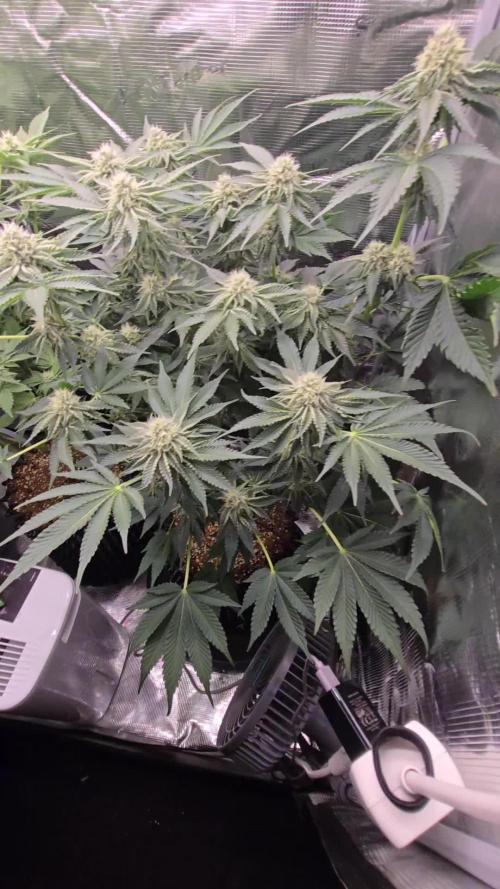
Amazing week buds have grown loads both plant really top heavy both smell amazing and look beautiful!!

Likes
16
Share


@CannaTrope
Follow
I tried to tie down and make an even canopy with FBT2311 and 2312. These two plants are now starting to fill in nicely with pistils and hopefully are nearing the end of stretching
FBT2313 is a very stout plant. I beleive that my lights were turned too high and the fan blew too hard, causing a phenotypic response. Much further into flower development then 2311 and 2312. A much smaller plant means ot needs less nutes, but the soil was amended with organic inputs at the beginning of the grow and I didn't cut back on supplement feeding enough, so it seems to have more P and/or K then it needs. I did not need to tie down but I used the trellis as a way to open the canopy some for air flow and light penetraion.
FBT2314 ended up slightly larger and stretched a little more then 2313. Flowers are developing nicely and some signs of deficiencies and possible light burn. Otherwise going pretty good. It's difficult to trim the back part of the grow tent so I am letting these ride and see what happens.
Likes
84
Share


@TragicTerps
Follow
Easy harvest single plant super dense and honestly it couldn't have gone smoother. I am debating removing the popcorn bud or revegging it... either way the main tops were the biggest buds I've harvested yet covering my entire palm.
I will be growing this in the future I won't log the grow however. This pheno I believe is one of a kind and I likely won't be as pleased with a second run.
The sungro#4 I grew in was excellent too and honestly I am seeing the relation between quality and the medium being used. I will be using this medium for a while.
Until the final dry weight is In, Happy Growing and Happy Toking!
-TRAGIC OUT-
Update water curing was the best end result and will be the way I cure all my flower.


Likes
Comments
Share


@UrbanBoer
Follow
Since the remain plants have revegged, I will be pampering them with nutrients how 125ml once a week, I’ll be harvesting this baby in January or end of January. Loving the bud sizes… all I need is for them firm up and finish this reveg phase, I do not mind her adding more development on the existing.
Likes
7
Share


@MadeInGermany
Follow
Harvest day 66
since time switch
to 12 / 12 h
Hey guys :-)
Finally it's time 💚
The lady is done the large leaves have been removed and hung upside down to dry in the dark drying room.
You can now stay there for 13-15 days at a temperature of 18-20 degrees and 55-62% humidity.
After 13-15 days it is neatly trimmed by hand and placed in jars with boveda packs 62.
After 4 weeks Boveda 58% come in and are ready for testing ;-).
After everything has been cut cleanly, the last update comes with the smoke report and the finished pictures.
Let's get to the plant 💚.
The growth was great from start to finish.
She had no problems at all and also had no problems with animals 👍.
I'm amazed at the great smell the beautiful buds give off😀.
Of course I cut cuttings and if the taste is as good as the smell it will be grown again ☺️.
A final report comes with the Smoke Report.
Until then, I would like to say thank you to the whole Green House team and wish you all the best fun with the diary 💚🙏🏻
Have fun and stay healthy 💚🙏🏻
👇🏼👇🏼👇🏼👇🏼👇🏼👇🏼👇🏼👇🏼👇🏼👇🏼👇🏼👇🏼
‘Powered by GreenHouse Feeding’
Copy the link for 10% off all Nutrients 👇🏼
http://shop.greenhousefeeding.com/
affiliate/madelngermany_passiongrower/
👇🏼👇🏼👇🏼👇🏼👇🏼👇🏼👇🏼👇🏼👇🏼👇🏼👇🏼👇🏼
Water 💧 💧💧
Osmosis water mixed with Cal/Mag (24 hours stale that the chlorine evaporates) to 210 ppm and Ph with Ph- to 5.8 - 6.4
MadeInGermany

Likes
27
Share


@phobic94
Follow
De plantjes staan nu al een paar dagen in bloei. Ik heb ze paar dagen alleen maar water gegeven omdat ze wat donker van kleur waren nu geef ik weer voeding. Heb net mijn netje geplaatst en binnen paar dagen schakel ik over naar bloeivoeding.
Likes
1
Share


@blablamesh
Follow
Not really happy with this week. I expected a lot more stretch from the plant, but there is sadly almost none. Also not happy how some of the leaves are looking (turned down). I thought that it might be light or water stress but I tried to reduce both factors and it didn't really change anything. Also tried to lower the vpd but also nothing changed. There are a few gnats here and there, but I can't imagine they would have such an impact, so my last theory would be the pH of the water, but I just ordered a pH meter and it will take some time to arrive. I you have any ideas, let me know.
Likes
16
Share


@GirlGoneWeed
Follow
Recovery at its finest, that's what you will see on week 4 around here! Guess who's loving the CO2 with high temperature? Thats right, all plants are!
The comparison of last week with this week have such a difference, on day 24 I introduced a DIY CO2 bottle, the recipe consist in:
-CO2-
2 cups of sugar
1 tablespoon of yeast
1 tablespoon of baking soda
1 later of warm water
Mix all ingredients on a bottle, make a nail hole on the cap shake a little (when shaking put your finger on the nail hole, you should hear a hissssss when you release the hole) use it when lights are on, increase temperature to 30-35C, watch for high levels of humidity, and voila!
I haven't started any LST yet, I am waiting for a bit more growth to start bending, I have to make sure all 5 plants will have enough space inside this 2x4 tent.
All suggestions are welcomed :)
Thats is for now, Stay Lit folks!

Likes
10
Share


@TiRobotProds
Follow
Les site d'usine grossissement de jour en jours, bientôt engraissement des colas au Méga pk.

Likes
11
Share


@TechDCo
Follow
12/02/2024
13/02/2024
MS is growing funny 😁
TF has exactly the same feed mls.
Shes looked forever hungry
14/02/2024
Lite Defoll.
Midday.
TF has never looked the healthiest with the first time using HydroSol + H202 water soluble feed.
I think i have the ratio/some sroted to where I've seen improvements.
First improvements i have seen are:
1. NO Nutritional burn or Lockout!
(non-salt based). P.s ignore the over salas 12% HP at the start (no idea what i was thinking).
Sometimes being ahead; means i am a being with a head that makes human errors. Oh, the joys of plant-discovery. Sorry side tracked lol
2. Quicker Absorbing witb water soluble food. As long as she's hydrated she's eating!
3. No idea yet
Have a ball!!
Listening to this relaxing and i started thibking about Spirituality and how its included in all faiths. But if say "Jesus Christ is a façade and all religions are based on astrological events painted with fictional characters to repent the Christological doctrine to "date" the past.
21 Ways Archaeologists Date Ancient Artifacts are mostly flawed because they only have the "present" to date decay from. They miss the mark and the professionals deliberately push the religious artifacts to match up to the hollyword.
So who's to say what "Date & Time" we are currently living in!
In reality; we can only measure and date time from the the last natural apocalypses or near misses, dor we are the surviours from such events..
Look round at real history! What mordern day academics just brushed under the rug with some made up theories of what they like us to believe happened. Even they are in a Dilemmas (government's) have the knowledge of these such events.
SpaceX and Nasa are all doomsday preppers! As for India going to the moon 🌙 seriously 😐 who's buying this stuff?
I've let go so much that the whole world is my own intention and floods my brain with endorphins of being the observer. The reason we are all "consciousnesses" and in sudden alert of awareness of this world and being alive is because we are in the end time again! We have all woken up to everything because the omens of the apocalypse alerts and kicks in certain parts of the DNA to force memories to the soul like "hey you need to remember this and get somewhere safe"
17/02/2025
Vast improvements
18/02/2025
Defolled to make way for fast growth

Likes
4
Share

@Growfather2
Follow
Hello everyone,
Everything is going according to plan, i added a dehumidifier to combat high humidity.
Let's see how they look next week, thanks for stopping by and have a nice week.
Growfather
