
Likes
Comments
Share


Likes
11
Share


@UrbanBoer
Follow
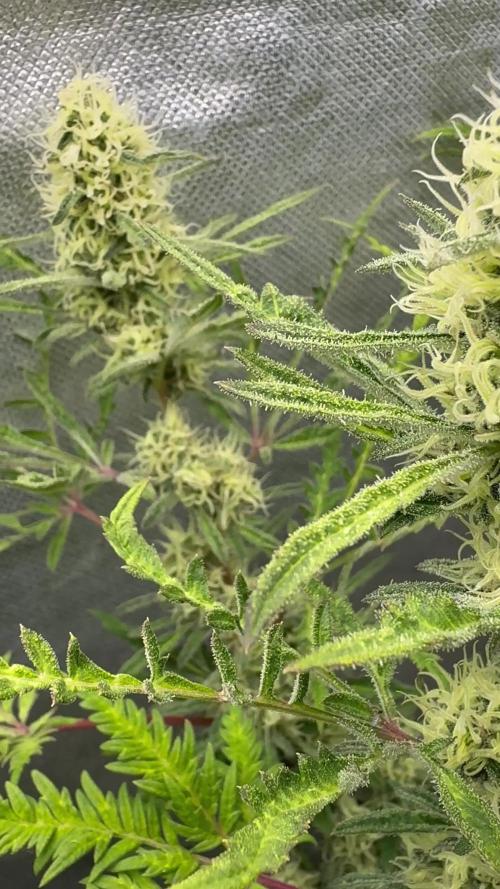
Week39
Had to stripped of the brown dried bud, to facilitate the reveg, now she's vegging at dope pace, she will flower with the summer day cycle, and it will not be distrupted by change of season, she should be done with flowering by then.


Likes
17
Share


@PatriciaGant
Follow
what a journey, such a beautiful result i should retire now how can it become any better. thx everyone watching by. have a nice day and an even better grow

Likes
25
Share


@BudHaks
Follow
She is getting fat! What a great plant she is - again, little to no deficiencies, other than some light burn but I could not complain to have such strong genetics for my first ever grow! Trichomes are not too cloudy, so still a while to go but what an AUTO!

Likes
4
Share


@Ninjabuds
Follow
My Rainbow Melon plant is an absolute beast! It's definitely tied for the biggest plant in the tent, and it's by far the smelliest. The aroma is so strong and sweet, it's incredible. I can't wait to see how this one turns out!
Okay, This past week has been absolutely fantastic! The weather has been incredible, and I've been able to keep the windows open almost the entire time. My plants are thriving in the humidity, and the VPD has been perfect. Everything just feels so balanced and in check.

Likes
9
Share


@Chucky324
Follow
Hello This is the end of week 13 and the beginning of week 14 of veg.
I didn't report last week because I was still harvesting the 13 plants of Captain Future. Put the last plant in the curing bags last night.
I'll be switching over to flowering either tonight or tomorrow by taking out the lights and opening the tent at 8 am and closing it at 8 pm.
Each plant is getting 2 gallons of rainwater for now. Still lots of compost in the pots for food for them.
But I'll be mixing up some flowering solution to put in the 15 gallon reservoir and giving each plant a few minutes each day.
It will last for 6 days and I'll clean and mix some new nutrient on the seventh day. I'll hand water when the pots seem dry.
Each plant has filled their space now and it's time to flower.
OK. Have Fun.
Chuck.
Likes
8
Share


@eldruida_lamota
Follow
Que pasa familia, vamos con la segunda semana de floración de estás Zkittelz de Seeds Mafia.
La humedad está entorno al 50%,y la temperatura la tengo entre los 22/24 grados.
Controlamos en ph en cada riego a 6.2.
Y el agua que utilizo de riego suele estar estancada entre 24 / 36 horas.
Cambie el fotoperiodo a 12 horas, hasta aquí todo bien, tienen un buen color, ya van progresando y creciendo a buen ritmo, vemos cómo avanzan estas semanas y como avanza el progreso de las flores.
Mars hydro:
Code discount: EL420
https://www.mars-hydro.com/
Agrobeta:
https://www.agrobeta.com/agrobetatiendaonline/36-abonos-canamo
Hasta aquí todo, Buenos humos 💨💨💨

Processing
Likes
13
Share


@MG2009
Follow
Transplanted to one gallon pots,for further growing, definitely two different phenotype. Gonna look at old pics and narrow down its parents traits. More pics later gotta go to work. Finish update tonight
2/04/18
#1 has pointed more darker leaves.
#2 has rounded less pointed paler green leaves. Also purplish traits seen in the stems.


Likes
19
Share


@Dunk_Junk
Follow
This week she grew 11cm taller & got a lot bushier. I still say she is an Indica pheno...
Nutrients used this week: 20 grams 20-20-20 powder mixed with 10 litres of water + 40ml of Cannazym = ~1470ppm
Timelapse sequence is:
*** Auto Jack ***
Pineapple express
CBD Lime
Blue Dream
*** Auto Jack ***
Pineapple Express
CBD Lime
Blue Dream

Likes
34
Share


@Almora
Follow
I switched to new fertilizer, I used a little too much, but it's not a problem, I gave around 900 ppm to each plant, but I don't mind, flawless finish is available.


Likes
28
Share


@Professor_Chaos
Follow
Beginning of week..
They are starting to show pistils everywhere.. They both already showed preflower.. But you can really see more and more pistils popping out every day.. And the Mandarin Cookies is already stretching WAY too much lol.. This isn't gonna work out as I wanted it to.. Ugh.. This one Mandarin Cookies could easily fill this 2x4 tent by herself at this point.. Poor ETHOS Cookies is gonna be drowned out or deprived of light.. But this Mandarin Cookies is gonna produce more than enough by herself as well.. Even if she isn't a huge yeilder! The ETHOS Cookies is showing some hints of some possible early bag apeal?? Maybe?? The stems that connect the leaf to the main stem is showing some cool designs.. Usually they are just solid red or purple.. Or solid green or yellow.. This one is green with red stripes.. Not a deficiency because the plant is healthy. If there were any signs of issues then the coloring on the stem would be an issue.. In this case, it is genetics and usually is in my case.. I've always had 99% of my plants show the red/purple stems.. From autos to photos.. From ilgm to fastbuds.. They almost have all showed this "sunburn" type coloring on the stems that are exposed to the heavy lighting.. Usually nothing to worry about.. Now if you see other issues and that begins to pop up out of nowhere.. Then yes.. It would be a deficiency.. But this is why I love growing in coco.. Its quicker to fix issues than soil.. I can flush all day and still add my nutrients after without having to wait for the medium to dry out.. Hydroponics would be the easiest, I suppose.. Just change the reservoir lol.. Damn.. That was alot of nonsense lol.. Sorry I've been smokin my cheese harvest! Yum! Lol
Mid week..
Ok so the Mandarin Cookies was stretching 2-3 inches daily! I went ahead and dropped the Mandarin Cookies off of the crate I still had her on.. Now she is on the ground.. The ETHOS Cookies is still up on 2 larger crates.. A good 10 inches from the ground maybe.. I vegged this Mandarin Cookies a little too long.. I bet one week earlier would have made a HUGE difference.. But whatever.. I am content woth the way things are going.. Runoff pH is still trippin on the Mandarin Cookies.. Usually 5.7.. It has spit out 5.5 once or twice but it seems to jump back up to 5.7 the next watering.. The ETHOS Cookies has been dialed back in.. Runoff is the same as it goes in.. But the ladies are both lookin healthy.. Slowly spittin out more and more pistils.. Within the next 5 days or so, there should be little clusters of pistils at each top.. I'm so excited to see what these girls do under the Optic SLIM 320H!!!.. Beast of a light! Bad ass genetics.. It doesn't get any better than that! Lol...
End of week...
I am seeing some leaf tips being burnt on the very top leaves (newest sprouts).. Which is understandable.. I have been really pushing these girls.. Really just wasting nutes.. But I am going to down the nutes a bit next week for sure.. Big changes will be made.. No more MYCO Plus.. No more FloraGro.. No more Armor Si (Silica).. Instead of 1400 - 1500 PPM, I think I want to get it down to 1000 - 1200 PPM. We are starting to dry out around here.. And I'm getting close to running out of rain water lol.. But filtering my tapwater should be ok.. Still got the power of the light at 50%... About 12 - 14 inches from the canopy.. For the most part lol.. About 750 μmols at the center and about 500 - 550 μmols at the far ends of the tent. Thinking I may go ahead and upgrade to a 6 inch exhaust system.. I like the Vivosun 6" fan (the black with red blades and adjustable speeds) along with the ducting and a carbon filter.. All for $79.. Not bad.. Anyways.. Next week we should see alot more pistils! On to the next!...

Likes
7
Share


@Zuppler
Follow
Vegetation Phase - Week 2
Shoutout to Cannapot, the Austrian plug who came through with the genetics from Humboldt Seed Company. The 10 Donutz plants are pushing through their second week of veg, and while the majority are thriving, a few challenges are starting to show — all part of the game when experimenting with new soil, pots, and nutrients.
Updates & Adjustments:
Lamp Adjustment: Raised the light to reduce stress and give the plants more breathing room as they stretch and develop.
Watering: Keeping it relaxed and minimal with reverse osmosis (RO) water. No overwatering here — slow and steady wins the race.
Nutrients: If deficiency will further ill add more fertilizer.
Observations:
9/10 plants are growing steadily, with vibrant green leaves and visible progress in height and structure.
1 runt: One plant is struggling hard — stunted growth, ugly leaves, and generally looking like it’s fighting for its life. Still, it’s got a spot in the tent, and we’ll see if it can bounce back.
Some minor issues spotted on a few plants, likely nutrient deficiencies as they adjust to the new setup. It’s not surprising, given the new gear and methods, but nothing alarming yet.
Next Steps:
Staying the course with low-stress management. Let the plants adjust to their environment and dial in any issues over time. The Donutz are strong genetics, so they’ll likely power through. Even the sickly one gets a chance — no plant left behind! This sea is still on track to make waves.

Likes
12
Share


@Kenpowarrior
Follow
●heavy defoliation done and 2 days drying out they were to wet. Then i got some brown tip leaves.😔😟
●got drinks and food again.(24/1) hope the rest will not do the same.
●honeys still weak🤔
●wrong settings of nutriens on diarie. All set to 2,5L before. Changed it to 1L
●when white is your new favo color!🤤😎👍❄️😁

Likes
9
Share


@420DeepGrow
Follow
Gracias al equipo de Sweet Seeds, Marshydro, XpertNutrients y Trolmaster sin ellos esto no sería posible.
💐🍁 Cream Caramel:
Variedad sintética resultado del cruce de varias de nuestras mejores índicas, Blue Black x Maple Leaf Indica x White Rhino. Reconocida por la escena cannábica mundial, es la variedad más premiada de nuestro catálogo.
El sabor y aroma de esta variedad es muy intenso, dulce y acaramelado como de golosinas, fruto del cóctel molotov de índicas que contiene, con un fondo de matices terrosos procedentes de la genética Blue que interviene en el cruce. Ideal para el cultivo interior y una superplanta en el cultivo en exterior.
Su estructura es típica de las plantas índicas, con un robusto tallo de corta distancia internodal, desarrolla un gran cogollo central y multitud de ramas laterales.
La preferida por los usuarios de cannabis medicinal entre nuestras plantas ricas en THC. Relajante y antidepresiva.
🚀 Consigue aqui tus semillas:
https://sweetseeds.es/es/semillas-fotodependientes/35-cream-caramel.html
💡TS-3000 + TS-1000: se usaran dos de las lámparas de la serie TS de Marshydro, para cubrir todas las necesidades de las plantas durante el ciclo de cultivo, uso las dos lámparas en floracion para llegar a toda la carpa de 1.50 x 1.50 x 1.80.
https://marshydro.eu/products/mars-hydro-ts-3000-led-grow-light/
🏠 : Marshydro 1.50 x 1.50 x 1.80, carpa 100% estanca con ventanas laterales para llegar a todos los lugares durante el grow
https://marshydro.eu/products/diy-150x150x200cm-grow-tent-kit
🌬️💨 Marshydro 6inch + filtro carbon para evitar olores indeseables.
https://marshydro.eu/products/ifresh-smart-6inch-filter-kits/
💻 Trolmaster Tent-X TCS-1 como controlador de luz, optimiza tu cultivo con la última tecnología del mercado, desde donde puedes controlar todos los parametros.
https://www.trolmaster.com/Products/Details/TCS-
🍣🍦🌴 Xpert Nutrients es una empresa especializada en la producción y comercialización de fertilizantes líquidos y tierras, que garantizan excelentes cosechas y un crecimiento activo para sus plantas durante todas las fases de cultivo.
Consigue aqui tus Nutrientes:
https://xpertnutrients.com/es/shop/
📆 Semana 3:
Muy buena semana, he aplicado un riego solamente con agua de manantial para reducir la cantidad de sales acumuladas en el sustrato y se ha notado una mejoria .
Creo que le quedan unas dos semanas por estirar, parece que va a ser una buena cosecha.
Se mantiene un buen control del cuarto de cultivo gracias a @marshydro y @trolmaster.
Mantengo las dosis de 1/3 de nutrientes recomendados por el fabricante.
Potencia del foco 80%


Likes
4
Share


@Funkyfreshgreens
Follow
Recovering from being topped, bushing out. Some leave damage, stress or weather I assume
Likes
12
Share


@Lysidious
Follow
WoW many crystals have formed overnight, almost as if she went out and partied hard and forgot to wipe her “nose” before she got back home...
No complaints at all, just watering daily with pH 6.4 water and adding compost tea.
Going to do a phosphorous boost on her this week since she is starting to pack on mass...
Thanks for reading.