


Likes
Comments
Share


@biggreens420
Follow
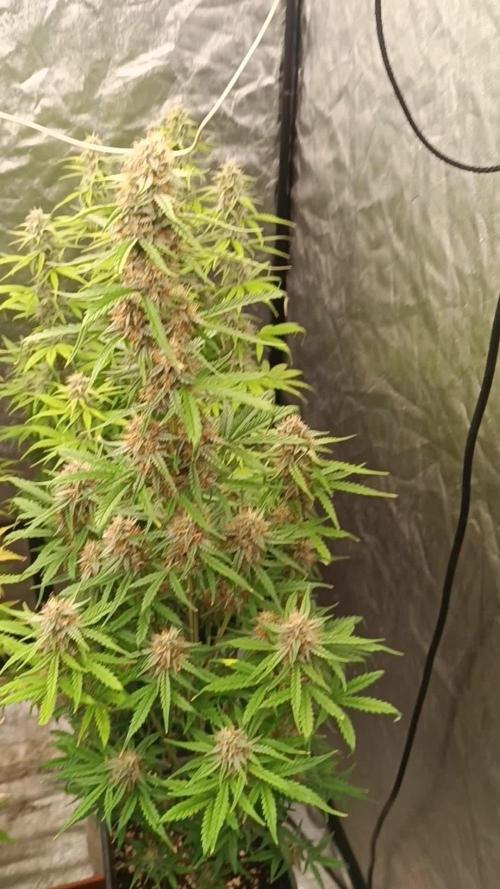
hey guys dinachem is looking better this week after swapping hps for led last week temps are a lot better but still high 70s even with no hps and just led but shes a lot happier removed lots of dead and faded leaves and dosnt seem to be getting worse. will start introducing bud candy at 0.5g per 2l it didn't really effect ph or e.c which I like . she's started showing some frost and should start fattening up from here on feed will be the same untill week before flush then will drop to half of the nutrient listed she's got a similar smell to gorilla so far which I'm liking a lot sounds weird but with a slight hint of garlic lol thanks for reading happy growing guys

Likes
9
Share


@Chupadeos
Follow
Todas están finalizando su floración aunque llevan días de diferencia finalizando la floración,los olores son tremendamente intensos y potentes,hay dos fenotipos de sweet skunk y dos fenotipos de killer kush ,gorilla Girl parece ser la más estable,aunque haya distintos fenotipos (2) los olores son similares pronto llegará la cosecha ,deseando que llegue dulces humos familia!!😍💓🇪🇦

Likes
4
Share


@Purkle
Follow
End of Week 9 of Flower. I can just taste those buds now!
The smell is intoxicating and the view is picturesque. There is definitely a noticeable difference between the two pheno's but I suspect both will pack a good punch. There has been some purpling in some of the top leaves which I expect will increase with the drop in temperature the last week or so. I cant wait to get some good pictures at the end of the week as Ive decided the chop day will be this coming Sunday.
The clash of yellow, purple and green is always my favourite so I plan to capture as much as possible since the next update will be jam packed with pictures of the girls just before their chop and after 48 hours of darkness to get the last of that resin production from the plant. I will also take some pics of the hanging plants in the drying cupboard.
The reason I am leaving my plants in darkness for 48 hours before they get chopped, is that it has been long belived that this practice will increase the last of the thrichome production and some say increases potency. There has been a recent study in the Netherlands which does confirm increased resin production for plants left in 48 hours of darkness (they also tested 24 hours darkness but found 48 was better) at the end of their flower cycle.
The chop has been planned to be pretty straight forward where I will just be taking off the main fan leaves and leaves with no thrichomes as well as chopping off the larfy/popcorn buds which will go straight in the freezer for a fresh frozen bubble hash run. I dont bud wash my flower as my tent gets a regular clean each week and always gets a full deep clean when every harvest is over and besides, its only me and my friends that smoke it!
The drying cupboard I use for drying is a small cupboard designed for storing and drying clothes which I have put a carbon filter and fan as well as a small desk fan to circulate the air as well as a small dehumidifier just incase there is an increase in humidity.
So the basics of drying is that you want the area where you are drying to be dark and fairly cool (its recommended to be between 15 and 22 degrees C), have a humidity level between 45% and 55%. I aim for around 21 degrees C temperature and 50% humidity. The drying time can vary depending on strain but its recommended to dry the buds for 7 - 10 days and I will explain further about how to tell if your bud is done drying and is ready to be cured on the next post. Drying is very important as you can affect all your hard work if the conditions arent right and the bud ends up too dry (luckily these days there are ways to fix bud thats too dry) or you end up with mouldy ganja which isnt save to smoke. Its also believed that a good long dry in good conditions helps increase potency and also has been shown to reduce anxiety.
Anyway thats it for this week and I hope to see you all on the final post for the end of Week 10 of flower and the harvest!
Until next week.
✌️


Likes
33
Share


@ThrashedTV_BakedByGlaze
Follow
I'm starting to suspect that the larger Cali Snow in the middle is ACTUALLY the LSD-25 seed from my other diary right now..
When I germinated them I put them separated but on the same cloth. At one point the LSD rolled over into the Cali Snow seeds but I was PRETTY sure I knew which one it was. Looking at how the two seedlings are similar in their stunted growth compared to the big buy in the middle who's right on schedule. I think THAT might be the real LSD-25 but I might have to wait a few weeks before I figure it out 😂
You can see it's definitely struggling but it is still growing along. Let me know if you know what is going on with it!
Still just using a spray bottle for the soil around the plants using plain water a couple times a day. I will start a light water Molasses/Water feeding starting next week most likely.
DAY 19 - 11/17:
Just got back from a day or so out of town. Left them well watered with their domes on to help with moisture loss. Left the Veg half of my LED on so not full power but still a great bit of progress when I got back today.
The next node of Plant 1 is out and the struggling Plant 2 hit it's first node and regular growth has taken over. Will give them a dark period tonight to give them a break from the 36 or so hours of light they've had when I was away.
Still just letting the FoxFarms Ocean Floor do the feeding with plain waterings with a spray bottle. Will start to feed the soil Molasses/Water mixes by the end of the week or as soon as I feel the little plants and handle a pour feed compared to gentle spray.
Thanks for stopping by! Like, Follow, and I follow back on IG: @GlazedGrow 💪
Likes
13
Share


@DeepRootsGrowTrees
Follow
DIVINE OG KUSH / DIVINE SEEDS
WEEK #20 OVERALL
WEEK #8 FLOWER
This week her buds are really getting weight to them they have that OG bud structure smaller tight dense buds that are covered in trichomes!! She got a overpowering smell to her that's WOW!! She's almost done a few left!! Stay Growing!!!
Thank you for stopping by and taking a look it's much appreciated!!
THANK YOU DIVINE SEEDS!!!
DIVINE OG KUSH / DIVINE SEEDS

Likes
6
Share


@lOlympusl
Follow
I added a second light yesterday. I’m not sure if it’s overkill and if it’ll work well with the other one. They are both VIVOSUN 300w LEDs, the one I already had has a veg and bloom switch, but the new one doesn’t. But hey it was cheap on Black Friday for $63. But having the new one in there quickly increased the heat in there from 75 to 85. I’m waiting for an oscillating fan to throw in there also which will help. Any advice on the light situation? More light spectrum the better?
Update: did my first LsT on all three girls on 12/1. Within 3 hours all the leaves were facing the lights again I was impressed

Likes
3
Share


@Mr_nugs_lover_David
Follow
She's looking super gorgeous,I forced her with her sisters on August 3rd into flowering due to the street lights that surround my house,let's see how she how this pheno of Black cherry punch performs! And what type of terpenes we can get 🇺🇲🍒👊💚✌️

Likes
13
Share


@XoticGROW666
Follow
🍓🍌🍧🍨
No toppin
No trainin
Jus test run
Little cupped leafs here & there due to cold temps!! But this strain a fighter and the nuggs on her gun be super dense not that big but Can’t wait to grow her again in full sun and see perform in full glory

Likes
17
Share


@Tazard
Follow
We are nearing the end and she looks beautiful. I will flush with plain RO water the next week or two while she ripens. I didn’t do any training to her. I have a clone from her and I cut a few leaves from the top of the meristem when she was vegging and she responded with 6-8 branches catching up with the top.

Processing
Likes
3
Share


@Uberfetus
Follow
Growing at her own pace.
Lights are about 40 inches away.
Day 4 I realize that my solo cup has tons of holes in it. This means the roots will grow through the cup and when I went to transplant it'd rip the roots. I pulled the cup up and there were only a 3 or so roots sticking out of 60+ holes. When I went to transplant I fucked up and the soil spilled everywhere and she toppled over and got fucked up.
I just picked her up pat her down. She responsed by bouncing back and growing even more. So I fed and watered her in. First feeding week 2 day 4. You can see she bounced back.
Fed her right after transplant. Bad idea, she needed two more days. Ah well. She's growing.
Likes
3
Share


@Bdawg
Follow
Grow went well.
Spider farmer produces again the se5000. One day they myt sponsor me beofre someone else does.
Dyno myco somw gd stuff chek out ppl.
Likes
29
Share


@Gilgamesh15
Follow
-Godetevi il video della presentazione del locale di coltivazione!!!!
-Problema calo PH in stabilizzazione.
-Continua problema di ingiallimento foglie a ventaglio!?!
-Mainlining e manifold in crescita.
-Il controller CO2 Evolution della Etechnics funziona male (fa svuotare la bombola).
Likes
38
Share


@Cariboo_OG
Follow
Utopia Haze is a rare heavily sativa dominant hybrid (90% sativa/10% indica) strain created through back crossing Brazilian Sativa strains. This tasty little bud took home 1st Place for Best Sativa in the 2008 High Times’ Cannabis Cup and for good reason – with its potent 18-22% average THC level and long lasting cerebral effects, Utopia Haze is one powerhouse smoke. The Utopia Haze high comes on soon after you finish your first toke, hitting you with a strong cerebral lift that infuses you with a sense of hazy relaxation.
Type: Feminised/Photoperiod
Cultivation: Indoor/Outdoor
Flowering Time (days): 70-75
Indoor Yield (g): Up to 650
Feminised Outdoor Harvest Month: October
Feminised Outdoor Harvest Month Week: 3rd-4th week
Aroma: Citrus, Woody, Pungent, Mint
Effect: Cerebral Lift, Hazy Relaxation, Sleepy
Welcome Everyone to the Final Entry of my Utopia Haze Grow !
There is so much to discuss ! I have been extremely busy as of late trying to get this Harvest together, but i am happy to have it here for you now !
I Seriously under estimated the amount of time, help from others, and my own necessary skills to pull this off.. and i still kind of screwed it up lol !
But its worth noting i have never actually done this before and trying to document it during....was extremely hard.
It is next to impossible to work an iPhone with rubber gloves on !
First I want to discuss everything step by step so before you jump straight into the comments on how the end product is so small in "quantity"
Rest assured i am happy with its"quality"...and thats all that matters to me because Life is a journey not a destination! and i have learned so much from this grow that I couldn't be any happy even if i messed some things up :)
But at the very least I hope you read through this entry in its entirety with an open mind and focus more on the process, rather than just the outcome!
I ran out of Ice & i was only able to wash three times..(normally I've heard you should go sometimes 5-6 washes)
Preparation is Key & things will be much better next round :)
Photos 1-22
These are pretty self explanatory but for those of you just tuning in now.. this is what happens to a very happy plant when you don't have the necessary tools to monitor key components of growing cannabis.. Ph, as well as EC levels play a very key role in the outcome of your grow lol that being said I was just able to save this plant by purchasing both tools but that doesn't mean the plant didn't suffer because of the prior events.. This was a Huge reason behind me choosing to turn this harvest into what i would consider
"Solventless Hash Rosin" from "Ice water extracted Bubble hash".
Pictures 23
The idea here is the process of using "fresh Frozen Cannabis" this has been discussed many a time online on such sites as instagram and here on grow diaries as well.. I personally have Never tried the process so i decided to try it out and make a judgement for myself..
Video 24
The Cannabis has now been in the freezer for 72 hours making it very well frozen.. as you can tell i struggled getting it all into the 25u Screen Wash Bag. One thing of note i would do differently is i will de-stem my next batch as i also believe this played a part in the amount of plant matter that escaped through the sieves.
Photo/Video's 25-28
The idea here is "ice water Seiving" & especially with the bags that I am using here that are only have screen material on the bottom portion of the bag it is very important to have spaces in-between the screens to allow the water to pass directly through the screens into the bottom bucket with the least amount of resistance.. because the hash is so extremely temperature dependant if it gets warm on the side of the bag.. it will stick there and not make it to the bottom to become use able product..
29
You do not need to use as much Ice as i used here lol... the idea is to keep everything very cold..i certainly achieved that but at the sacrifice of using so much that i ended up grinding product and producing "contaminants" but in the end they are just plant matter that i would be smoking when i rolled up my joint either way so.. I'm not super disappointed..
But it should be noted that what you want to achieve here is a Layering effect where you have the wash bag between two small layers of ice while the "water current" washes the Trichomes away allowing them to be separated by the screens setup below :)
Before Starting the machine you should allow some time (i.e.;10-12minutes pre soak to allow the product to become saturated) before the first cycle.
By video 32 I have just ran out of ice lol..
Video 33-34
Here I have a tip for you.. to separate the screens that you sieve through.. cut 5 gallon buckets to stretch them across nice and tight.. it'll make scooping your Bubble that much easier ! i learned this from the many "Frenchy" videos I have watched :)
Picture 35
Here in lays the problem for most people.. drying your hash without loosing vast amounts of "Terpenes" whilst also stay ever vigilant against mold !
Thanks to all those videos I've watched on youtube.. id like to think this was one of my most successful parts of this process..
Things to Note; Terpenes start to seriously evaporate at temperatures 68F or 20C
you need to stay as cold as possible whilst bringing the Relative Humidity in the space down into the 40-30% to stay away from that nasty mold !
I used my cold storage room in the basement.. with a dehumidifier running to keep the space at 45% RH & staying at a constant 15c.
All while spreading the hash as thin as possible across parchment paper, on top of the white screens with a fan moving air across both sides of the paper.
Pictures 36-38
These are some macros i took in the middle of my drying session I fell in love with the colour.
Yes i know the black spots are plant material but they will get caught when i bag the hash & squish the oil out.
Thing to Note; at this stage it is important to ensure you 'micro plane" the hash down as fine as you can whilst staying weary of the temperature... any "chunks" will hold pockets of moisture.. that lead to potential problems..ie; mold ...
Picture/Video 39-41
Successfully planed bubble hash ready to be bagged and Squished !
Picture 42
Ive decided to follow Pedro.. from Pedros Grow Room and double bag to be on the safe side so i don't have any blow outs.
So thats One 25u bag inside one 160u bag ! :)
Pictures 43
This is almost 3 grams of the bubble hash from above, already melting in the bag.. this is where i ran into trouble again lol things started getting to warm in the house and i was only able to get one of the three squish's i did on video :( things started getting sticky.
Picture 44
This is basically just a photo of the equipment I'm using; 3x5 LowTemp Cage in the frame I built myself, with a 20Ton bottle jack.
Something to note here is this is an older Lowtemp model with only a single heating zone which is which i have it closed here heating Both sides of the press :)
As well as the importance of having adequate pressure on your plates.. my rig is very overkill for the size of hash bags..lol
Video 45
Here is the lovely press video.. its didn't quite work the way i wanted either lol my directional folding wasn't quite tight enough for a big "drip" :)
&the Press was set to 65°c
Photo's 46-50 are pretty self explanatory :) I had a blow out.. but still managed to pull an 80% return from the hash once squished...& yes it tasted amazing :)
Was it worth it in the end... that could be debated.. for some..i understand..its not your thing, but for those of us that are interested in making our own concentrates.. free from Solvents...
I wouldn't make it any other way :)
If even ONE of you reading this diary finds it helpful to reference for ANYTHING.....even if its "what not to do" ill consider it a success !
Thanks again for tagging along on this garden adventure.. its been one heck of a journey !
Much Love from B.C. Canada,
Until Next time,
Cariboo

Likes
5
Share

@Shivashamboom1
Follow
4 settimana di fioritura.belle piantine mie continuate a fare dei bei fiori grandi e terapeutici 😂🙏😉..........
questa è la settimana che iniziano a gonfiare le cime.che i bei fiori prendono forma e profumo...
adesso gli farò il lavaggio radici per un paio di settimane e via......
Processing
Likes
14
Share


@Mr_Og_GreenThumb
Follow
(Log date week 7, day 49) So this week was a mixed bag, Tuesday started off with me finding a spider web on one of the lower fan leaves on my Hulkberry plant and noticed some bite marks on some of Fat Banana. In my haste to give rid of the spider mites, i caused some minor wind damage to some of the fan leaves on Hulkberry which caused some copper spotting and a stunted Fat banana cola. After i correctly treated both plants for spider mites and wind damage, they both bounced back and started to recover quite nicely.
I also noticed a difference between topping these plants at different times; i topped fat banana when it had 4 cola's but i waited until hulkberry's roots reached to the bottom of my 5gal bucket and she had 8 cola's. A BIG difference in their recovery and overall structure, where fat banana jump out the gate with explosive veg growth and hulkberry struggled for two weeks just to develop it's first set of fan leaves. To now whereas hulkberry is much bigger, greener and bushier than fat banana. Hulkberry has responded much better to the additional stress whereas fat banana has struggled or stalled due to the stressful conditions. All in all wasn't too bad of a week, except for the power going out for a couple of hours on Saturday which raised my grow-room temperature to 90f, i was able to put out a couple of fires this week without any adverse long term effects. I also topped hulkberry on the last day of the week and I'm going to continue to feed them Technfloa at the full recommended strength since they have both responded very well to last week's formula.
as always my pic are in chronological order
Mr. O.G.T

Likes
11
Share


@Dirty_Hippy
Follow
Week 8:
Such vigorous flowering!!!
These buds are just beautiful orange green and white.
The smells are like candy oranges and sage(hippie armpit variety)
Pretty interested to see how this stuff smokes!!
Resin looks off the chain.


Likes
5
Share


@GhostmanGrows
Follow
Friday: Hi there! This week I did'n do much behave of feeding nutrients. Sunday I will defoliate again and switch the outtake fan because of heat and humidity. It was 29,5 degrees in the tent Friday and the airflow can be better. But in the end this is a new tent and a new location at a friends house so I'm trying to bring al factors to the perfect conditions.. Next run it will be Calafornian Snow Autoflowers at this location due that I am not there every day..
Likes
92
Share


@DogDoctorOfficial
Follow
🌸 Week 3 Flower – Growing Strong, Tall, and Vibrant! 🌱
Hey Grow Fam! It’s already Week 3 in flower, and I’m thrilled to bring you this update because these plants are doing phenomenally well! Some are stretching up so tall that I might have to get creative in the coming weeks! Fruit production is well underway, and it’s absolutely amazing to watch the canopy fill out as these girls reach their potential.
Aptus Holland Pack Unboxing & New Additions
This week kicked off with a big arrival: the Aptus Holland nutrient pack! 🙌 I couldn’t wait to share the unboxing with you all; there’s a video up where I go through all the goodies, so check it out if you haven’t yet! Between the photos and videos, you’ll be able to see just how well these nutrients are already feeding these green beauties. Having a blast sharing more content lately—I’m in the zone with editing and creating, so get ready for even more shares!
🌡️ Environmental Control and Fine-Tuning the Reservoir pH
Temps this week have been holding around 27.2°C with RH at 65.2% and CO2 at 800 ppm, creating a VPD of 1.26 for ideal flower development. The lighting intensity is at 833 PPFD, and the solution in the reservoir is fine-tuned to a pH of 6.22, EC of 475, with a temp of 21.8°C.
Let’s talk pH in the reservoir: it’s a dynamic process, and I’m constantly adjusting it to keep everything at the right level. The pH tends to rise throughout the week, and each day, I work it back down, fine-tuning it to keep those plants happy and balanced. Managing pH is truly a hands-on job, and it’s worth every moment. I love staying on top of it for optimal nutrient uptake—it’s all about consistent effort and keeping that perfect range dialed in.
Leaf Maintenance & Selective Defoliation
These leaves are HUGE and gorgeous, creating a lush canopy that’s nearly too perfect! I’ve been taking a few leaves here and there, focusing on leaves that may be blocking light from reaching lower parts of the plant. Selective defoliation at this stage is key because it opens up airflow and allows light to penetrate deep, boosting energy distribution across the whole plant.
Big, healthy leaves mean we’re getting excellent photosynthesis, but a gentle, strategic defoliation can guide that energy toward those developing buds. Leaf removal is all about balance, giving the plant space to breathe and thrive while still maximizing growth in flower!
🌐 TrolMaster + App – Real-Time Precision
Huge shoutout to the TrolMaster system and the app—keeping everything in sync and at peak performance is honestly effortless with this ecosystem. The app provides a full overview of each environmental parameter, allowing me to make real-time adjustments as needed and track trends over time. The precision here is unbeatable, giving me complete control over temps, humidity, CO2, and VPD, ensuring my girls are in a controlled paradise 24/7.
What I love most is how the app records everything automatically, so I always know exactly where things stand without having to keep separate records. If you haven’t tried TrolMaster yet, it’s a total game-changer for any grow setup!
💥 Shoutouts & Gratitude
Massive shoutout to TrolMaster and Aptus Holland for powering this grow with tech and nutrition that’s second to none. And, of course, gratitude to Pro-Mix for the superb growing medium and to the seed banks behind the genetics. We’re running strong thanks to each of you.
And to the whole community—thank you, everyone, from new friends to seasoned followers, lovers to haters. Your energy, whatever form it comes in, is all part of this journey, and I’m so grateful for it all. Special shoutout this week to my brother Daggadna—head over to IG and give him a follow! And if you’re loving the journey, remember to like, comment, and subscribe—it really helps the channel grow and reach others who may also dig this content!
Discount Codes so you can save big on your next check out 💚💚💚
Kannabia - DOGDOCTOR 30% off
SeedsmanSeeds - DOGDOCTOR 10% off
CannaKan- DOGDOCTOR 15% off
terpyz.eu - DOCTOR 15% off
The Neutralizer - PORKIT5-DOG 15% off
As always thank you all for stopping by, for the love and for it all , this journey of mine wold just not be the same without you guys, the love and support is very much appreciated and i fell honored and so joyful with you all in my life 🙏
With true love comes happiness 💚🙏 Always believe in your self and always do things expecting nothing and with an open heart , be a giver and the universe will give back to you in ways you could not even imagine so 💚
Friendly reminder all you see here is pure research and for educational purposes only
Growers Love to you all 💚💚💚


