
Likes
Comments
Share


@Bud_Zilla
Follow
Found large numbers of spidermites as well as some thrips. Luckily all were on my marigold plants, a few had wondered on to my ladies but the issue has been contained with minimal harm to the plants

Likes
31
Share


@Splashy
Follow
24.04.2026
Heute habe ich mich dazu entschlossen die Damen zu ernten. der Hauptpunkt welcher mich jetzt dazu gebracht hat zu ernten waren die trichome, es sind jetzt auf jeder Pflanze Bernstein farben zu erkennen. sie trinken auch nicht mehr all zu viel und ich musste am Ende nur noch alle 3 tage gießen anstatt alle 2 Tagen.
sie sind jetzt grob getrimmt und trocknen und curen jetzt in der vcure von vivosun. ich werde noch mehr Bilder machen, sobald sie fertig sind. freue mich schon auf das Ergebnis. die buds werden jetzt 5 Tage getrocknet und dann 9 Tage gecured, also gibt es in 14 Tagen neue Bilder.
ich wünsche allen die bei dem Contest mit machen viel glück und einen guten grow, am Ende sind wir alle Gewinner eines guten grows.
danke an zamnesia und plagron für das bereitstellen der Samen und des düngers.
es gab mir Mal die Chance einen Strain von zamnesia zu testen und in den dünger von plagron rein zu schnuppern. hat mir beides gefallen und ich werde drauf zurück greifen in Zukunft, ganz sicher.


Likes
136
Share


@Kitties_and_Colas
Follow
~_~_~_~_~_~_~_~_~_~_~_~_~_~_~_~_~_~_~_~_~_~_~_~_~_~_~_~_~_~_~_~_~_~_~_~_~_~_~_~_~_~_~_~_~_~_~_~_~_~_~_~_~_~_~_~_~_~_~_~_~_~_~_~_~_~_~_~_~_~_~_~_~_~_~_~_~_~_~_~_~_~_~_
1/15/22
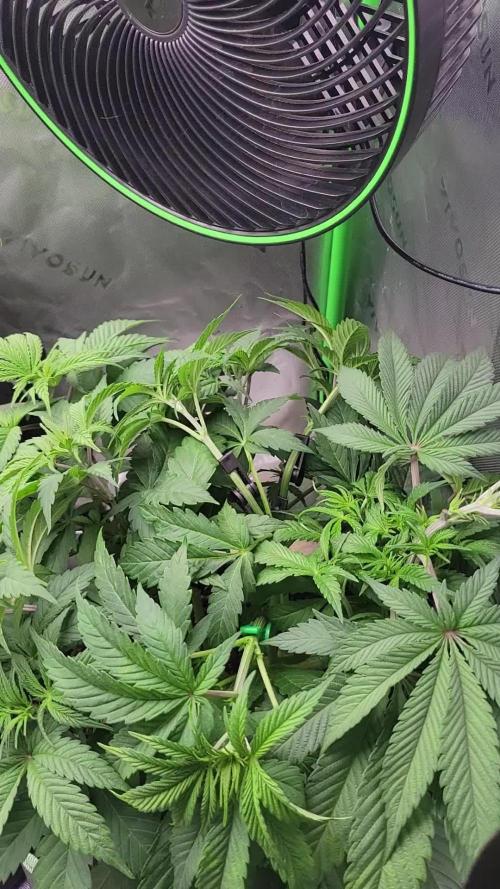
😻Week 5 of veg and things are looking good! I didn't know how I wanted to train these so my husband's suggested we top 2 plants and low-stress the other 2.. I went a little too heavy with their last feeding, no burned tips yet but 2 of them are very dark, we'll be doing water only for these this week..there is some minor discoloration on a couple of the lower leaves nothing major but something we're watching..we'll update again midweek..thanks for all the love Growmies ❤️🌱
⚡Mars Hydro/SP-3000⚡ Specifications ⚙️:
Diodes: Samsung LM301B / Osram 660nm (960 total!)
Driver: Meanwell 300watt 🔌 (300W±5% @AC120V-277V)
PPF: 824umol/S ☢️
PPE: 2.8 µmol/j 〰️〰️
Lifespan: >50k hrs ⌛
Weight: 10.1 lbs (4.6kg)
Veg Coverage: 3 x 5 ft 🌱
Flowering Coverage: 2 x 4 ft 🌼
-The SP-3000 uses an aluminum heatsink (no fan) and the driver can be placed outside the tent 🌡️⬇️
-IP65 waterproof ratings, tolerant to high humidity grow environments 💦 ..
-Up to 15 can be daisy-chained together and all controlled from a single light 💡~💡~💡~💡~💡
~_~_~_~_~_~_~_~_~_~_~_~_~_~_~_~_~_~_~_~_~_~_~_~_~_~_~_~_~_~_~_~_~_~_~_~_~_~_~_~_~_~_~_~_~_~_~_~_~_~_~_~_~_~_~_~_~_~_~_~_~_~_~_~_~_~_~_~_~_~_~_~_~_~_~_~_~_~_~_~_~_~_~_
1/18/22
Things are good 😺👌..New growth seems to be coming in fast on the 2 plants we topped...much faster growth than we've seen up to this point..all plants seem happy and all have a great color (after working out my slight overfeeding )..we've been running the MarsHydro near the top of the tent the entire grow as a test and its still more than adequate. .we don't have a light meter but we do have some crazy tight node spacing to confirm lol...I still say these plants are a little on the small side but they seem to be growing faster now..I'm pretty sure leaving them rootbound in cups didn't help their development...I think they're finally becoming adjusted to their new homes and we'll see some explosive growth in the coming week 💡🌱... fingers crossed 😺🤞
~_~_~_~_~_~_~_~_~_~_~_~_~_~_~_~_~_~_~_~_~_~_~_~_~_~_~_~_~_~_~_~_~_~_~_~_~_~_~_~_~_~_~_~_~_~_~_~_~_~_~_~_~_~_~_~_~_~_~_~_~_~_~_~_~_~_~_~_~_~_~_~_~_~_~_~_~_~_~_~_~_~_~_
01/19/22
AHHHHHH!!! I DID IT AGAIN!! Kicked my timer power after watering yesterday and put these into about 14hrs of darkness 😥.. lights are back on, hopefully they didn't notice lol.. ah well these things happen and I'm sure they'll be just fine ❤️🌱
~_~_~_~_~_~_~_~_~_~_~_~_~_~_~_~_~_~_~_~_~_~_~_~_~_~_~_~_~_~_~_~_~_~_~_~_~_~_~_~_~_~_~_~_~_~_~_~_~_~_~_~_~_~_~_~_~_~_~_~_~_~_~_~_~_~_~_~_~_~_~


Likes
28
Share


@TheGreenQueen420
Follow
Growing well apart from middle one. Pot fees heavy so I am drying it out for a few days before I water.
Will be increasing nutrients next feed to 1ml grow 1ml bloom and will introduce top max soon.

Likes
14
Share


@NorthernChemist
Follow
July 3: Great week for new growth and plants are starting to send out first flowers. Big stretch on height. About another inch of rain (2.5 cm) this week and soil has plenty of moisture. Today saw some amazing clear sky and strong sun. Expecting the flowers to start stacking. Still need to mulch around the plants. First resin is skunky with a bit of burned rubber (?) - unusual yet appealing. Great structure and impressive vigor.

Likes
23
Share


@gottagrowsometime
Follow
Welcome to my Apricot Auto Diary sponsored by Fastbuds & Xpert Nutrients.
Day 57-63 Week 9
Last of fattening & some of ripening left of this stinky colorful gem. Possibly the best auto I've done from Fastbuds. Plant reacted really well in her fattening stage. This is her last week. Just sugars/sticky fingers & enzymes. 450ppm. Still drinking good. And will let her finish up with what's left in the pot. She is stunning as is.
Nutrients
Pult off everything except sugars, and enzymes. 450ppm (no NPK ppm) ph from 6.1 to 6.7. 15c 700ml. And then just water, 700ml a day, slowing down to half that on her last days.
DLI 49 959 ppf over 13hrs. Lowered from 55+.
Harvest after 24hr dark rest.
Thanks to my sponsors Fastbuds & Xpert Nutrients. Much appreciated to all my viewers. I look forward to seen your diaries. Either way thanks for dropping by.
DISCOUNT CODE FOR XPERT NUTRIENTS
CODE:GGST 20% OFF.


Likes
1
Share


@Leonardo_DaGrower
Follow
Experienced explosive growth this week. I continue to LST for a low canopy.


Likes
3
Share

@Yahti
Follow
D56 - Plants were looking good | 6L of Water DLI | 43
But while watering saw that the left plant was a herm.... Saw a couple pollen sacks and plucked them but overall decided not worth it and culled it.
Shame... Flipped on day 38 would push out to 49 next time
Did some LST and supercropping on the survivor to fill up the tent.
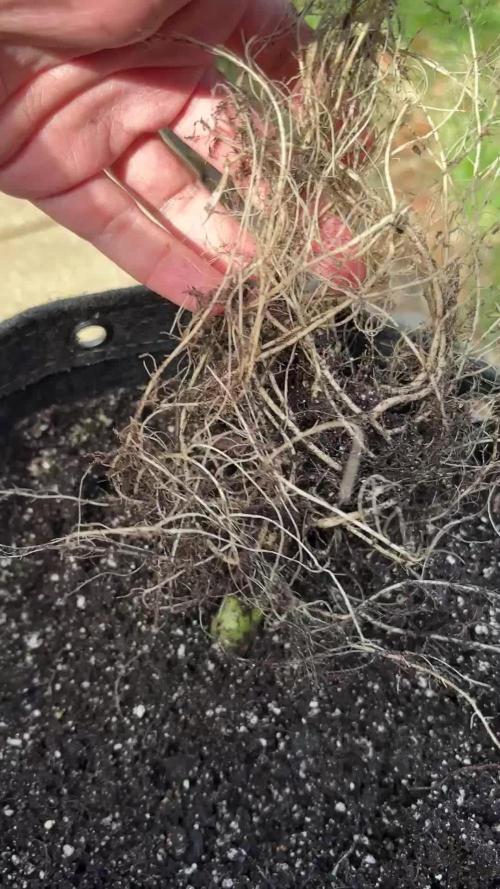
D57 - Did an autopsy on the herm'd out plant.. Taking a look at the main root ball she was root bound.
When i did the transplant, right afterwards... I remembered I should've roughed up the roots (out of the cup form). The video shows what I mean.
The roots were growing well but were all twisted and crossweaved.
Found a handful of pollen sacks today on the survivor, the outlook is ominous, this one likely has the same root issue going on. Will check over the next few days but not holding out much hope, once the herm trait is activated, there's no reversing it...
Likes
19
Share


@DrLaggis
Follow
Day 64 - Beginning of the Final Flowering Week 🌱
Hello, my grow friends! We’re entering the last flowering week, and it looks like I’ll be harvesting the plant around Friday, which will be roughly Day 68.
💭 Harvest Decision:
It’s a tough decision because while the buds are still growing, the trichomes in the middle and lower parts of the plant are already about 80% milky and 10% amber. I’ll keep an eye on things and plan to check the trichomes again on Day 65, two days before harvest, to make a final decision.
🌿 Trichome Considerations:
I have a feeling that even after cutting the plant and hanging it upside down to dry, some nutrients might still move into the buds, potentially causing them to swell a bit more. This is something I’m curious to see.
💧 Humidity, Water, and Temperature:
As I mentioned in my last update, I flushed the plant yesterday, just before the start of the final week, with 4 liters of water. This should help flush out any remaining nutrients, and I likely won’t need to water again before harvest since the pots are thoroughly soaked.
The humidity and temperature are holding steady between 52-58% and 20-24°C, which I find ideal. I’ve got my exhaust system and fan running continuously to ensure no mold develops.
📸 Final Updates:
I’ll check in again with an update just before harvest to let you know how things are looking. Remember, I’m posting new pictures and videos of my plant every day.
🌱 Day 70 - Last Day Before Harvest 🌱
Hey Grow-Friends! 😄
Today marks the final day before harvest, and I couldn’t be more excited! As planned, I’ve kept the plant in darkness for the last 48 hours and haven’t watered it for 6 days. My goal is to let it sit in the dark until this evening, when the time finally comes to chop it down. 🌿✂️
Drying Decisions 🌬️
After much research and considering several factors—especially the high humidity in my tent—I’ve decided to go with wet trimming instead of dry trimming. I know dry trimming is often recommended for better bud quality and taste, but my main concern is avoiding mold at all costs. So, to play it safe, I’ll wet trim the buds, get them into the right size, and then place them in a drying net for about 7 days.
Timing Concerns ⏳
I’m still figuring out the best timing for transferring the buds into curing jars. Since I’m wet trimming, I won’t be able to rely on the classic “stem snap test” to check dryness. But we’ll figure that out as we go along!
Final Reflections 🌟
It’s been an amazing journey, and although I could push the grow a little further, I believe this is the perfect time to harvest. Given my upcoming personal plans, it feels right to finish up now.
I can’t wait to report back with the harvest update soon! 🌿 Stay tuned, and as always, thanks for following along!


Likes
8
Share

@PavementPunk
Follow
Snapped the main branch a little but its been healing ok. Besides that shes been getting bigger filling out her new pot. Also took the smaller lowest branch for my first clone attempt. Probably gonna experiment with a couple more cuttings maybe even an auto clone for laughs. Been raising the light an inch at a time as i noticed signs of light stress. All in all good week happy growing friends
Likes
7
Share


@Wild_Coyote
Follow
She has really starting to put effort into her buds. I trimmed most of the fan leaves from the main side branches to allow more light underneath, and so she can put more time into those buds

Likes
10
Share


@valiotoro
Follow
Hello everyone 🤩
she grew fast and with a beautiful green colour on the leaves!
She has responded superbly to low stress training and topping & i defoliated her aswell and seems didn't even notice 😎
For the nutrient half grow half bloom and power buds 1ml/L
Spider Farme SE7000 70%
Wish you all a good day and happy growing 😎
Likes
5
Share


@Ozgrow
Follow
just about finished up this week. Choc mint 1 is about ready for chop. Chopped couple of main colas as i seen couple of signs of budrot. Dropped lights down to 400w each as temps are starting to rise above 30c.
Choc mint 2 is looking unreal. Heaps of huge colas,think i will pull the most of this one. Will probably give till day 65.


Likes
12
Share


@Cris1982
Follow
En su 3 semana de cultivo exterior. Siento que se retrasó su crecimiento por el clima tan cambiante que tuvo la semana.. se realizó transplante a maceta de 7 litros para que pueda desarrollarse de mejor manera, durante la noche se mantienen en interior para mantener una temperatura más estable.. creo que van bien para ser mis primeras fem qué cultivo
Likes
17
Share


@Ksouth1
Follow
Last week went well. She is still growing like crazy. Happy that the weather has started to act right so I was able to get her put in the ground. She had more roots than I thought. I think she will grow rapidly now with the strength of the sun and having unlimited root space. I did some lst, supercropping and defoilation to open her up and to create the best structure to build on. After long I will prepare to support the mains so she doesn't snap her branches. I will update as she progresses. There will be more joining her soon. Until next time happy growing to everyone!


