
Likes
Comments
Share


@Eauderay
Follow
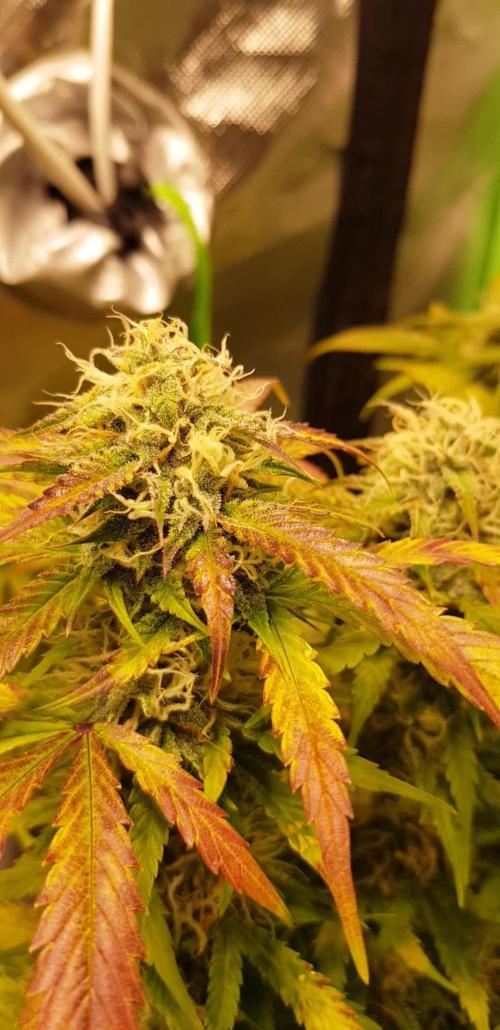
This week I have changed the 400w HPS lights for a 240w Leds, and I have seen great improvements for the rust burn that used to plague me for quite some times seems to have stopped and repair to the parts still viable started, now I know it was due to hight intensity and heat for 12h on those fan leaves that turned them dry and eventually burned them...
I still have to watch out because those Leds are powerful and loaded with Deep red, IR and UV!
They are at 45 cm the closest and 70cm the furthest no bleaching is seen so far, I am keeping a close eye on those leaves tip and if I see bleaching to those I higher up the lights for a while...
I feel like I am dancing around those marvelous plants, sometimes pulling the lights or dimming them, tucking those fan leaves shadowing lower growth whenever I feel they need a break or a hand! Trying to be a cannabis whisperer lol
Added 2 tablespoons of fish blood and bones to top layer with worm castings and bat guano a handful.
Lots of spiky hair on one and the other those are curly.
They look almost the same, lots of trichomes, at least 16% covered and smell kushy and flowery, very nice.
Let's hope the leaves do not get worse and the repair continues, not to forget to offer a prayer to Marie Jane so all goes well! ☺️🌹❤️

Likes
24
Share


@Daweed83
Follow
Last daaaays 😍😍 Im trying not to rush the flush and I rather wait a few more days to bring this ec right down.
Still looking pretty healthy and not much yellowing yet.
Note to myself : stop thinking of cutting stop thinking of cutting ....

Likes
56
Share


@Prilyfe13
Follow
May 10, 2024 Day 85
A new week and I'm not sure these 2 are ready for flushing. They have way too many white pistils. Plenty of orange, though. Banana Purple Punch A has more orange pistils.
Both got a gallon of nutrient water today. So they are definitely still drinking somewhat heavily. And they haven't slowed down yet. I'll keep an eye on them though. Flushing will have to happen sometime. I'd say in the next 3 waterings. That's just a guess based on their current progress. It just seems that they aren't done swelling and there's absolutely no purple coming through yet.
Banana Purple Punch A still looks great. Her buds are starting to weight down the taller tops and they are slightly leaning toward the outside of the plant. It's actually quite good. It's opening up even more space for the lowers to get as much light as possible.
Air flow is great as well. This is especially important because she is in the back directly under a clip fan. So it's more prone to mold. At least that's what happened in my last grow. This time I have another clip fan across from this one, so the air circulates throughout the whole tent, top to bottom.
Banana Purple Punch B looks great! She's not bending any tops, but I don't expect her to with how strong her branches are. Practically immovable. However, she's definitely getting more jiggly. And she has huge buds top to bottom. I wonder if that's the reason she doesn't budge. No room. Lol. Honestly, she may be really compact, but I have her branches spread out enough for good airflow. There's just a couple of clusters that are a bit too dense with foliage, but it doesn't seem to be a problem. Lots of airflow and light.
She's a bit behind her sister plant. Way more white pistils and orange on this one. No signs of purple whatsoever. Just a healthy growing plant.
I'll be checking trichomes later today if I'm up to it. I hurt my back earlier. Regardless of that, I'll be getting trichome pics today or tomorrow. Probably tomorrow with videos at the end of the week. It's been quite some time since I last took trichome pics. Bad planning on my part. However, I'm excited to see how much further along they are from last time.
I won't be changing the light for another few days I think. Then I'll drop the power down. As I said before, I don't think they are ready for flushing, so not ready for light changes.
The environment is still a bit off. Today the temp is 76° but the humidity is still high at 56%. This is sure to ruin something. I'm still trying to get the humidity down. I have a feeling I just don't have enough air exchange in my bed room. I'm going to continue messing with it until it's right though.
Grow System Environment:
Temp: 74.1°
RH: 54.2%
VPD: 1.29 kPa
May 11, 2024
Not a lot going on today. Just some pictures.
Banana Purple Punch A is looking really good. She looks to have another week or so. I'm really confused as to why my plants take so long to grow and finish up.
Banana Purple Punch B has completely caught up with her sister plant. She has the same amount of orange pistils. That tells me there isn't much left to go. If she caught up, that means Banana Purple Punch A is even closer to being done than I think. Maybe.
I'll check the trichomes again tomorrow. No pics unless they are done. I doubt they will be. Especially Banana Purple Punch B. On the other hand Banana Purple Punch A could have only a couple days left and just isn't going to turn purple or fade at all.
I'm going to start flushing in a couple days I think. They both look about ready for it. Plus, they are about as big as they are going to get. I think the flush will bring out the colors. So next watering will be the beginning of the flush cycle. It should be in a couple days.
Also, both ladies have slowed down on their water intake. So the reservoirs should be empty in 2 to 3 days. Probably 2 days. Then I can clean them out and get to it.
The lights are going to be turned down when flushing begins. I'm going to aim for a DLI of 36 mol/m²/d for the rest of the grow. It shouldn't be anymore than a week of flushing before they are done.
The environment is still messed up. It got down to 49% yesterday for a couple hours, but then this morning it was right back up to 54%. The temp is fine at 76° Still not cold enough at night, but I have time. A few days to work it out. I'd like to be down to 65° by then for the last week of their lives.
Grow System Environment:
Temp: 73.1°
RH: 53.7%
VPD: 1.27 kPa
Update: I decided to check the trichomes anyway.
Banana Purple Punch A has quite a few cloudy trichomes. Very few amber and a bit too many clear. I'd say she has about 5 days left.
Banana Purple Punch B also has quite a few cloudy trichomes. However, she has about 15% to 20% clear trichomes. Amber trichomes are basically nonexistent. There's a few here and there, but mostly on the sugar leaves and not on the buds themselves. I'd say she has another 7 days left.
Honestly I don't want to harvest them separately. I'd rather harvest them at the same time, so I might harvest them in 6 days. Right in between. Maybe 7 days if Banana Purple Punch A isn't quite there yet.
To be honest, I have no real idea with this strain. They seem to be getting there, but there's no purple, still a lot of clear trichomes and it's been 12 weeks. So it could be another 2 weeks for all I know. I'd like to push them as far as they need, but I have 4 other plants that need to come in the tent ASAP. So I may have to chop a bit earlier than I really want to.
I'll post some trichome pics tomorrow and see what you all think. Comments are welcome. Lol
May 12, 2024
Some pics today. I'll try to keep this one short.
Banana Purple Punch A looks good. I checked the trichomes. Not done yet. I'm sticking by my 5 days estimate. So 4 days left.
She doesn't seem to be drinking at all. She is, but it's a trickle. Definitely not like it was. I'll have to empty the reservoir out tomorrow and start the flushing cycle.
Banana Purple Punch B also looks great. I also checked her trichomes. She is about the same as her sister plant. Not enough cloudy trichomes, but the amber ones are starting to show up. A good sign. She might be ready in 4 days. I'm still guessing 5 to 6 days.
She also isn't drinking nearly as much as she was before. A great sign that she should be starting the flush.
For trichome pics, I'll be posting some tomorrow. Nothing to post today.
I'll be dropping the light power when I start flushing. Which should be tomorrow or the next day. As I've said before, the DLI will be around 36 mol/m²/d.
The environment is a lost cause. I cannot for the life of me get the damned humidity to a reasonable level, so I'll continue to open the tent every couple of hours throughout the rest of the grow. Happily, it's only a few days to a week. The temp is a bit high today as well. 77°. I'm already working to drop it a bit without going over 60% humidity. I should be able to get it down to 74° without a problem. It's just the humidity that's killing me.
Grow System Environment:
Temp: 73.9°
RH: 55.6%
VPD: 1.25 kPa
May 13, 2024
Flushing day! I decided to rinse out the basins and begin the flush. I was going to wait another day, but I think it's time. They have about a week left I think. Honestly it should be done by now, but they aren't. Lol. No matter. They should be done in about a week. Maybe slightly less. So they have been given 4 ml of Flawless Finish. It should be the only dose I have to give. Maybe one more, but I doubt it. I still need to dry the containers out. That will take a day or two. So maybe a half gallon in a few days, just to get that last push in.
Banana Purple Punch A looks great! Some more lean happening with the tops. Nothing bad or anything, just a slight lean. Perfect for heavy buds. I didn't bother checking her trichomes today. No point. You can tell she's not ready just by looking at her.
Banana Purple Punch B may need even more time. I'm going to have to decided what to do. Wait for this one to be done then harvest both? Or harvest one at a time as they finish up? Decisions decisions. I'll figure it out in a week.
Her branches are really jiggly now. No lean exactly, more like a sway. When she gets moved her top heavy branches sway a bit. Great sign for a heavy yield from a 17" plant. Or is it 19"? Either way, it's going to have a fantastic yield compared to her size.
One advantage I am seeing with the longer finish is it will give me time to dry some Tropicana Cookies I am harvesting in a couple of days. I'll be wet trimming this time around and the dry time should only take about 5 to 7 days. Maybe 10, but I'd rather not try to stuff 4 plants in a 2x2 to dry. It's a recipe for disaster. 2 at a time stacked on top of each other.
I'll be dropping the light intensity tomorrow or later this afternoon. Maybe even tonight during lights out so in the morning it will be ready for the new day of less light. As I've said before... Over and over... I'll be dropping the light power to 70% which should drop the DLI down to 36 mol/m²/d. Oh, btw, I use the Photone for my light measurements. It has a PAR meter, Lux, DLI and I Believe color spectrum? Kelvin? No clue what that does. I focus on DLI. It's a better reading than just PPFD.
The environment is still messy... as always... I'm keeping the temp down to 74°. The humidity at 58%. So it's still too high, but I've done all I can to drop it down and it won't even go below 50% with the tent door wide open. It just won't. So unless I can get the humidity in my room down to like 30%, the humidity in the tent remains over 50%. Hopefully pulling the plants out daily is enough to prevent mold and other issues. There's also the two circular fans. They aren't at full power, but they don't need to be as there's two. Plenty of airflow. I'll really need to keep an eye on these plants. Maybe I'll take them out multiple times a day. Like 2 or 3.
Grow System Environment:
Temp: 74.5°
RH: 56.2%
VPD: 1.25 kPa
Update: I ordered a new dehumidifier for grow tents today. It should be here tomorrow. I'm guessing a lot of my problem with the humidity is my current dehumidifier. It barely pushes air. Cheap and well used. The new one is from Vivosun. A much more reputable company.
May 14, 2024
Trichome day! Alright, so I took some video today. Not the best quality, but I hurt my back so I'm all shaky. The pics were a lost cause. Lol
Banana Purple Punch A looks great! More leaning branches. This late in the grow, I don't care. They aren't leaning that bad and it's only showing how heavy these buds are.
Trichomes are mostly cloudy with a bit left of clear and nowhere near enough amber. 5 to 6 more days I think.
Banana Purple Punch B is so pretty. She has the faintest purple coming from the flowers, but not much. It is a sign that we may end up with a purple plant during flush.
Trichomes are partly cloudy with 30% clear and next to no amber. She still has time to go. I'd say another 7 to 10 days. Now I'm overshooting it just incase.
I don't think the plants noticed a difference in the light drop, or they did and it's not doing anything. However, I'm not sure what it should be doing. I'm guessing preserving trichomes? Makes sense. Anyway, it's staying at 36 mol/m²/d DLI.
The environment is still an absolute mess. The humidity is at like 59% and as always, I can control the temp, but nothing changes the humidity. And it's like 55% humidity out today. Fail. Lol.
Grow System Environment:
Temp: 74.3°
RH: 59.0%
VPD: 1.16 kPa
May 15, 2024
Nothing to do today. They are still watered and whatnot. No changes in color yet either. I'm starting to think these both will be green phenomes. Or maybe they really aren't ready yet. It's just weird. What am I doing wrong to get all my plants to grow for so long? Oh well.
This round is just different because of the other 4 plants that need this space. I really need them to finish up ASAP. No trichome check today. I can still t ell they aren't ready. The bottoms still have a majority of white pistils and the tops are just not there yet. I think they can get denser. They aren't quite rock hard yet, so I know they still have time.
Banana Purple Punch A looks amazing. More leaning branches that are swaying in the breeze. No fade yet, but the leaves are starting to look ready for the fade. Maybe.
Banana Purple Punch B is strong as ever. Definitely still packing on weight. Definitely not ready for harvest. Still another week I think. I'll check trichomes tomorrow on this one. I think I'll wait for her to be done then I can harvest both plants at once.
The light seems to be just being a light now. I can't really see what it's doing, but I know the frost is there. Lol. So it must be doing something.
The environment is killing me. Still over 60% and my room has climbed up to 60% as well. I have a heater running and the dehumidifier that I think is done working. My new one should be here today. And not a moment too soon. I should have replaced this one months ago. Unfortunately, I don't have much control over the heat anymore. The humidity is just over powering it and I can't get anything to change. I'm going to crank the heat and see if that helps. Like set it to 80° and see what happens. It's currently set to 74°. And 8 don't think that temp is high enough to combat the humidity. Crank it up!
Grow System Environment:
Temp: 72.9°
RH: 63.0%
VPD: .00 kPa
May 16, 2024
Today is looking pretty good. I checked the trichomes on Banana Purple Punch B as she has the longest to go. I figure when she is done, Banana Purple Punch A will be as well.
I've also watered them with plain water. PHed to 6.2. just a half gallon in the reservoirs. I'm not ready to let them dry out yet.
Banana Purple Punch A looks great! Her branches are starting to lean a bit harder and her buds look amazing. No purple yet. Or at all. I'm not sure. But I'm certainly sure that the fade hasn't begun yet.
I'm not bothering with trichomes for now. I'll just wait to see what her sister does. I'll check trichomes in a couple of days.
Banana Purple Punch B looks amazing. Her buds are fat and dense. She smells great and stays strong. A bit more swaying. But it's the whole plant now. Wonderful!
I checked the trichomes on this one. She is developing quite nicely. I'd say another 5 to 7 days? Maybe a little less if we're lucky. There's more cloudy trichomes than before and finally some amber. Much less clear as well.
She definitely is nowhere near fading, so that's a concern for time.
The light stays the same.
It seems to be perfect for these two. So no changes.
The environment is still a nightmare, but it's 86% humid outside and 63% in my room. Happily, not really, the humidity is down to 60%. Not good at all, but better than 63% or even 65%. I'm really hoping these ladies are super resilient. They should be. It's FastBuds and they have great genetics. The temp is fine. I haven't a bit higher to help some with the DLI. So it's hanging out around 76° to 77° for now.
The new dehumidifier works way better than the other one. But a cool thing is that they are both small, so I fit them both in and it seems to be kinda working. It's keeping the humidity below what it is in my room, but not low enough. I know it will drop when I figure out how to drop it in my room. I really need a big dehumidifier for my room. That would solve quite a bit.
Grow System Environment:
Temp: 75.8°
RH: 62.8%
VPD: 1.07 kPa

Likes
4
Share


@DatGuyGrows
Follow
Grown out this week and got them ready for the early flower growth. Trimmed heavy and wired all branches away from each other. LST in full effect. Hoping it’s not too much trauma for them.. they proved me wrong. Bounced back with vigor and bright excitement! Eager to see these buds start forming 👀

Likes
16
Share


Likes
17
Share


@Fitzwell
Follow
The start was easy as it gets just add water the first 20 days and LST every day. When i saw some of the lower leaves start to change color that's when i started to add nuits. after that it was just following the instructions foxfarm already had laid out for me. I cut back by half in the start of my feeds but by the end of my grow I was at full strength. Testing your run off is key. Cropking send me great seeds and genetics is a great foundation and starting point.
---------------------------------------------------------------------------------------------------------------------------------------------------------------------
I was very happy I got almost 5 ounces off one plant.

Likes
2
Share


Likes
4
Share


@Crusty_Juggler
Follow
60x60 cm tent in a 1920's peek-in-closet
Oversized vent for silence
High power DIY LED
True SoG 12/12 from seed with 15 plants in 2L pots
Watering all plants in bottom tray with 30% of total pot size (10L)
WEEK 1
DAY 1 - Germinated in paper towel
DAY 3 - Planted into pots + Lights ON at 125w
DAY 5 - All plants have broken soil
DAY 7 - Slight stretch - Light at 185w
WEEK 2
Two of the Iced Out are lagging behind, others are on point - I'm trying to push light and nutes to the max.
Extraction fan (AC infinity Cloudline T6) on level 2.
DAY 13 - First full watering (10L) with 20 ml Canna Terra Vega
DAY 14 - Circulation fan turned on (low) during lights on
WEEK 3
Good growth, two Iced Out still lagging
DAY 18 - Light at 225w, Extraction fan on level 3 during lights on
DAY 20 - 2nd watering, 8L with 30ml Vega + Light at 250w
DAY 21 - On point, mostly :) Could've pushed nutes a bit more from the go
WEEK 4
DAY 24 - So far this week I'm just kicking back and watching them do their thing. The two lagging Iced Outs are trying to catch up.
DAY 26 - Watering 10L with 50 ml Vega (one day too late...) + light on 300w (max)
DAY 28 - 4 weeks from popping the seeds, looking good except for the two Iced Outs, one of them is trying to get with the program, the other... Well, some plants are just pricks.

Likes
24
Share


@Mr_Awesome_Badass
Follow
Well still on auto pilot for the most part.
Giving her a daily feeding till run off of the nutes my other girls are using. Other than that I'm just checking on her daily.
The main cola is big, fat and pretty dense. Not the hardest but everything considering I'm really happy. It's about the look anyway when it comes to cannabonsi plants.
Finished the roll of butt wipe so that looks pretty cool. Hope to harvest next weekend but we will see.
Thanks for following this has been a fun grow.

Likes
4
Share


@Growstopher
Follow
5.27.25. 4th week of flower
What’s up growers so plant is doing pretty good after being way stressed out! She’s drinking every day and putting on bud quick! Still have 5-6 weeks of flower do hoping she finishes strong!!
Thanks for checking out my grow I appreciate it!


Likes
Comments
Share


@Edgy58
Follow
These plants got off to a slow start, as I can tell by the pony tail root system.
They were scrawny little plants from the get go.
I believe due to a couple reasons.
Colder night time temperatures in my tent and in the reservoirs, creating anthocyanins as a cold defense which has given them some color.
Talk about the smell of blackberries. Did I say Blackberries!
I’m not one to throw things out so I gave them some love and patience.
You can tell these girls are fighters.
Check out the resins drops in the second video.
That's why I rated Blackberry a 10 was because of the resin drops.
Can't wait to grow again, expecting larger yields.
Likes
10
Share


@HideAndFly420
Follow
Day 29, I’ve been slowing a little bit with fer too loser as I m going into flow and I used an all mix soil from biobizz that’s already charged with an high ec, I don’t wanna risk any over, I left it for one week with just water and regulator, the development of roots will help to absorbs the ec present in the soil so I will restart to fertilise next week.
I’m using the complete line from aptus and I’m really satisfied I see how healthy the littles are.
I will have my lamp 40 cm for this week and I’ll
Move to 33 at the end of this week
Day 32 this OS is flowering supersoeedy, I can already see buds, i had one of last lst just give her a more clean structure.
I stopped to fertilise in the last 5 days, I just gave ph controlled water and yesterday 0.5 lt of water with just regulator and calmag. I wanted the plant to eat all the nutrients I gave during veg, I think this worked pretty well as I I saw her growing every day and I can. See an healthy nice green on leaves .
I think that max tomorrow I’ll start again with fertiliser.
Day 33 the orange sherbert is really running fast.
I restarted feeding her today, flowering feedings started.
Let’s goo
Let’s goo!!
Likes
37
Share


@Capo420
Follow
Good week so far. 😎
Ups and downs,but learning tons along the ride.🤓
The plants are responding well to the flushing (yes flushed again) color is much better and just the general appearance looks good after 2 days. 💪🌱💪
Lst seems to have been received well, no extra stress to these girls. 🙏
Will continue to update with pics and vids throughout the week.
Likes
9
Share

@GERGrowDesigns
Follow
Welcome to Flower Week 5-6 of Divine Seeds Auto Fractal
I'm excited to share my grow journey with you all as part of the Divine Seeds Autoflowering Competition 2025. It's going to be an incredible ride, full of learning, growing, and connecting with fellow growers from all around the world!
For this competition, I’ve chosen the Feminized Automatic strain: Auto Fractal
Here’s what I’m working with:
• 🌱 Tent: 120x60x80
• 🧑🌾 Breeder Company: Divine Seeds
• 💧 Humidity Range: 50
• ⏳ Flowering Time: 60 Days
• Strain Info: 23%THC
• 🌡️ Temperature: 26
• 🍵 Pot Size: 0.5l
• Nutrient Brand: Narcos
• ⚡ Lights : 200W x 2
A huge thank you to Divine Seeds for allowing me to be a part of this amazing competition and Sponsoring the Strains. Big thanks for supporting the grower community worldwide! Your genetics and passion speak for themselves!
I would truly appreciate every bit of feedback, help, questions, or discussions – and of course, your likes and interactions mean the world to me as I try to stand out in this exciting competition!
Let’s grow together – and don’t forget to stop by again to see the latest updates!
Happy growing!
Stay lifted and stay curious!
Peace & Buds!

Likes
15
Share


@Black_Widow
Follow
Привет садоводы
началась пятая неделя
растение чувствует себя нормально и стало немного больше и имеет красивые формы
но оно не очень крупное выросло , не монстр !
запах имеет как по паспорту - сладкий виноград
Последние 2-3 недели я будк поливать ее простой водой
Хочу поблагодарить создателей SSSC , за такое чудесное растение !
И всех кто следит за моим садом !

Likes
17
Share


@FrankieBones
Follow
Hi 420 Family.
Start of week 6, and we are well into the blooming stage. So far so good, these ladies have gained a lot of growth over the past 2 weeks, they have stretched a lot and have now shifted their energy into making buds. The one WW is a little ahead of the rest in maturity it seems, the other two WW's not far behind. PL's I think will flower for an extra week or two looking at the bud sites and the pistils. At this stage they are getting about 1L of bloom feed every 1.5 days but it does seem to pick up and they are getting more thirsty every watering. I guess they will eventually settle on about 1L per day.
D36 - 11 Aug - All good and no complaints, other than the stretchy PL's. Let's hope they just make for awesome bud sites.
D38 - 13 Aug - Steady as it goes... Bud sites are forming nicely and I have not again spotted any sacks on the WW that initial had about 6/8 sacks on the oldest branches, nodes closest to the main stem. Very happy that I didn't kill her; I am still keeping a close eye tho. The PL's have again stretched a little bit but not as much as last week, thank goodness. They were watered yesterday morning and will be letting them dry out properly before giving them another feeding.
D38 Heights:
WW1 - 46CM
WW2 - 45CM
WW3 - 62CM
PL1 - 65CM
PL2 - 72CM
PL3 - 76CM
Stay blessed and I wish you all a happy grow!
Likes
57
Share


@Kmikaz420
Follow
Alors aujourd'hui je fais du BHO et pour vous remercier de votre fidélité je vais vous montrer ma méthode (que j utilisé dans le passé (j ai depuis acheter du matériel un peut plus professionnel ;)
Alors pour tous sa il vous faudra
=1..2 seringue de 300ml ou plus dispo sur mamazon
= des filtres à café (NON BLANCHIE !!!)
=des colier de serrage pour fixer les filtres.
= et bien sûr du gaz (butane et en général je prend du gaz filtrer 12x pour éviter les saleté qu il peut y avoir dans certain gaz .
=et enfin il vous faudra un bol pour récupérer tous le nectar^^
(J UTILISE DES MOULES A GÂTEAUX EN SILICONE (rien qui accroche)
Mais si vous utilisez un extracteur en plastique et ou un moule en silicone il faudra absolument prendre du butane et non pas DME =CAR LE DME ENMENE DES PARTICULES DE SILICONES EY DE PLASTIQUE LORS DU GAZAGE
Voilà voilà je vais commencer et prendre des vidéo au fur et à mesure que je vais poster pour vous montrer .
Après 1heure de dégazage vous aurez une fine couche ai fond qu il va falloir travailler pour y faire rentrer de l air (ne t inquiète pas j vais poster une vidéo se soir ou tu pourra voir comment faire..)
Le crumble est je pense la seul sorte de bho que l on peut faire sans trop d équipement (pour le reste il faudrais evaporatrice rotative ou autre etc )
Avec le crumble c est votre main qui fais le travail = l objectif est que l air touche toute les partie de la patte comme sa le gaz sort et l air oxyde les trichome etc etc
Likes
8
Share


@CecilioJardinero
Follow
Segunda semana de floración para nuestras #kriticalbilbo de @genehtik_seeds 🐷🌱🌺🍒.
En esta semana aplicamos solo base de floración así preparamos nuestras plantas para la segunda dosis de #bigone de @topcrop 🕶️🤠.
En las fotos se puede apreciar un ejemplar especial de la Kriticalbilbo, tenía un brazo creciendo al mismo tiempo del central sufrió un ataque gatuno y la dejó gravemente herida, gracias a la habilidad del jardinero se logró amarrar y salvar, ahora es la más hermosa de las #kriticalbilbo con más de 8 brazos engordando a full 🕶️🤠😁
Comentarios y sugerencias les leo siempre... 😇
Recuerden seguirme en instagram como @Cecilioeljardinero.

Likes
74
Share


@Mr_Maes
Follow
We are officially in full bloom. The have been enjoying 6-7 hours of sun light per day for about 4 days now, then brought back in under the cobs. The girls are all exploding with growth and stacking what I expect to be huge buds.

