
Likes
Comments
Share

@Rayshian
Follow
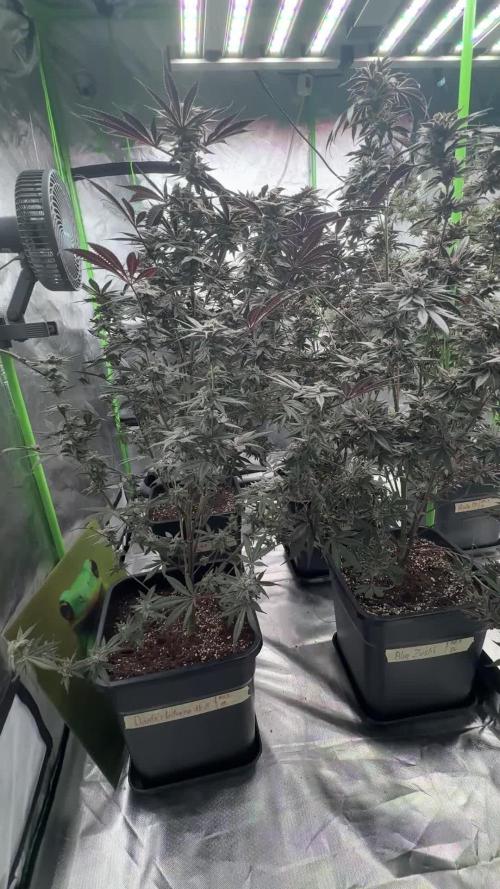
Day 78- Flowering day 26- These OG girls are gettin thirstier by the day, I had to feed them yesterday because the soil is starting to dry out every 2-3 days now. I gave them what I've been giving them normally, about 1.5L for the big OG girls and about 1L for the small seed producer. I also put the clone in the back bathroom and tried my hand at pollinating it, we'll see how that turns out and I'll definitely wait to put this one back in the flowering tent because I'm not sure if the pollen was fully thawed but I got a lot of it on the pistils so I don't want to take any chances. I fed the BD about 2L of nutrient solution and she's only showing a very slight sign of overwatering but I'm sure she'll be recovered by the end of the day. All the plants in the tent have stopped stretching, I'm gonna have to remember how to train future plants like OG 1 because those buds are lookin absolutely fantastic. I made a mistake with OG 2 and didn't train it exactly the same so it stretched a bit too much and I doubt it's gonna yield as much as OG 1.
Day 81- Flowering day 29- Well I think I’ve figured out what’s going on with OG 2 but we’ll see if I’m right. I think, aside from the heat stress it was under, there may be a slight nitrogen toxicity. OG 1 and BD have sucked up everything I’ve thrown at em without complaint but OG 2 still has some curled up leaves even though a lot of them have gotten better. I think it’s nitrogen toxicity because the leaf tips on my Green Crack just started curling downward and I know its not heat stress. The only thing that makes sense is too much nitrogen because I have been using more cal/mag than usual so today I just watered all the plants with molasses water and I’ll keep checking in on them. Also had to tie up some of the branches on OG 2, I’ve definitely gotta make sure to train plants in the future to not stretch so much cap that the branches will grow thicker and stronger.


Likes
3
Share


@Briangrowss
Follow
I think she start to look delicious
28/7 she really start to smell good
30/7 give her this morning the first time green sensation and build it up to 0,5 in the next week that starts tomorrow ☘️


Likes
102
Share


@Roberts
Follow
Ztrawberriez auto has grown great in just perlite. Super frosty colas on her. She is showing lots of cloudy, and clear trichromes at the moment. I am switching her to just ph water as she ripens. Next update will be her harvest. She was smelling really good prior to the head cold I caught. Looks like she turned out great. Thank you Fast Buds. 🤜🏻🤛🏻🌱🌱🌱
Thank you grow diaries community for the 👇likes👇, follows, comments, and subscriptions on my YouTube channel👇. ❄️🌱🍻
Happy Growing 🌱🌱🌱
https://youtube.com/channel/UCAhN7yRzWLpcaRHhMIQ7X4g
If anyone needs to purchase fastbuds here is a link for my affiliate program
https://myfastbuds.com/?a_aid=60910eaff2419

Likes
8
Share


@NoProbation4Weed
Follow
Very Nice looking and good Smelling Plant. Buds after Trim are medium dense but very tasty.
Flavourwise it goes into ripe Berrys with a hint of Citrus and Soapyness in the background.
The Plant looks exactly like on the pictures High-Giraffe-Seeds shows on their website.
All in all definetly a recommendable Plant to grow.
Likes
5
Share


@Sorrnaparszarei
Follow
Whats is wrong with my plants?
I don't know
If you know please advise

Processing
Likes
8
Share


@Max1973
Follow
Day 63 - lookin good.... haha....
um, tanks stabilized, ph 5.8 - ppm 1200 .... she's feedin alot.....
buds are fillin and lotsa white furries....
listed the nutes and amounts etc.., but i'm kinda feeding her as she needs.... so every few days she is drinking
2 lts +- and i'm just mixing up a neut solution in a 2 lt bottle every day or 2 ..... sometimes she just wants abit of water......
Day 64
+vid....shows her deep green and gloss... abit of crystalic :)
Day 65 - vids pics.... trimmed her, and abit of bending....
Added blood and bone.... she's stretching alot, 60cm+ ........
Day 67 took all the early buds on all the stringy 0ff shoots....
Poor lighting vids, but don't want to mess with her flowering, :)
👍😎👊

Likes
41
Share


@MR_PUUF_K93
Follow
Las Banana Cream 🍌 estan enormes!!
Los puntitos que empezaron a salir en una de ellas me han dicho que puede ser carencia de calcio.
Las Runtz que salieron después tuve que germinar dos por fallo de las semillas esta muy bien creciendo poco a poco y la que es de su día avanzando y comiendo 😎🤟🏼
Las ZKITLLEZ mutantes que salieron con un cotiledón han aguantado bien y estáN como nunca! La que salio con dos cotiledones SUPER ANCHA!! ME ENCANTA💪🏼🌴😎
ESTA SEMANA YA LAS CAMBIARÉ A 12/12 🌸🌸🌸


Likes
Comments
Share


@Mimiqt_Farm
Follow
Willkommen in Woche 4 der vegetativen Phase! 🌱
Die Ladys haben das Umtopfen in die großen 14L-Töpfe sehr gut verkraftet – sie sehen gesund aus und entwickeln sich prächtig! Momentan gieße ich alle zwei Tage etwa 4 Liter auf alle Töpfe verteilt. Ich nutze dabei einen Drucksprüher, was sich bei meinem Canna-Koko-Erde-Mix absolut bewährt hat. Das Substrat bleibt gleichmäßig feucht und die Wurzeln scheinen es zu lieben!
Ein kleines Thema aktuell: die Luftfeuchtigkeit. Aufgrund der Temperaturen ist die Luft recht trocken – ich überlege, den Luftbefeuchter wieder in Betrieb zu nehmen 😄 Allerdings zeigen die Pflanzen bislang keine Anzeichen von Stress, also scheint alles noch im grünen Bereich zu sein.
Ich bin mir noch etwas unsicher, wie lange ich die Vegi-Phase dieses Mal laufen lassen möchte. Bald werde ich jedoch mit dem LST (Low Stress Training) beginnen, um die Struktur der Pflanzen optimal auf die Blüte vorzubereiten.
Bis dahin – happy growing! 🌿

Likes
21
Share


@MG2009
Follow
12/17/2021
They are growing well,#1 will be eliminated she is a runt, and way to far behind her sisters in growth, so culling her tomorrow.
Ps. #1 sprang back to life!
No sign of sex yet but soon I hope, as I was hoping for a short veg. More pics of #2-#8 in a.m.
Pretty cool to see plants know when lights going to out, and leaves look lower (drooping) about an hour before light shuts off !.
Getting ready for (sleep)? Pics 1-8 at lights on and leaves starting to reach for the sky (waking up)
Plants are about 31 days old and should start to show signs of sex.
Likes
36
Share


@MrJoint
Follow
⏰PP #1 is really late.
✨PP #2 and #3 are pretty nice.
🌴 I made an LST on PP #1 to try to ensure reasonable performance with main line, despite delay from this girl.
⭐️I’ll start a new diarie for PP #1.
✌️🎃Thank you for checking my cultivation.
Likes
1
Share


@GLeee
Follow
Unfortunately one of the light bulb slide down and burned plant:( after the burn i had to remove 2 leafs as shown in video.


Likes
3
Share


@DogDoctorOfficial
Follow
🍋 Project Blue Tent – Folder 14
Pickled Lemon Haze F1 – Pheno A
Week 2 – The Journey Begins
Welcome back to Project Blue Tent, my newest adventure focused on exploring Zamnesia Genetics while growing in Plagron Premium Coco Grow Bags using the complete Plagron Hydro feeding program.
Every phenotype has its own diary because every plant deserves to tell its own story. Although all plants share the same environment, nutrients, and care, each one develops its own structure, rhythm and personality. This diary follows Pickled Lemon Haze F1 – Pheno A from her very first days until harvest.
⸻
🌱 The Environment
This project is being grown under an 18/6 light schedule, allowing the plants to enjoy long, energetic days followed by six hours of uninterrupted darkness to recover and continue building strong root systems.
The entire grow takes place inside the Zamnesia ecosystem, creating a stable environment where every variable can be controlled consistently.
Current environmental conditions remained very stable throughout the week:
• Temperature: 29°C
• Relative Humidity: 68%
These warm, humid conditions are ideal for encouraging vigorous vegetative growth while helping the young plants establish themselves before accelerating into larger development.
⸻
🥥 Why We Sink the Pots into the Coco
One detail that often raises questions is why the starter pots are placed directly inside the Plagron Premium Coco Grow Bags instead of remaining outside until transplant day.
There are several reasons behind this approach.
The surrounding coco acts as a natural thermal buffer, helping keep the root zone at a much more stable temperature than a pot exposed directly to the air.
It also helps maintain consistent moisture around the root ball, preventing the edges of the starter pot from drying excessively while avoiding large fluctuations between wet and dry cycles.
Another advantage is purely practical. Because the pot sits inside the grow bag from the beginning, the final transplant becomes almost effortless. The plant never needs to adapt to a completely new environment, and the root ball slides directly into the cavity already prepared for it.
Finally, shaping the cavity around the starter pot creates a perfectly fitted transplant hole. When the moment arrives, the root ball drops into place with almost no disturbance, eliminating air pockets and ensuring immediate root-to-coco contact. It’s a small detail, but one that greatly reduces transplant stress.
⸻
🌿 Feeding Program
The first irrigation after transplant introduced the plants to the Plagron Hydro line.
Current nutrient solution:
• Plagron Hydro A
• Plagron Hydro B
• Plagron Hydro Roots
Solution parameters:
• pH: 5.83
• EC: 1.26 mS/cm
• Water temperature: 23.1°C
This mild feeding provides everything the young roots need while encouraging rapid colonization of the fresh coco substrate.
⸻
🌱 Root Development
One of my favorite moments this week was checking the root system before transplant.
The entire root ball was beautifully colonized with bright white, healthy roots wrapping around every side of the substrate.
Exactly what we hope to see.
The roots had reached every corner without becoming root-bound, showing excellent vigor and confirming that the timing for transplant was absolutely perfect.
Strong roots today build strong flowers tomorrow.
⸻
🍋 Pickled Lemon Haze F1 – Pheno A
Even at this early stage, this little lady is already beginning to reveal her personality.
Her internodal spacing is compact and symmetrical, producing a balanced structure with broad, healthy leaves reaching confidently toward the light.
The stem is thick for her age, showing good structural strength, while new growth is emerging quickly with a vibrant green color that indicates she’s comfortably adapting to her new home.
Leaf posture remains open and relaxed throughout the day, another sign that both the environmental conditions and feeding program are right where they should be.
Everything about this plant suggests a smooth, stress-free start.
⸻
Looking Ahead
Now that the transplant is complete, the focus shifts entirely toward root expansion.
Over the coming days, I expect the roots to begin exploring the entire Plagron Premium Coco Grow Bag, setting the foundation for vigorous vegetative growth before training begins later in the cycle.
The stronger the underground development today, the stronger the canopy will become in the weeks ahead.
⸻
Final Thoughts
Every project starts with small plants and big dreams.
Watching a healthy seedling settle into her final home is always one of the most satisfying moments of any grow. It’s the stage where patience matters most, because the work invested now will determine everything that follows.
Pickled Lemon Haze F1 – Pheno A has made an excellent start, and I’m excited to see how her individual character develops as this journey continues.
⸻
🙏 Thank You
A huge thank you to Zamnesia for the incredible genetics and for providing the complete ecosystem that makes this project possible.
Special thanks to Plagron for supplying the Premium Coco Grow Bags and the Hydro nutrient line that will feed these ladies from start to finish.
And finally, thank you to the amazing GrowDiaries community. Your encouragement, advice, and shared passion make every grow even more rewarding. I hope you’ll enjoy following this journey as much as I enjoy documenting it.
Growers Love and see you all in the next update! 🌱💙
Likes
86
Share


@Ageddd
Follow
-------------------------
| BLUEBERRY HARVEST |
-------------------------
After two sunny days it is harvest time !!
- Finally, 16 days of flush -
At first thought, the trimming would be easier compared to my previous plants, but when removing more leaves, more buds appearing too hahaha so it took like 4 hours or more..It is not the most accuurate trimming but i had not much time that day, i removed all the leaves and branches after weighting it all..
Like i said on the last post, im harvesting having in mind my bud preferences (the later the better), weather, humidity and sunlight, so the first of the cloudy/rainy days she was chopped in the moring, attending the principle of thc regeneration at night..
Got to say that, i wasnt expecting such production (8 days until it was well dried), this plant started as the season saver because the Cheese started to flower in march, revegged etc.. and i have been rewarded with this BB, a true genetic portent !! If i could, i would keep her as mother forever ^^
The quality is awesome, she looks more like a WW talking about that coat of thc..
Flavour without proper cure, is deep earthy at first, transitioning to a fruity, sweet one, it is a pleasure to smoke, delicious sweet aftertaste..
Maybe, this is the last year with this awesome climate, because im planning to leave Spain..
Thank you for follow and check !!! I hope you liked the diary :)
Song of the week : Radiohead - Codex
Good Vibes GrowDiaries !!
----------------------------------------------------------------------------------------------------------------------------------------------
000000000000

Processing
Likes
15
Share


@donovanliam
Follow
I'm doing terrible. The plant hasnt done anything bad it's all healthy (super strong stock) it's all me. Trying to prolong its veg and restricting its height. But the other plants have caught up so switching to flower next week the week after ones a clone so it's already. But ones only 6 weeks. In the video I posted there is my white widow I'm confused why its stock it so tiny
Likes
16
Share


@Mplants
Follow
Hemos germinado la genética con éxito. Una va un poco más rezagada pero saldrá.
El seguimiento de la planta se hará con abonos canna, cambiaremos la formulación con respecto al anterior cultivo.
En pocos días empiezo a abonar con crecimiento.

Processing
Likes
62
Share


Likes
14
Share


@Quintall
Follow
Hallo lieber Grower,
hier mein erster Grow^^
Nach 3 Tagen Wasserbad alle in die Erde gelegt mit der Wurzel nach unten zeigend.
Bis alle aus der Erde kommen 24/7 Licht. Dann 18/6
Luftfeuchtigkeit auserhalb des mini Gewächshäuschens 60-70 %
Temperatur 20-25 grad