


Likes
6
Share


@ButterfliesLittleFarm
Follow
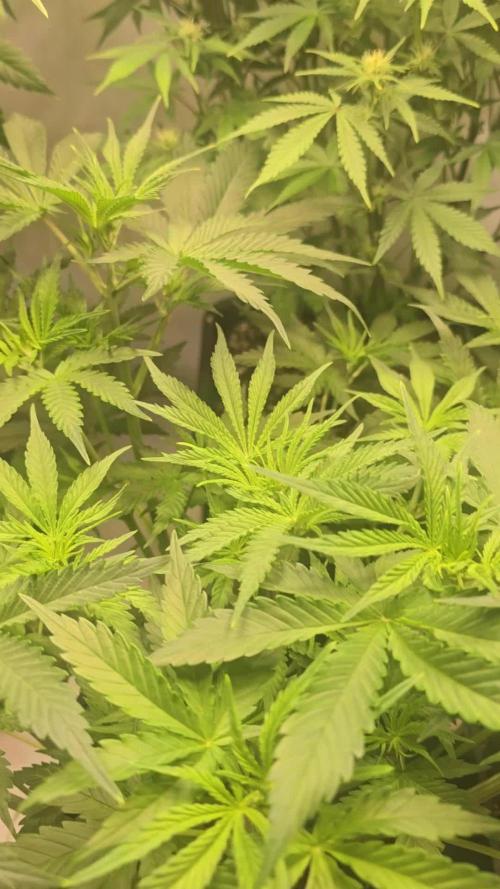
Hello Diary,
White Widow has finished its fourth week of flowering, 7 weeks have passed since the beginning of the vegetation.
Now I can already say that we are slowly approaching the end, from next week I will be painting her on a black background.
What can I say, White Widow looks great.
The flowers are very hard to the touch although they are not that big if I compare them to her roommates on the "Farm".
Although smaller in volume, the flowers bend the branches slightly downwards with their weight.
The main cola rises above the branches, the flowers on it are hard as a rock and full of trichomes.
The smell is now very intense, when I open the grow box, the smell takes over the whole room.
The leaves are a healthy green color, it is obvious that the new nutrients Bio Grow and Bio Bloom Fertilizer are doing their job.
The conditions on the Farm are good, the temperature is around 28 degrees while the humidity is below 50%.
Watering is still almost every two days, they still require a lot of water.
I continued to add CalMg and Bio Bloom Fertilizer with each watering.
I am very happy to see how White Widow looks, all three plants on the Farm have far exceeded my expectations.
White Widow has responded nicely to my efforts to provide her with the best conditions I can.
Here is a quick overview of the past week.
06/09/2024 - Day 44.
Watering.
I prepared 9 liters of water, added CalMg and Bio Bloom Fertilizer and lowered the p.H. to 6.0.
With that amount of water I watered all three plants on the "Farm".
08/09/2024 - Day 46.
Watering.
I repeated the same procedure as two days earlier.
10/09/2024 - Day 48.
Watering.
Same procedure.
11/09/2024 - Day 49.
End of the 7th week from the beginning of the vegetation, or the fourth week of flowering. Photographing and measuring the height of the plants.
White Widow - Day 49. - 69 cm.
That's all from me for this week, see you soon and thank you all for the comments.

Likes
10
Share


@ZzTooRightOGzZ
Follow
She's slowly getting better 😁
I flushed her at the start of the week because of a nutrient lockout.

Likes
Comments
Share

@ThatsmyGrow
Follow
It has truly exceeded all my expectations. I mean, look how wonderfully wide and evenly it grows without me having to help it along.
Likes
12
Share


@valiotoro
Follow
Hello everyone, all good for this week 😎
They grow fast and with a beautiful green colour on the leaves!
In this grow i will be testing out Plagron Nutrients and Mars Hydro FC-E6500
LSD-25 from Fast Buds 🍷🎢


Likes
2
Share


Likes
8
Share


@MrLahey
Follow
Flipped ‘em to flower about a week ago. So far to my untrained eyes they’re looking great. I’m watering ever three days and feeding once every other watering. Mixture of fox farms nutrients (disregard amounts in stats above) at like 25-40 percent of full strength. Ppm was 700 and ppfd is 700-800 according to Photone.
Disregard the little fella in the solo cup. I never transplanted it and just kept it in there. Now I’m just keeping it as a bonus plant plus to learn leaf symptoms, etc.
I’m really excited to guide these through the home stretch! They’re already way bigger than my last, and first, harvest.

Likes
35
Share


@eldruida_lamota
Follow
Bueno familia ya finalizamos, estas red hot cookies son una cepa bestial.
La verdad que el secado muy bien 7 días en Malla y a los botes, 45% humedad y 23 grados es la temperatura ambiental que han tenido en el secado.
4 plantas que se cultivaron en un armario de 1.20 pero estos ejemplares solo ocuparon 80x80.
Así que ya está cultivada esta gran variedad que es novedad este 2020, americana de la familia Cookies, la Tropicanna Cookies (Girl Scout Cookies x Tangie) con un porcentaje de thc entre los 17/25%, una bomba.
Que decir de Agrobeta, lo peta 💪 en cuanto a nutrientes. Un saludo y buenos humos.


Likes
7
Share


@GYOweed
Follow
Ended up being my runtz gum x amnesia lemon haze seed I found on kitchen floor.
Typical branchy big creamy flowery frosty pheno i got like last times..
I have many fem seeds of this F1. It's nothing interesting in my opinion.
This was grown in partial sun and flowered in mostly shade couple hours direct sun only. 🌞
Likes
36
Share


@TheGreenLeopard
Follow
had a bit of a nightmare. bit much on over water and may have had a nutrient lockout. took one sweet cherry pie out and replaced with seedsman northern lights auto. also added a few more of those in the tent 5th dec. was unfortunate as this week was for topping. went ahead and did it. will be very careful next week. Purple berry Kush came on strong this week. took the nutrients fine. less damage from over water.


Likes
31
Share


@LockDownGrow
Follow
Everything has gone really well up till now ,
She is start too show the beginning of pre flower , I wasn't expecting that for a couple of weeks so not sure if this is normal ? But she is growing fast and strong ,
I picked of a few select large leaves that where coving the side branches , but very minimal , mabey one or two leaves of each plant , and also pulled down the branches too help with light getting down into the center of the girl ,
Likes
18
Share


@Pokan187
Follow
Slowly cruising and getting closer to the end, they all reacted very well to the feeding and look rejuvenated.
Had some aphids on the GDP but I caught them early and sprayed them with some homemade soapy water with essential oils mixture,so it shouldn't be a problem moving forward plus I spotted some natural allies (ladybugs)
The Runtz has the biggest buds and looks like it will finish first
The G13 has the best and strongest smell


Likes
5
Share


@Levinho14
Follow
from the original grow ive only kept the 2 pineapple express and the 3 grandaddy purples... ive sent one of the grandaddy purples to flower its probably in week 2 right now and i will be making a diary about it. the northern light ive turned into a mother so its no longer a part of this grow diary since its going to be kept in the vegetative state.
ill be sending 1 pineapple express and 2 grandaddy purples to flower in the flower tent. as of next week.. i will feed them bud ignitor an begin the process :)

Processing
Likes
1
Share


@bk_garbage
Follow
little clone lollipops still partying. Just hand watering ever couple days, or throwing one of the drip rings into the pot once in a while. I also am rotating the pot a 1/4 turn when I remember.
Will probably move this out from under the shade this week cause I think they've gotten used to the flower lights and will bud soon.

Likes
6
Share


@HowtoBubatz
Follow
We’re officially in the final week for my Strawberry Gorilla Automatic from Fast Buds! 🌟
This beautiful girl has had a very quick flowering phase, but looking at the trichomes, they’re right where they need to be so no complaints!
She will be flushed throughout this week and then harvested and hung up to dry next week.
I’m super happy with how she’s developed!😋
Likes
5
Share


@123Grow
Follow
It time for push and tuck. I did the feeding for transition ( 1:1:1 ratio). I watch them for about 3 hours, then turn the lights out for 24-36 hours. This depletes the hormone that says veg and switches to flowering.
Espoma seed starter mix : 1 TBSP
Jobe’s Citrus Fruits : 1 TBSP
3 TBSP earth worm castings
1/4 tsp recharge
Aerated for 30 hours at 68 degrees ( nice and frothy 😂😂)
1 gallon of water 750-765 ppms at 1:1:1 ratio. This will last for the first 6-7 days, then we switch to 1:3:2 ratio. I will list what I use for 1:3:2 as it will change from week to week.
10-18 Lights are out for 30 hours and we will see how they look. Lights go back on at 6am EST.
10-19 The lights are kicking. Did some tucking. I did 30 hours of dark before introducing 12-12 light schedule. I can see some of the pre-flower hairs sticking out. 8-8-8 at 760 something ppm’s went well. This is the first run I will be hand feeding the plants throughout flower. I relied on dry amendments and had some success, but I think I can push the bar higher having more control over the feedings. I will be doing a total of 8 feedings.
10-22 The trellis is filling up!!! I added photosynthesis plus to the mix and some fulvic/humic acid. All the ladies are praying up.

Likes
7
Share


@BongRip
Follow
The yield is
1st plant: 23.5g
2nd plant: 60g
3rd plant: 46.5g
4th plant: 56.6g
I avg 2ozes/plant for these autos except for the untrained one. It's been a great grow and gotta love the harvest. The nugs are dense and big, esp the last plant. It gives one of the best high, and it suits to smoke during day time.


