


Likes
Comments
Share


@Boomdrawfyah
Follow
Empezamos con Terranabis nos ha facilitado una tabla de cultivo donde mete a sus nuevos productos de este 2021 daran mucho que hablar !! Estar muy agradecido a Terranabis y Paradisw Seeds!

Likes
4
Share


@GrowingGiant
Follow
Buds are starting to thicken. I was hoping for a purple phenotype but I didn’t get lucky. SMELL IS AMAZING. Huge plant

Likes
9
Share


@All_our_small_plants
Follow
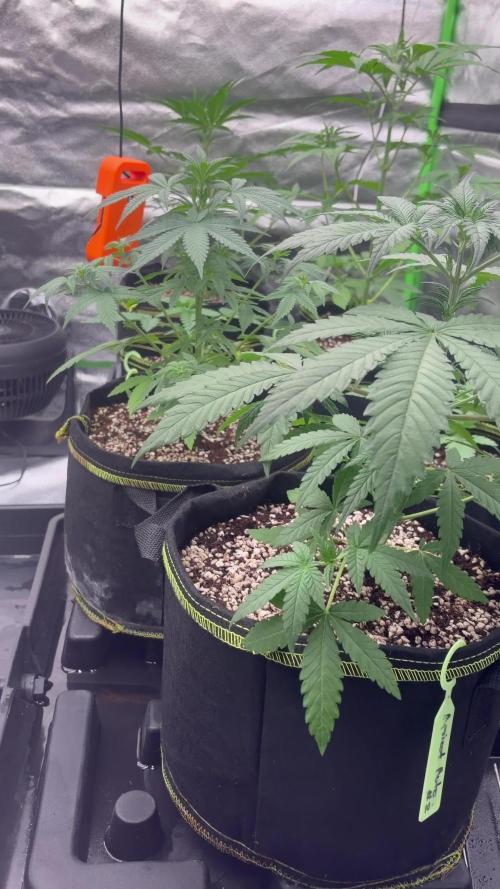
Tag 64 sie ist immer noch am Stretchen, aber so langsam entwickeln sich auch ihre Blüten immer mehr. Heute hat sie wieder eine Ordentliche Portion Wasser mit Dünger bekommen, und jeden 2 Tag Wasser ohne.
Tag 69 Heute haben wir angefangen Plagron Green Sensation und Canna PK 13/14 hinzuzugeben und werden langsam mit dem NPK Dünger aufhören. Wir wechseln von dem NPK 10-4-7 zu einem NPK 3,5-6-6 da die Pflanzen nicht mehr so viel Stickstoff brauchen.

Likes
4
Share

@Fyno_TH
Follow
Noticed Magnesium deficiency on lower leaves. Increased dosage in this week’s feeding and monitoring pH to ensure recovery. New growth looks stable.

Likes
22
Share


@drgreentips
Follow
I feed water till the day 10 mark now shes had the chop filled the smell proof weed dryer and the was left hung for drying
Processing
Likes
6
Share


@Flydope21
Follow
Seeing a lot of changes since I’ve started the LST. Most of the plants are doing good exept for one that seems to be having a hard time. I will also be adding an xl exhale co2 bag.

Likes
12
Share


@Medgrow93
Follow
Just waiting for them to finish.
8 Apr - 2.2L each + B.A.C Final Solution (last watering before harvest)
I'll probably harvest them early because I need to paint the room. Will give them one more week until the substrate dries out.
10 Apr - just waiting for the substrate to dry out before chopping down. Trichome productions is crazy. I hope they taste as good as they look.

Likes
39
Share


@Hazecat_420
Follow
Todo bien, entrando de lleno en la segunda semana. Hasta el momento solo seguimos con micorrizas del colectivo científico y agua semana por medio

Likes
15
Share

@Mati_86
Follow
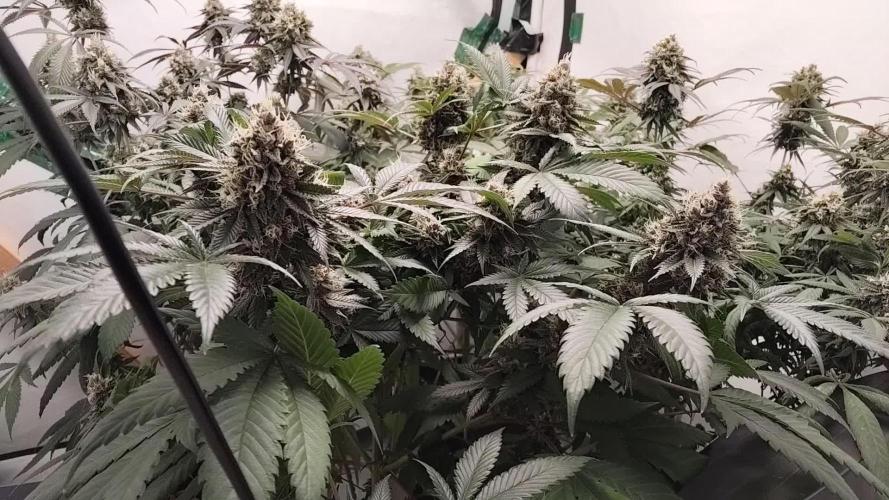
die buds schwellen an und ab jetzt gibt es keinen dünger mehr. ich hatte diese woche mal leicht gespült sodass ich ca 1 l drain hatte. der ec lag bei 2.0 ca.. werde kommende woche nochmal leicht spülen und wieder messen. zurzeit faden die oberen blätter aber die unteren sind mir etwas zu grün. habe noch 1.5 bis 2 wochen bis ich ernte. denke bis dahin wird das grün verschwinden. bin bis jetzt zufrieden und hoffe das die rlf sich senkt, denn es hat viel geregnet in der vergangenen woche und im zelt hatte ich gestern mittag 63% rlf😐.
ist aber bis zum abend auf 52 %runter..
heute hab ich 48% rlf im zelt.
die super boof und rainbow melon halte ich mir als mutti's 😁

Likes
3
Share

@Organic473
Follow
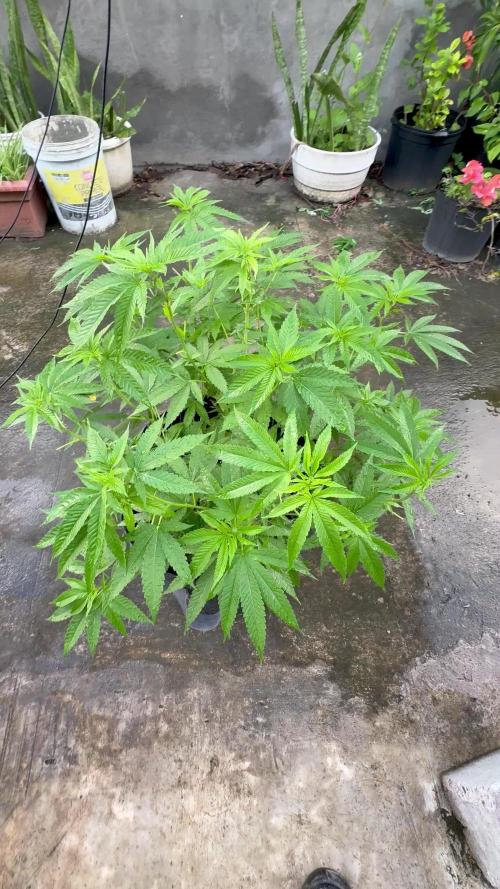
She is looking good haven’t watered in a while as the continuous rain helped. I’m doping she can gain more height in the next 2 weeks as I intend to flower her into the dry season.

Likes
16
Share


@ChiefIllini
Follow
We're moving right along on this grow! Buds are really filling out and they are covered in resin. The smell is of sweet candy and grapes. Can definetly tell she's going to be pungent!
Still water every other day or so ph'd 6.8 to 6.5. Completely stopped feeding 2 weeks ago. So going with a 5 week flush before harvest. Again, I went all organic.
As you can see the fan leaves are beginning to yellow as well and I went ahead and raised the light just incase they are getting some light burn.
Thanks for tuning in🤙

Likes
48
Share


@FatnastyzBudz
Follow
1-9
Watered 3x, starting flush.
1-11
Day 67 from seed
Day 43 of flower
Boosted Scc and cal/mag
Small shot ppm 550 ph 6.2
1-12
Started 3x flush. Ppm brought down to about 200.
1-14
Feed Scc ppm 550. Same as last feed.
Leaves showing fading.
.
Likes
5
Share


@Matou
Follow
Ernte.
3 Wochen Fermentation/Curing.
62% RH mit Regulierung über Boveda Hygro-Pack 62%
Likes
26
Share

@All_our_small_plants
Follow
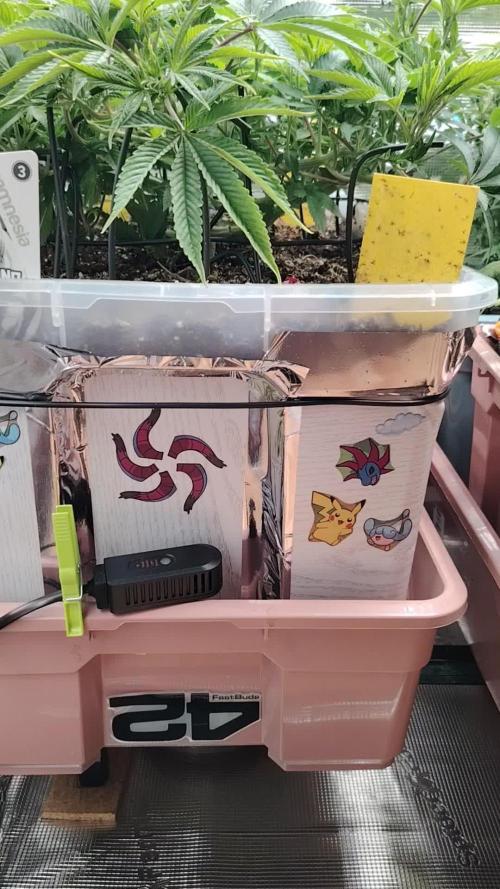
4000 ml alle 2 Tage
PH-Wert: 6
EC-Wert: 1,1
Temperatur: 22ºC
Luftfeuchtigkeit 62%
Schädlingsbekämpfung: Nematoden und Raubmilben
PPFD: 500
DLI: 32,4
Düngemittel: Mineralischer Dünger 10-4-7
Besonderheiten: Wurden direkt in die erde gepflanzt in einer Kokos-Quelltabletten.
-Tag 65 Heute erhielt sie 4 l Wasser, versetzt mit 2,5 ml Calmag und 6,5 ml NPK 10-4-7. Der EC-Wert lag bei 1,020 mS/cm und der pH-Wert bei 5,9 😻
-Tag 67 Heute haben wir sie mit 4000 ml Wasser gegossen, angereichert mit 3,5 ml Calmag, 7,5 ml NPK 10-4-7, 10 ml HY-PRO Rootstimulator sowie 0,64 ml HY-PRO Generator. Der EC-Wert betrug 960 mS/cm und der pH-Wert lag bei 5,9 😙
-Tag 69 Wir haben heute denn licht Zyklus auf 12/12 gewechselt und sind gespannt was der Stretch diesmal mitbringt. Sie hat heute auch wieder Wasser mit Mikroorganismen bekommen

Likes
10
Share

@DogDoctorOfficial
Follow
💙 Project Blue Tent – Week 9
Blue Waffle F1 – Pheno A
🌿 Too Much Stretch, Then a Big Reset
Hello everyone, and welcome back to another chapter inside Project Blue Tent! 💙🌱
If you're new here, Project Blue Tent is our little experiment with four individual Blue Waffle F1 plants from Zamnesia, each documented separately from seed to harvest.
All four girls share the same environment, lighting, irrigation, nutrition and general cultivation philosophy.
And yet, as always...
they each have their own personality.
Last week I was wondering just how much these girls were going to stretch after seven weeks of vegetation.
Well...
I got my answer. 😂
They stretched.
A lot.
And this week became one of those weeks where the grower has to stop watching and start acting.
The plants were getting simply too tall.
With the height of the pots and substrate, the drainage system underneath them, and the distance between the canopy and the LED fixtures becoming increasingly limited, some of the tops were getting dangerously close to the lights.
So we made some changes.
A fairly big reset, actually.
And looking at the room now?
I'm very happy with where we landed.
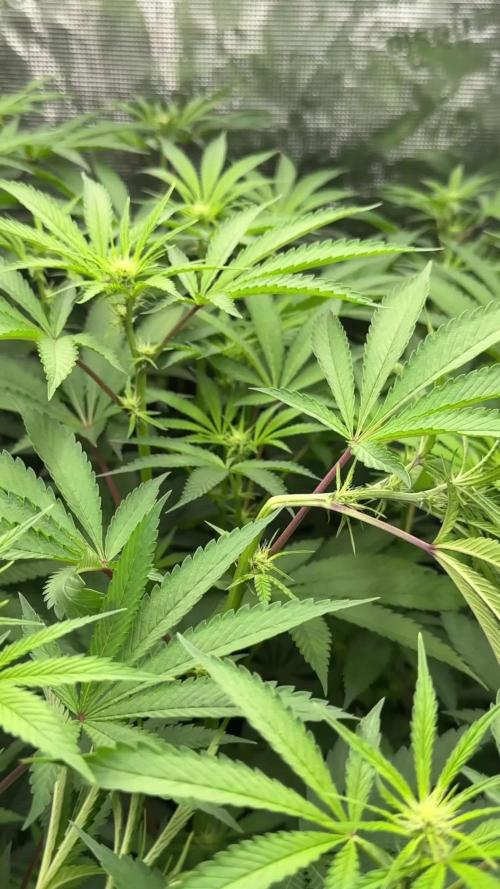
🌿 Pheno A – She Took the Invitation to Stretch Seriously
Plant A is now approximately 145 cm tall.
😂
Yes.
One hundred and forty-five centimetres.
And when you add the height coming from the pots, substrate and drainage arrangement underneath the plants, that number becomes even more relevant when you're working inside a relatively limited vertical space.
Last week she was already moving quickly.
This week she basically said:
"Hold my nutrient solution."
😂💙
The structure she built during those seven weeks of vegetation gave her an enormous amount of material to work with.
The SCROG distributed that growth beautifully.
But once flowering stretch really kicked in, all of that established structure began pushing upward.
And eventually...
we simply ran out of comfortable vertical room.
So rather than fighting the plants continuously, we changed the room around them.
🕸️ The Second SCROG – Because These Girls Are Getting Big
One of the biggest changes this week was the installation of a second SCROG net.
This wasn't done because the first net failed.
Quite the opposite.
The first net did exactly what we wanted during vegetation:
It helped distribute the plants horizontally and build an even canopy.
But now these girls have become much taller.
And as flowering progresses, those branches are going to become heavier.
So the second net is there for something different:
support.
We're essentially creating another layer of structure through the upper portion of the plants.
This gives the flowering branches something to lean against as the flowers develop and gain weight.
And with plants this tall, I would much rather organize that structure now than discover later that a heavy flowering branch has decided to take a dramatic trip toward the floor.
😂
The second net also helps keep the canopy organized after the major defoliation.
And looking at the room now...
I think it was absolutely the right decision.
✂️ The Big Defoliation
And then came the other major event of the week.
Defoliation.
Not a little cleanup.
Not removing three leaves and calling it a day.
We went deep.
The room had become extremely dense, and with the plants stretching this aggressively, we needed to open everything up.
We removed leaves where they were creating unnecessary congestion and took out foliage from stems where appropriate, leaving the productive growth and flowering structure we wanted to carry forward.
This wasn't about making the plants look naked.
It was about making the structure functional again.
And there's an important distinction here.
We're not defoliating because removing leaves magically creates more flowers.
That's not the objective.
Leaves are valuable.
They're part of the plant's photosynthetic machinery.
The objective here was to manage excessive congestion, improve visibility through the canopy, increase air movement through the plant and reduce the amount of unnecessary foliage competing for space around the developing flowers.
We're trying to create a better working environment for the plant.
Not punish the plant.
Not stress it for the sake of stress.
And certainly not remove every leaf we can find.
🌿 What We Expect From This Defoliation
Now comes the interesting part.
After a significant cleanup like this, I don't expect the plants to immediately look like they're growing faster.
Quite the opposite.
There can be a period where they need to settle.
They've lost a considerable amount of leaf area.
We've physically changed their architecture.
So I expect the plants to spend some time adjusting and continuing their transition into flowering.
What I'm hoping to gain is something different:
better structure.
Better airflow.
Better light penetration.
Better access to the flowering sites.
Less congestion.
And a much easier canopy to manage as the flowers continue developing.
Will it completely stop the stretch?
No.
I wouldn't expect that.
The plants are already well into their flowering transition, and genetics, plant maturity and environmental conditions still have a huge influence on how much they stretch.
But by removing excess congestion and adding the second SCROG, we've made the remaining structure considerably easier to manage.
Now we watch.
🔥 A Few LED Burned Tops – And We Caught It
There was another little lesson hidden inside all that stretching.
Some tops had gotten too close to the LEDs.
And we saw a few leaves and flowering tips showing signs of LED stress/burning.
Nothing catastrophic.
Nothing that concerns me at this point.
But definitely something we needed to address.
And honestly?
I'm glad we caught it now.
Because once the plants were getting that close to the lights, we were already running out of room to work with.
So we attacked the problem from several directions.
We moved the ventilation equipment outside the tent.
We raised the LEDs.
We opened the canopy.
We installed another SCROG.
And suddenly...
we gained some valuable vertical breathing room.
That little bit of extra space can make a huge difference inside a tent.
🌬️ Moving the Carbon Filter & Extractor Outside
Another major change was moving the carbon filter and extractor outside the tent.
Previously, having that equipment inside the tent was consuming precious vertical space.
And with these girls reaching toward the lights, every centimetre suddenly became valuable.
So we moved the filter and extractor to the top of the tent.
The system now pulls air from the tent through the carbon filter and extractor and then exhausts it outside.
This gave us the space we desperately needed.
And that allowed us to raise the LED fixtures closer to the top of the tent rather than having the ventilation equipment occupying that valuable ceiling space.
It sounds like a relatively small modification.
But in a tent with plants this tall?
Huge difference.
Sometimes the solution isn't changing the plant.
Sometimes it's changing the room around the plant.
😂💙
💡 More Room for the Lights
And this is one of the most satisfying results of the whole operation.
Once the ventilation equipment was moved outside, we could bring the LEDs higher.
That immediately created more separation between the flowering tops and the fixtures.
The few areas that had experienced LED stress were addressed before things could become serious.
And now we have much more room to work with.
That's exactly what I wanted.
Because I don't want to spend the remainder of flowering constantly fighting the ceiling.
I want these girls to have somewhere to finish.
They already have plenty of height.
Now we need them to put their energy into the flowers.
🌬️ Two Fans – Creating a Vortex
We also added a second Zamnesia clip fan, positioned underneath the canopy.
So now we have:
One fan above.
One fan below.
And the goal isn't simply to make the leaves move.
We're trying to create a more complete circulation pattern through the tent.
With one fan moving air across the upper canopy and another helping move air underneath, the airflow can circulate through different levels of the room rather than leaving the lower portion relatively stagnant.
The idea is to encourage a kind of vortex-style circulation through the canopy.
Air moves.
Circulates.
Changes direction.
And continues moving through the plant structure.
This is particularly important now because we've spent the week opening the canopy and creating space.
There's no point creating all that space if the air simply sits there.
So now we've got airflow working from above and below.
And looking at the room?
It feels considerably more alive.
🌿 The Room After Defoliation
I have to say...
I love the way the room looks now.
Before the defoliation, it was an absolute jungle.
Beautiful.
Healthy.
But incredibly dense.
Now?
You can see the architecture.
You can see the branches.
You can see the flowering sites.
You can see the second SCROG.
You can see the airflow equipment.
And most importantly...
you can see the plants.
😂💙
The room feels organized again.
And that's exactly what we needed.
These girls have been growing extremely aggressively.
Now we're giving them a structure in which that growth can actually be managed.
✂️ A Word About Scissors
I also want to mention something that might seem insignificant but is actually very important to me.
The Zamnesia curved scissors.
I really like these.
For much of my defoliation, I actually use my fingers.
If a leaf can be gently removed without cutting anything else, that's often my preference.
But that's not always possible.
Some leaves are tucked into awkward places.
Some are smaller.
Some are delicate.
Some require a precise cut.
And that's where the scissors come in.
But there is one rule I don't compromise on:
Clean scissors.
Always.
Even when they're brand new, I still like to make sure the scissors are clean before using them.
When you're moving from plant to plant and making multiple cuts, cleanliness matters.
We're working with living tissue.
So there's no reason to introduce unnecessary contamination into the process.
Clean tools.
Gentle hands.
Deliberate cuts.
And don't cut something just because you happen to have scissors in your hand.
😂
💙 Pheno A After the Reset
And now...
let's come back to our girl.
Because despite all the work this week, Pheno A looks fantastic.
She's still one of the larger structures in this tent.
She's tall.
She's vigorous.
She's got plenty of flowering sites.
And after the cleanup, her architecture is much easier to appreciate.
The plant has gone from:
"How the hell are we going to fit all of this in here?"
to:
"Okay. Now we have a plan."
😂💙
The flowers are there.
The structure is there.
The health is there.
And now she has additional support underneath her developing flowering branches.
This is a very good place to be heading into the next stage.
🌸 From Building Plant to Building Flowers
This is the transition I'm most interested in now.
Up until this point, so much of the conversation has been about growth.
Height.
Branches.
SCROG.
Canopy.
Stretch.
But now?
The plant has done enough building.
I want to see her start putting more of that energy into flowering.
The architecture is established.
The second net is installed.
The canopy has been opened.
The lighting has been raised.
The airflow has been improved.
The room has been reorganized.
Now we let her work.
And hopefully...
the next photographs will show us exactly what all that preparation was for.
Beautiful flowers getting bigger.
💧 Nutrition – The Girls Are Hungry
Another important development this week is nutrition.
The girls are absolutely loving the feeding.
So we've increased the Hydro A and Hydro B recipe slightly.
We're now running:
Plagron Hydro A — 2.2 ml/L
Plagron Hydro B — 2.2 ml/L
Plagron Hydro Roots — 1 ml/L
Plagron Power Buds — 1 ml/L
pH adjustment as required
That small increase has brought the EC up accordingly.
Current recorded EC is approximately 2.49 mS/cm.
And again, this wasn't some dramatic change.
It was simply a small progression because the plants are consuming aggressively and showing us that they are ready for it.
They're growing.
They're flowering.
They're drinking.
They're hungry.
So we listen.
And we adjust.
That's the whole philosophy.
Don't feed a number.
Feed the plant.
🌡️ Week 9 Environment
The current recorded conditions are:
🌸 Flowering: Week 9
📏 Height: approximately 145 cm
💡 Light schedule: 12/12
☀️ Day temperature: 27°C
🌙 Night temperature: 27°C
💧 Relative humidity: 67%
⚗️ pH: 6.01
⚡ EC: approximately 2.49 mS/cm
🌡️ Solution temperature: 25.3°C
🌱 Substrate temperature: 24°C
🌬️ CO₂: approximately 666 ppm
? Pot size: 8 L
💦 Watering: approximately 1.6 L per plant / 24h
The environment remains remarkably stable.
And that's especially valuable after a week where we've physically changed so much of the room.
The plants have enough to deal with simply adapting to their new architecture.
I don't want environmental instability adding another variable.
So now...
stability.
Consistency.
Observation.
🔬 Same Room. Same Conditions. Four Different Girls.
One thing that's fascinating about this particular project is how uniform the room remains despite the plants being so vigorous.
The four Blue Waffle F1 girls are remarkably similar.
They all went through the same long vegetative period.
They all experienced the same lighting.
They all received the same irrigation.
They all received the same nutrition.
They all experienced the same environmental conditions.
And now they're all showing that same general flowering transition.
There are individual differences, of course.
That's what we're documenting.
But overall?
They are behaving like sisters.
And that's making this experiment incredibly interesting.
🌿 What I'm Watching Now
After this week's reset, there are several things I'm going to be watching closely.
First:
How quickly does the stretch settle?
Second:
How do the plants respond to the heavy defoliation?
Third:
How does the second SCROG hold the flowering branches as they gain weight?
Fourth:
How does the new airflow pattern perform under a developing flowering canopy?
And finally...
How much of that beautiful vegetative structure is going to turn into flowers?
Those are the questions now.
We've done the work.
Now we observe the results.
🌸 The Big Lesson From This Week
If there's one thing this week reminded me of, it's that a grow isn't always about having a perfect plan.
Sometimes you make the best plan you can.
Then the plant laughs at you.
😂
We knew they might stretch.
We didn't know they'd stretch this much.
So we adapted.
We moved the ventilation equipment.
We raised the LEDs.
We cleaned the canopy.
We installed another SCROG.
We added another fan.
We adjusted the nutrition.
And now?
The room is looking better than it did before the problem appeared.
That's what I consider a successful grow.
Not avoiding every problem.
Recognizing them early and adapting intelligently.
🔭 Looking Ahead – Now We Let Them Flower
And this is where things get exciting.
The girls have been through a major reset.
The canopy is open.
The second SCROG is in place.
The LEDs are higher.
The ventilation system has been moved outside.
Airflow is now working from above and below.
The plants are receiving their updated nutrition.
And Pheno A?
She's standing there at 145 cm, looking at me like none of this was particularly dramatic.
😂💙
Now I want to see what she does with the room we've created for her.
Hopefully the aggressive vertical growth begins to calm down.
Hopefully the flowers start becoming the dominant story.
Hopefully the second SCROG gives us the support we need as those flowers gain weight.
And hopefully those few LED-stressed tops recover without further drama.
I think we caught that issue early enough.
Now we watch.
💙 Final Thoughts – The Room Is Back Under Control
What a week.
Seriously.
😂
We went from:
"They're stretching a little."
to:
"Okay, these girls are going to hit the LEDs."
And then we went to work.
The carbon filter and extractor moved outside the tent.
The LEDs went higher.
The canopy received a serious cleanup.
A second SCROG was installed.
A second Zamnesia clip fan went underneath the canopy.
Airflow now works from above and below.
The nutrition was increased slightly.
A few LED-burned leaves and tops were cleaned up.
And after all of that...
I look at the room and smile.
Because it looks beautiful.
The plants look healthy.
The structure is organized.
The flowering sites are everywhere.
And Pheno A is absolutely shining.
She's tall.
She's vigorous.
She's beautifully developed.
And now she's finally got some breathing room.
🌿💙
The defoliation wasn't about making her smaller.
It wasn't about forcing her to flower.
It wasn't about chasing some magical yield increase.
It was about taking an overly crowded flowering structure and making it more functional.
The second SCROG isn't there because we expect failure.
It's there because these girls have become substantial plants and we want to support them properly.
The second fan isn't there simply to make the leaves dance.
It's there to help create better circulation through the entire canopy.
Moving the ventilation equipment wasn't cosmetic.
It gave us precious vertical space.
And raising the LEDs gave us more room between the fixtures and the flowering tops.
Every change had a reason.
And now...
we wait.
The girls have done their part.
We've done ours.
Now let's see what Blue Waffle F1 Pheno A does with this new chapter.
Because I have a feeling the next few weeks are going to get very interesting.
💙🌸🌿
🙏 A Huge Thank You
A huge thank you once again to Zamnesia for making Project Blue Tent possible and for giving us the opportunity to explore these beautiful Blue Waffle F1 genetics phenotype by phenotype.
Thank you to Plagron for the Hydro nutrient line and everything supporting these girls through this very vigorous cycle.
A massive thank you to Zamnesia for the Phytonaut LED lighting and for the curved scissors and clip fan that have become part of the practical side of this project.
Thank you to Mars Hydro for the irrigation and drainage system that continues keeping these girls supplied while they absolutely demolish their water.
😂💙
And thank you to GrowDiaries for giving us the platform to document all of this craziness and share it with growers around the world.
Most importantly...
thank you to everyone following Project Blue Tent.
This week was definitely one of those chapters where the plants reminded us who's actually in charge.
We planned.
They stretched.
We adapted.
😂
And now the room is ready for the next phase.
Four Blue Waffle F1 girls.
One room.
One environment.
One very ambitious flowering canopy.
And a second SCROG ready to catch whatever these ladies decide to throw at us next.
Let's see how they finish.
Until next week...
More room. More airflow. More support. And hopefully a lot more flowers. 💙🌸🌿
Growers Love, happy growing, and take care everyone! 🌱💙
Likes
18
Share

@TrickzGrowz
Follow
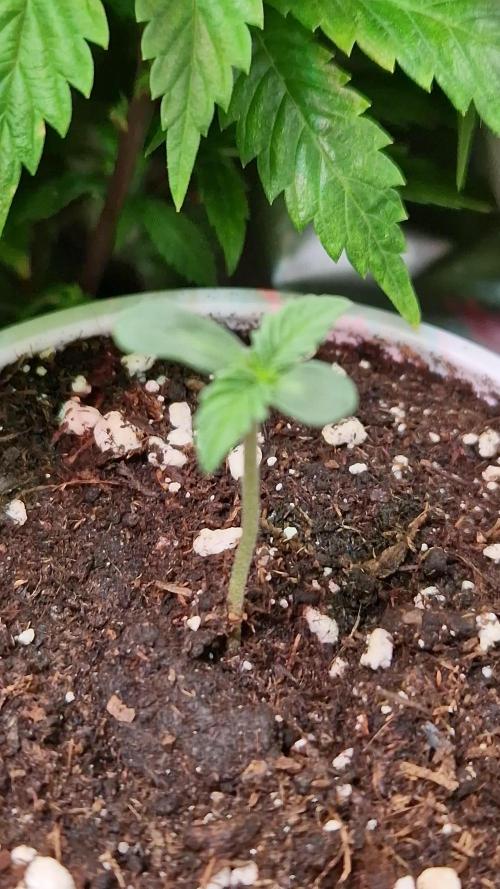
Die kleine Dame ist geschlüpft und es geht in die erste Woche. Sie bekommt nun einen "Topf" und kann sich erstmal darin ausleben.
Likes
29
Share


@nonick123
Follow
Día 13 (06/05) Nos acercamos al final de la fase plántula. A ver si ahora empiezan a crecer de forma explosiva!
He sido muy estricto con los riegos, dejando que el top hasta el nudillo se seque completamente!
Día 14 (07/05) Hago una mejora en la tienda. Hasta ahora tenia intracción pasiva, pero ahora he instalado una turbina para que impulse aire fresco dentro de la tienda
Día 15 (08/05) Con el calor que hace me sorprende que las macetas sigan aguantando la humedad, pero al hundir el nudillo sigue húmeda. Mañana haré un riego de nuevo
Día 16 (09/05) Relleno el top con sustrato para compensar la compactación y dar mas soporte a las plantas
Riego con 300 ml solo H20 - pH 6,2
Día 17 (10/05) Baño de sol de dos horas.
Día 18 (11/05) Baño de sol de dos horas
Día 19 (12/05) Riego 750 ml H2O + Regulator 0,15 ml/l + CaMg-Boost 0,25 ml/l + Startbooster 0,25 ml/l - pH 6.2
💦Nutrients by Aptus Holland - www.aptus-holland.com
🌱Substrate PRO-MIX HP BACILLUS + MYCORRHIZAE - www.pthorticulture.com/en/products/pro-mix-hp-biostimulant-plus-mycorrhizae
Likes
8
Share


@Growin_Ish
Follow
Candace hasn't recovered from overwatering. The pot is very light / dry, but the leaves still droop. They aren't crispy, discolored, curling, or taco, just droopy. I'm concerned if I let the pot dry completely it will force the microbes to go dormant and the short flower cycle may never catch up. She has the perfect structure to be a monster but this leaf drooping is not helping at all! She doesn't even need LST!
Sheryl looks to have recovered fine but is much smaller and bushier than Candace.
I skipped the preflower top dress because this strain has a 4 week flower cycle. I'll keep feeding them SimPro once a week. If I top dress, I'll never be able to get a good fade on these.
Day 36
Bottom watered both with plain PH water.
Day 37 - Both liked the bottom watering. Candace is 9" Sheryl is 11.25".
LST the side branches on both.
Day 41
The leaves had bounced back, but are now droopy again, which tells me they're thirsty. I have two small lower leaves on both plants show PK deficiency, so they're hungry too.
Whipped up a tea using Roots Organics Terp Tea Bloom, Azoz, & Simpro Bloom. Each got 1Ml of Fish Sh!t & CalMag.
Likes
6
Share


@GorkedOut
Follow
Only 1 plant harvested, the other is a few weeks behind and is in much better health. Chopped one on day 77 and I'll let the other go until like day 82-85.
I will also prob create a better song for this strain. I was on a time constraint.

Likes
6
Share

@Salokin
Follow
Week 4 | Jealousy Marker
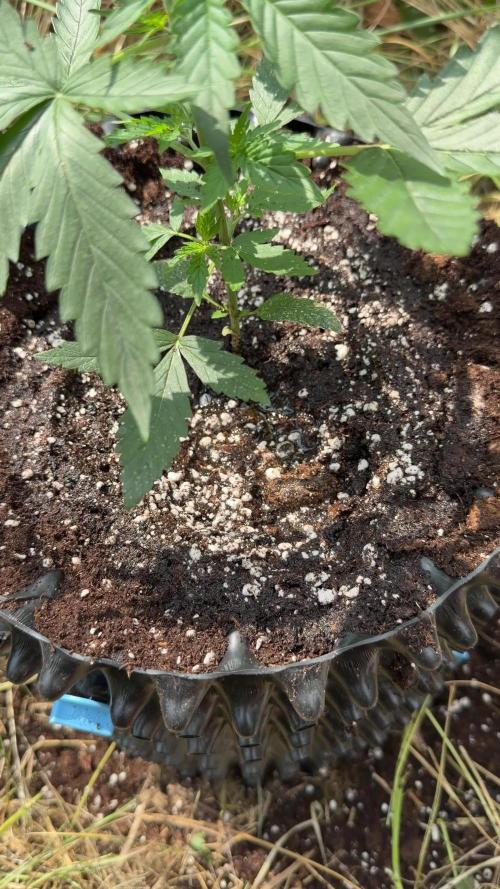
Decision made. After the comparison period, one plant clearly outperformed her two siblings in vigour, structure and overall development. The other two have been discarded, and the winner has now moved outside — straight into a 5L airpot, bottomless, set in the garden next to the 46 Kush. Ran short on the bigger pots this time around, so she's starting outdoors a size down from the others — being bottomless though, roots can push down into the native soil below as she grows, so the smaller pot footprint isn't a hard limit.
**RootX** was applied again at this transplant, delivering mycorrhiza (*Glomus intraradices*), *Trichoderma harzianum*, 13 strains of *Bacillus spp.*, humic acids, amino acids and vitamins straight into the new root zone — giving her the same strong start outdoors that got her through the indoor selection phase.
Last recorded indoors before the move: Week 4, height 15cm, light schedule at 17 hours, EC 1.5 mS/cm, pH 6.2. Now she's outside and adjusting to natural light and the elements.
Updates every Sunday. Stay tuned.

Processing
Likes
2
Share


@Patillac31
Follow
•Morning of day 19, ¾ through week 3.
Did a light defol on both ladies. I gotta say I'm a big fan of Big Bud by Seedstockers! This girl is going to be exactly what her name is. I know its early with roughly 40 days to go, but I will for sure be growing this girl again. Any suggestions drop me a line. Happy gardening and stay safe Gromies! 🔥🌱🙏🖖✌️😷
•Morning of day 15, start of week 3.
°Big bud is 32" in diameter after more LST. And 37"tall (soil to top). Less stretching and more compacting of nodes. Very pleased! She's feeding at full strength and looking like she might want more. Very vigorous growth.
°Agent Orange. 30" in diameter after LST. plant did NOT respond well to LST. AND IS 36½" tall (soil to top). Also showed signs of nutrient burn. Will only feed half strength every 3rd watering.
Any suggestions drop me a line! Happy Gardening!

