The Grow Awards 2026 🏆 


Likes
Comments
Share
@HurlinghCultiveta
Follow
Hola cultivetas! agregue humus al sustrato que estoy usando y sobrefertilice. Las hojas se empezaron a poner verde oscuro y algunas puntas se doblan hacia dentro. Solo me queda esperar a que se limpie.
Vienen muy bien. Creciendo bastante. Buenos humos!

Likes
12
Share
@OrionSparkles
Follow
I gave them a root wash; I will continue watering with plain water until the end with a pH of 6.5, some waterings with 1L and others with 1.5L... everything is wonderful.👌


Likes
14
Share
@Bluntblazer66
Follow
Dec 13th
Week 20 flowering week 9
Dec 14th
Switched nutes to dense Buds
Buds are on the smaller side and quantity is looking low
If I get an ounce out of this I’ll be surprised. Hopefully the quality is good
Dec 16th
Switched nutes to weekly nutes

Likes
202
Share
@CrazyHorse
Follow
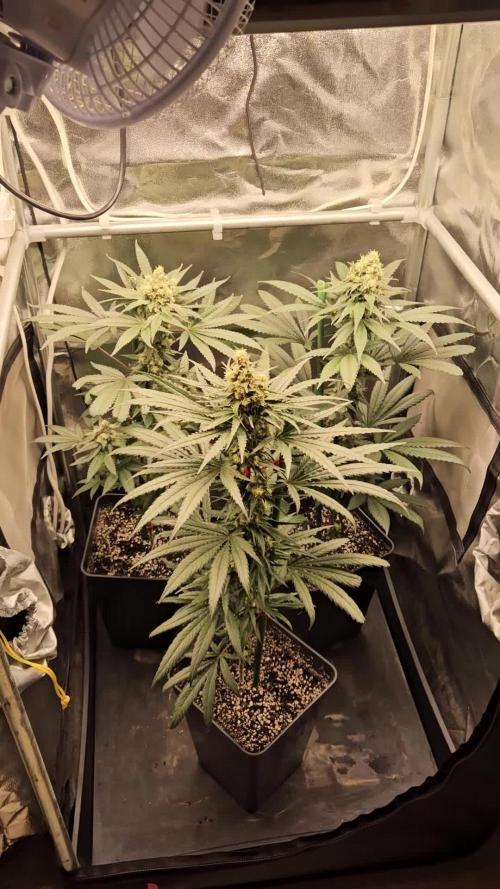
Hello everyone 😊😊😊
This week bring the problems with humidity, I started to add to much steam and some small scorching and discoloration occur. However I remove humidifier and everything back to normal. Girls grow up like nothing happened, tomorrow I will proceed small defoliation like I'm doing it in every grow.
Have a fantastic night, You lovely girls growers 😊😊😊
Likes
77
Share
@SuggaShane
Follow
So far so good. Don’t think I’m gonna do any type of training on these but not 100% yet. Get me ideas on what to do.

Likes
12
Share
@DyadyaAsya
Follow
Wedding cheesecake FF by Fast Buds
Germination, days: 3
Vega (18/6), days: 35
Flowering (12/12), days: 70
Total, days: 108
Ec 2.5 (Athena bloom, Fade, Cleanse, Balance)
Ph 6.1
Red 100%
Blue 25%
UV 20%
DLI ~32
T. Day: ~25C
T. Night: ~21.5C
Humidity: ~57%
T.leaf: 24.5C
Week progress:
I can't delay any longer, the chance of mold increases due to dry leaves.
On the last day of the 10th week of flowering I started washing the substrate, washed with RO water + Athena Cleanse (2ml/l).
Tomorrow I'll wash again and harvest on the next day!
For now I'm planning to cut off those two lagging plants, but I might change my mind :)
Likes
5
Share
@BettaN
Follow
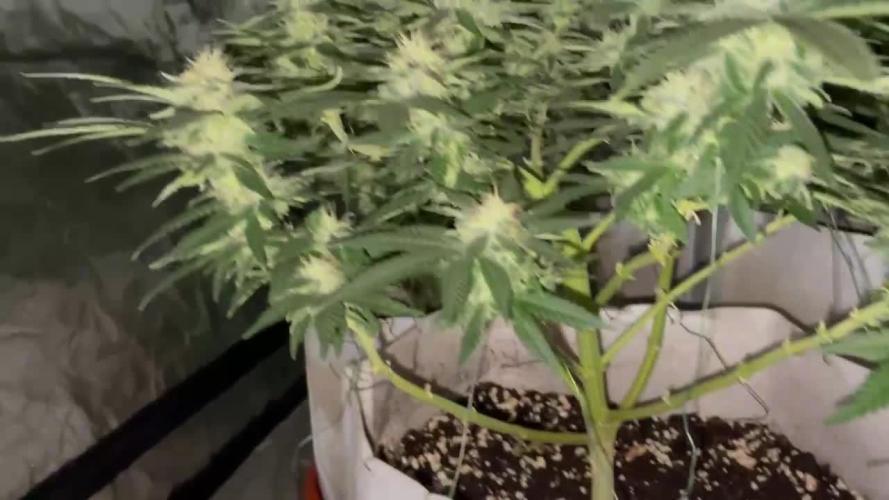
The LST really opened up the girls and helped them to increase volume.
During the week PE finally got some more training, it feels like she opened up nicely.
It is not very comfortable to grow 2 plants in a 60*60cm tent.
Likes
8
Share
@ZombieKushAddicted
Follow
FC-E 4800 lamp ,
to view this lamp or any other marshydro product go to: https://instagram.com/marshydro_aliexpress?igshid=YmMyMTA2M2Y=


Likes
14
Share
@Chi_K24
Follow
hey guys,
Into week12 and plants are recovering nicely from the fungus gnat issue from week 10-11.
Its time to add another round of organic amendments, this time in a 70/30 ratio 9f 284 to 444. Increasing the P since we are now clearly into flpwer and the ladies will love it! I also found that the amendments needs a few waterings before it really gets in to the system. Have to plan ahead for that to ensure your plants are not starving for npk.
Added d.e. again and another pack of yellow fly traps up.
As for watering, each plant gets 9L ea every 2-4 days since temps are going crazy jn the gta. Few days at 35+ deg c to 14 lows.
As always, have a good one and see you on the next update!

Processing
Likes
7
Share
@Kushizlez
Follow
Day 45-52
(Day 46) I just realized I forgot to zip up a small flap in the tent for at least 5 days or so. This probably made the added co2 useless. All the plants are slightly clawing and almost look overwatered, which is normal for plant at this stage but I wonder if the lower co2 levels are contributing at all.
I couldn’t help myself today and did a small defoliation. Hopefully this doesn’t stress them out too much. I took about 15-20 leaves per plant. I really want some of this larf on the bottom fill out more. Even by 10-15%.
(Day 47) Wow. I just noticed that #5 is putting on a thick layer of late frost. I’m guessing this has to do with all the mid flower feedings. Unfortunately the density on this girl lacking big time. Especially on the lowers. This could be genetic but there is too many variables at play to say for sure. If this stuff smokes proper I will continue to feed in mid flower.
Plants are really starting to fade out here now. #3 in particular has some odd red coloring in a few of the leaves.
(Day 48) I watered in 2 gallons on each plant making sure to get some decent runoff from each.
Sucks that #3 didn’t fill out. The genetic potential was definitely there, something just went awry after that tea I gave it. I have at least 2 or 3 clones of that I will try outdoors. It’s been a very P hungry plant too. The stems were purpling like crazy, even in veg. Some people say this can be fixed with a microbial product like Mammoth P or Tribus which I might try for my next grow.
#6 isn’t really filling out much either unfortunately. Tops look decent but everything under that is pretty leafy and airy.
#1 and #7 are the clear winners here. #1 especially is picture perfect. If I wasn’t working on another project after this I would clone just #1 and run another scrog like this from clone.
(Day 50) I was plucking some leaves today and I found a confirmed banana sticking out of one of the main colas on the stubby pheno. I didn’t defoliate this one too much so I wonder if it was caused by stress at all. I hope I don’t find anymore because we only have 10 days left here.
(Day 52) My family member trimmed up the m39. It looks super scraggly but has some decent crystal nonetheless. That’s partly why I would never use an amazon blurple for flowering. It just doesn’t have the same canopy penetration that a light like mine does. Although for a budget setup they’re pretty awesome.
Likes
31
Share
@ThrashedTV_BakedByGlaze
Follow
NEW HEMPER DAB RIG UNBOXING! https://www.youtube.com/watch?v=OtbngkBE6yw
Lots of @GlazedGrow content coming to the new YouTube channel: THRASHED TV 🙏 https://www.youtube.com/c/Christhrash
Cannabis Content + Metal/Music + Interviews & more!
Biggest yield yet! 75 grams of great, non-larf flower.
Over 100 grams of pure frosted sugar leaves mostly from Plant One. The very classic sativa pheno + the lights and Advanced Nutes Big Bud + Overdrive.
With the other plant in the Bruce Banner harvest: https://growdiaries.com/diaries/105959-grow-journal-by-glazedgrow
The final bud weight is 103 grams, just 10 grams shy of a Quarter Pound 😱 + over 100grams of pure frosted sugar trim.
Lights: @ViparSpectraLED XS1000 + P1500
--
Become a @ViparSpectraLED partner for testers and commission here: https://partners.viparspectra.com/create-account?ref=378
Worth the buy: https://www.viparspectra.com/?aff=378&utm_source=affiliate or use discount code GLAZEDGROW.
IG: @GlazedGrow @Glazed_Grow @ChrissThrash @ThrashedShop
YouTube: https://www.youtube.com/c/Christhrash
Twitter: @GlazedTweets @GlazedGrow @ThrashedTV @ThrashedShop
Likes
22
Share
@MicrowGrow420
Follow
Radical defoliation this week to get all energy and light to the main nugs. Incorporated some Organic Molasses into the feed to sweeten and fatten up the buds. I'm definitely too close to the lights with this grow, they grew taller than i expected but i didn't top this grow, i wanted it to be more freestyle and natural but my small space (1mx1.2m) dictates otherwise, i will definitely be cropping, topping and mainlining in the next grow, one plant has passed the light and the last time i suppercropped i bust a branch that was irrepairable so i've left them to do their thing till harvest.


Likes
13
Share
@PrairieFrostGrow
Follow
**Week 8 - September 7 to 13, 2020 - Days 50 to 56 from germination******
Getting closer tho the finish line and it was a good week. Pushing them harder now for feeding as there aren’t many feed days left. Trying not to pull the feed too early this run as I want to give these girls every chance they can get to fatten up. Been an interesting run🤪 Suspect I am looking at 11 weeks on these girls........they may ripen sooner though.......so will likely feed through week 9 and think I might use Flawless Finish this run as they will all finish at different times and it may happen more suddenly than expected. This strain has a fair bit of Sativa in it and I see it in the narrow blade fan leaves and the time she has taken to start swelling.
Trichome production is a little slow but starting now. The next two weeks I expect to be the fun ones and will see how these phenos do with ripening.
Kept the feedings light and watering a little too light I think this run. Should have got a little more CalMag in them and also increased the waterings to runoff. In the earlier weeks I was holding back on the watering wanting to help avoid too much nitrogen going into bloom. They needed to be up to two and three litre daily feedings sooner than week 7 for example, coco coir😃 This caused some deficiency in mid flower. Learning experience here was to keep up the watering volumes, because of pure coco, but reduce the ppm if needed.......I reduced both☹️
There are three girls that are going to make it to harvest and obviously LAK1 is going to yield well and the others will be less........keep them happy to the end because quantity doesn’t matter as much as quality😃 Next auto girls are not going to face the same issues👍
Little more detail:
Sept 7/20 - Day 50
- Terpinator @ 3ml, Big Bud & Liquid Weight & Rezin & CalMag @ 1.5ml
- 565ppm and 5.8pH
- LAK1 - 2.5L, LAK2 and LAK3 - 1.5L
-
Sept 8/20 - Day 51
- LAK1 ONLY - 3L - CalMag @ 2ml/L, Vitathrive @ 1.5ml, Dual Fuel @ 1ml/L
- 775ppm and 5.8pH
- The other girls were on a dry out day.
-
Sept 9/20 - Day 52
- Plain water only today
- LAK1 - 3L, LAK2 - 1.5L, LAK3 - 1.5L
-
Sept 10/20 - Day 53
- Overdrive @ 2ml, Rezin @ 2ml, Dual Fuel @ 1ml
- 650ppm and 5.9pH
- LAK1 - 2.5L, LAK2 - 1L, LAK3 - 1L
-
Sept 12/20 - Day 55
- Terpinator @3ml, Overdrive, Enzymes K., Rezin, Liquid Weight, CalMag @ 1.5ml, Dual Fuel @ 1ml
- 1110ppm and 5.9pH
- LAK1 - 4L, LAK2 - 3L, LAK3 - 4L
- Heavy watering for all the girls.
Sept 13/20 - Day 56
- Terpinator @3ml, Overdrive, Rezin, Liquid Weight, Vita, CalMag, Dual Fuel @ 1.5ml
- 1125ppm and 5.8pH
- 3L for LAK1, 2L for each of the other girls......lots of runoff from all......they were still wet.
(I have been working on cleaning up some bottles from different nutrient lines😃........certainly not giving everything listed in a single feeding)
Getting caught up on the missing weeks in backwards fashion :) Wanted to keep up with the current week. Get the two missing weeks in here soon.


Likes
Comments
Share
@DogDoctorOfficial
Follow
Skywalker OG — Week 2 VEG 🌱
12/12 from seed | Synganic approach
Week two of vegetative growth comes to a close, and all phenotypes are behaving remarkably similar. Despite being grown in different containers (plastic pots and plastic bags), growth rhythm, structure, and overall development are nearly identical across the board.
This kind of uniformity early on is always a good sign — it speaks to stable genetics and a plant that knows exactly what it wants to do. That excites me a lot, both for what’s happening now and for what’s coming later.
⸻
🌿 Plant Development
• Plants are currently working on their third node (third pair of true leaves)
• Height sits around ~7 cm
• Structure is compact and tight, with short internodes
• No visible stress or irregular behavior
Considering this is only Week 2 of VEG and the plants are running 12/12 from seed, this development is exactly where I want it to be. At this stage, the plants are clearly prioritizing root mass and underground work, and I fully accept — and respect — that pace.
No rush. Foundations first.
⸻
💡 Light Cycle Perspective
Running 12/12 from seed means we shouldn’t expect explosive vertical growth early on. Instead, energy is redirected toward:
• Root establishment
• Hormonal balance
• Structural preparation
Top growth will come later — once the roots say they’re ready.
⸻
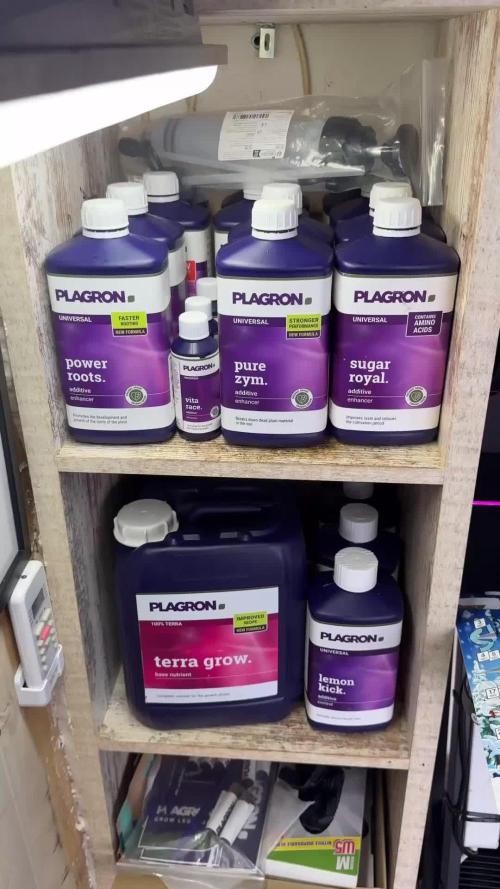
Nutrition & Feeding — Plagron Synganic Recipe
For this run, I’m deliberately combining mineral precision with organic biological support, creating a synganic symbiosis rather than choosing one side.
The idea is simple:
• Minerals provide accuracy, availability, and control
• Organics support microbial life, enzyme activity, and long-term soil health
This approach allows the plant to:
• Feed immediately when needed
• Build a healthy rhizosphere for future stages
• Avoid deficiencies while still staying biologically active
Rather than forcing growth, the goal is to support the plant’s natural rhythm — letting roots, microbes, and nutrients work together.
Same base recipe as the other diaries, but the intention here is clarity and balance, not speed.
⸻
🧠 Final Thoughts
Everything we’re seeing right now points in the right direction:
• Consistency across phenotypes
• Calm, controlled growth
• Strong early structure
These young Skywalker OGs are doing exactly what they should be doing at this stage — and that’s why I’m very happy with them.
No chasing.
No forcing.
Just listening, observing, and guiding.
On to Week 3. 🌱💚
FOR DISCOUNT CODES AND MORE JUST FOLLOW THE LINK https://website.beacons.ai/dogdoctorofficial
📲 Don’t forget to Subscribe and follow me on Instagram and YouTube @DogDoctorOfficial for exclusive content, real-time updates, and behind-the-scenes magic. We’ve got so much more coming, including transplanting and all the amazing techniques that go along with it. You won’t want to miss it.
GrowDiaries Journal: https://growdiaries.com/grower/dogdoctorofficial
Instagram: https://www.instagram.com/dogdoctorofficial/
YouTube: https://www.youtube.com/@dogdoctorofficial
⸻
Explore the Gear that Powers My Grow
If you’re curious about the tech I’m using, check out these links:
🔆 Lighting & Environmental Control
• Future of Grow — Advanced LED lighting technology
https://www.futureofgrow.com/
DISCOUNT CODE: DOG20
• Lumiflora — Under-canopy LED lighting
https://lumiflorade.com/
• TrollMaster — Environmental controllers and automation gear (past collaboration)
⸻
Genetics
• Zamnesia Seeds — Genetics used in this project
https://www.zamnesia.com/
⸻
🌱 Soil, Substrates, Boosters & Root Support
• Plagron — Substrates, bio mixes, and supportive products
https://plagron.com/en/
⸻
🎒 Storage, Curing & Preservation
• Grove Bags — Curing and storage solutions
https://grovebags.com/
⸻
📸 Photography Equipment & Tools
(Not sponsors, but part of my creative toolkit)
• Sony A6700
• Sony full-frame macro lens + few more
• Stacking photography workflow - learning
• iPhone (for behind-the-scenes shots)
We’ve got much more coming as we move through the grow cycles. Trust me, you won’t want to miss the next steps, let’s push the boundaries of indoor horticulture together!
As always, this is shared for educational purposes, aiming to spread understanding and appreciation for this plant. Let’s celebrate it responsibly and continue to learn and grow together.
With true love comes happiness. Always believe in yourself, and always do things expecting nothing and with an open heart. Be a giver, and the universe will give back in ways you could never imagine.
💚 Growers love to all 💚
📸 P.S. – The Eye Behind the Lens
All photos in this diary (for now — except for the ones showing the camera, which I took with an iPhone) are taken with a Sony A6700 paired with a Sony full-frame macro lens and a few more.
Photography is part of the story — it’s how we share the fine textures, the glow, and the quiet details that words can’t always capture.
I’ve also started experimenting with photo stacking — a technique where multiple images, each taken at a slightly different focus point, are layered together to create one perfectly sharp image from front to back.
It’s not digital enhancement or AI; it’s pure photography — a way to reveal the plant’s beauty in microscopic depth, from trichome to petal.
You’ll even see a few shots of "ghost me" capturing the shots — camera, lens, setup — because every grow deserves not just to be cultivated, but documented like art.
FOR DISCOUNT CODES AND MORE JUST FOLLOW THE LINK https://website.beacons.ai/dogdoctorofficial
NEW DISCORD - Official Server Invite Link : https://discord.gg/ksjAkA5T74
P.S.2— Light Intensity & Environment
For clarity and reference, current light intensity is being kept in a moderate PPFD range, appropriate for early vegetative growth under 12/12 from seed.
At this stage, the goal is not to push top growth, but to support:
• Root development
• Healthy leaf formation
• Stress-free adaptation to the environment
PPFD will be gradually increased as the plants establish themselves and signal readiness. Environment remains stable and consistent, allowing the plants to set their rhythm without unnecessary fluctuations.
As always, light, environment, and nutrition are adjusted in response to the plant, not the calendar.

Likes
38
Share
@Crownlaura
Follow
12 weeks / 84 days old today.
So my first grow journey is coming to an end!
Not a lot to report this week. Been using my jewellers loupe daily to keep an eye on the trichomes and can definitely see a big difference. (Sorry, pictures are crap - don’t have enough hands to get a good one!)
Still watering with plain water but they’re taking a lot less and only been watered every 4 days or so.
Sticky orange has lots of cloudy trichomes and starting to get a few Amber. Her leaves are drying off so she is getting harvested before the weekend.
Purple skunk is a bit behind so I think I will wait and see how she goes for another week or so. I always thought she’d be the one to finish first too.
I think I will be drying in the garage. We are consistently getting 18 degrees outside now but with the temperature drops at night, I am not sure whether to bring the buds inside overnight. I’ll be drying in a hanging ‘herb’ dryer and I have my curing jars all labelled and ready to go. Thinking of wet trimming roughly then going in for a final dry trim later once dry to neaten them up. Drying advice welcome!
I did think I’d have to harvest in stages and chop the lower buds later on. But even the bottom buds look like they’ve caught up this week.
I have honestly enjoyed every second of this grow and I’m almost disappointed it’s nearly finished. But at the same time, I can not wait to see (and taste) the final result!
